

Keytwo
By L. F. Randolph
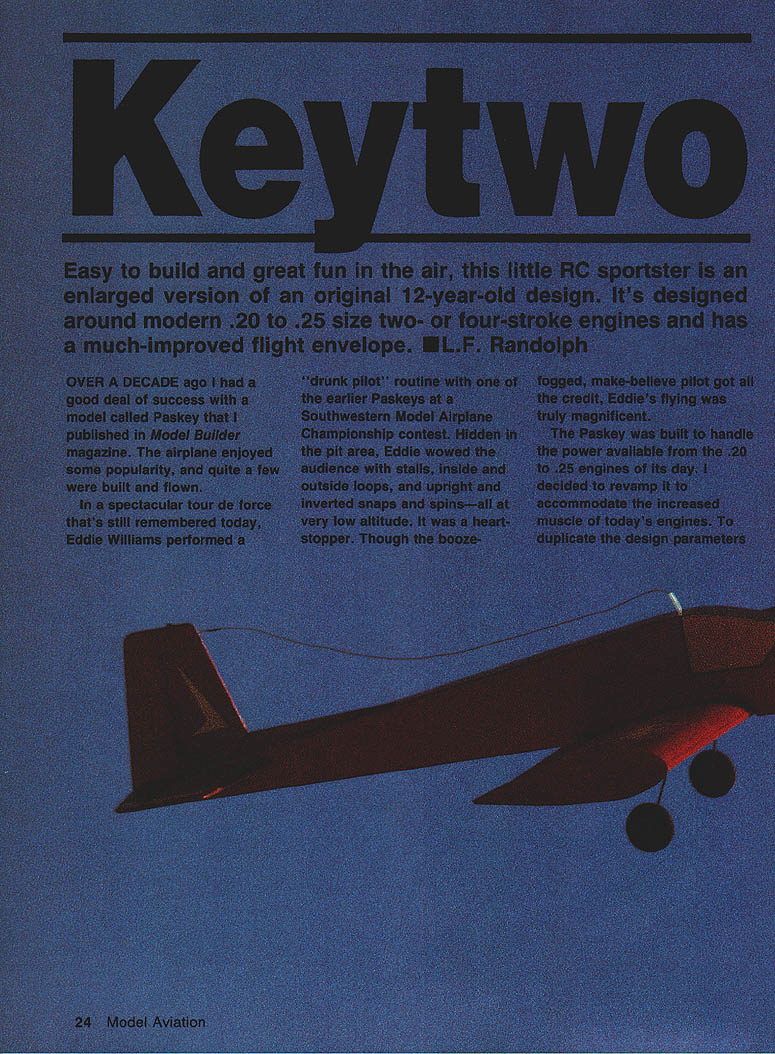
Easy to build and great fun in the air, this little RC sportster is an enlarged version of an original 12-year-old design. It's designed around modern .20 to .25-size two- or four-stroke engines and has a much-improved flight envelope.
Over a decade ago I had a good deal of success with a model called the Paskey that I published in Model Builder magazine. The airplane enjoyed some popularity, and quite a few were built and flown.
In a spectacular tour de force that's still remembered today, Eddie Williams performed a "drunk pilot" routine with one of the earlier Paskeys at a Southwestern Model Airplane Championship contest. Hidden in the pit area, Eddie wowed the audience with stalls, inside and outside loops, and upright and inverted snaps and spins—all at very low altitude. It was a heart-stopper. Though the booze-logged, make-believe pilot got all the credit, Eddie's flying was truly magnificent.
The Paskey was built to handle the power available from the .20 to .25 engines of its day. I decided to revamp it to accommodate the increased muscle of today's engines. To duplicate the design parameters of the original while using the power curve of the current O.S. .25 FSR engine, I'd need a larger airplane with somewhat heftier construction.
The updated model, called the Keytwo, uses the same power range of .20 to .25 engines as its predecessor. Installation of one of the new breed of two- or four-cycle .20s produces very little depreciation in performance.
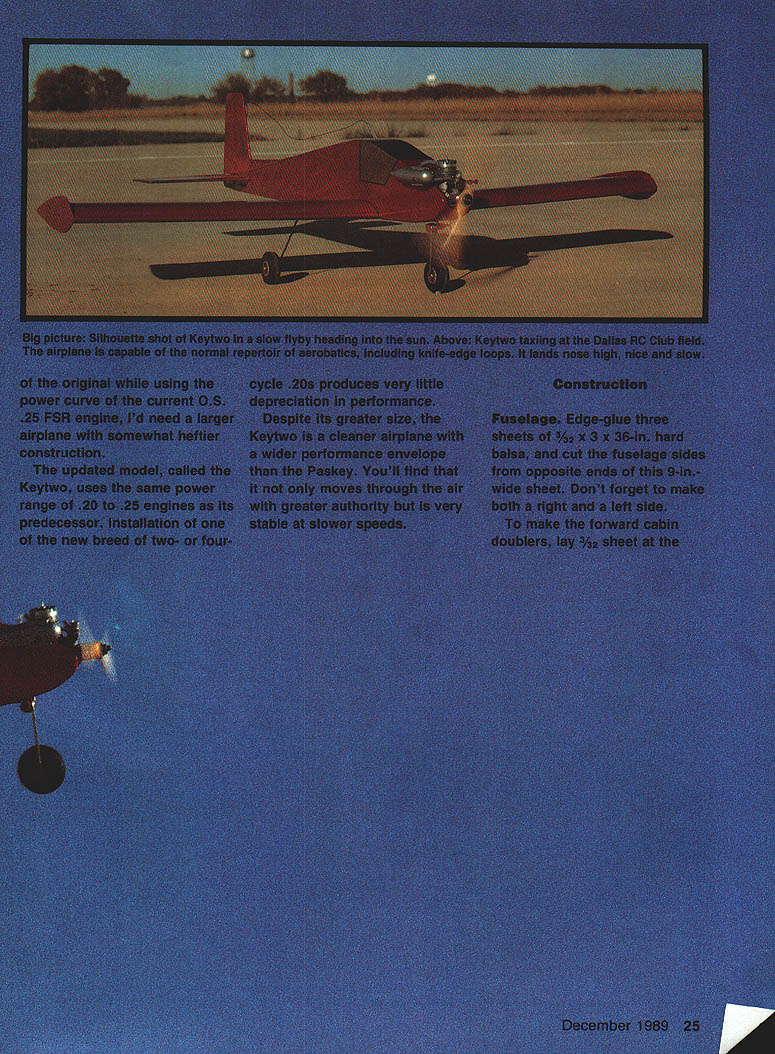
Despite its greater size, the Keytwo is a cleaner airplane with a wider performance envelope than the Paskey. You'll find that it not only moves through the air with greater authority but is very stable at slower speeds.
Construction
Fuselage
- Edge-glue three sheets of 3/32 x 3 x 36-in. hard balsa, and cut the fuselage sides from opposite ends of this 3-in.-wide sheet. Make both a right and a left side.
- To make the forward cabin doublers, lay 3/32-in. sheet at the location shown on the plan and adhere with a slow-setting cyanoacrylate (CyA) glue.
- When the glue has set, pin the fuselage sides together and cut the wing saddle into both halves at once. Cut the stabilizer slot at the tail.
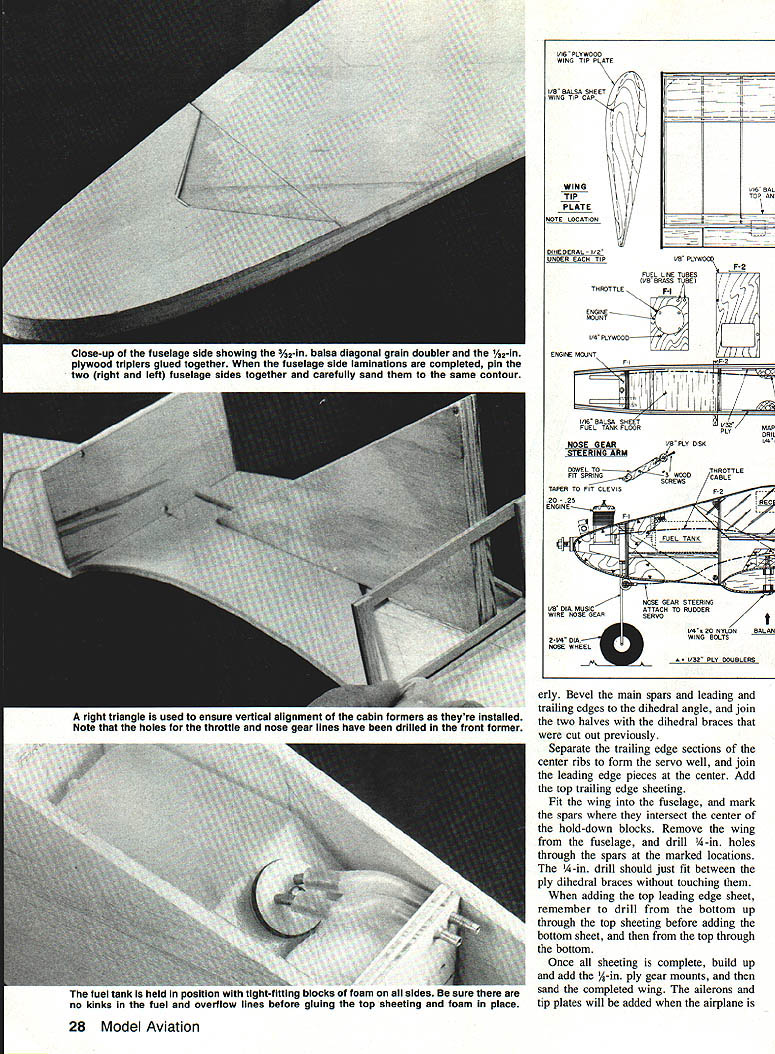
- Add the 3/32-in.-sq. longerons and 3/32 x 1/4-in. balsa uprights in the aft fuselage area to both sides. Note the doublers under the stab slot and the upright at the aft cabin bulkhead location. Add the 3/32-in. plywood triplers up front and at the wing mounts.
- When this assembly is dry, repin the two sides together and sand them to matching outlines. Use the edge of the workbench as a guide for the sanding block to keep edges square.
- If the wing is to be held in place with rubber bands rather than nylon bolts, drill the 1/4-in. holes for the dowels at the locations shown on the plan.
- Add the 1/8 x 1/4-in. servo mounting rails and the rails for the fuel tank compartment. Glue the undrilled hardwood wing mounting blocks in place on their 3/32-in. ply triplers.
- Cut the two cabin formers from 1/8-in. plywood and the firewall from 1/4-in. plywood. Mark the location of the throttle cable and the nose-gear steering cable on the forward bulkhead, then drill the bulkhead to fit your Nyrod.
- Drill the firewall for the engine mount bolts, throttle cable, and fuel and overflow lines. Epoxy T-nuts on the back side for the mounting bolts.
- Glue the two cabin bulkheads to one fuselage side, using a right triangle to ensure they're exactly perpendicular. When set, align and glue the bulkheads to the second side. Pull the tail halves together and glue. Add the firewall and the fuel tank floor.
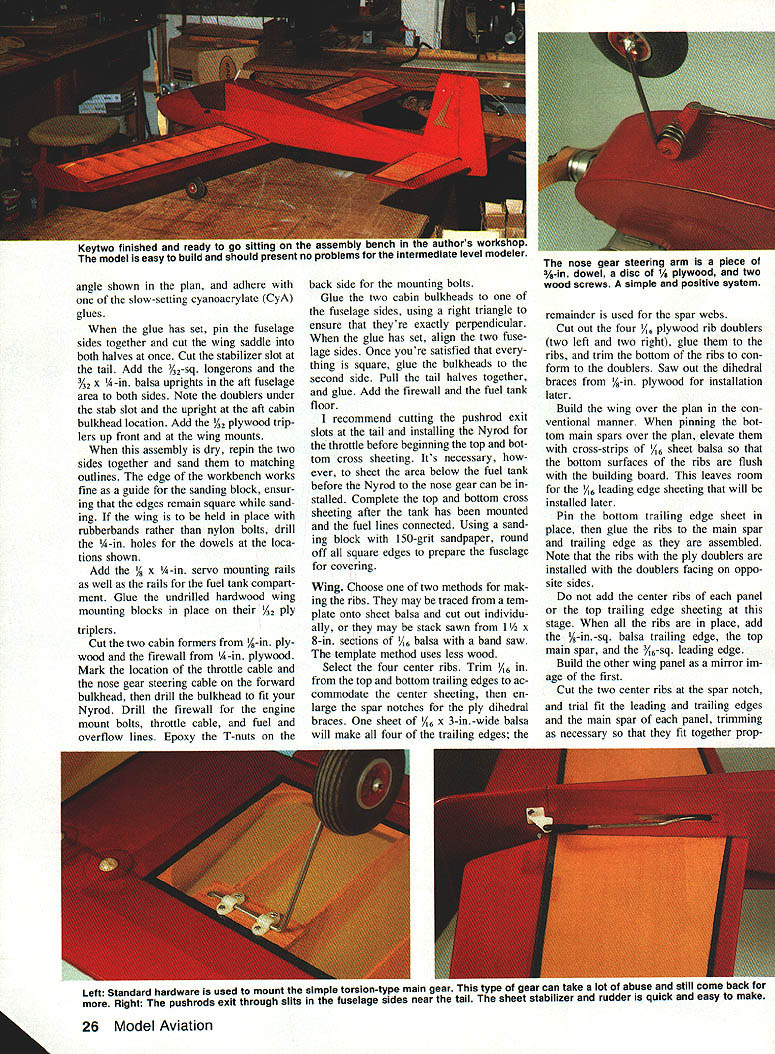
- I recommend cutting the pushrod exit slots at the tail and installing the Nyrod for the throttle before beginning the top and bottom cross sheeting. Sheet the area below the fuel tank before installing the Nyrod for the nose gear. Complete the top and bottom cross sheeting after the tank is mounted and the fuel lines are connected.
- Using a 150-grit sanding block, round off all square edges to prepare the fuselage for covering.
Wing
- Choose one of two methods for making ribs: trace from a template onto sheet balsa and cut individually, or stack-saw from 1-1/2 x 8-in. sections of 1/16-in. balsa with a band saw. The template method uses less wood.
- Select the four center ribs. Trim 1/16 in. from the top and bottom trailing edges to accommodate the center sheeting, then enlarge the spar notches for the ply dihedral braces.
- One sheet of 1/16 x 3-in.-wide balsa will make all four of the trailing edges; the remainder is used for the spar webs.
- Cut four 1/16-in. plywood rib doublers (two left and two right). Glue the doublers to the ribs and trim the bottom ribs to conform to the doublers.
- Saw out the dihedral braces from 1/8-in. plywood for installation later.
- Build each wing panel over the plan in the conventional manner: pin the bottom main spars over the plan, elevate the cross strips, and use 1/16-in. sheet balsa for the bottom surfaces with the ribs flush to the building board. This leaves room for the 1/16-in. leading-edge sheeting to be installed later.
- Pin the bottom trailing edge sheet in place, then glue the ribs to the main spar and trailing edge as the panel is assembled. Install ribs with the doublers facing opposite sides.
- Do not add the center ribs of each panel or the top trailing-edge sheeting at this stage.
- After both panels are assembled, add the 1/8-in.-sq. balsa trailing edge, the top main spar, and the 3/16-in.-sq. leading edge.
- Bevel the main spars and the leading and trailing edges to the dihedral angle, and join the two halves with the dihedral braces.
- Separate the trailing-edge sections of the center ribs to form the servo well, and join the leading-edge pieces at the center. Add the top trailing-edge sheeting.
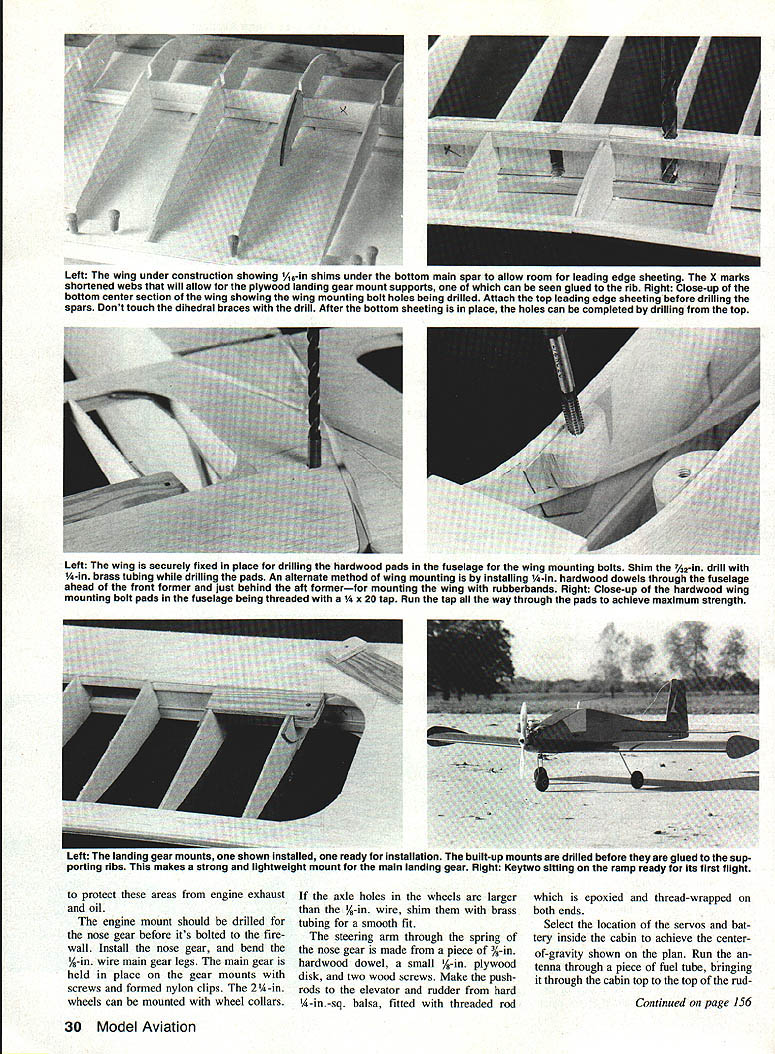
- Fit the wing into the fuselage and mark the spars where they intersect the center of the hold-down blocks. Remove the wing and drill 1/4-in. holes through the spars at the marked locations. The 1/4-in. drill should just fit between the ply dihedral braces without touching them.
- When adding the top leading-edge sheet, drill from the bottom up through the top sheeting before adding the bottom sheet, and then from the top through the bottom, to ensure alignment for any dowels or bolts.
- Once all sheeting is complete, build up and add the 1/2-in. ply gear mounts, then sand the completed wing. The ailerons and tip plates will be added when the airplane is covered.
- Finish as required and prepare the wing for covering.
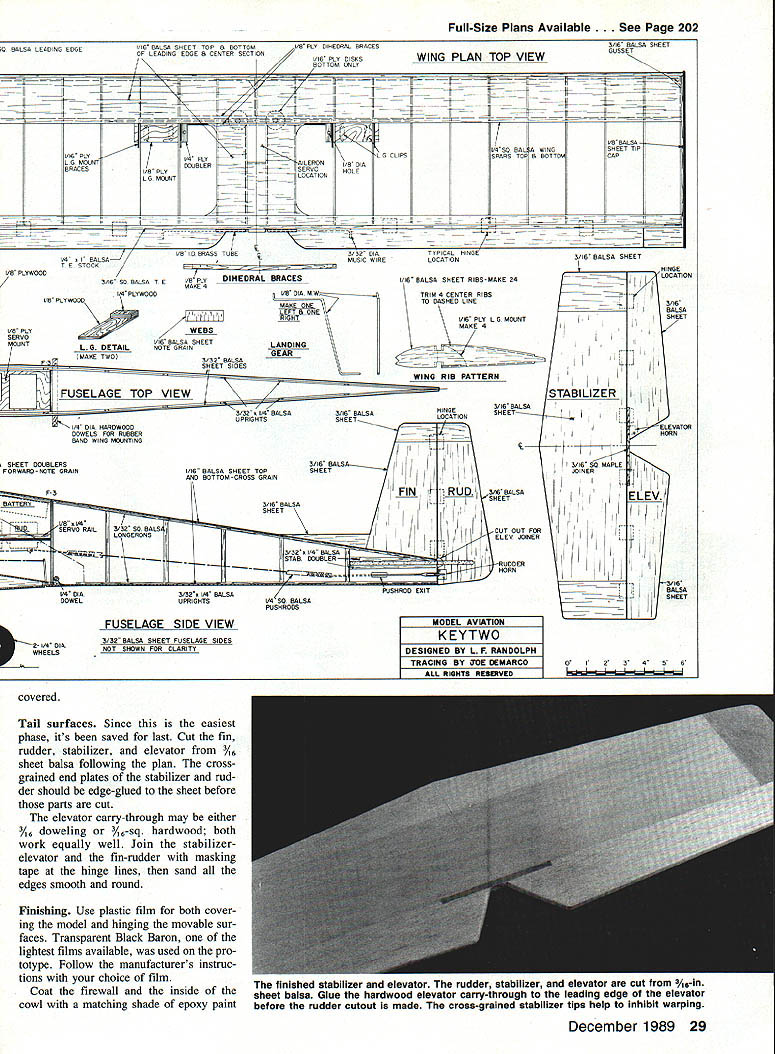
Tail surfaces
- Cut the fin, rudder, stabilizer, and elevator from 3/16-in. sheet balsa following the plan.
- Edge-glue the cross-grained end plates of the stabilizer and rudder to the sheet before cutting those parts.
- The elevator carry-through may be either 3/16-in. doweling or 3/32-in. square hardwood; both work equally well.
- Join the stabilizer-elevator and the fin-rudder with masking tape at the hinge lines, then sand all edges smooth and round.
Finishing
- Use plastic film for both covering the model and hinging the movable surfaces. Transparent Black Baron (one of the lightest tints available) was used on the prototype. Follow the manufacturer's instructions for your chosen film.
- Coat the firewall and the inside of the cowl with a matching shade of epoxy paint to protect these areas from engine exhaust and oil.
- Drill the engine mount for the nose gear before bolting it to the firewall. Install the nose gear and bend the 5/8-in. wire main gear legs.
- The main gear is held in place on the gear mounts with screws and formed nylon clips.
- The 2-1/2-in. wheels can be mounted with wheel collars. If the axle holes in the wheels are larger than the 1/8-in. wire, shim them with brass tubing for a smooth fit.
- The steering arm through the spring of the nose gear is made from a piece of 3/16-in. hardwood dowel, a small 1/8-in. plywood disk, and two wood screws.
- Make the pushrods to the elevator and rudder from hard 1/4-in.-sq. balsa, fitted with threaded rod which is epoxied and thread-wrapped on both ends.
- Select the location of the servos and battery inside the cabin to achieve the center-of-gravity shown on the plan.
- Run the antenna through a piece of fuel tubing, bringing it through the cabin top to the top of the rudder.
- When everything is in place, range-check the equipment — and it's time to fly!
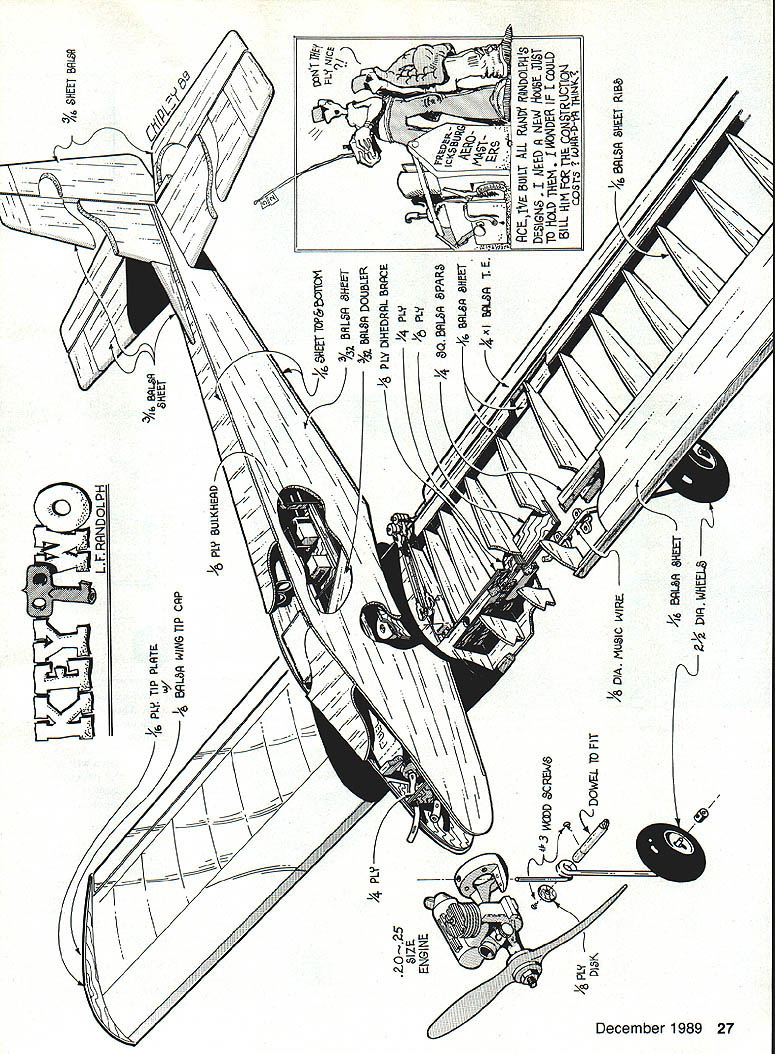
Parts and Materials (typical)
- 3/16-in. balsa sheet
- 1/16-in. ply tip plate
- 1/8-in. balsa wing tip cap
- 1/8-in. ply bulkhead
- 1/4-in. ply
- 1/16-in. sheet (top & bottom)
- 3/32-in. balsa sheet
- 3/32-in. balsa doubler
- 1/8-in. ply dihedral brace
- 1/4-in. & 3/8-in. spars
- 1/16-in. balsa sheet
- 1/4 x 1-in. balsa trailing edge
- 1/16-in. balsa sheet ribs
- 1/8-in. balsa sheet
- 1/8-in. dia. music wire
- 2-1/2-in. dia. wheels
- 1/8-in. ply disk
- 2 dowels to fit
- 3 wood screws
- 0.20–0.25 two-cycle engine (or equivalent modern .20–.25 two- or four-stroke)
- Fuel tank floor: 1/32-in. ply
Flying
- Keytwo has a wide performance envelope compared to the Paskey but is basically a gentle flier. Whether upright or inverted, the stall shows no tendency to snap. If the model is balanced correctly, it's very difficult to make it snap.
- If you want more snap, move the center of gravity aft about 1/2 in. and increase elevator throw by 1/4 in.
- A roll rate with about 3/16 in. of up and down movement at the trailing edge of the ailerons is comfortable for sport flying.
- Landings can be made nose-high and slow, with full aileron control all the way to touchdown.
- Knife-edge flight may require a bit of correction: the airplane can have a tendency to climb into a half-loop unless you apply a little down elevator while holding rudder. Once mastered, knife-edge loops are possible.
- After flight testing, fine-tune throws and balance for the flying style you prefer.
And what did Eddie Williams have to say about my latest re-creation? "I see you've built another Paskey," said that unsurpassed maestro of the drunken pilot routine. "It's about time! Play it again, Eddie!"
Transcribed from original scans by AI. Minor OCR errors may remain.

