
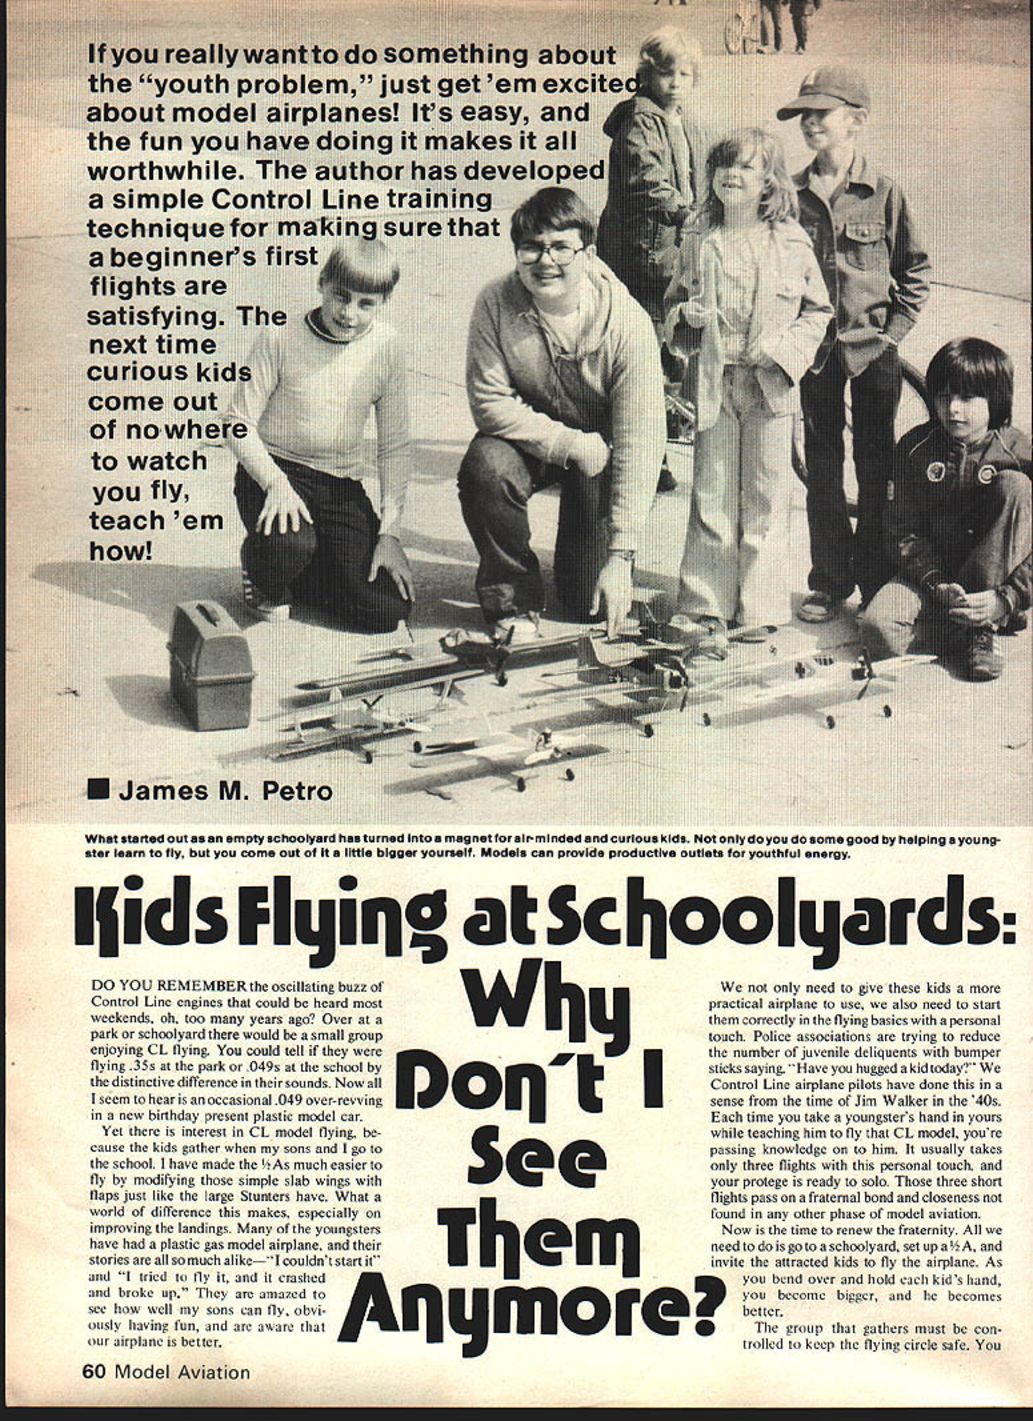

Kids Flying at Schoolyards: Why Don't I See Them Anymore?
James M. Petro
If you really want to do something about the "youth problem," just get 'em excited about model airplanes! It's easy, and the fun you have doing it makes it all worthwhile. I have developed a simple Control Line training technique to make a beginner's first flights satisfying. The next time curious kids come out of nowhere to watch you fly, teach 'em how!
DO YOU REMEMBER the oscillating buzz of Control Line engines that could be heard most weekends, oh, too many years ago? Over at a park or schoolyard there would be a small group enjoying CL flying. You could tell if they were flying .35s at the park or .049s at the school by the distinctive difference in their sounds. Now all I seem to hear is an occasional .049 over-revving in a new birthday-present plastic model car.
There is interest in CL model flying, because kids still gather when my sons and I go to the school. I have made the 1/2 A's much easier to fly by modifying those simple slab wings with flaps just like the large stunters have. What a world of difference this makes, especially for improving landings. Many youngsters have had a plastic gas model airplane, and their stories are all so much alike—"I couldn't start it" and "I tried to fly it, and it crashed and broke up." They are amazed to see how well my sons can fly, obviously having fun, and are aware that our airplane is better.
We not only need to give these kids a more practical airplane to use, we also need to start them correctly in the flying basics with a personal touch. Police associations are trying to reduce juvenile delinquency with bumper stickers saying, "Have you hugged a kid today?" We Control Line airplane pilots have done this in a sense from the time of Jim Walker in the '40s. Each time you take a youngster's hand while teaching him to fly that CL model, you're passing knowledge on. It usually takes only three flights with this personal touch, and your protégé is ready to solo. Those three short flights pass on a fraternal bond and closeness not found in any other phase of model aviation.
Now is the time to renew the fraternity. All we need to do is go to a schoolyard, set up a 1/2 A, and invite the attracted kids to fly the airplane. As you bend over and hold each kid's hand, you become bigger, and he becomes better.
The group that gathers must be controlled to keep the flying circle safe. You cannot do both instructing and policing effectively. As the leader, you must organize the kids into orderly turns for:
- flying
- engine starting
- takeoff
- holding the handle
- airplane retrieving
- keeping the circle clear
These jobs teach the essentials and give the reward of responsibility. Even the hard cases can sometimes be changed by the personal touch and become the more colorful members of the fraternity.
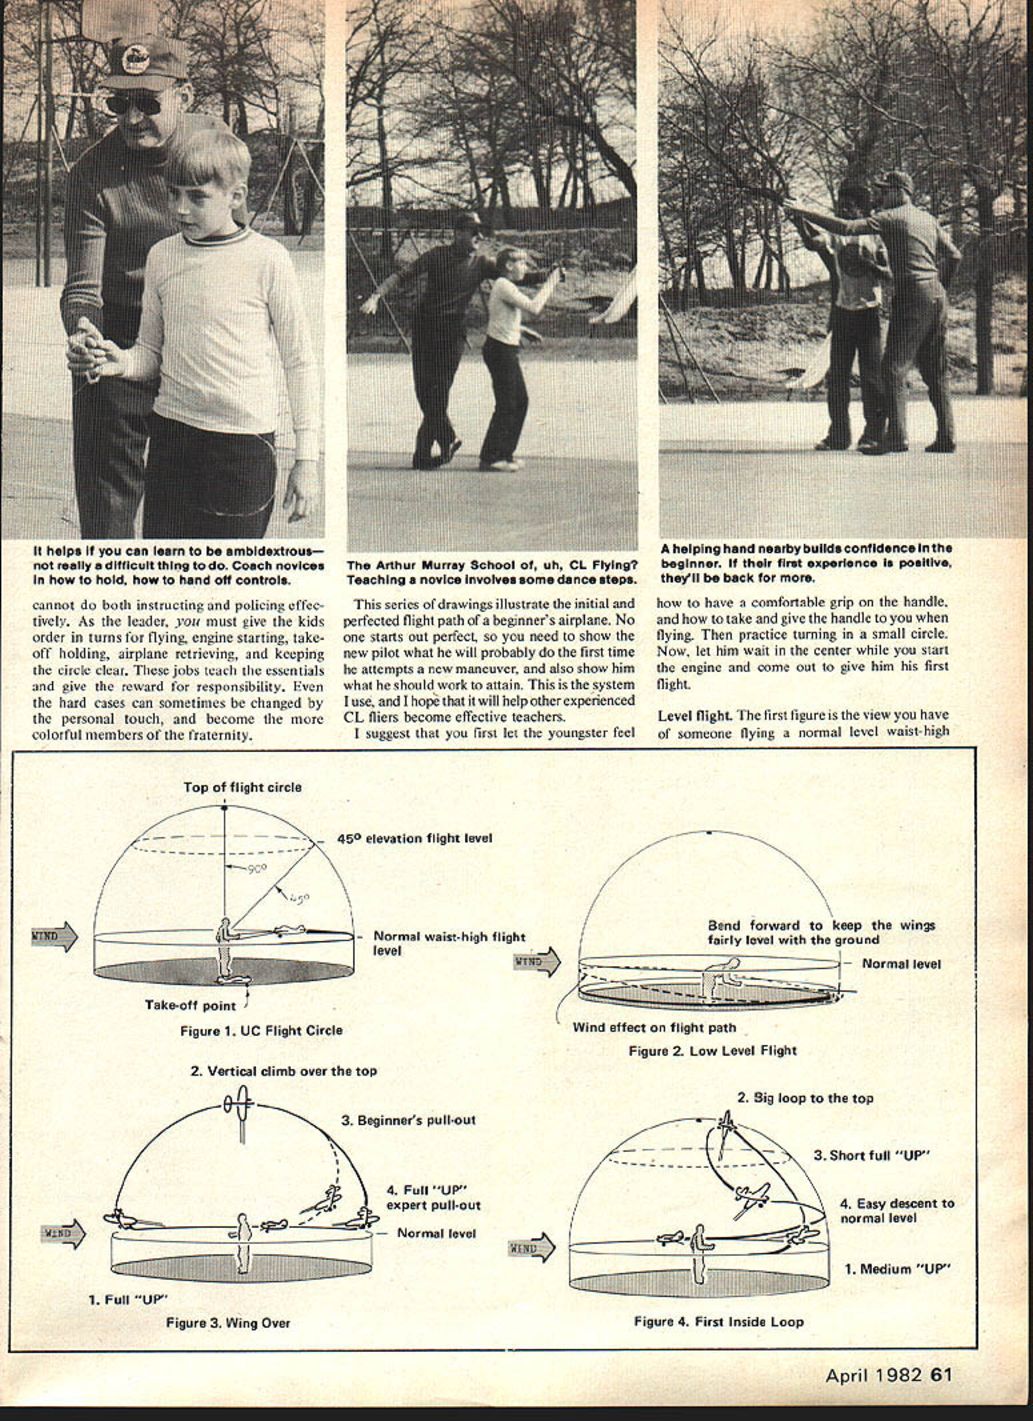
This series of drawings (not shown here) illustrates the initial and perfected flight path of a beginner's airplane. No one starts out perfect, so you need to show the new pilot what he will probably do the first time he attempts a new maneuver and also show him what he should work to attain. This is the system I use, and I hope it will help other experienced CL fliers become effective teachers.
I suggest that you first let the youngster feel how to have a comfortable grip on the handle and how to take and give the handle to you when flying. Then practice turning in a small circle. Now, let him wait in the center while you start the engine and come out to give him his first flight.
Level flight
The first figure is the view you have of someone flying a normal level, waist-high flight. You are standing just outside the circle with the shaded arrow (wind direction) at the left side. The airplane on the ground closest to you is at the takeoff position on the flying circle. Flying at waist level, the airplane is moving in the normal counterclockwise direction. At 45° up from waist height is the dashed line indicating this level. All the way at the top of the hemisphere is the dot at the top of the circle, exactly 90° above level flight. Direction of the plane's flight path is shown by the tapered trail behind the plane.
Low-level flying
How high to fly is your option, but it is mandatory that all flying stops at ground level. Therefore, I prefer to have the beginner learn low-level flying before other maneuvers. All directions—up, down, neutralize—are control-handle movements. With 1/4 A's you can safely fly 6 in. to 12 in. above the ground.
Wing-over
A wing-over maneuver will determine whether your plane is good enough for aerobatics. It must have enough power to carry over the top of the circle; if not, you'll need to move quickly to keep the lines tight. As you practice, try to hold the controls neutral all the way over the top. Apply a quick full up at the last instant so the pull-out is at the normal level, exactly on the opposite side of the circle from where you started. Following this flight path allows the wind to help keep the speed up and the lines tight during the downward portion of the maneuver. With a lot of experience you can make an inverted pull-out and fly upside down, but it takes much nerve and good reflexes. Don't try inverted flight yet.
Inside loop
Successfully mastering the wing-over makes you ready for a loop. The entire maneuver takes place on the downwind part of the circle. This helps keep the lines taut. Continue practicing until you can comfortably make a perfectly round large loop with the starting and end positions at the same spot on the downwind normal level. This large round loop is formally called the inside loop, because the head of a pilot in the airplane always would be on the inside of the circle.
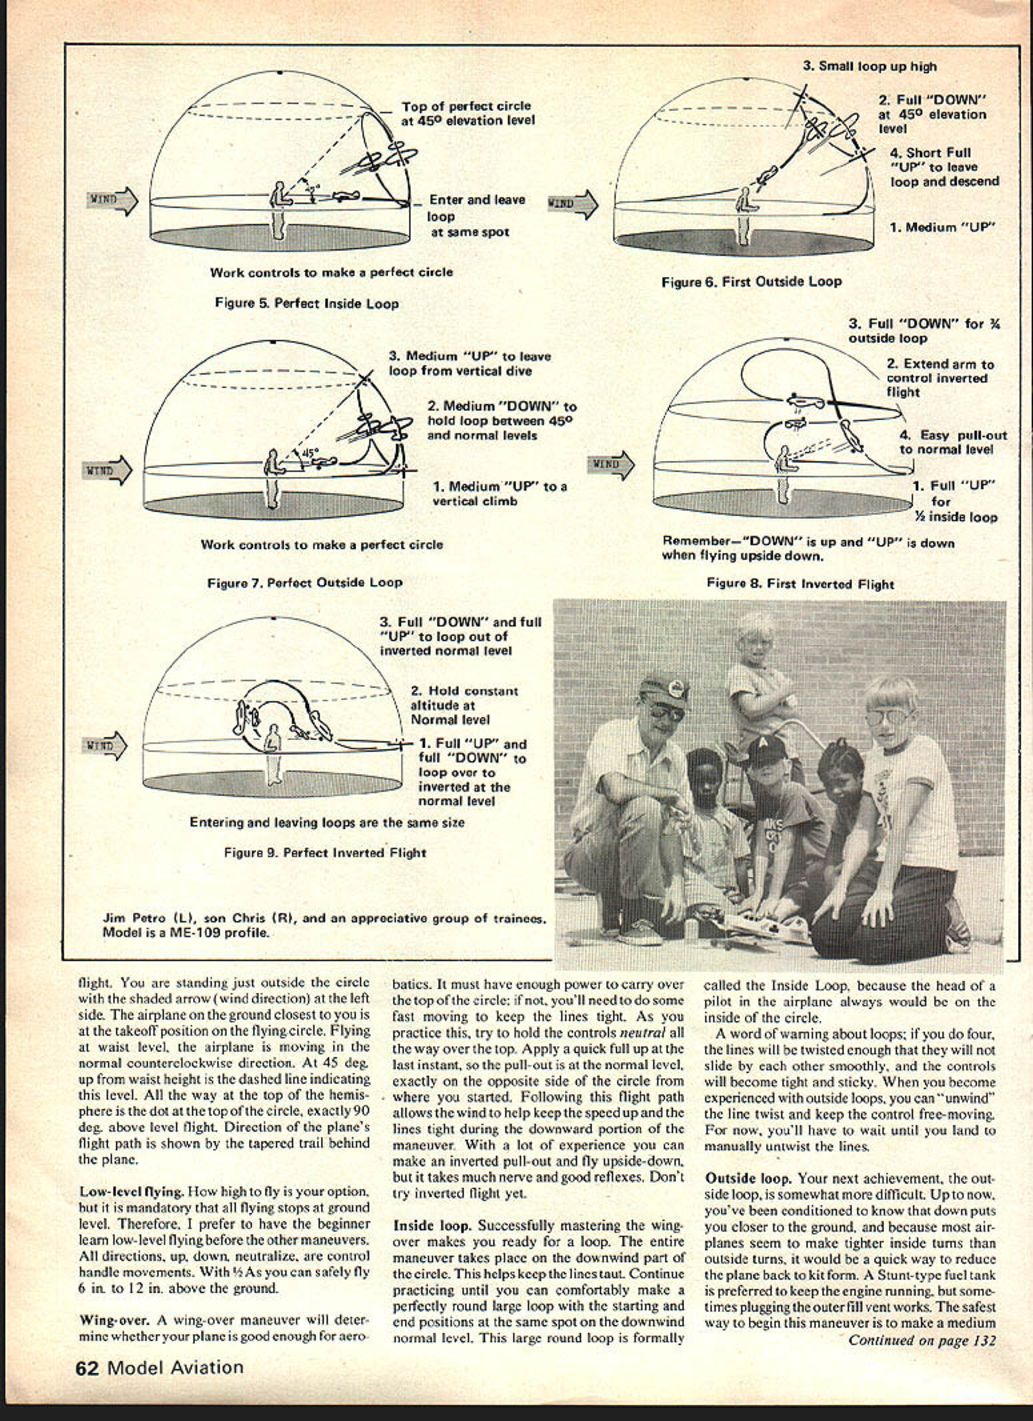
A word of warning about loops: if you do four, the lines will be twisted enough that they will not slide by each other smoothly, and the controls will become tight and sticky. When you become experienced with outside loops, you can "unwind" the line twist and keep the control free-moving. For now, you'll have to wait until you land to manually untwist the lines.
Outside loop
Your next achievement, the outside loop, is somewhat more difficult. Up to now you've been conditioned to know that down puts you closer to the ground, and because most airplanes seem to make tighter inside turns than outside turns, an outside loop can quickly reduce the plane to kit form if mishandled. A stunt-type fuel tank is preferred to keep the engine running, but sometimes plugging the outer fill vent works.
To start the outside loop, apply full up to turn and climb vertically to the 45° elevation level. Then apply full down. When the plane returns toward completion of the loop, smoothly go from full down to a medium up control, and the plane will break out of the loop and pull out at the normal level altitude.
Practice the high outside loop not only for the experience, but more importantly to determine if the plane is aerodynamically capable of a tight outside turn. You may need to change the balance, engine thrust line, or control linkages. Sometimes a new plane is needed. Part of the reason for a larger outside turn is the control-handle setup. For normal sport flying, the handle is set with a slight down angle, like the handle of a pistol. This feels comfortable and lets the plane fly in a level groove nicely, but limits how much your wrist can pivot for more down. If you set the handle more upright, so up and down wrist pivots are equal, your hand is no longer in a comfortable neutral position and you will have to concentrate to fly level. Set up the handle to fit your individual taste and requirements for grooving and maneuvering. (What is needed is a handle with a finger-actuated trim change feature. Who's going to invent one?)
Inverted flight
If you're still with me, you may be on your second airplane. That's all right, as we may get rid of that one, too, with the next maneuver. For inverted flight I prefer to hold the handle normally and make all movements very slowly at first so that I can feel the plane is going the way it's supposed to go. That is, up on the handle turns the nose to the ground, and down on the handle turns the nose to the top of the circle. All you have to remember is that up is down and down is up. Have your helper hold the handle upside down, and practice on the ground before attempting it in the air.
For the first attempt, keep the plane high to allow more room for corrections, and fly inverted for only 1/4 lap. You will need a stunt-type fuel tank to keep the engine running while inverted. Keep practicing until you can stay inverted for three level laps. Pull-outs can be made anywhere except at the windward quadrant of the circle.
Join AMA
The basic stunt maneuvers (low level, inside and outside loops, wing-over, and inverted) will make you the schoolyard ace. The next step is to join the Academy of Model Aeronautics (AMA). Membership not only gives you the Official Model Aircraft Regulations, but enables you to test your skill in flying against the best in the world. AMA regulations prescribe the official flight maneuvers for the basics plus square loops, triangular loops, figure eights, square eights, hourglass, and four-leaf clover. For pure one-on-one aerobatics, CL Combat challenges your skill to maneuver and intercept a moving target.
Some of these maneuvers are made much easier with a larger airplane on longer lines. With the addition of a .35 engine, a more stable airplane, longer flight time and more reaction time, you have entered the big league of CL flying. Learn to maneuver the 1/4 A now, and a stunter in the future will give the thrill of that strong pull on the control handle, second only to the flying of a real plane.
Transcribed from original scans by AI. Minor OCR errors may remain.

