
Kingfisher
Les King
For 25 to 35 power, this lightly built stunt model of the Navy's World War II observation plane offers excellent flight characteristics.
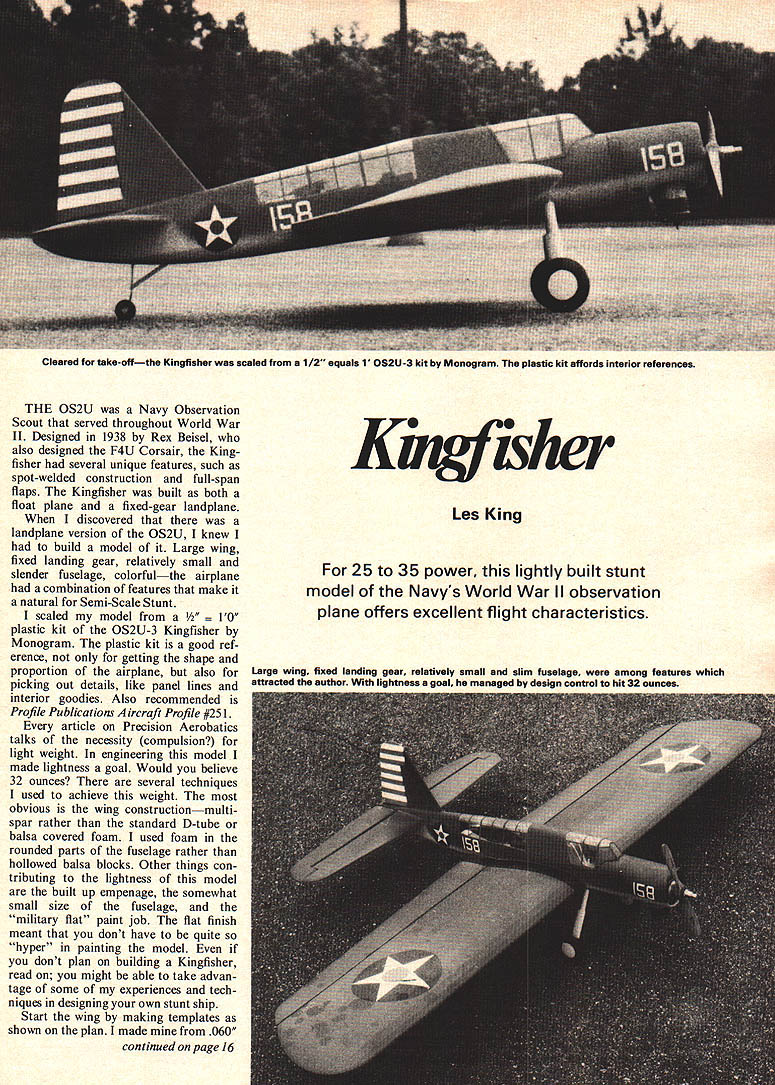
THE OS2U was a Navy Observation Scout that served throughout World War II. Designed in 1938 by Rex Beisel, who also designed the F4U Corsair, the Kingfisher had several unique features, such as spot-welded construction and full-span flaps. The Kingfisher was built as both a float plane and a fixed-gear landplane.
When I discovered that there was a landplane version of the OS2U, I knew I had to build a model of it. Large wing, fixed landing gear, relatively small and slender fuselage, colorful—the airplane had a combination of features that made it a natural for Semi-Scale Stunt.
I scaled my model from a 1/2" = 1'0" plastic kit of the OS2U-3 Kingfisher by Monogram. The plastic kit is a good reference, not only for getting the shape and proportion of the airplane, but also for picking out details, like panel lines and interior goodies. Also recommended is Profile Publications Aircraft Profile #251.
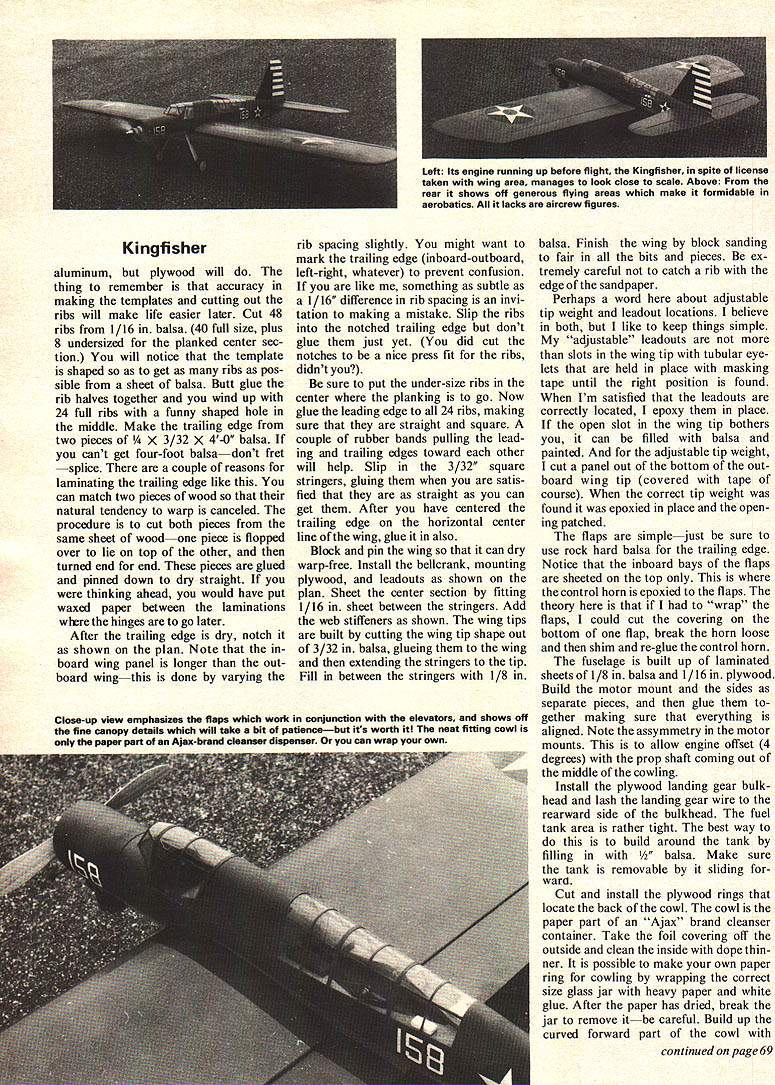
Every article on Precision Aerobatics talks of the necessity (compulsion?) for light weight. In engineering this model I made lightness a goal. Would you believe 32 ounces? There are several techniques I used to achieve this weight. The most obvious is the wing construction—multi-spar rather than the standard D-tube or balsa-covered foam. I used foam in the rounded parts of the fuselage rather than hollowed balsa blocks. Other things contributing to the lightness of this model are the built-up empennage, the somewhat small size of the fuselage, and the "military flat" paint job. The flat finish meant that you don't have to be quite so "hyper" in painting the model. Even if you don't plan on building a Kingfisher, read on; you might be able to take advantage of some of my experiences and techniques in designing your own stunt ship.
Start the wing by making templates as shown on the plan. I made mine from .060 aluminum, but plywood will do. The thing to remember is that accuracy in making the templates and cutting out the ribs will make life easier later. Cut 48 ribs from 1/16 in. balsa. (40 full size, plus 8 undersized for the planked center section.) You will notice that the template is shaped so as to get as many ribs as possible from a sheet of balsa. Butt glue the rib halves together and you will end up with 24 full ribs with a funny shaped hole in the middle. Make the trailing edge from two pieces of 1/4 x 3/32 x 4'-0" balsa. If you can't get four-foot balsa—don't fret—splice. There are a couple of reasons for laminating the trailing edge like this. You can match two pieces of wood so that their natural tendency to warp is canceled. The procedure is to cut both pieces from the same sheet of wood—one piece is flopped over to lie on top of the other, and then turned end for end. These pieces are glued and pinned down to dry straight. If you were thinking ahead, you would have put waxed paper between the laminations where the hinges are to go later.
After the trailing edge is dry, notch it as shown on the plan. Note that the inboard wing panel is longer than the outboard wing—this is done by varying the rib spacing slightly. You might want to mark the trailing edge (inboard-outboard, left-right, whatever) to prevent confusion. If you are like me, something as subtle as a 1/16" difference in rib spacing is an invitation to making a mistake. Slip the ribs into the notched trailing edge but don't glue them just yet. (You did cut the notches to be a nice press fit for the ribs, didn't you?)
Be sure to put the under-size ribs in the center where the planking is to go. Now glue the leading edge to all 24 ribs, making sure that they are straight and square. A couple of rubber bands pulling the leading and trailing edges toward each other will help. Slip in the 3/32" square stringers, gluing them where you are satisfied that they are as straight as you can get them. After you have centered the trailing edge on the horizontal center line of the wing, glue it in also.
Block and pin the wing so that it can dry warp-free. Install the bellcrank, mounting plywood, and leadouts as shown on the plan. Sheet the center section by fitting 1/16 in. sheet between the stringers. Add web stiffeners as shown. The wing tips are built by cutting the wing tip shape out of 3/32 balsa, gluing wing-extending stringers to the tip. Fill in between the stringers with 1/8 in. balsa. Finish the wing by block sanding to fair in all the bits and pieces. Be extremely careful not to catch a nick with the edge of the sandpaper.
Perhaps a word here about adjustable tip weight and leadout locations. I believe in both, but I like to keep things simple. My "adjustable" leadouts are not more than slots in the wing tip with tubular eyes that are held in place with masking tape until the right position is found. When I'm satisfied that the leadouts are correctly located, I epoxy them in place. If the open slot in the wing tip bothers you, it can be filled with balsa and painted. And for the adjustable tip weight, I cut a panel out of the bottom of the outboard wing tip (covered with tape of course). When the correct tip weight was found it was epoxied in place and the opening patched.
The flaps are simple—just be sure to use rock hard balsa for the trailing edge. Notice that the inboard bays of the flaps are sheeted on the top only. This is where the control horn is epoxied to the flap. The hinges are a TV flat or if I had to "wrap" the flaps, I could cut the covering on the bottom of one flap, break the horn loose and then shim and re-glue the control horn.
The fuselage is built up of laminated sheets of 1/8 in. balsa and 1/16 in. plywood. Build the motor mount and the sides as separate pieces, and then glue them together making sure that everything is aligned. Note the asymmetry in the motor mounts. This is to allow engine offset (4 degrees) to the prop shaft coming out of the middle of the cowling.
Install the plywood landing gear bulkhead and lash the landing gear wire to the rearward side of the bulkhead. The fuel tank area is rather tight. The best way to do this is to build around the tank by filling in with 1/8" balsa. Make sure the tank is removable by it sliding forward.
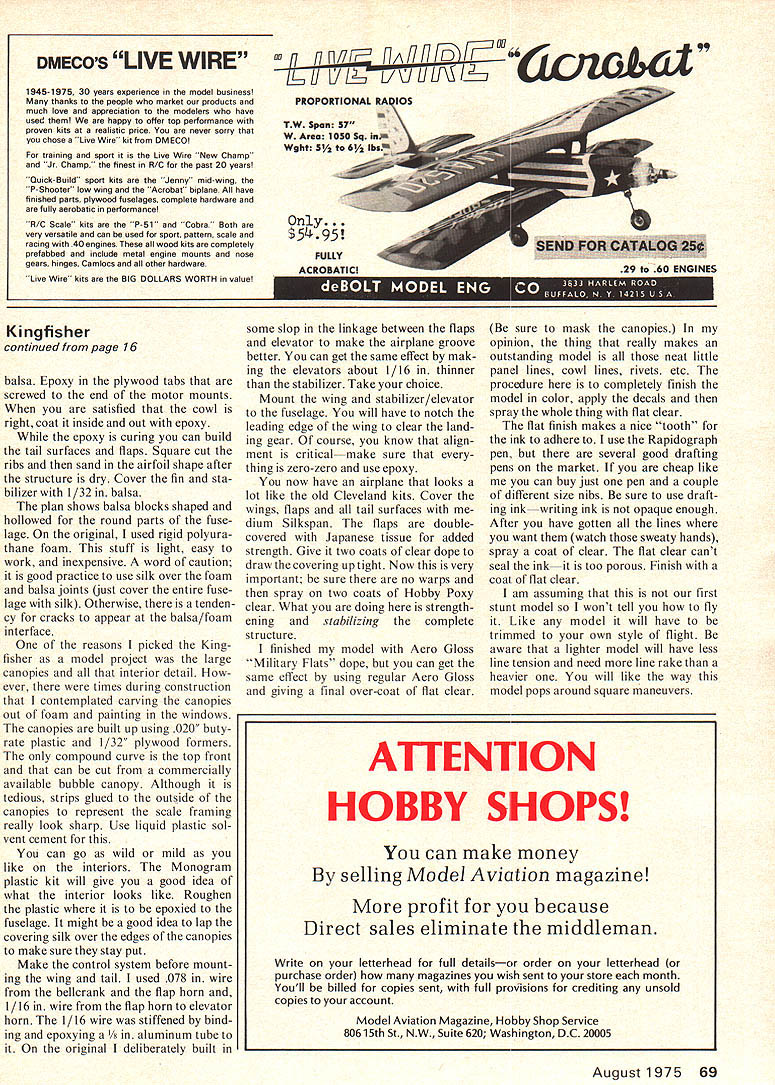
Cut and install the plywood rings that locate the back of the cowl. The cowl is the paper part of an "Ajax" brand cleanser container. Take the foil covering off the outside and clean the inside with dope thinner. It is possible to make your own paper ring by cowling by wrapping the correct size glass jar with heavy paper and water. After the paper has dried, break the jar to remove it—be careful. Build up the curved forward part of the cowl with
Kingfisher
balsa. Epoxy in the plywood tabs that are screwed to the end of the motor mounts. When you are satisfied that the cowl is right, coat it inside and out with epoxy.
While the epoxy is curing you can build the tail surfaces and flaps. Square cut the ribs and then sand in the airfoil shape after the structure is dry. Cover the fin and stabilizer with 1/32 in. balsa.
The plan shows balsa blocks shaped and hollowed for the round parts of the fuselage. On the original, I used rigid polyurethane foam. This stuff is light, easy to work, and inexpensive. A word of caution; it is good practice to use silk over the foam and balsa joints (just cover the entire fuselage with silk). Otherwise, there is a tendency for cracks to appear at the balsa/foam interface.
One of the reasons I picked the Kingfisher as a model project was the large canopies and all that interior detail. However, there were times during construction that I contemplated carving the canopies out of foam and painting in the windows. The canopies are built up using .020" butyrate plastic and 1/32" plywood formers. The only compound curve is the top front and that can be cut from a commercially available bubble canopy. Although it is tedious, strips glued to the outside of the canopies will represent the scale framing and really look sharp. Use liquid plastic solvent cement for this.
You can go as wild or mild as you like on the interiors. The Monogram plastic kit will give you a good idea of what the interior looks like. Roughen the plastic where it is to be epoxied to the fuselage. It might be a good idea to lap the covering silk over the edges of the canopies to make sure they stay put.
Make the control system before mounting the wing and tail. I used .078 in. wire from the bellcrank and the flap horn and 1/16 in. wire from the flap horn to elevator horn. The 1/16 wire was stiffened by binding and epoxying a 1/8 in. aluminum tube to it. On the original I deliberately built in some slop in the linkage between the flaps and elevator to make the airplane groove better. You can get the same effect by making the elevators about 1/16 in. thinner than the stabilizer. Take your time and mount the wing and stabilizer/elevator to the fuselage. You will have to notch the leading edge of the wing to clear the landing gear. Of course, you know that alignment is critical—make sure that everything is zero-zero and use epoxy.
You now have an airplane that looks a lot like the old Cleveland kits. Cover the wings, flaps and tail surfaces with medium Silkspan. The flaps are double-covered with Japanese tissue for added strength. Give it two coats of clear dope to draw the covering up tight. Now this is very important; be sure there are no warps and then spray on two coats of Hobby Poxy clear. What you are doing here is strengthening and stabilizing the complete structure.
I finished my model with Aero Gloss "Military Flats" dope, but you can get the same effect by using regular Aero Gloss and giving a final over-coat of flat clear.
(Be sure to mask the canopies.) In my opinion, the thing that really makes an outstanding model is all those neat little panel lines, cowl lines, rivets, etc. The procedure here is to completely finish the model in color, apply the decals and then spray the whole thing with flat clear.
The flat finish makes a nice "tooth" for the ink to adhere to. I use the Rapidograph pen, but there are several good drafting pens on the market. If you are cheap like me you can buy just one pen and a couple of different size nibs. Be sure to use drafting ink—writing ink is not opaque enough. After you have gotten all the lines where you want them (watch those sweaty hands), spray a coat of clear. The flat clear can't seal the ink—it is too porous. Finish with a coat of flat clear.
I am assuming that this is not our first stunt model so I won't tell you how to fly it. Like any model it will have to be trimmed to your own style of flight. Be aware that a lighter model will have less line tension and need more line rake than a heavier one. You will like the way this model pops around square maneuvers.
Transcribed from original scans by AI. Minor OCR errors may remain.

