


Kingfisher
Steven Baardsen
In 1937 the U.S. Navy issued an invitation for bids on a new battleship-based observation scout aircraft to be based on land or water. The Chance Vought Kingfisher was chosen for production. The XOS2U-1 was the most radical of the submitted designs, being a monoplane instead of a biplane. This decision proved to be an excellent choice, as the aircraft was easy to maintain at sea and handled well in the variety of roles it was assigned.
During its service the Kingfisher was also exported to a number of Allied countries, where the aircraft's record was very good. Its best-known role was that of a rescue plane for downed WWII carrier-based airmen who had been shot down over the Pacific Ocean.
The Kingfisher has been a popular Navy Carrier subject for a number of years; my version is the first that I have seen developed particularly for the .15 Profile Carrier event.
My interest in this aircraft originated from the desire to build a legitimate Carrier aircraft for the .15 event with the lightest possible weight and the largest possible wing area without looking too distorted. Since the original Kingfisher was designed as a scout floatplane, it was optimized for high lift using a big wing area for its relatively small size—perfect for Carrier competition.
A number of other features of the full-size aircraft were attractive:
- A midwing location allowed mounting the bellcrank at the center of gravity and within the wing for less drag.
- Fuselage-mounted gear for less weight and a stronger mounting arrangement.
- A large scale tail group.
- A small body relative to its wing area.
- A fairly large user group of countries for different color schemes.
- It was a Navy aircraft.
Specifications
- Type: .15 Profile Carrier
- Wingspan: 35 inches
- Engine size/type: .15 glow
- Flying weight: 24 ounces
- Construction: Built-up or foam wing
- Covering/finish: HobbyPoxy on fuselage; MonoKote on wing
- Full-size plans available: See Page 160
I wanted the best contest airplane I could build, and everything was considered with that objective in mind. I used the lightest balsa I could find, applied the lightest hot-fuel-proof finish, installed a reworked Conquest engine with an O.S. 2H helicopter carburetor, and used low-drag racing wheels. The only concession to performance is the stock muffler.
This model will exceed the 70 mph limit set by the event and will fly as slowly as the pilot can manage without going over the 60° angle rule. It has proven to be the competitive machine I had hoped it would be.
Although the model is capable of higher performance with more horsepower, it is recommended that the average builder install a stock engine. Contests are won primarily with reliable, consistent equipment and good low-speed times. High-speed times don't matter much as long as speed is close to the 70 mph limit, but you can't win if the engine doesn't run properly or you don't complete the flight.
CONSTRUCTION
Fuselage
The construction is similar to most profile models, except that I do not cut the fuselage to slide the wing in. I prefer to build the wings and fuselage as an integral unit so the usual profile fuselage cracking between the body and the wing doesn't occur.
Cut the fuselage from a sheet of 3/8" x 4" hard balsa, and add the maple engine mounts and tailwheel block. Laminate the 1/16" plywood doublers using epoxy. After the epoxy has cured, drill the engine and landing-gear strap mounting holes.
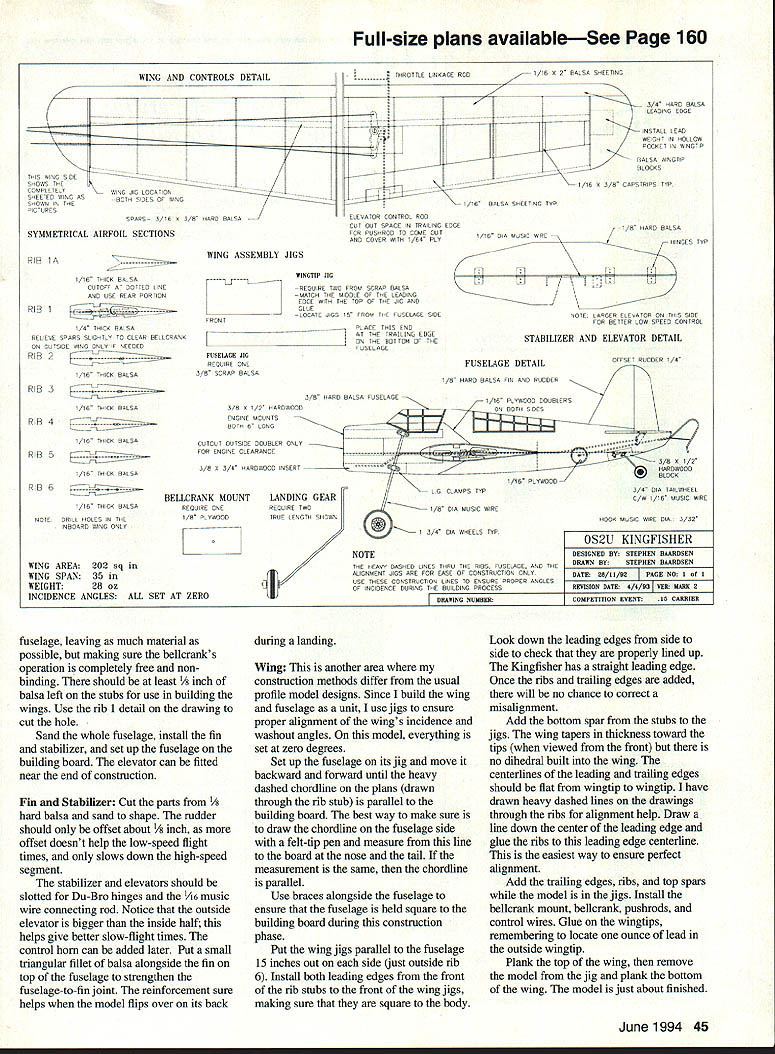
Join ribs 1 and 1A and glue these assemblies to both sides of the fuselage to form the stubs used to support the wing. Rib 1A is used as a spacer between rib 1 and the fuselage to compensate for the 1/16" plywood doubler. Take care to locate the stubs as shown on the plans; they control the incidence angle of the wings. I have drawn heavy dashed lines on the side view of the fuselage to help with alignment.
Note that the plywood bellcrank mount is recessed into the bottom of the outside rib only. This mount butts up against the plywood doubler and does not project into the fuselage. This is the strongest arrangement that a bellcrank can have—the aircraft would have to disintegrate before this bellcrank could pull loose.
Carefully cut the bellcrank clearance hole through the stubs and the body of the fuselage. Leave as much material as possible while ensuring the bellcrank operates completely free and nonbinding. There should be at least 1/8" of balsa left on the stubs for use in building the wings. Use the rib 1 detail on the drawing to cut the hole.
Sand the whole fuselage, install the fin and stabilizer, and set up the fuselage on the building board. The elevator can be fitted near the end of construction.
Be sure all parts are accounted for prior to construction. Jigs are a quick, easy way to ensure a properly aligned model.
Fin and Stabilizer
Cut the parts from 3/8" hard balsa and sand to shape. The rudder should only be offset about 1/8"; more offset doesn't help low-speed flight times and only slows the high-speed segment.
Slot the stabilizer and elevators for Du-Bro hinges and the 1/16" music-wire control rod. Note that the outside elevator is larger than the inside half; this helps give better slow-flight times. The control horn can be added later. Put a small triangular fillet of balsa alongside the fin on the top of the fuselage to strengthen the fin-to-fuselage joint. This reinforcement helps when the model flips over on its back during a landing.
Wing
My construction method differs from the usual profile designs because I build the wing and fuselage as a unit and use jigs to ensure proper alignment of incidence and washout angles. On this model everything is set at zero degrees.
Set up the fuselage on its jig and move it forward and backward until the heavy dashed centerline on the plans (drawn through the rib stub) is parallel to the building board. The best way is to draw the centerline on the fuselage side with a felt-tip pen and measure from this line to the board at the nose and the tail. If the measurements are the same, the fuselage is parallel.
Use braces alongside the fuselage to ensure it is held square to the building board during construction. Put the wing jigs parallel to the fuselage 15 inches out on each side (just outside rib 6). Install both leading edges from the front of the rib stubs to the front of the wing jigs, making sure they are square to the body.
Look down the leading edges from side to side to check alignment—the Kingfisher has a straight leading edge. Once the ribs and trailing edges are added there will be no chance to correct a misalignment.
Add the bottom spar from the stubs to the jigs. The wing tapers in thickness toward the tips (when viewed from the front) but there is no dihedral built into the wing. The centerlines of the leading and trailing edges should be flat from wingtip to wingtip. I have drawn heavy dashed lines onto the drawings through the ribs for alignment help. Draw a line down the center of the leading edge and glue the ribs to this leading-edge centerline—this is the easiest way to ensure perfect alignment.
Add the trailing edges, ribs, and top spars while the model is in the jigs. Install the bellcrank mount, bellcrank, pushrod, and control horns. Glue on the wingtips, remembering to locate one ounce of lead in the outside wingtip for balance.
Plank the top of the wing, then remove the model from the jig and plank the bottom of the wing. The airframe is then nearly finished.
Finish
I used MonoKote on the wing and sprayed the fuselage and tail surfaces with HobbyPoxy paint to keep weight down and protect the finish from high-nitro fuels. Finishing is a personal choice; this aircraft was used by a variety of countries, so paint schemes are numerous and colorful.
Hardware and Fuels
- I have used Du-Bro two-ounce plastic tanks, set up to feed in a uniflow style, with perfect results and have had no feeding troubles. I highly recommend this setup.
- Any ball-bearing Schnuerle-ported engine that will idle well will be competitive. That is the beauty of the 70-mph speed limit: it doesn't require expensive, exotic competition engines. Carburetors available now will throttle better with low-nitro fuels than the older carbs.
- If you are using a Perry carb, use higher-nitro fuels—Perry carbs idle and throttle better without bogging on higher nitro.
- Make sure whatever fuel you use contains at least 15% pure castor oil. Synthetic oil appears to serve only as a lubricant, whereas the Carrier event benefits from the castor oil's ability to help remove heat from the engine during running—particularly during the low-speed run.
Bellcrank
I use a bellcrank setup I first learned of in the early '70s. It consists of two small Fox or Perfect bellcranks mounted on top of one another as shown on the plans. Drill a hole approximately 1/2" from the center of one bellcrank and bolt the second through this hole, using washers as spacers to obtain proper clearances. The plans show the proper setup. I have found this arrangement superior in feel and control to the standard L-S/Roberts type, although I question its use in a larger model.
Wing and Controls Detail
- Symmetrical airfoil sections
- 3/32" sheeting where shown
- 1/16" balsa sheeting typical
- Elevator control rod and typical installation shown on the plans
The bellcrank arrangement details and the lines and pushrods are shown on the drawings.
Foam Wings
John Hall has made foam wing cores available for $5 a set plus postage. Contact: John Hall 10917 50 Ave. E. Tacoma, WA 98446-5301 Tel.: (206) 535-1034
Flying and Trimming
My last two models flew right off the board with the balance point about two inches back from the leading edge. This appears to be the right range for balancing this design, but experiment by shifting the CG back using weights until the model "hunts" during flight; then move the CG forward until the hunting tendency stops.
The .15 Profile class of Navy Carrier was conceived by Gerry Deneau of Denver, Colorado as a low-tech, fun, inexpensive event for entry into Carrier competition. The drawings for the Kingfisher are shown with that philosophy in mind. Those who want more performance can write for more information:
10580 Argenta Dr. Richmond, B.C. V7E 4K5 Canada
I hope you enjoy flying my version of the Kingfisher!
Transcribed from original scans by AI. Minor OCR errors may remain.

