
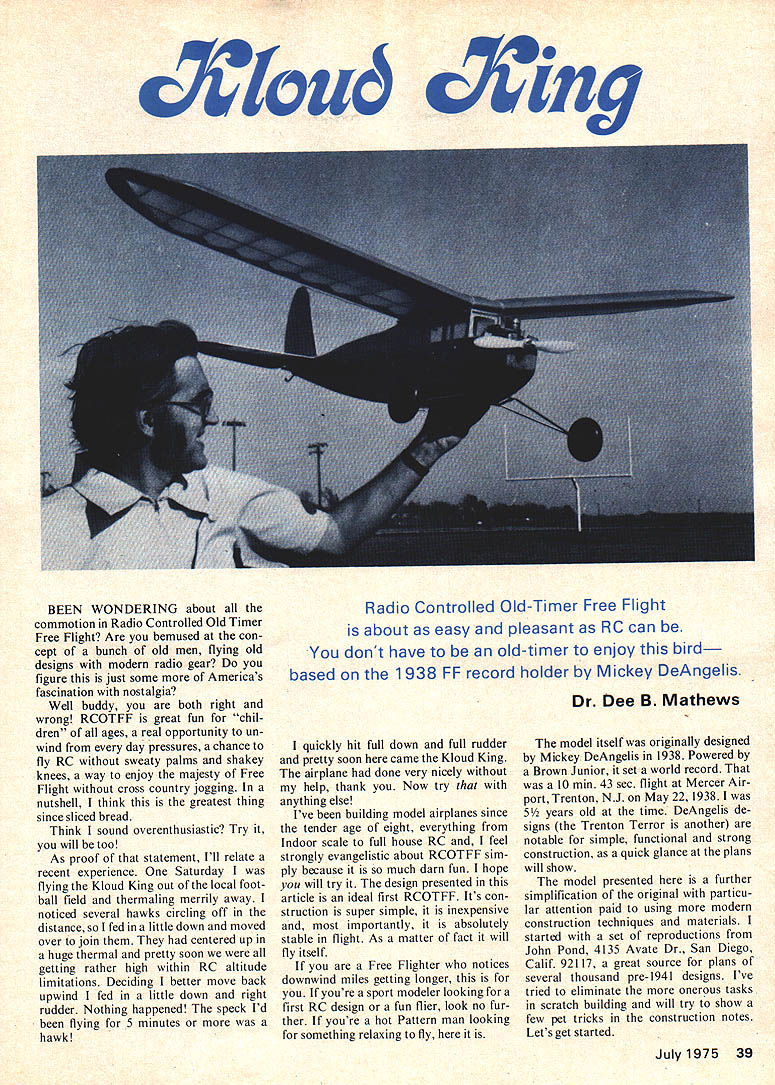
Kloud King
BEEN WONDERING about all the commotion in Radio Controlled Old Timer Free Flight? Are you bemused at the concept of a bunch of old men, flying old designs with modern radio gear? Do you figure this is just some more of America's fascination with nostalgia?
Well, buddy, you are both right and wrong! RCOTFF is great fun for "children" of all ages, a real opportunity to unwind from everyday pressures, a chance to fly RC without sweaty palms and shaky knees, a way to enjoy the majesty of Free Flight without cross-country jogging. In a nutshell, I think this is the greatest thing since sliced bread.
Think I sound overenthusiastic? Try it — you'll be sold. As proof of that statement, I'll relate a recent experience. One Saturday I was flying the Kloud King out of the local football field and thermaling merrily away. I noticed several hawks circling off in the distance, so I fed in a little down and moved over to join them. They had centered up in a huge thermal and pretty soon we were all getting rather high within RC altitude limitations. Deciding I better move back upwind I fed in a little down and right rudder. Nothing happened! The speck I'd been flying for 5 minutes or more was a hawk! I quickly hit full down and full rudder and pretty soon here came the Kloud King. The airplane had done very nicely without my help, thank you. Now try that with anything else!
I've been building model airplanes since the tender age of eight, everything from Indoor scale to full house RC and, I feel strongly evangelistic about RCOTFF simply because it is so much darn fun. I hope you will try it. The design presented in this article is an ideal first RCOTFF. Its construction is super simple, it is inexpensive and, most importantly, it is absolutely stable in flight. As a matter of fact it will fly itself. If you are a Free Flighter who notices downwind miles getting longer, this is for you. If you're a sport modeler looking for a first RC design or a fun flier, look no further! If you're a hot Pattern man looking for something relaxing to fly, here it is.
Radio Controlled Old-Timer Free Flight is about as easy and pleasant as RC can be. You don't have to be an old-timer to enjoy this bird—based on the 1938 FF record holder by Mickey DeAngelis.
Dr. Dee B. Mathews
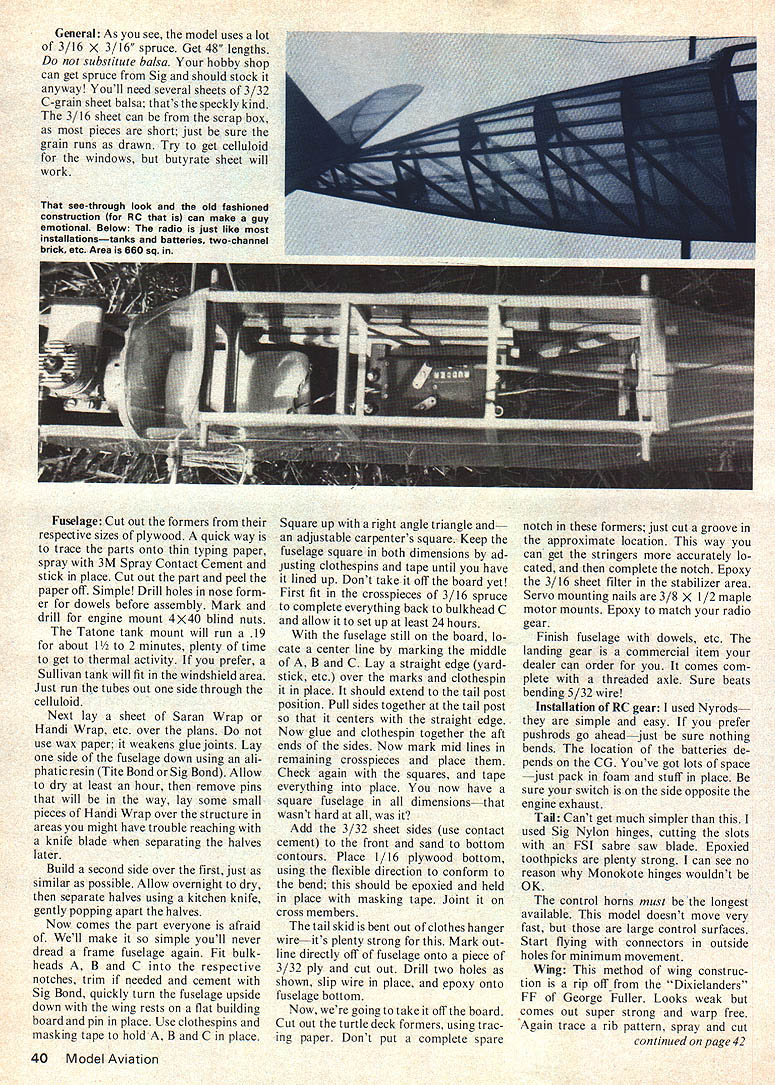
General:
As you see, the model uses a lot of 3/16 x 3/16 spruce. Get 48" lengths. Do not substitute balsa. Your hobby shop can get spruce from Sig and should stock it anyway! You'll need several sheets of 3/32 C-grain sheet balsa; that's the speckly kind. The 3/16 sheet can be from the scrap box, as most pieces are short; just be sure the grain runs as drawn. Try to get celluloid for the windows, but butyrate sheet will work.
Fuselage:
Cut out the formers from their respective sizes of plywood. A quick way is to trace the parts onto thin typing paper, spray with 3M Spray Contact Cement and stick in place. Cut out the part and peel the paper off. Simple! Drill holes in nose former for dowels before assembly. Mark and drill for engine mount 4x40 blind nuts. The Tatone tank mount will run a .19 for about 1 1/2 to 2 minutes, plenty of t to get to thermal activity. If you prefer, a Sullivan tank will fit in the windshielded area. Just run the tubes out one side through the celluloid.
Next lay a sheet of Saran Wrap or Handi Wrap, etc. over the plans. Do not use wax paper; it weakens glue joints. Lay one side of the fuselage down using an aliphatic resin (Tite Bond or Sig Bond). Allow to dry at least an hour, then remove pins that will be in the way, lay some small pieces of Handi Wrap over the structure in areas you might have trouble reaching with a knife blade when separating the halves later.
Build a second side over the first, just as similar as possible. Allow overnight to dry, then separate halves using a kitchen knife, gently pop apart the halves.
Now comes the part everyone is afraid of. We'll make it so simple you'll never dread a frame fuselage again. Fit bulkheads A, B and C into the respective notches. If needed smear some Sig Bond, quickly turn the fuselage upside down with the wing rests on a flat building board and pin in place. Use clothespins and masking tape to hold A, B and C in place.
Square up with a right angle triangle and an adjustable carpenter's square. Keep the fuselage square in both dimensions by adjusting clothespins and tape until you have it lined up. Don't take it off the board yet! First fit in the crosspieces of 3/16 spruce to complete everything back to bulkhead C and allow it to set up at least 24 hours.
With the fuselage still on the board, locate a center line by marking the middle of A, B and C. Lay a straight edge (yardstick, etc.) over the marks and clothespin it in place. It should extend to the tail post position. Pull sides together at the tail post so that it centers with the straight edge. Now glue and clothespin together the aft ends of the sides. Now mark mid lines in remaining crosspieces and place them. Check again with the squares and tape everything into place. You now have a square fuselage in all dimensions—that wasn't hard at all, was it?
Add the 3/32 sheet sides (use contact cement) to the front and sand to bottom contours. Join 1/16 plywood bottom, using the flexible direction to conform to the bend; this should be epoxied and held in place with masking tape. Joint it on cross members.
The tail stick is bent out of clothes hanger wire—it's plenty strong for this. Mark outline directly off of fuselage onto a piece of 3/32 ply and cut out. Drill two holes as shown, slip wire in place, and epoxy onto fuselage bottom.
Now, we're going to take it off the board. Cut out the turtle deck formers, using tracing paper. Don't put a complete spare notch in these formers; just cut a groove in the approximate location. This way you can get the stringers more accurately located, and then complete the notch. Epoxy the 3/16 sheet filler in the stabilizer area. Servo mounting rails are 3/8 x 1/2 plate or motor mounts. Epoxy to match your radio gear.
Finish fuselage with dowels, etc. The landing gear is a commercial item your dealer can order for you. It comes complete with a threaded axle. Sure beats bending 5/32 wire!
Installation of RC gear:
I used Nyrods—they are simple and easy. If you prefer pushrods go ahead—just be sure nothing bends. The location of the batteries depends on the CG. You've got lots of space—just pack in foam and stuff in place. Be sure your switch is on the side opposite the engine exhaust.
Tail:
Can't get much simpler than this. I used Sig Nylon hinges, cutting the slots with an FSI saber saw blade. Epoxied toothpicks are plenty strong. I can see no reason why Monokote hinges wouldn't be OK.
The control horns must be the longest available. This model doesn't move very fast, but those are large control surfaces. Start flying with connectors in outside holes for minimum movement.
Wing:
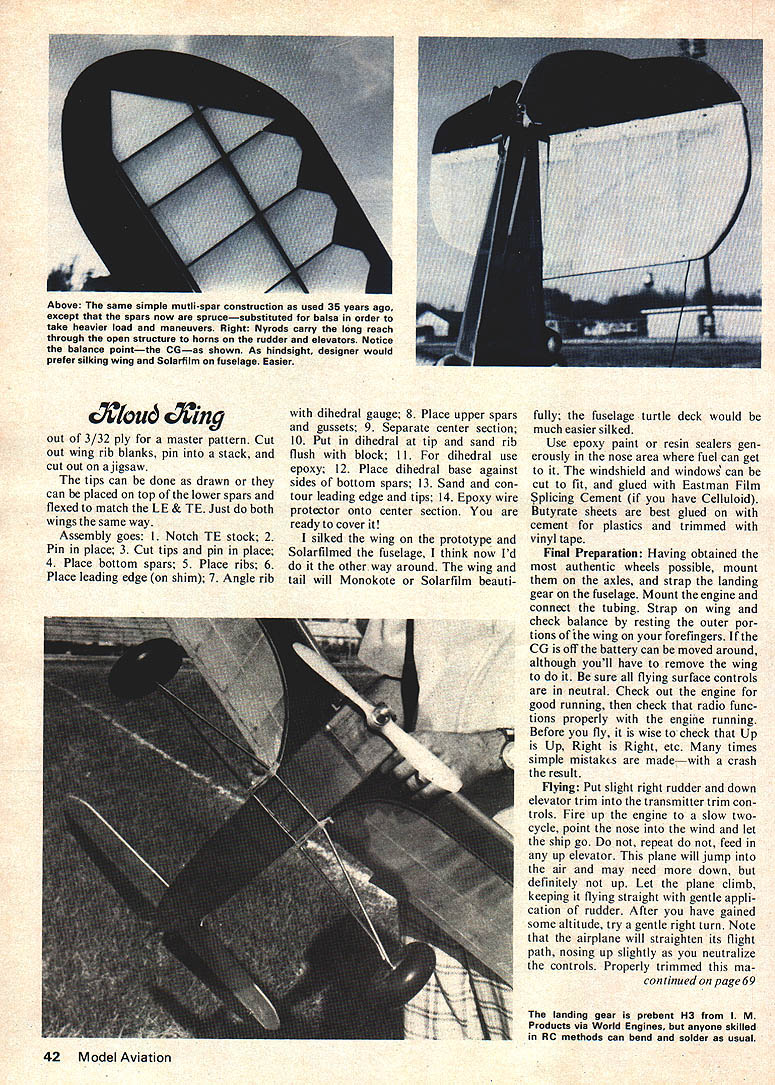
This method of wing construction is a rip off from the "Dixielanders" F/F of George Fuller. Looks weak but comes out super strong and warp free. Again trace a rib pattern, spray and cut out of 3/32 ply for a master pattern. Cut out wing rib blanks, pin into a stack, and cut out on a jigsaw.
The tips can be done as drawn or they can be placed on top of the lower spars and flexed to match the LE & TE. Just do both wings the same way.
Assembly goes: 1. Notch TE stock; 2. Pin in place; 3. Cut tips and pin in place; 4. Place bottom spars; 5. Place ribs; 6. Place leading edge (on shim); 7. Angle rib with dihedral gauge; 8. Place upper spars and gussets; 9. Separate center section; 10. Put in dihedral at tip and sand rib flush with block; 11. For dihedral use epoxy; 12. Place dihedral base against sides of bottom spars; 13. Sand and contour leading edge and tips; 14. Epoxy wire protector onto center section. You are ready to cover it!
I silked the wing on the prototype and Solarfilmed the fuselage. I think now I'd do it the other way around. The wing and tail will Monokote or Solarfilm beautifully; the fuselage turtle deck would be much easier silked.
Use epoxy paint or resin sealers generously in the nose area where fuel can get to it. The windshield and windows can be cut to fit, and glued with Eastman Film Splicing Cement (if you have Celluloid). Butyrate sheets are best glued on with cement for plastics and trimmed with vinyl tape.
Final Preparation: Having obtained the most authentic wheels possible, mount them on the axles, and strap the landing gear on the axles. Mount the engine and connect the tubing. Strap on wing and check balance by resting the outer portions of the wing on your forefingers. If the CG is off the battery can be moved around, although you'll have to remove the wing to do it. Be sure all flying surface controls are in neutral. Check out the engine for good running, then check that radio functions properly with the engine running. Before you fly, it is wise to check that Up is Up, Right is Right, etc. Many times simple mistakes are made — with a crash the result.
Flying:
Put slight right rudder and down elevator trim into the transmitter trim controls. Fire up the engine to a slow two-cycle, point the nose into the wind and let the ship go. Do not, repeat do not, feed in any up elevator. This plane will jump into the air and may need more down, but definitely not up. Let the plane climb, keeping it flying straight with gentle application of rudder. After you have gained some altitude, try a gentle right turn. Note that the airplane will straighten its flight path, nosing up slightly as you neutralize the controls. Properly trimmed this ma-
Kloud King
machine will climb in lefthand circles by itself. If you become disoriented go to neutral control and let the King do the flying.
Once the engine cuts you'll need some up trim for a nice gentle glide. The change from power to glide could be handled with down-thrust, but natural stability would suffer. As a free flighter of many years, I am going to preach a little about thermalling.
In watching the RC Soaring people I'm wondering if most of them know what the bubble looks like. Don't fly the plane around looking for lift; let it find lift on its own. When the wings wake up in lift, let the airplane turn up into it. I am afraid that many fliers are flying the fuselage; that is, if the nose comes up they think they are gaining altitude. No, not so. The entire airplane rises in lift and invariably the turn tightens, causing the nose to drop.
A thermal can be felt on the ground as a wind drop and a warmer feel to the air. In the sky you can expect to lift over plowed fields, pavement, or other heat radiating surfaces. Lift is upwind in a column feeding a flat-bottom cloud downwind. The most reliable way to find lift is to circle with the birds. They really know what they are doing!
Keep your flights upwind as much as you can. Once downwind and 50 feet high, it's a little late to be watching birds. Landing is a cinch. Just line up the plane and feed in some down until the wheels touch. Then feed in up to touch down the tailwheel.
The Kloud King will give you hours of fun, I assure you. After you have mastered it, then consider a Bombshell or a Clipper — the possibilities are limitless.
A final note. Don't fly hawks unless they are on your frequency!
Transcribed from original scans by AI. Minor OCR errors may remain.

