
KOMET
The fastest fighter of WW II in profile form — and with stabilizer added — makes a good 1/2-A Trainer or a Mouse Racer.
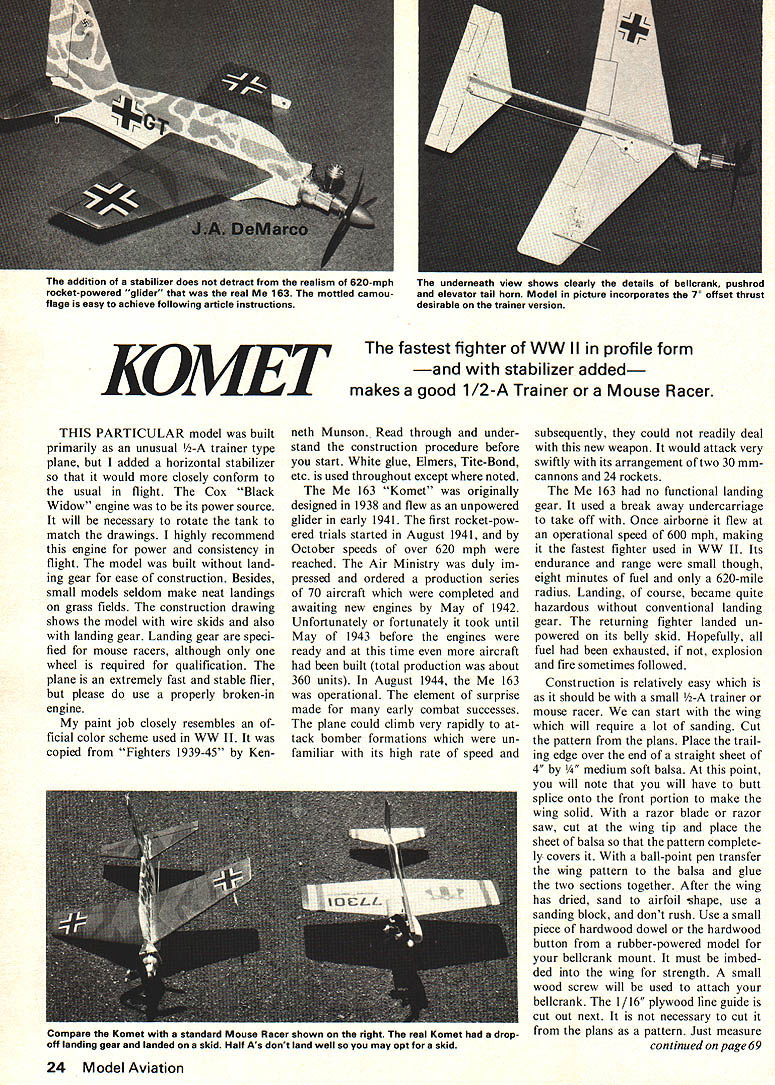
THIS PARTICULAR model was built primarily as an unusual 1/2-A trainer type plane, but I added a horizontal stabilizer so that it would more closely conform to the usual in flight. The Cox "Black Widow" engine was to be its power source. It will be necessary to rotate the tank to match the drawings. I highly recommend this engine for power and consistency in flight. The model was built without landing gear for ease of construction. Besides, small models seldom make neat landings on grass fields. The construction drawing shows the model with wire skids and also with landing gear. Landing gear are specified for mouse racers, although only one wheel is required for qualification. The plane is an extremely fast and stable flier, but please do use a properly broken-in engine.
My paint job closely resembles an official color scheme used in WW II. It was copied from "Fighters 1939–45" by Kenneth Munson. Read through and understand the construction procedure before you start. White glue, Elmers, Tite-Bond, etc., is used throughout except where noted.
The Me 163 "Komet" was originally designed in 1938 and flew as an unpowered glider in early 1941. The first rocket-powered trials started in August 1941, and by October speeds of over 620 mph were reached. The Air Ministry was duly impressed and ordered a production series of 70 aircraft which were completed and awaiting new engines by May of 1942. Unfortunately or fortunately it took until May of 1943 before the engines were ready and at this time even more aircraft had been built (total production was about 360 units). In August 1944, the Me 163 was operational. The element of surprise made for many early combat successes. The plane could climb very rapidly to attack bomber formations which were unfamiliar with its high rate of speed and subsequently, they could not readily deal with this new weapon. It would attack very swiftly with its arrangement of two 30 mm cannons and 24 rockets.
The Me 163 had no functional landing gear. It used a break-away undercarriage to take off with. Once airborne it flew at an operational speed of 600 mph, making it the fastest fighter used in WW II. Its endurance and range were small though, eight minutes of fuel and only a 620-mile radius. Landing, of course, became quite hazardous without conventional landing gear. The returning fighter landed unpowered on its belly skid. Hopefully, all fuel had been exhausted; if not, explosion and fire sometimes followed.
Construction is relatively easy which is as it should be with a small 1/2-A trainer or mouse racer. We can start with the wing which will require a lot of sanding. Cut the pattern from the plans. Place the trailing edge over the end of a straight sheet of 4" by 1/8" medium soft balsa. At this point, you will note that you will have to butt splice onto the front portion to make the wing solid. With a razor blade or razor saw, cut at the wing tip and place the sheet of balsa so that the pattern completely covers it. With a ball-point pen transfer the wing pattern to the balsa and glue the two sections together. After the wing has dried, sand to airfoil shape. Use a sanding block, and don't rush. Use a small piece of hardwood dowel or the hardwood button from a rubber-powered model for your bellcrank mount. It must be imbedded into the wing for strength. A small wood screw will be used to attach your bellcrank. The 1/16" plywood line guide is cut out next. It is not necessary to cut it out first; it is more or less a pattern. Just measure. Draw the dimensions rectangle onto plywood and cut out. Later you can drill holes and round corners. Make a slight 1/16" cut at the wing gluing line guide. Wing now complete. Before you ask, no weight at the outer wing tip is required; it will hang out just fine.
Next, the fuselage will fit onto a 4" sheet with little trouble. Cut out the pattern, trace and cut the fuselage out with a very sharp X-Acto knife (#11). Cut out wing and tail slots. The fuselage point is critical—accuracy is important. Sand the top portion to a rounded shape.
Komet/DeMarco
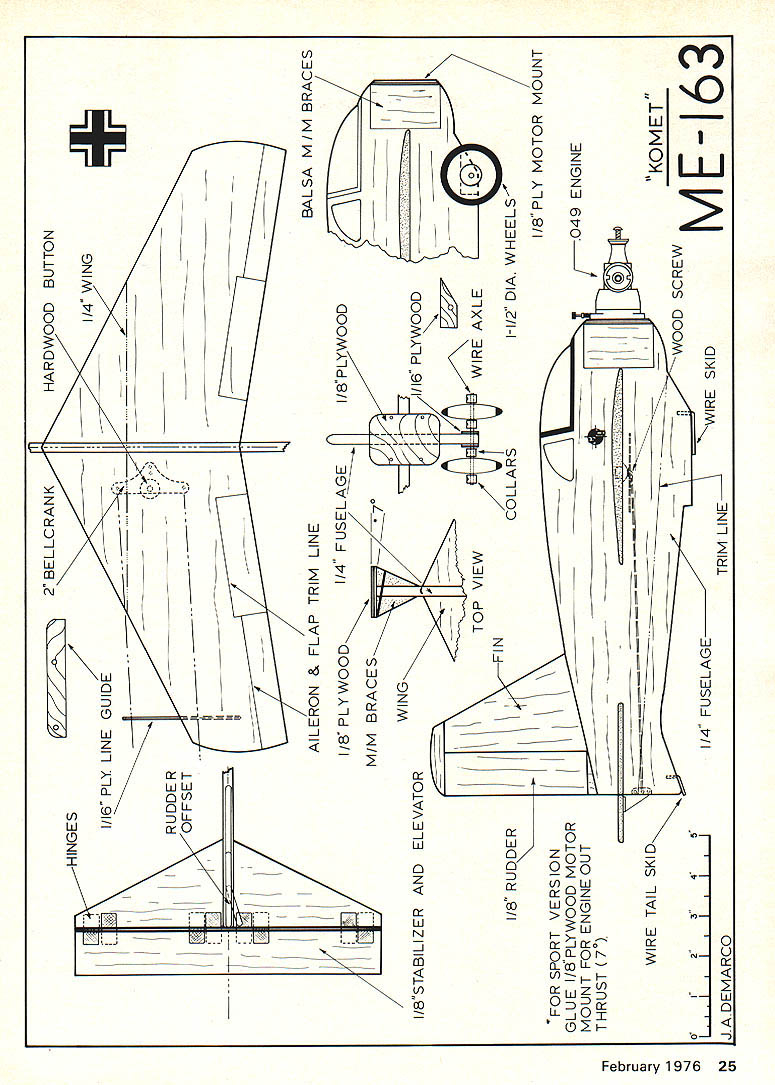
The balsa motor mount braces are nothing more than triangle-shaped scraps used to brace up the 1/8" plywood motor mount. At this point you have a decision to make, trainer or mouse racer. Glue everything on straight as shown in the plans and you lose little in speed. If you choose trainer, glue the motor mount at a slight angle pointing away from you as it would be in flight. (The top view shows how to cut the nose for 7 degrees of thrust. This causes more drag but greatly increases line tension — important for a new flier to have.) Also use the inner hole on the bellcrank and the outer hole on the elevator horn.
The rudder stabilizer and elevator are cut out next from 1/8" sheet balsa, also of medium soft quality. Cut all parts as shown, note the direction of the wood grain. This is important for optimum strength.
We can now glue the wing and stabilizer into the fuselage. Use a small triangle for gauging squareness before the glue dries. When the glue has dried, cloth-hinge on the elevator to the stabilizer. The fin and rudder are next. The rudder will angle out approximately 3/8" for good line tension in either a mouse racer or a trainer.
For landing gear, cut out and glue on the 1/16" plywood doublers. Drill through the fuselage for your 1/16" wire axle. Any combination of wheel collars and wheels will give you one- or two-wheel gear. If you choose a skid, epoxy an "L"-shaped piece of 1/8" music wire. The 1/16" wire tail skid is also epoxied in.
Sand the entire model with a fine sandpaper. I used Aerogloss Products on my model. Paint the plane with three coats of clear, fine sanding between each. The underside is light blue made by mixing a drop of blue into about three ounces of white. The fuselage is light gray made by adding a drop of black into about three ounces of white. The mottled dark gray is then added. The wings are painted medium green followed by a darker green splinter camouflage. The greens were also mixed as Aerogloss does not make too many shades of green.
If you would like to take a crack at making your own decals with "Trim MonoKote" use the cross on the drawing. Cut out the entire shape in white followed by four black "L"s then the narrower black cross. Follow the directions on the back of the sheet for mounting. Fuel-proofing doesn't hurt as high-nitro fuels get under the decal and melt the adhesive. Save the backing for future templates.
Use two .010 lines 35 feet long and always be sure to take off downwind. For Mouse Racing .010 lines are required if single strand, .012 if multi-strand.
Transcribed from original scans by AI. Minor OCR errors may remain.

