

LA-5FN
Overview
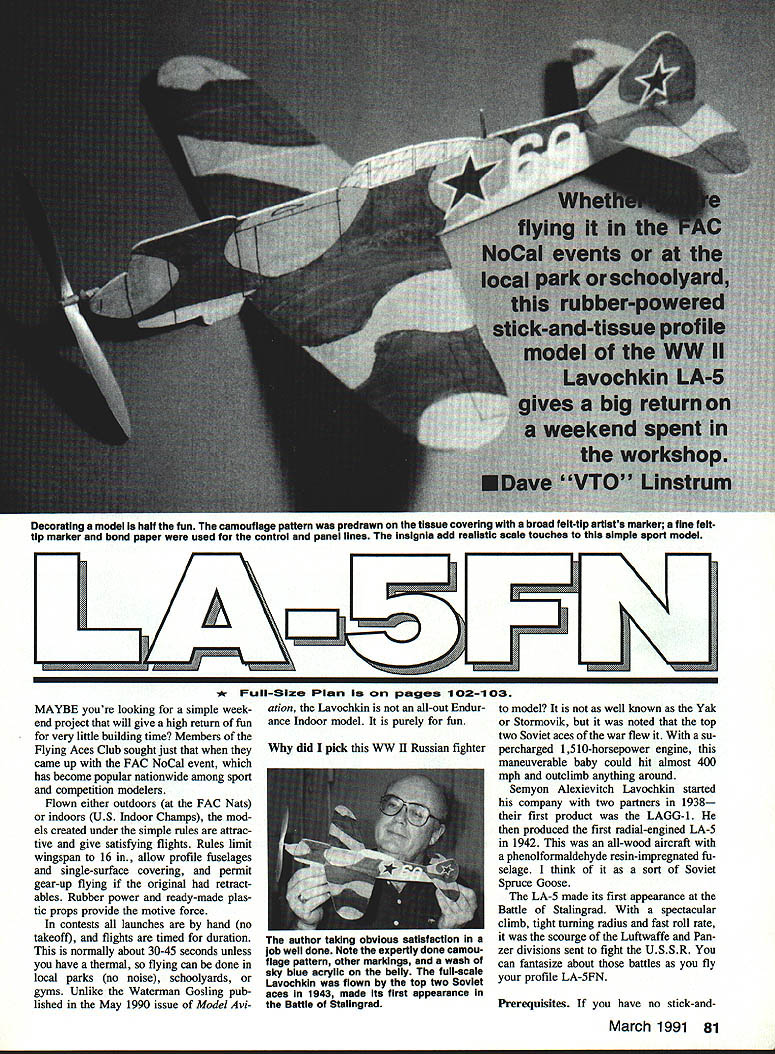
Maybe you're looking for a simple weekend project that will give a high return of fun for very little building time. Members of the Flying Aces Club came up with the FAC NoCal event, which has become popular nationwide among sport and competition modelers.
Flown either outdoors (at the FAC Nats) or indoors (U.S. Indoor Champs), the models created under the simple rules are attractive and give satisfying flights. Rules limit wingspan to 16 in., allow profile fuselages and single-surface covering, and permit gear-up flying if the original had retractables. Rubber power and ready-made plastic props provide the motive force.
In contests all launches are by hand (no takeoff), and flights are timed for duration. This is normally about 30–45 seconds unless you have thermal; so flying can be done in local parks (no noise), schoolyards, or gyms.
Unlike the Waterman Gosling published in the May 1990 issue of Model Aviation, the Lavochkin is not an all-out Endurance Indoor model. It is purely for fun.
Why model this WWII Russian fighter? It is not as well known as the Yak or Stormovik, but the top two Soviet aces of the war flew it. With a supercharged 1,510-horsepower engine, this maneuverable plane could hit almost 400 mph and outclimb most opponents.
Semyon Alexeivitch Lavochkin started his company with two partners in 1938—his first product was the LaGG-1. He then produced the first radial-engined LA-5 in 1942. This was an all-wood aircraft with a phenol-formaldehyde resin-impregnated fuselage.
The LA-5 made its first appearance at the Battle of Stalingrad. With a spectacular climb, tight turning radius and fast roll rate, it was the scourge of the Luftwaffe. You can fantasize about those battles as you fly your profile LA-5FN.
PREREQUISITES AND TOOLS
- If you have no stick-and-tissue modeling experience, try some simple models first (AMA Delta Dart, Peck ROG, etc.). It takes skill to handle thin balsa sticks and cover with paper.
- Basic tools:
- X-Acto or craft knife with #11 (or similar) blade
- Straight pins
- Small artist’s brush (sable recommended)
- Scissors
- Small needle-nose pliers
- Straight building board at least 11 x 17 in.
MATERIALS
- Clear tape and wax paper
- Thin UFO Hot Stuff CA (use thick if you make crude joints)
- Elmer’s Craft Bond #1 (thin at 50% with water for applying the covering)
- Scraps of 3/32" and 1/16" sheet balsa
- A couple strips of 1/16" square balsa
- Strip of 1/8" x 3/16" hard balsa
- Scrap of 3/32" plywood for a rib pattern
- Scrap of artist matboard for tip forms
- Peck silver 6-in. plastic prop with nylon bearing and prop shaft
- Color marker for camouflage (dark gray/light gray or sand/green scheme)
- Several feet of 1/8-in. FAI gray rubber (if only tan is available, try 3/16-in. wide)
- Peck 5:1 crank-type rubber winder
- Two 11 x 17 photocopies of the centerfold plan (one for cutting up into patterns and insignia)
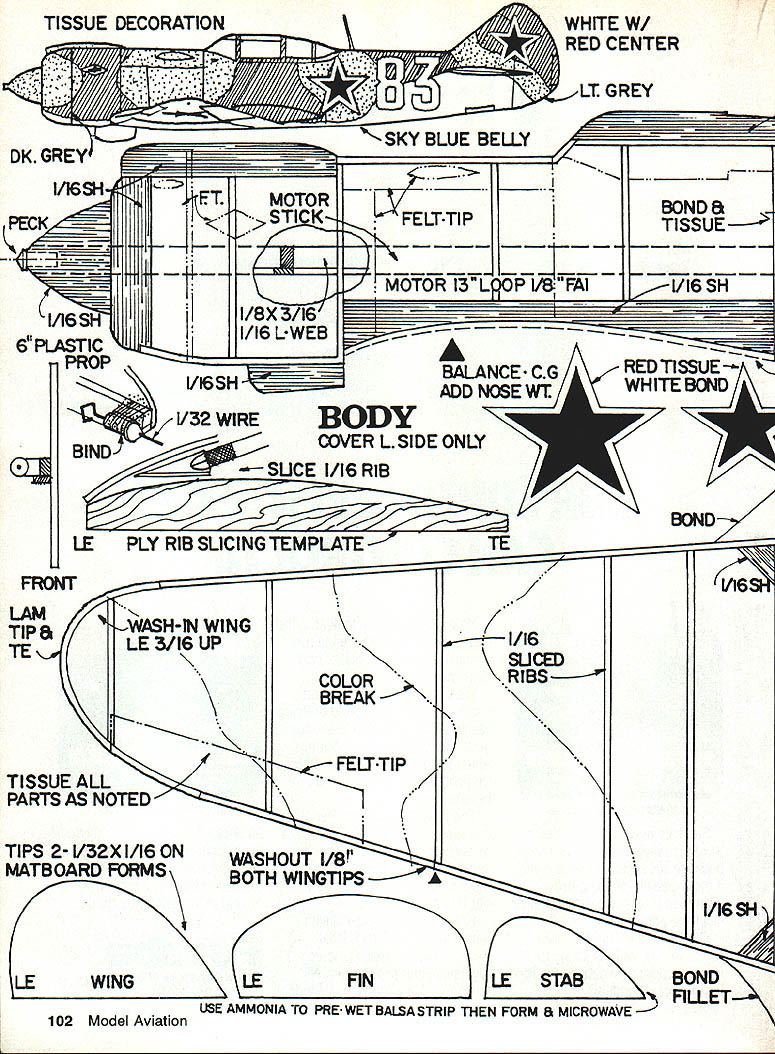
TISSUE DECORATION
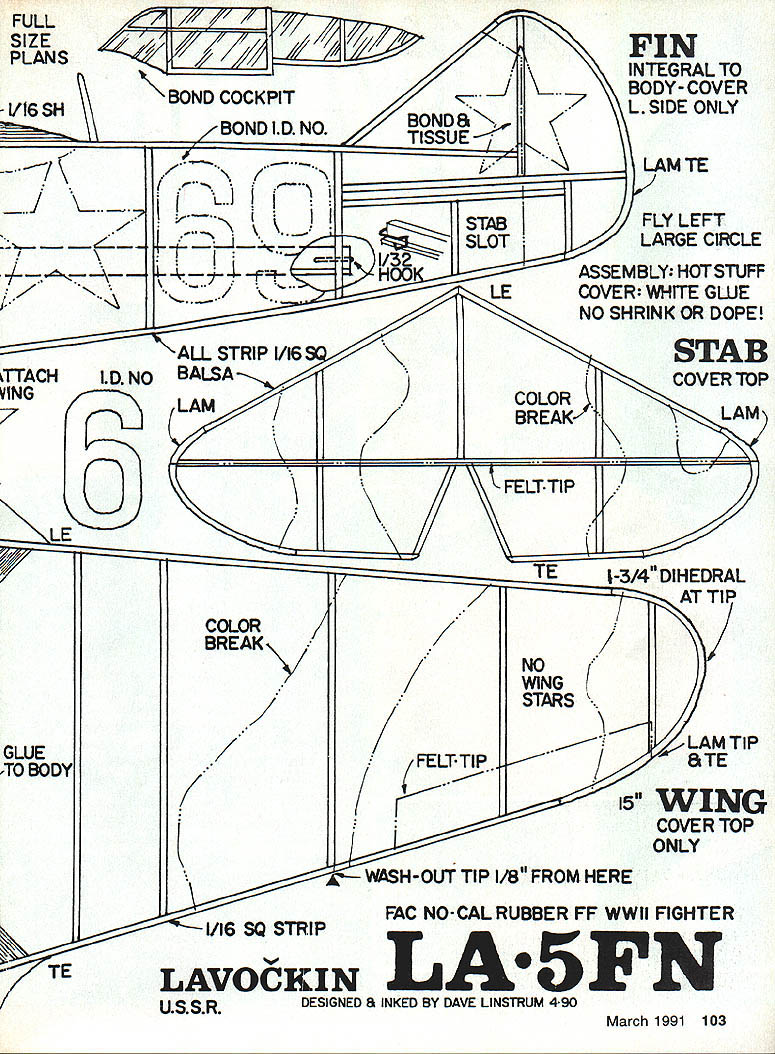
- Body: cover left side only before applying some parts; cover top of stab only
- Colors and markings:
- White with red center for national star
- Light gray and dark gray or sand and spinach green camouflage
- Sky-blue belly (apply a thin coat of sky-blue acrylic)
- Red tissue for stars; mount on white bond paper and trim
- Felt-tip marker: use dark gray or spinach to color darker camo areas and a fine black felt-tip to outline panels/controls
- Fabrication notes:
- Tips: two pieces, 1/32" x 1/16", formed on matboard forms
- Washout: 1/8" both wingtips (tip TE raised)
- Wash-in: left wing leading edge (LE) 3/16" up for left-turn climb stability
- Dihedral: 1-3/4" dihedral at each tip
- Cover wing top only (15" wing cover top only)
- No shrink or dope; cover with thinned white glue
- All strips 1/16" square balsa unless noted
- Use ammonia to pre-wet balsa strip, then form and microwave to shape tips (careful)
CONSTRUCTION
Preconstruction parts
- Glue the root rib pattern to a scrap of 3/32" plywood and cut out a template.
- Use the template to slice ribs one at a time from 1/16" sheet. Cut the rear of ribs overlength to fit when building the wing.
- Make wing and tail tips by stripping 5-in. lengths of 1/32" x 1/16" balsa and laminating them on matboard forms:
- Wax the edge of the matboard to prevent glue bond (candle wax or heavy Crayola wax).
- Soak strips for about a minute in household ammonia (do not inhale fumes), dry on a paper towel, tape in pairs to the curved form, pinch, then put in a micro-vise on high for about one minute to dry.
- Run a light bead of Hot Stuff CA between strips to laminate.
Motor stick and fittings
- Cut the motor stick to length and add a 1/16" L-brace for stiffness.
- Using a 1/8" scrap for offset, glue the bearing to the front and the hook to the rear on the right side of the stick (the side with the brace showing).
- Bind in place with thread and glue securely.
- Attach the motor stick to the body only after covering is completed (see note below about a personal build).
Note: The author built an LA-5FN attaching the motor stick only to the front three uprights, allowing some flexibility with a fully wound motor.
Fuselage and fin
- Pin strips to the plan and glue up the fuselage sticks. The body uses some sheet parts for stiffness; form the cockpit area using templates and glue to the fuselage sides.
- Everything else is 1/16" square, cut to size and joined. Use Hot Stuff CA applied from the end of a round toothpick for precise joints.
- Pin strips in an "X" fashion rather than pinning through strips to avoid weakening.
- The fin is built integral with the body; cut the curved part to fit and butt-joint it to the strip.
Stabilizer
- Build the stab like the fin. For the wire hook use:
- Pin the leading edge (LE) and trailing edge (TE) strips down (do not glue at center yet).
- Add cut-to-fit tips.
- Glue two ribs together and set aside as a root rib.
- Cut and fit the rest, trimming from the rear for a tight fit.
- Crack the TE at indicated points and raise it off the plan with a bit of 1/8" sq. wood at the tips to provide washout.
- Glue all but the root ribs in place.
Wing assembly
- Pin strips and glue the wing structure on the plan.
- Remove the right wing panel from the building board and bevel the root ends of the LE and TE for dihedral.
- Raise the tip of the left LE off the board by 3/16" (wash-in) — this is critical for left-turn climb stability.
- Glue the wings together with the right tip elevated 3/32" off the board.
- Glue the root rib pair and gussets in place, aligning the root rib halfway between the dihedral angles of the two panels.
- Ensure the center joint is strong and well glued. Do not add fillets until after covering.
COVERING AND DECORATION
- Leave wax paper on the plan to keep the glue from sticking to the plan.
- Cut light-color tissue (gray or sand) oversize and tape it over the body, stab and wing plan.
- Use a broad felt-tip artist's marker (dark gray or spinach green) to color in darker camo areas—refer to photos and the plan inset. Color to the edge of the paper.
- Apply a thin coat of sky-blue artist’s acrylic to the belly as shown on the plan.
- Add panel markings and control outlines with a fine black felt-tip pen.
- Make red stars:
- Cut red tissue stars (or draw with a red marker) and glue them to white bond paper, then trim to outline.
- Slip two scraps of white bond under the numeral "6" on the plan and cut through to make ID numbers.
- Turn numbers and stars upside down on newspaper and spray with aerosol rubber cement, then apply to the body tissue.
- Alternatively, some builders use spray cement to apply darker-color tissue for camouflage.
- Insignia can also be adhered with thinned Elmer's glue.
- Remove the tissue from the plan, cutting the wing covering at the root to make left and right panels.
- Using thinned Elmer's and a small sable brush, glue the oversize tissue positions to the outlines on the parts.
- When dry, remove excess tissue with a sharp X-Acto blade or an emery board at 45°, sanding carefully without cutting through the wood.
Final assembly after covering
- With the left side of the body covered, add the motor stick to the right side, positioning it to match the plan.
- Cut tissue from the stab slot, slip the stab in place and align; spot-glue at LE and TE.
- Run glue along the root rib and glue the wing in place, sighting from the front to assure level alignment.
- Add the prop shaft, a small washer and the plastic prop; peen an L into the end of the shaft to fit the prop hub.
- Do not add fillets until after initial trimming and flight tests (fillets can be added later for strength and finish).
FLIGHT TRIM AND FLYING
- Balance: the prototypes required nose weight to achieve the plane point shown on the plan. Add clay or strip solder glued to the spinner above and below the motor stick as needed.
- Rudder: crack the fin and bend in about 1/16" left rudder. A combination of motor torque and stab incidence should give a good left turn.
- Motor: make a motor by tying a square knot in a 27-in. strip of rubber to form a loop about 13 in. long. Lube with baby shampoo or Peck rubber lube.
- Winding (requires a helper):
- Helper grasps the prop hub and points the model at you with wings horizontal, motor stick out.
- Attach the rear of the motor loop to the winder, stretch the rubber motor to about three times motor length, and wind about 150 turns (about 30 cranks of the 5:1 winder).
- Move in slowly as you wind, then grasp the motor in front of the crank, remove it to make a small loop, and attach that loop to the rear hook on the motor stick.
- Launching:
- Face into the wind (do not fly if wind is over 10 mph—use a gym).
- Launch the model nose-up about 30° with wings level. Release the prop tip; do not throw. It should spiral up left in circles of about 30-ft diameter.
- Trim adjustments:
- If the model stalls or goes right, add nose weight or increase left rudder.
- If it spins in to the left, increase washin of the left wing tip (crack the LE, raise the tip, glue the crack) or reduce left rudder trim.
- If it dives, check the CG. If CG is correct, add up elevator by cracking the stab and spar and gluing the adjustment.
- If needed, adjust thrust line by cutting the bearing loose and setting slight down or left thrust.
- Expect flights of about 30–45 seconds maximum indoors or in calm conditions.
FINAL NOTES
- Use a box or paper grocery sack to protect the model when transporting to a gym.
- Remember to fly only in relatively calm air or indoors.
- Happy landings, Ace!
When responding to advertisers, mention that you read about them in Model Aviation.
CREDITS
FAC No-Cal Rubber FF WWII Fighter — Lavochkin LA-5FN Designed & inked by Dave Linstrum, 4-90.
Transcribed from original scans by AI. Minor OCR errors may remain.

