
Letters to the Editor
Scale Cable System
When I received my copy of the January Model Aviation, I was so excited when I saw Norm Rosenstock's plans for the Church Midwing.
You see, I'm building Bill Wendt's Quarter Scale D-8, and I'm using four cables from the elevators like Rosenstock did. But I've been held up, because I just couldn't figure out how to connect the two elevator bellcranks to one servo — and I was disappointed that the Midwing plans don't show this detail. The article says to use a piece of wire, but I just can't figure out how.
Would you please send me a sketch showing in detail how the servo is connected to the two bellcranks? Also, what size cable should be used — 35-lb., 45-lb.? What size turnbuckles?
Geo. McGinnis Goshen, NY
As is our practice in such matters, we turned over Mr. McGinnis' inquiry to the author. Since it may be of general interest, we include the response below.
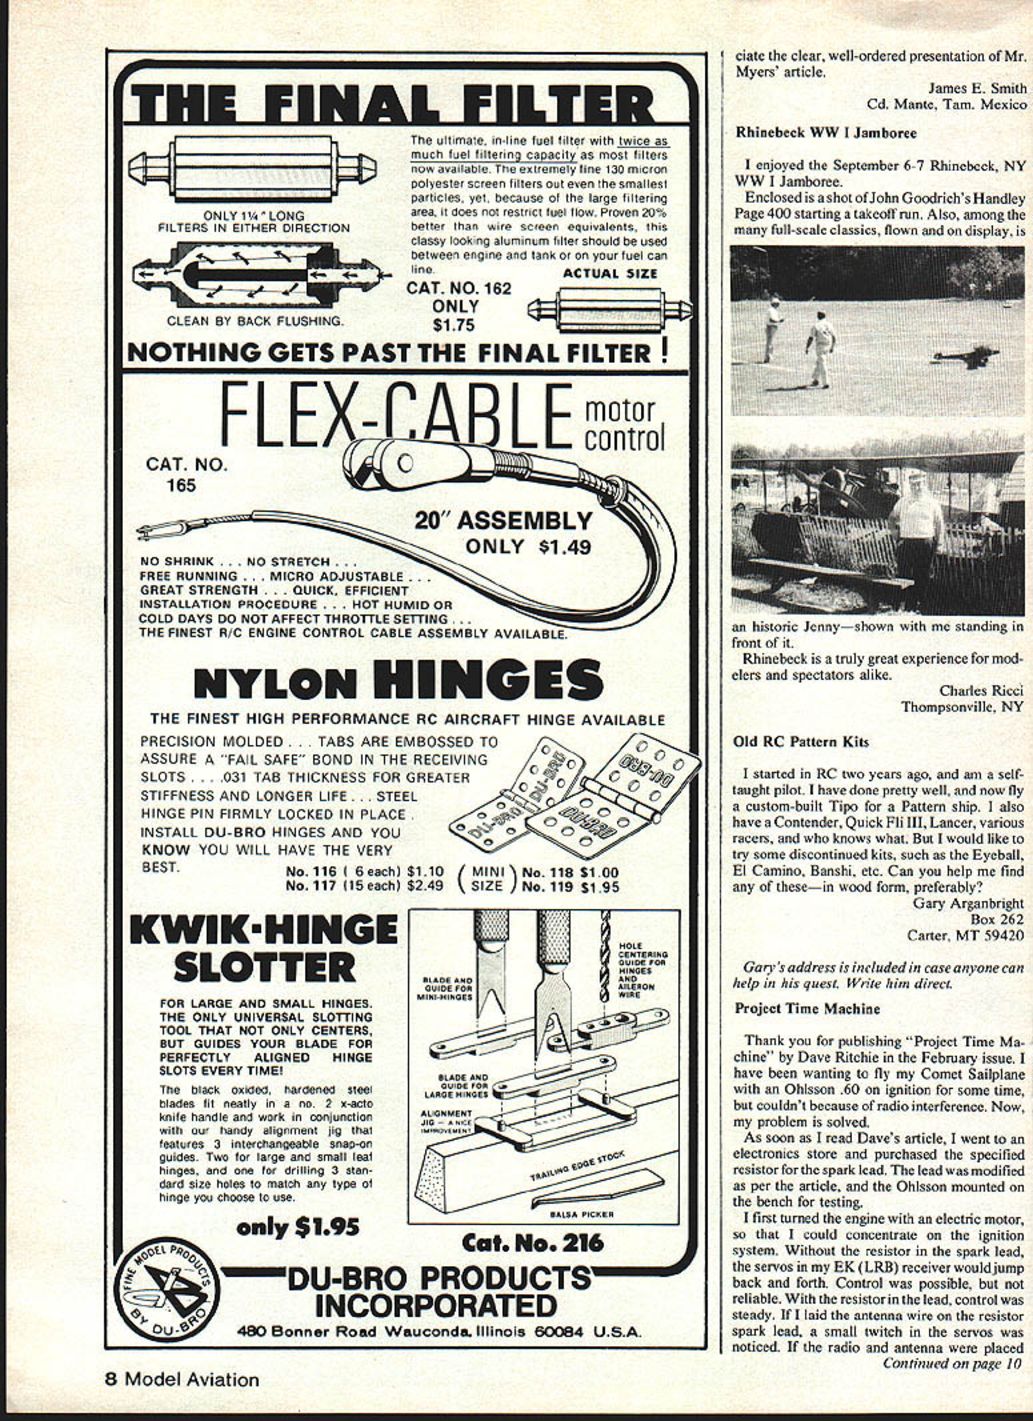
As stated in the article, the rudder and elevator are each controlled by cable. As the elevator is split, each side is controlled by two cables.
The elevator and rudder bellcranks are mounted in the fuselage on a common piece of plywood, side-by-side, and the servos are also mounted side-by-side. Each servo is connected to its related bellcrank with a short piece of threaded rod — with kwik-links, so that flight trim adjustments can be made.
The rudder cables are connected in a straightforward manner: one rudder cable to each end of the rudder bellcrank. If the direction of rudder movement is reversed, simply switch the cables to the opposite ends of the bellcrank.
The elevator cables follow the same procedure, except that there are two up-cables and two down-cables. To simplify the hookup of the elevator bellcrank, join the two up-cables together as shown in the sketch. The two cables pass through the swage fitting, looped through twice, and a third cable coming in from the other direction is also looped through twice. When the looped cables are pulled tight, the swage fitting is then squashed flat with a pair of pliers, locking the cables together. The excess ends are trimmed off. This joins the two up-cables into one up-cable, which is then connected to the elevator bellcrank in the same manner as the rudder cables. The same procedure is followed for the down-cables.
I used turnbuckles at the ends of the cables where they connect to the control horns to give fine control over the alignment of the two elevator halves. However, once this adjustment is made, the turnbuckles must be safety-wired.
The turnbuckles, swages, and control cables I used in rigging my Church Midwing all came from Proctor Enterprises Corp., P.O. Box 9641, San Diego, CA 92109. Part numbers: Turnbuckles, #2c; Control Cable, #203; Swage Fittings, #312.
Norman Rosenstock Plainview, NY
Take a Bow, George
Just a note to express my appreciation of George Myers' article in the September issue about the MEN Charger. I worked in electro-mechanical research and development on atomic and nuclear weapons for 10 years before becoming a missionary to Mexico in 1960. Incidentally, I enjoyed and appreciated every minute of that opportunity to serve my country. Happy Veterans' Day. (Written on November 11 — ed.) I authored a couple of technical manuals while there, and I appreciate the clear, well-ordered presentation of Mr. Myers' article.
James E. Smith Cd. Mante, Tam., Mexico
Rhinebeck WW I Jamboree
I enjoyed the September 6–7 Rhinebeck, NY WW I Jamboree.
Enclosed is a shot of John Goodrich's Handley Page 400 starting a takeoff run. Also, among the many full-scale classics flown and on display, is a historic Jenny—shown with me standing in front of it.
Rhinebeck is a truly great experience for modelers and spectators alike.
Charles Ricci Thompsonville, NY
Old RC Pattern Kits
I started in RC two years ago and am a self-taught pilot. I have done pretty well, and now fly a custom-built Tipo for a Pattern ship. I also have a Contender, Quick Fli III, Lancer, various racers, and who knows what. But I would like to try some discontinued kits, such as the Eyeball, El Camino, Banshi, etc. Can you help me find any of these — in wood form, preferably?
Gary Arganbright Box 262 Carter, MT 59420
Gary's address is included in case any readers can help in his quest. Write him direct.
Project Time Machine
Thank you for publishing "Project Time Machine" by Dave Ritchie in the February issue. I have been wanting to fly my Comet Salk plane with an Ohlsson .60 on ignition for some time, but couldn't because of radio interference. Now my problem is solved.
As soon as I read Dave's article, I went to an electronics store and purchased the specified resistor for the spark lead. The lead was modified per the article, and the Ohlsson mounted on the bench for testing.
I first turned the engine with an electric motor so I could concentrate on the ignition system. Without the resistor in the spark lead, the servos in my EK (LRB) receiver would jump back and forth. Control was possible, but not reliable. With the resistor in the lead, control was steady. If I laid the antenna wire on the spark lead, a small twitch in the servos was noticed. If the radio and antenna were placed three or four inches behind the engine, no interference could be noticed.
I initially used an Aero Spark coil with a Smith metal-clad condenser. Substitution of a Smith Firecracker or a Wilco coil did not change the results. The spark plug gap was varied from about .012 to .020 in., with no change noticed. In the final test, the electric motor was removed and the engine was run on gas and oil. Again, the resistor lead eliminated radio interference.
Field tests will be in order when warmer weather comes, but I believe the resistor lead will still be effective. I hope that others will share their experiences.
Roger J. Schroeder Overland Park, KS
Goin' Kougar
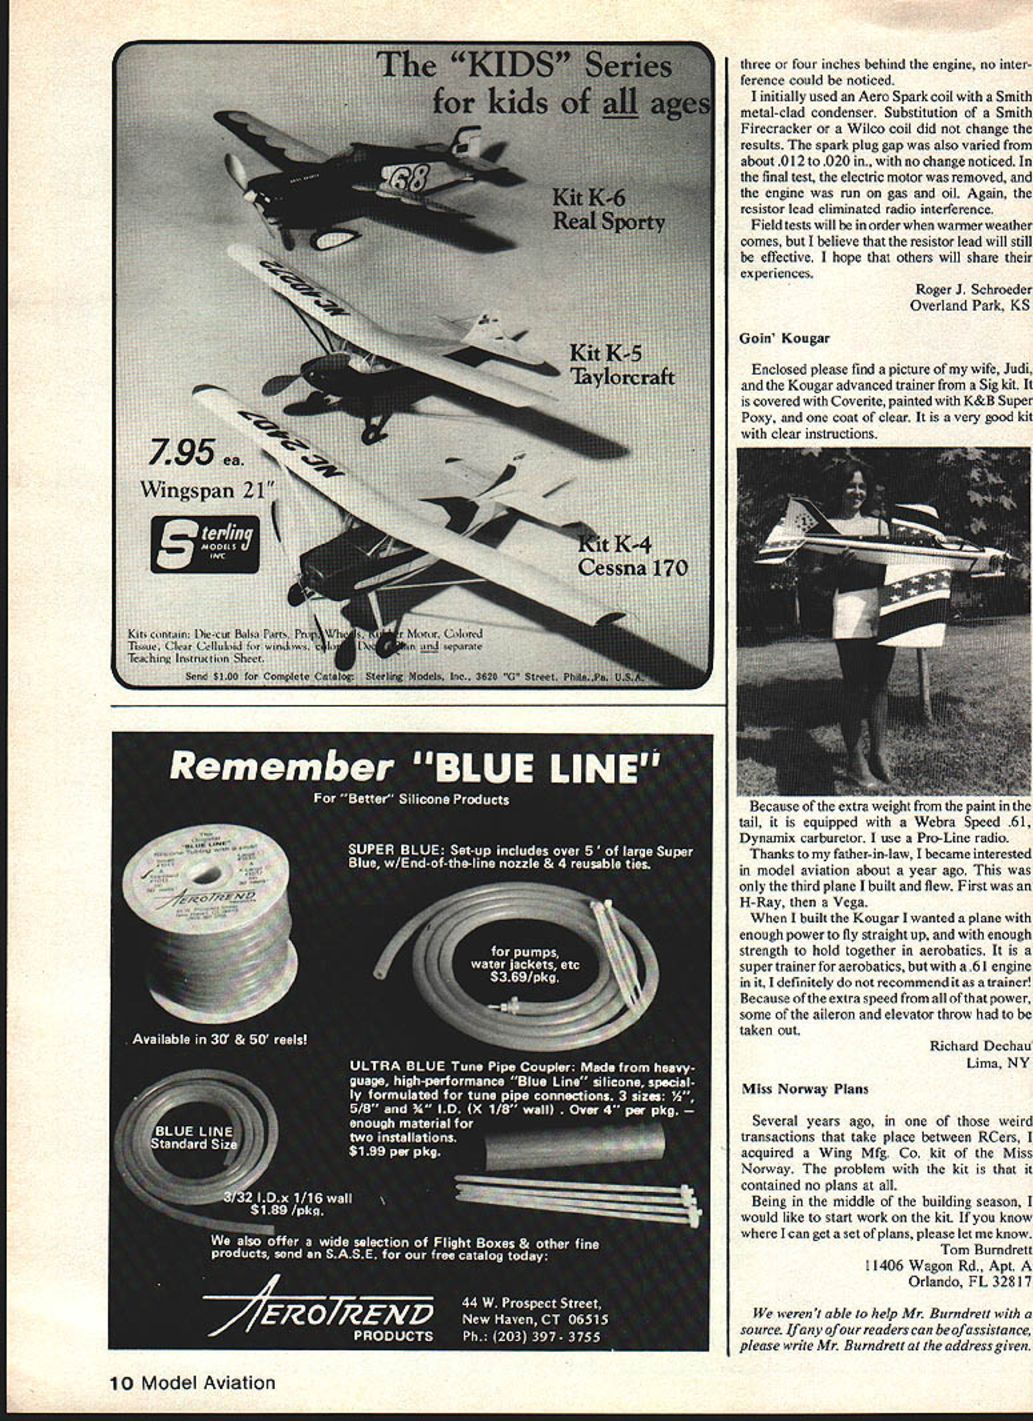
Enclosed please find a picture of my wife, Judi, and the Kougar advanced trainer from a Sig kit. It is covered with Coverite, painted with K&B Super Epoxy, and one coat of clear. It is a very good kit with clear instructions.
Because of the extra weight from the paint in the tail, it is equipped with a Webra Speed .61, Dynamix carburetor. I use a Pro-Line radio.
Thanks to my father-in-law, I became interested in model aviation about a year ago. This was only the third plane I built and flew. First was an H-Ray, then a Vega.
When I built the Kougar I wanted a plane with enough power to fly straight up, and with enough strength to hold together in aerobatics. It is a super trainer for aerobatics, but with a .61 engine in it, I definitely do not recommend it as a trainer! Because of the extra speed from all that power, some of the aileron and elevator throw had to be reduced.
Richard Dechant Lima, NY
Miss Norway Plans
Several years ago, in one of those weird transactions that take place between R/Cers, I acquired a Wing Mfg. Co. kit of the Miss Norway. The problem with the kit is that it contained no plans at all.
Being in the middle of the building season, I would like to start work on the kit. If you know where I can get a set of plans, please let me know.
Tom Bumdrett 11406 Wagon Rd., Apt. A Orlando, FL 32817
We weren't able to help Mr. Bumdrett with a source. If any of our readers can be of assistance, please write Mr. Bumdrett at the address given.
Transcribed from original scans by AI. Minor OCR errors may remain.

