
Letters to the Editor
All letters will be carefully considered; those of general interest will be used. Send to Model Aviation, 1810 Samuel Morse Dr., Reston, VA 22090.
Watch the Grain!
The April issue has an article on covering model aircraft with silk. In general it's a pretty good article. It does, however, have an extremely important omission as well as some inaccuracies.
The omission is that the article does not state the direction for laying the grain of the silk (silk has a grain the same as Silkspan). Like Silkspan, silk should be laid down spanwise, the grain running the length of the wing. On a fuselage, or any other rounded surface, the grain should go at 90 degrees to the curve or circumference.
The article said that the way to get rid of "blushing" was with additional coats of model dope. The only way I have found to clear blushing is to go over the blush with dope thinner. Since blushing is caused by trapped moisture, going over the blush with thinner softens the finish so the moisture can escape. This method works 100% of the time. To add more dope just more securely traps the moisture.
The text also said to only sand the framework, or other balsa surfaces, one time after doping the wood. I have found that at least three coats of clear dope are required, followed by sanding with a fine grit, before the wood nap stops rising. I then give all wood surfaces at least two more coats of clear dope, usually more, until the whole structure has a shiny surface.
When applying silk to the airplane, I treat it just like Silkspan. I use clear dope for the adhesive, reapplying it as necessary until it stays moist long enough to lay down and stretch the wet covering material. The only exception to putting on wet covering material is when an undercambered wing is being covered on the bottom side.
When trying to find the grain of silk, all you have to do is look at the side of the panel; there you will find a narrow, dense part called the selvedge. The selvedge runs in the direction of the grain. (If you can't find the selvedge, show the silk to your wife or girlfriend if she knows fabrics; if not, go to your aunt, mother, or grandmother.)
The rest of the article was pretty good—even to an old-timer like myself. I date back to stick-and-tissue models by Comet, Megow, and Cleveland (while Cleveland was still kitting airplanes before WWII).
Craig M. Mecum Philadelphia, PA
Editor's reply
Craig certainly has a good point about grain direction. While it's possible to cover wing panels with the grain chordwise, doing so will induce much sagging between open ribs and reduce rigidity in the spanwise direction.
We haven't encountered a problem, in our experience, in covering the bottom of an undercambered wing with wet silk, but as a safeguard the bottom is always covered first. However, we never favor pulling the silk taut while it is wet; whatever tightness can be obtained with the wet silk over the predoped (but dry) edges is adequate.
Our method of adhering the silk is to brush clear dope on the wet silk at the framework (a small area at a time), and lightly rub the moist dope through the silk pores with a finger. The same procedure is used for the wing top as well as the undercamber. For the undercamber covering (applied first), we also apply a thin strip of dope from the top side at the rib/silk juncture (both sides of each rib) as further assurance of adhesion. The silk is continually rewetted during this process so that it doesn't begin to shrink before the adhesion has become sufficiently dry to withstand the stress.
Blushing? The best avoidance, we think, is to not dope on high-humidity days or in high-humidity areas (such as a basement). One other trick is to pull a thread in the silk at each point the silk is to be cut for a covering panel. The pulled thread identifies the line where the silk can be cut to form a perfect rectangle, and that is an important aid in applying the silk with perfectly straight threads in both directions.
---
Prop Nuts
At our recent board meeting, the board of the Monmouth Model Airplane Club (New Jersey) asked me to write a letter to the editor about the following safety issue.
The AMA Safety Code Section 39 RC Pattern, Rules 6.5 states: "All planes must have rounded prop spinners or blunt faced hubs such that no propeller shaft protrudes. Rounded devices shall have a radius of point not less than 3mm."
Model Aviation violated this rule in the articles "Under-Budget RC" by E. H. Schoenberg and "RC Ryan B-5 Brougham" by Peter Miller. Please correct these safety violations by bringing the correct rules to the attention of your readers.
Joseph E. Wilkes, Sec. Monmouth Model Airplane Club Red Bank, NJ
Editor's reply
Many years ago the AMA liability insurance was based entirely upon compliance with the AMA rule book for coverage to be in effect. Then, the key was more about what you flew than how you flew. As sport flying proliferated, it became more and more difficult to use contest conditions (the rule book) for non-competition situations—so-called sport flying.
Presently, the determinant for AMA liability insurance is the Official AMA Safety Code (as printed on page 133 of the 1982–83 Official Model Aircraft Regulations, plus subsequent amendments). The Safety Code is more concerned with how you fly than what you fly, so it can readily be used for both non-contest and contest situations. In addition, it is a fairly short document, so that members can easily become familiar with its points and follow them.
While it is a good idea to have rounded spinners and rounded prop nuts on all models (required for RC Pattern and other competitions with this rule), there isn't such a requirement for the AMA liability insurance to be in effect.
---
Pen Pal Wanted
I would like to have a pen pal: a boy about 11 years old who is experienced in Control Line and who can give helpful advice to a beginner.
Eric Mueller Leuchtenberger Kirchweg 55a 4,000 Dusseldorf 30 West Germany
---
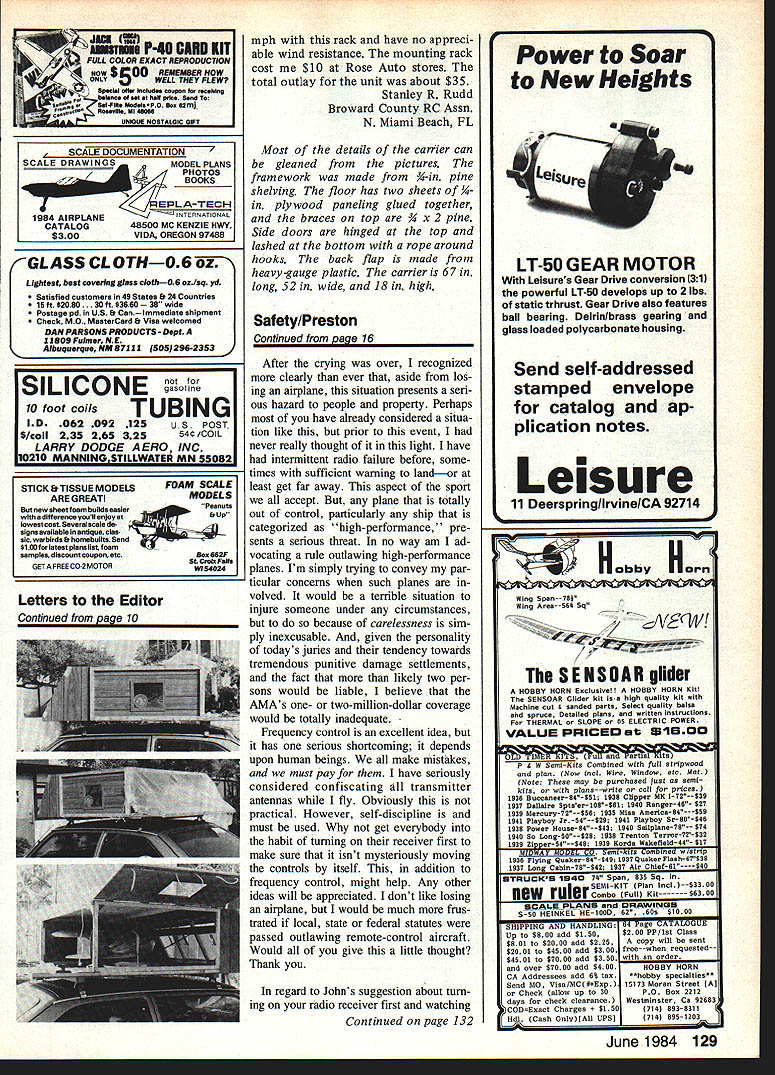
Roof Rack Carrier
Enclosed are several photographs of a roof rack that I designed and built for my R/C scale aircraft. The 60-inch-span Waco YMF-3 (kit by Pica Products) is too large to fit inside my car, and I don't want to disassemble it for transporting to the flying field.
My car is a two-door Mazda, and I find that I can travel at speeds up to 55 mph.
Transcribed from original scans by AI. Minor OCR errors may remain.

