
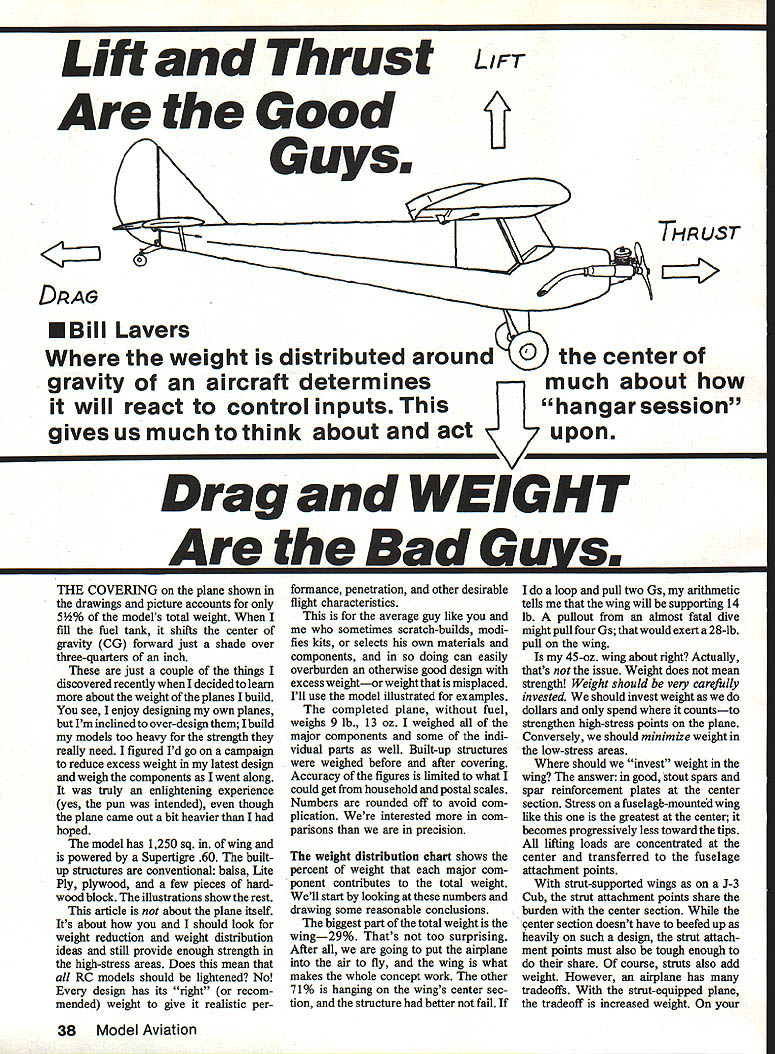

Lift and Thrust Are the Good Guys.
Bill Lavers
Drag and WEIGHT Are the Bad Guys.
Where the weight is distributed around the center of gravity of an aircraft determines much about how it will react to control inputs. This gives us much to think about and act upon.
The covering on the plane shown in the drawings and picture accounts for only 5½% of the model's total weight. When I fill the fuel tank, it shifts the center of gravity (CG) forward just a shade over three-quarters of an inch.
These are just a couple of the things I discovered recently when I decided to learn more about the weight of the planes I build. You see, I enjoy designing my own planes, but I'm inclined to over-design them; I build my models too heavy for the strength they really need. I figured I'd go on a campaign to reduce excess weight in my latest design and weigh the components as I went along. It was truly an enlightening experience (yes, the pun was intended), even though the plane came out a bit heavier than I had hoped.
The model has 1,250 sq. in. of wing and is powered by a Supertigre .60. The built-up structures are conventional: balsa, Lite Ply, plywood, and a few pieces of hardwood block. The illustrations show the rest.
This article is not about the plane itself. It's about how you and I should look for weight reduction and weight distribution ideas and still provide enough strength in the high-stress areas. Does this mean that all RC models should be lightened? No! Every design has its "right" (or recommended) weight to give it realistic performance, penetration, and other desirable flight characteristics.
This is for the average guy like you and me who sometimes scratch-builds, modifies kits, or selects his own materials and components, and in so doing can easily overburden an otherwise good design with excess weight—or weight that is misplaced. I'll use the model illustrated for examples.
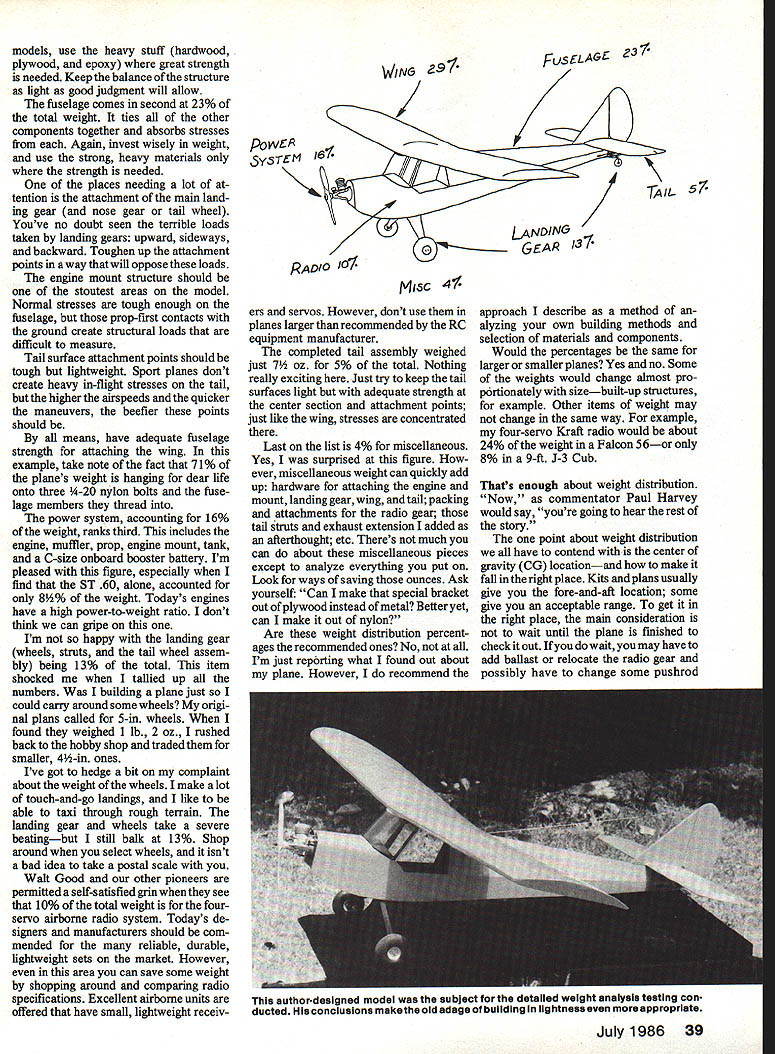
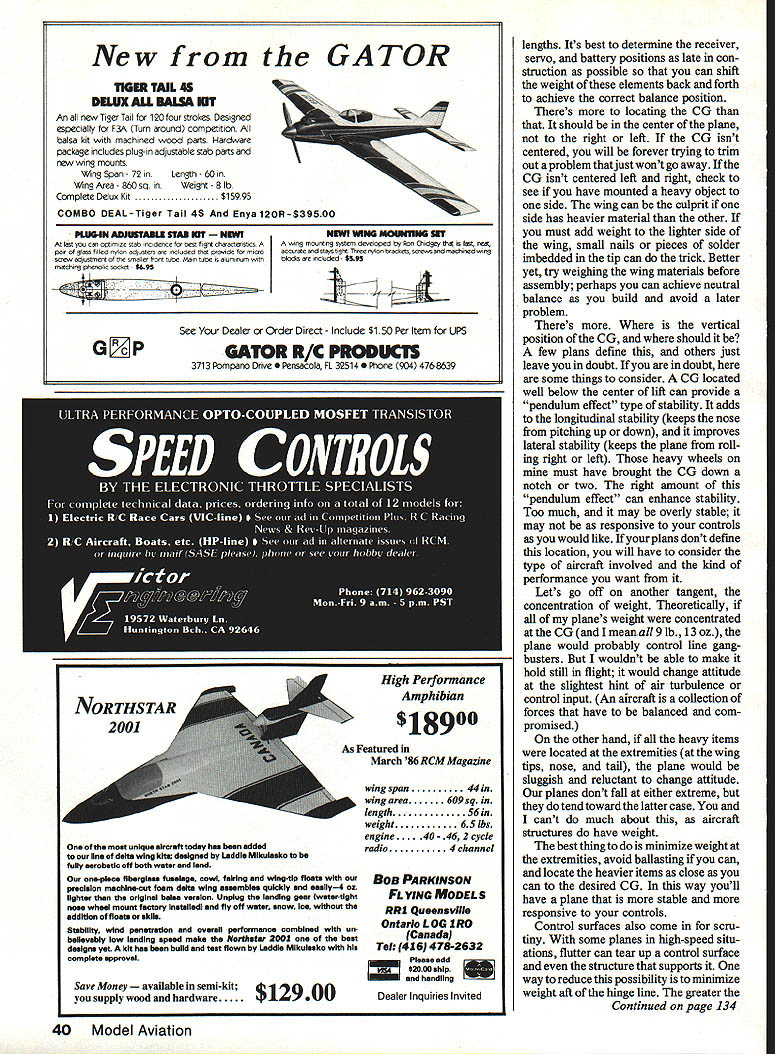
The completed plane, without fuel, weighs 9 lb., 13 oz. I weighed all of the major components and some of the individual parts as well. Built-up structures were weighed before and after covering. Accuracy of the figures is limited to what I could get from household and postal scales. Numbers are rounded off to avoid complication. We're interested more in comparisons than we are in precision.
The weight distribution chart shows the percent of weight that each major component contributes to the total weight. We'll start by looking at these numbers and drawing some reasonable conclusions.
The biggest part of the total weight is the wing—29%. That's not too surprising. After all, we are going to put the airplane into the air to fly, and the wing is what makes the whole concept work. The other 71% is hanging on the wing's center section, and the structure had better not fail. If I do a loop and pull two Gs, my arithmetic tells me that the wing will be supporting 14 lb. A pullout from an almost fatal dive might pull four Gs; that would exert a 28-lb. pull on the wing.
Is my 45-oz. wing about right? Actually, that's not the issue. Weight does not mean strength! Weight should be very carefully invested—weight should be counted as dollars and only spent where it counts—to strengthen high-stress points on the plane. Conversely, we should minimize weight in the low-stress areas.
Where should we "invest" weight in the wing? The answer: in good, stout spars and spar reinforcement plates at the center section. Stress on a fuselage-mounted wing like this one is the greatest at the center; it becomes progressively less toward the tips. All lifting loads are concentrated at the center and are transferred to the fuselage attachment points.
With strut-supported wings as on a J-3 Cub, the strut attachment points share the burden with the center section. While the center section doesn't have to be beefed up as heavily on such a design, the strut attachment points must also be tough enough to do their share. Of course, struts also add weight. However, an airplane has many tradeoffs. With the strut-equipped plane, the tradeoff is increased weight. On your models, use the heavy stuff (hardwood, plywood, and epoxy) where great strength is needed. Keep the balance of the structure as light as good judgment will allow.
The fuselage comes in second at 23% of the total weight. It ties all of the other components together and absorbs stresses from each. Again, invest wisely in weight, and use the strong, heavy materials only where the strength is needed.
One of the places needing a lot of attention is the attachment of the main landing gear (and nose gear or tail wheel). You've no doubt seen the terrible loads taken by landing gears: upward, sideways, and backward. Toughen up the attachment points in a way that will oppose these loads.
The engine-mount structure should be one of the stoutest areas on the model. Normal stresses are tough enough on the fuselage, but those prop-first contacts with the ground create structural loads that are difficult to measure.
Tail surface attachment points should be tough but lightweight. Sport planes don't create heavy in-flight stresses on the tail, but the higher the airspeeds and the quicker the maneuvers, the beefier these points should be.
By all means, have adequate fuselage strength for attaching the wing. In this example, take note of the fact that 71% of the plane's weight is hanging for dear life onto three 1/4-20 nylon bolts and the fuselage members they thread into.
The power system, accounting for 16% of the weight, ranks third. This includes the engine, muffler, prop, engine mount, tank, and a C-size onboard booster battery. I'm pleased with this figure, especially when I find that the ST .60, alone, accounted for only 8½% of the weight. Today's engines have a high power-to-weight ratio. I don't think we can gripe on this one.
I'm not so happy with the landing gear (wheels, struts, and the tail wheel assembly) being 13% of the total. This item shocked me when I tallied up all the numbers. Was I building a plane just so I could carry around some wheels? My original plans called for 5-in. wheels. When I found they weighed 1 lb., 2 oz., I rushed back to the hobby shop and traded them for smaller, 4½-in. ones.
I've got to hedge a bit on my complaint about the weight of the wheels. I make a lot of touch-and-go landings, and I like to be able to taxi through rough terrain. The landing gear and wheels take a severe beating—but I still balk at 13%. Shop around when you select wheels, and it isn't a bad idea to take a postal scale with you.
Walt Good and our other pioneers are permitted a self-satisfied grin when they see that 10% of the total weight is for the four-servo airborne radio system. Today's designers and manufacturers should be commended for the many reliable, durable, lightweight sets on the market. However, even in this area you can save some weight by shopping around and comparing radio specifications. Excellent airborne units are offered that have small, lightweight receivers and servos. However, don't use them in planes larger than recommended by the RC equipment manufacturer.
The completed tail assembly weighed just 7½ oz., or 5% of the total. Nothing really exciting here. Just try to keep the tail surfaces light but with adequate strength at the center section and attachment points; just like the wing, stresses are concentrated there.
Last on the list is 4% for miscellaneous. Yes, I was surprised at this figure. However, miscellaneous weight can quickly add up: hardware for attaching the engine and mount, landing gear, wing, and tail; packing and attachments for the radio gear; those extra struts and exhaust-retention items I added as an afterthought; etc. There's not much you can do about these miscellaneous pieces except to analyze everything you put on. Look for ways of saving those ounces. Ask yourself: "Can I make that special bracket out of plywood instead of metal? Better yet, can I make it out of nylon?"
Are these weight distribution percentages the recommended ones? No, not at all. I'm just reporting what I found out about my plane. However, I do recommend the approach I describe as a method of analyzing your own building methods and selection of materials and components.
Would the percentages be the same for larger or smaller planes? Yes and no. Some of the weights would change almost proportionately with size—built-up structures, for example. Other items of weight may not change in the same way. For example, my four-servo Kraft radio would be about 24% of the weight in a Falcon 56—or only 8% in a 9-ft. J-3 Cub.
Weight distribution (major components)
- Wing: 29% (wing weight about 45 oz.)
- Fuselage: 23%
- Power system (engine, muffler, prop, mount, tank, onboard battery): 16%
- Landing gear (wheels, struts, tail wheel assembly): 13%
- Radio system (four servos, receiver, related gear): 10%
- Tail assembly: 5% (about 7½ oz.)
- Covering: 5½% (9 oz. total — 5 oz. wing, 2½ oz. fuselage, 1½ oz. tail)
- Miscellaneous: 4%
That's enough about weight distribution. "Now," as commentator Paul Harvey would say, "you're going to hear the rest of the story."
The one point about weight distribution we all have to contend with is the center of gravity (CG) location—and how to make it fall in the right place. Kits and plans usually give you the fore-and-aft location; some give you an acceptable range. To get it in the right place, the main consideration is not to wait until the plane is finished to check it out. If you do wait, you may have to add ballast or relocate the radio gear and possibly have to change some pushrod lengths. It's best to determine the receiver, servo, and battery positions as late in construction as possible so that you can shift the weight of these elements back and forth to achieve the correct balance position.
There's more to locating the CG than that. It should be in the center of the plane, not to the right or left. If the CG isn't centered, you will be forever trying to trim out a problem that just won't go away. If the CG isn't centered left and right, check to see if you have mounted a heavy object to one side. The wing can be the culprit if one side has heavier material than the other. If you must add weight to the lighter side of the wing, small nails or pieces of solder imbedded in the tip can do the trick. Better yet, try weighing the wing materials before assembly; perhaps you can achieve neutral balance as you build and avoid a later problem.
There's more. Where is the vertical position of the CG, and where should it be? A few plans define this, and others just leave you in doubt. If you are in doubt, here are some things to consider. A CG located well below the center of lift can provide a "pendulum effect" type of stability. It adds to the longitudinal stability (keeps the nose from pitching up or down), and it improves lateral stability (keeps the plane from rolling right or left). Those heavy wheels on mine must have brought the CG down a notch or two. The right amount of this "pendulum effect" can enhance stability. Too much, and it may be overly stable; it may not be as responsive to your controls as you would like. If your plans don't define this location, you will have to consider the type of aircraft involved and the kind of performance you want from it.
Concentration of weight
Theoretically, if all of my plane's weight were concentrated at the CG (and I mean all 9 lb., 13 oz.), the plane would probably control like gangbusters. But I wouldn't be able to make it hold still in flight; it would change attitude at the slightest hint of air turbulence or control input. (An aircraft is a collection of forces that have to be balanced and compromised.)
On the other hand, if all the heavy items were located at the extremities (at the wing tips, nose, and tail), the plane would be sluggish and reluctant to change attitude. Our planes don't fall at either extreme, but they do tend toward the latter case. You and I can't do much about this, as aircraft structures do have weight.
The best thing to do is minimize weight at the extremities, avoid ballasting if you can, and locate the heavier items as close as you can to the desired CG. In this way you'll have a plane that is more stable and more responsive to your controls.
Control surfaces and material selection
Control surfaces also come in for scrutiny. With some planes in high-speed situations, flutter can tear up a control surface and even the structure that supports it. One way to reduce this possibility is to minimize weight aft of the hinge line. The greater the weight behind the hinges, the greater the problem becomes. Ailerons seem to be especially susceptible to this. Invest the tough, heavy materials in the areas that take the control-surface stresses; the hinge points and the control-horn mountings. Keep the rest of the structure as light as possible. (Static and dynamic balancing are topics for another time.)
In selecting wood for construction, generally speaking the high-density wood is tougher and heavier; low-density wood is weaker and lighter. Select wood for its purpose regarding strength and weight. For those ailerons mentioned before, I prefer high-density wood in the sub-spar that mounts the hinges and low-density for the trailing edge to reduce weight aft of the hinge line. Analyze the structure you're building, and take the time to select proper materials.
Covering and extras
Let's talk about the covering. You may use a Stits' method, but I happen to be a Monokote man. When covering planes in the past, I always felt that this type of covering added an undue amount of weight. But I was pleased to find that the covering accounted for only 5½% of the total weight. It came to 9 oz.—5 for the wing, 2½ for the fuselage, and 1½ for the tail. Considering Monokote's toughness, the great finish, and the considerable amount of strength it adds to built-up structures, I think it is a terrific investment in weight (in fact, a bargain). I haven't tried everything, so shop around; check manufacturers' spec sheets; be weight conscious as well as color conscious.
How about those nice-to-have but don't-really-need items that some of our planes hang around? On this plane I have an exhaust-pipe extension to keep the plane a little cleaner and a C-size onboard booster Ni-Cd for convenience. They're nice to have, but they add 3½ oz. to this plane.
I may have gone overboard on this one. On my first couple of planes, I used tubular nylon pushrods, but I was soon convinced that expansion and contraction from temperature changes was more than I wanted to put up with. Since then I've used hardwood dowel for pushrods, with my logic telling me that the larger the plane, the larger the dowel should be. Too late to correct, I now estimate that my four-dowel pushrods (1/16-in. dia. with threaded rod ends) weigh a little more than 3/4 oz. How it adds up. I'll have to rethink that one.
One last point, and we'd best close the hangar doors. Design your own planes, do you think? You've got some neat ideas? Well, I think that huge windsled on mine is neat. It weighs about 2 oz. Doesn't sound bad until you call it an eighth of a pound—and that's weight—and that's the name of the game.
See you Sunday.
Transcribed from original scans by AI. Minor OCR errors may remain.

