

Lippisch P-13
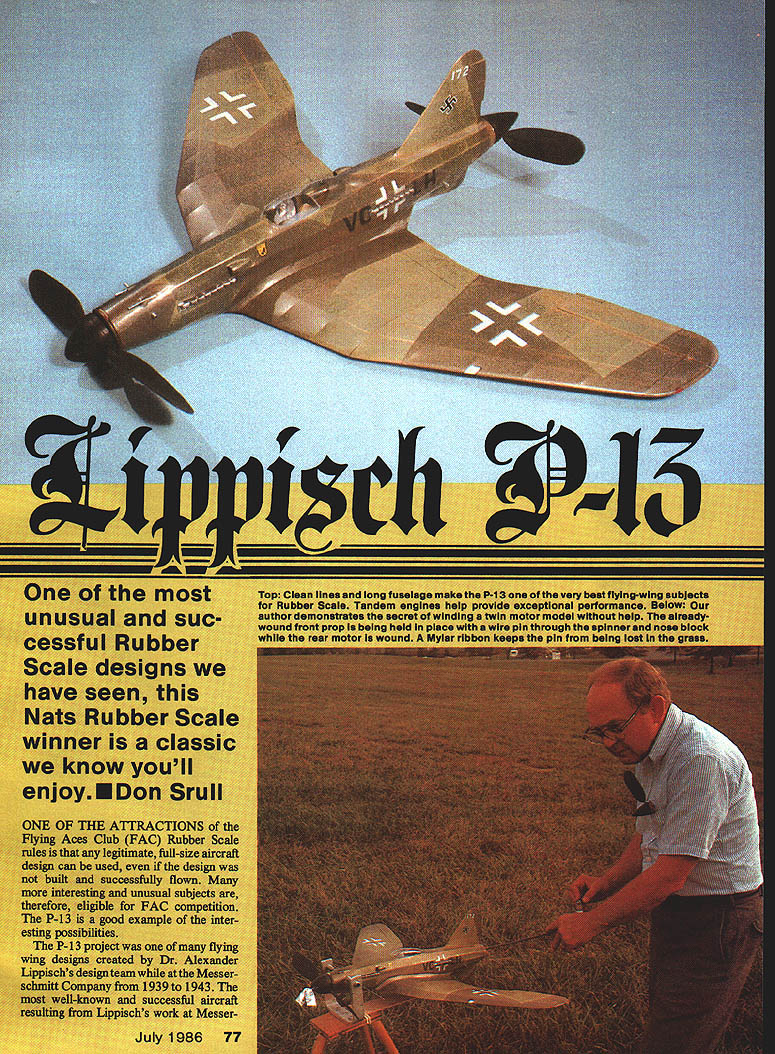
One of the most unusual and successful Rubber Scale designs we have seen, this Nats Rubber Scale winner is a classic we know you'll enjoy. — Don Srull
One of the attractions of the Flying Aces Club (FAC) Rubber Scale rules is that any legitimate, full-size aircraft design can be used, even if the design was not built and successfully flown. Many interesting and unusual subjects are, therefore, eligible for FAC competition. The P-13 is a good example.
The P-13 project was one of many flying-wing designs created by Dr. Alexander Lippisch's design team while at the Messerschmitt Company from 1939 to 1943. The most well-known and successful aircraft resulting from Lippisch's work at Messerschmitt was the rocket-powered Me 163 Komet. The P-13 design was the work of Josef Hubert, one of Lippisch's co-workers, in November 1942. It was intended to be a single-place high-speed bomber with a wingspan of 12.8 meters (42 feet) and powered by two 1,475-hp Daimler-Benz 605b engines in tandem. The P-13 apparently never got beyond the preliminary design stage. Hubert's original layout drawings for the P-13 are reproduced in Dr. Lippisch's book The Delta Wing: History and Development.
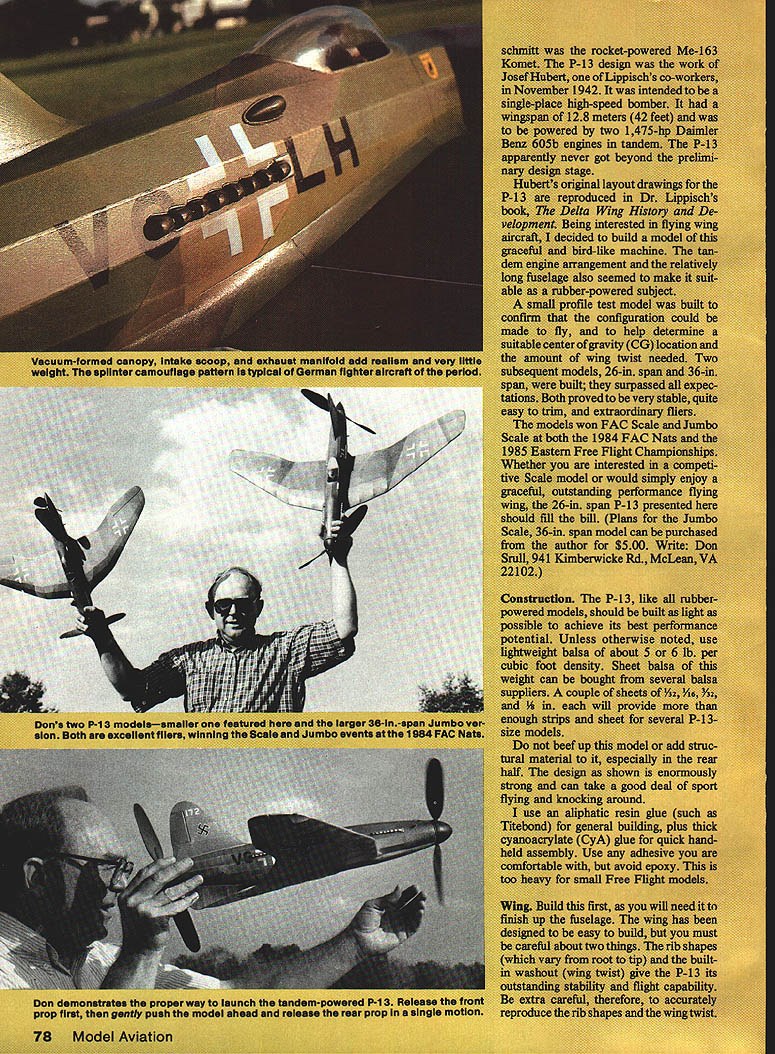
Being interested in flying-wing aircraft, I decided to build a model of this graceful, bird-like machine. The tandem engine arrangement and the relatively long fuselage also seemed suitable for a rubber-powered subject. A small profile test model confirmed the configuration could be made to fly and helped determine a suitable center-of-gravity (CG) location and the amount of wing twist needed. Two subsequent models—26 in. span and 36 in. span—were built and surpassed expectations: both proved very stable, easy to trim, and extraordinary fliers. The models won FAC Scale and Jumbo Scale at the 1984 FAC Nats and the 1985 Eastern Free Flight Championships.
Whether you are interested in a competitive Scale model or would simply enjoy a graceful, outstanding performance flying wing, the 26-in. span P-13 presented here should fill the bill. Plans for the Jumbo Scale 36-in. span model can be purchased from the author for $5.00. Write: Don Srull, 941 Kimberwicke Rd., McLean, VA 22102.
Construction
The P-13, like all rubber-powered models, should be built as light as possible to achieve its best performance. Unless otherwise noted, use lightweight balsa of about 5 or 6 lb/ft³ density. A couple of sheets each of 1/32 in., 1/16 in., 3/32 in., and 1/8 in. will provide more than enough strips and sheet for several P-13-size models.
Do not beef up this model or add structural material, especially in the rear half. The design as shown is enormously strong and can take a good deal of sport flying and knocking around.
Glue and adhesives:
- Use an aliphatic resin glue (such as Titebond) for general building.
- Use thick cyanoacrylate (CA) for quick hand-held assembly.
- Avoid epoxy for small free-flight models — it is too heavy.
Construction tips:
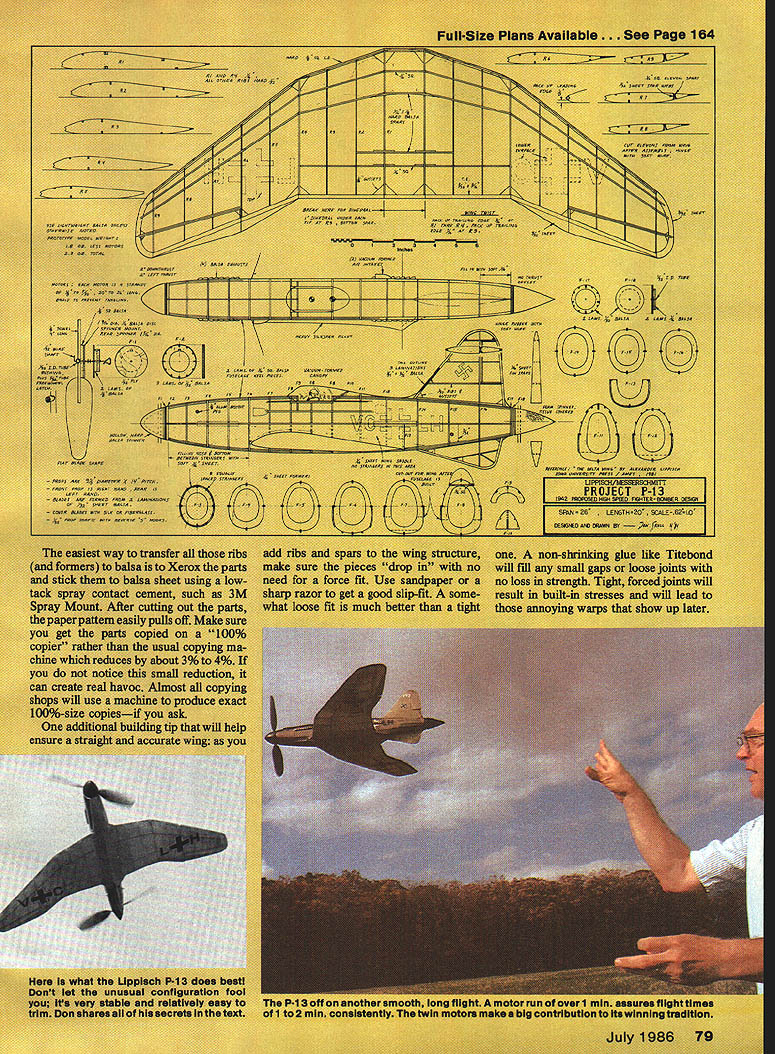
- The easiest way to transfer ribs and formers to balsa is to Xerox the parts and stick them to balsa sheet using a low-tack spray contact cement (e.g., 3M Spray Mount). After cutting out the parts, the paper pattern easily pulls off.
- Make sure you get copies at 100% size. Many copiers reduce by 3–4%; ask the shop to use a 100%-size machine.
- As you add ribs and spars to the wing structure, ensure the pieces "drop in" with no force fit. Use sandpaper or a sharp razor to get a slip-fit. A somewhat loose fit is better than a tight one. Non-shrinking glue like Titebond will fill small gaps without loss of strength. Forced joints can introduce stresses and lead to warps.
Wing
Build the wing first, as you will need it to finish the fuselage. The rib shapes (which vary from root to tip) and the built-in washout (wing twist) give the P-13 its outstanding stability and flight capability. Be extra careful to accurately reproduce the rib shapes and wing twist.
Wing building sequence:
- Pack up the leading edge (LE) and trailing edge (TE) as shown on the plans and add the ribs.
- Note that the outboard TE is jigged up more at the tip than at the root. Use a triangular wedge of 1/8-in. sheet balsa to hold this washout accurately while building.
- Use fairly hard, straight pieces of balsa for the LE and spars.
- After the upper spars are added to the outboard panels, put in the dihedral and complete the center-section spars.
- Finally add the lower spars and cut the ailerons free.
A somewhat loose slip-fit for ribs and spars reduces built-in stress and the chance of warps. Make sure there are no warps in the finished wing.
Fuselage
The fuselage is built by the usual half-shell method. The upper and lower vertical fins are built as part of the fuselage. After adding the 1/16-in. square stringers, fill in the nose section with very soft 1/16-in. sheet. Reinforce the motor peg positions with hard 3/32-in. sheet.
To facilitate covering where the fins blend into the fuselage, add small fillets of soft 1/32-in. sheet from the bottom fin ribs to the adjacent fuselage stringers. Small strips of bond paper are a suitable substitute. Carefully carve and sand the wing saddle to get a good, accurate fit to the wing.
Propeller assemblies
To eliminate torque problems, the P-13 uses counter-rotating propellers: a conventional right-hand prop in front and a left-hand prop in the rear. Both may be made by molding balsa blades over a gallon jug.
Prop construction:
- Blades are laminated from two layers of firm 3/32-in. sheet. Offset the grain of the two laminations by about 10° so the blades are stiffer and less likely to split.
- Propeller hubs are made from lengths of 1/8-in. dowel.
- Carved props look nicer. For carved props, lay out blocks to yield a 9-1/2-in. diameter and 14-in. pitch.
Nose assemblies and spinners:
- Front nose block is thick and sturdy for thrust adjustments; the front spinner should be laminated from hard balsa.
- Rear spinner is carved from lightweight foam and covered with tissue and white glue.
- Foam spinners can be turned in a drill by gluing a 1/8-in. dowel into the foam block, chucking it in a 1/4-in. drill, and shaping with a Dremel sanding drum at high speed. Wear a dust mask when shaping foam.
Set-up notes:
- The front nose block should have 2° down and 2° left thrust built in (left is correct).
- Use reverse "S" hooks on both the front and rear prop shafts.
Covering and finishing
- Sand the framework.
- Cover the wing and fuselage with lightweight tissue.
- Use either nitrate dope diluted with white glue or diluted white glue alone for attaching the tissue.
- Shrink the wing covering by brushing rubbing alcohol on half the wing at a time, pinning that panel to your building board until dry. Shrinking in this manner minimizes warping.
- Brush on three or four coats of thinned, low-shrink dope such as Sig Lite-Coat.
- Apply several coats of sanding sealer to the prop assemblies and sand until smooth.
- Glue on the wing and cut out wing fillets. For heavy silkspan, use wet silkspan with white glue for adhesion — the job is much easier that way.
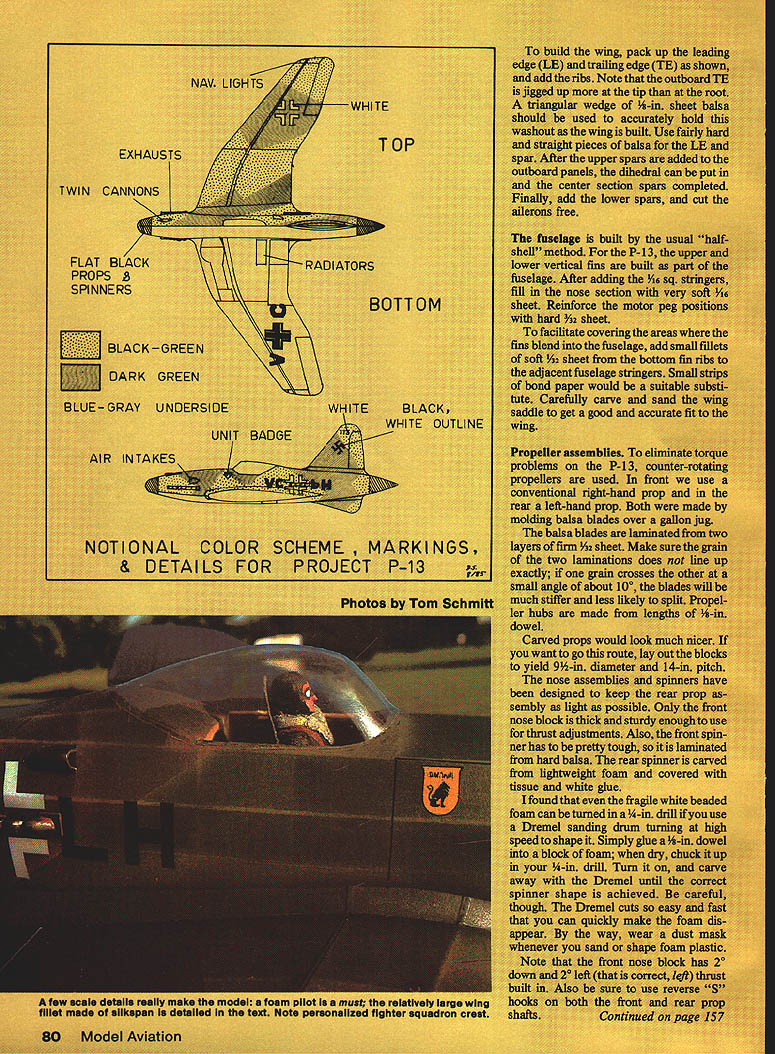
- Paint lightly with an airbrush. Since the P-13 never entered active service, any post-1942 German attack aircraft paint scheme is acceptable. A splinter camouflage pattern and fuselage/wing markings modeled after the Dornier 335 (the only tandem-engine German WWII combat aircraft) work well. Keep paint coats light.
- Model exhausts, air intakes, armament and other surface details after the Do 335.
- Vacuum-form or draw-form a canopy and attach it after adding an appropriate foam pilot figure and instrument panel.
Flying
Motors and preparation:
- Make up two test motors, each a 40-in. loop of 1/8-in. rubber. When folded in half these become four strands 20 in. long.
- Braid the motor to take up slack and prevent tangling inside the fuselage. Lubricate the rubber and put in about 100 turns, then fold the motor in half, smooth out lumps, and install.
- Take up any slack before installing the braided motor.
Pre-flight checks:
- Ensure there are no warps in the wing.
- Add ballast as necessary to get the CG within the range shown on the plans.
- Add 1/16–1/8 in. of left rudder (small left rudder).
- Try hand glides over a soft, grassy area. The model may not look impressive on hand tests because of the enormous drag of the two freewheeling props.
- Use hinged ailerons; elevator and roll trim will achieve a rather fast descending glide with just a hint of left turn.
Power testing and trimming:
- Start power tests with about 150 turns. Aim for a very shallow climb slightly to the left, using rudder and a little aileron if necessary.
- At around 300 turns and above, use only the front prop thrust adjustments to achieve a smooth, steady climb to the left. Under higher power the P-13 will tend to turn right — not due to torque but due to the spiraling prop wash from the front prop — so you may need a little more left thrust as power increases.
- If your model weighs 1-1/2 oz. or less without rubber, it should do over 1 minute on the test motors.
- For high-climbing, spectacular flights, use longer motors with greater cross sections. Don Srull used four strands of 5/32-in. FAI rubber, 26 in. long. Be sure to braid these longer motors to remove slack and prevent tangling.
- Stretch-winding should yield 1-1/2 to 2-minute flights of a very attractive rubber model.
Good luck with your P-13!
Transcribed from original scans by AI. Minor OCR errors may remain.

