
Little Devil
By Mike and Al Lidberg
Overview
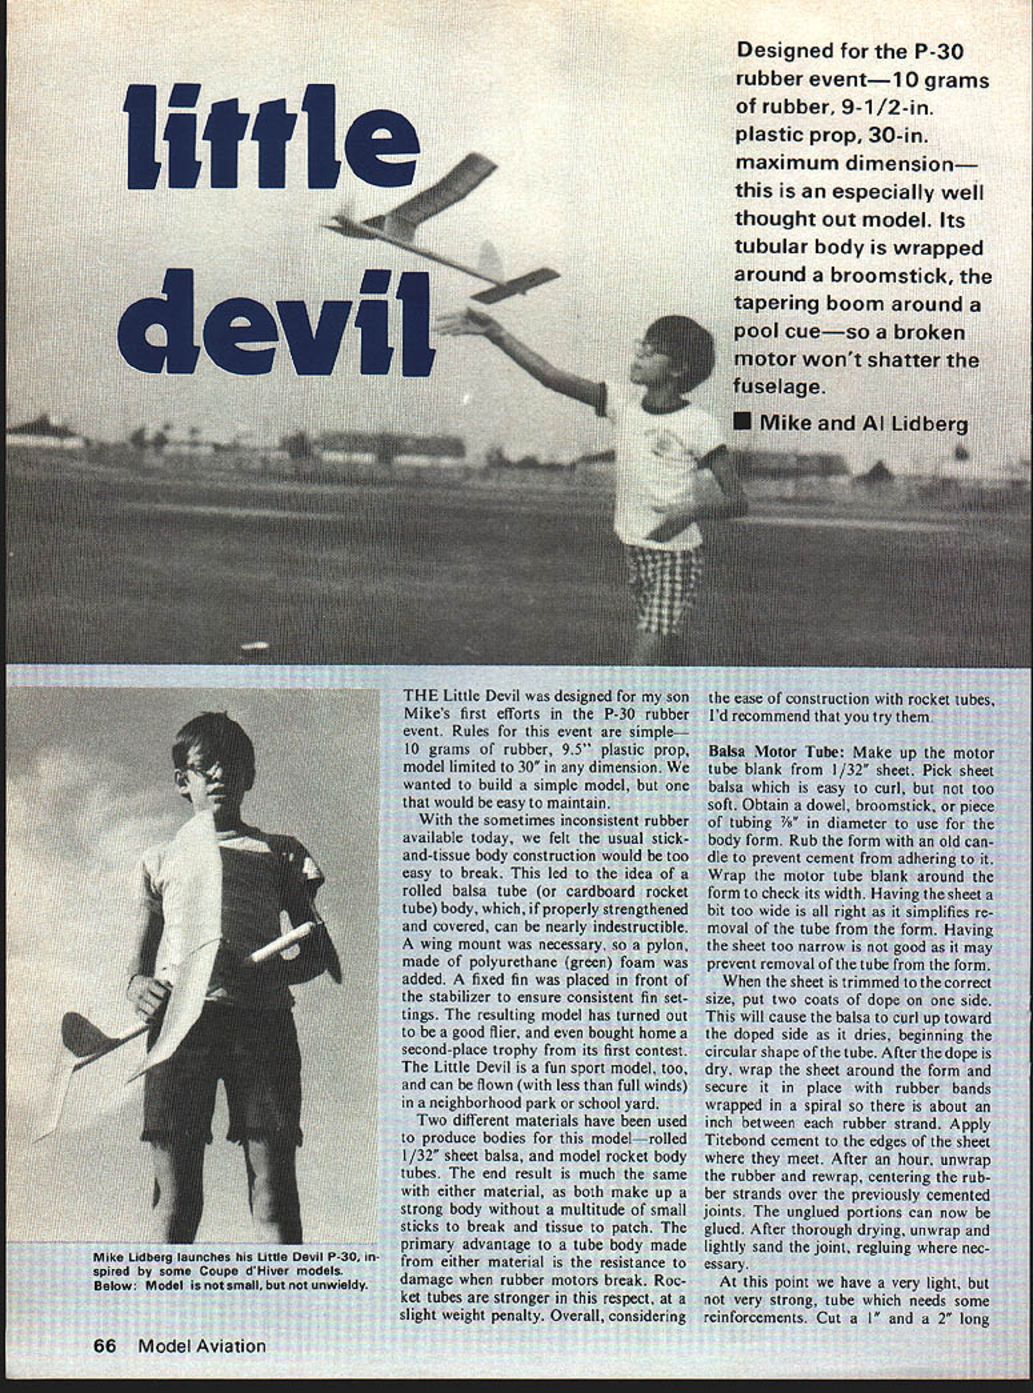
Designed for the P-30 rubber event (10 grams of rubber, 9-1/2-in. plastic prop, 30-in. maximum dimension), the Little Devil is a simple, durable, and well-thought-out model. Its tubular body is wrapped around a broomstick and the tapering tail cone around a pool cue so a broken motor won't shatter the fuselage. The design uses a pylon-mounted wing and a fixed fin ahead of the stabilizer to ensure consistent fin settings. The model is a good contest flier and a fun sport model that can be flown in parks or schoolyards in moderate winds.
Two body materials are used successfully: rolled 1/32" sheet balsa and 1" diameter model rocket tubes (Estes or Centuri). Both give a strong, damage-resistant body; rocket tubes are slightly heavier but easier to build with and more resistant to motor bursts.
Materials and tools (high level)
- 1/32" and 1/16" sheet balsa
- 1" diameter motor tube material (balsa or Estes/Centuri rocket tube, 18" long)
- Green polyurethane foam (for pylon) or balsa parts for built-up pylon
- Pool cue (for shaping tail cone) or equivalent form
- 1/4" aluminum tube (motor peg)
- 1/16" inside-diameter brass tube and small washer (prop bearing)
- 1/16" wire shaft for prop
- R-95 (P-30) plastic prop, 9-1/2-in.
- Dope (nitrate or equivalent), film glue, Titebond, soldering equipment
- Bamboo sticks or half-round toothpicks for wing hold-down pegs
- Japanese tissue, Sig Lite-Cote or plasticized dope, castor oil (for doping)
- Rubber (10-gram motor, see Motor section)
- Misc: sandpaper, files, clothes pin, drill, candle (release), rubber bands
Motor tube construction
Balsa motor tube
- Select 1/32" sheet balsa that curls easily but is not too soft.
- Obtain a 3/8" diameter form (dowel, broomstick, or tubing) and rub it with candle wax to prevent glue adhesion.
- Wrap the sheet around the form to check width. It's better to be slightly wide than too narrow.
- Put two coats of dope on one side of the sheet; it will curl toward the doped side as it dries.
- Wrap the doped sheet around the form and hold with spiral-wrapped rubber bands (about 1" between strands).
- Apply Titebond to the meeting edges. After an hour, unwrap and rewrap centering rubber strands over the glued joints; glue the remaining unglued portions.
- After the glue dries, unwrap and lightly sand joints; re-glue if necessary.
Reinforcements:
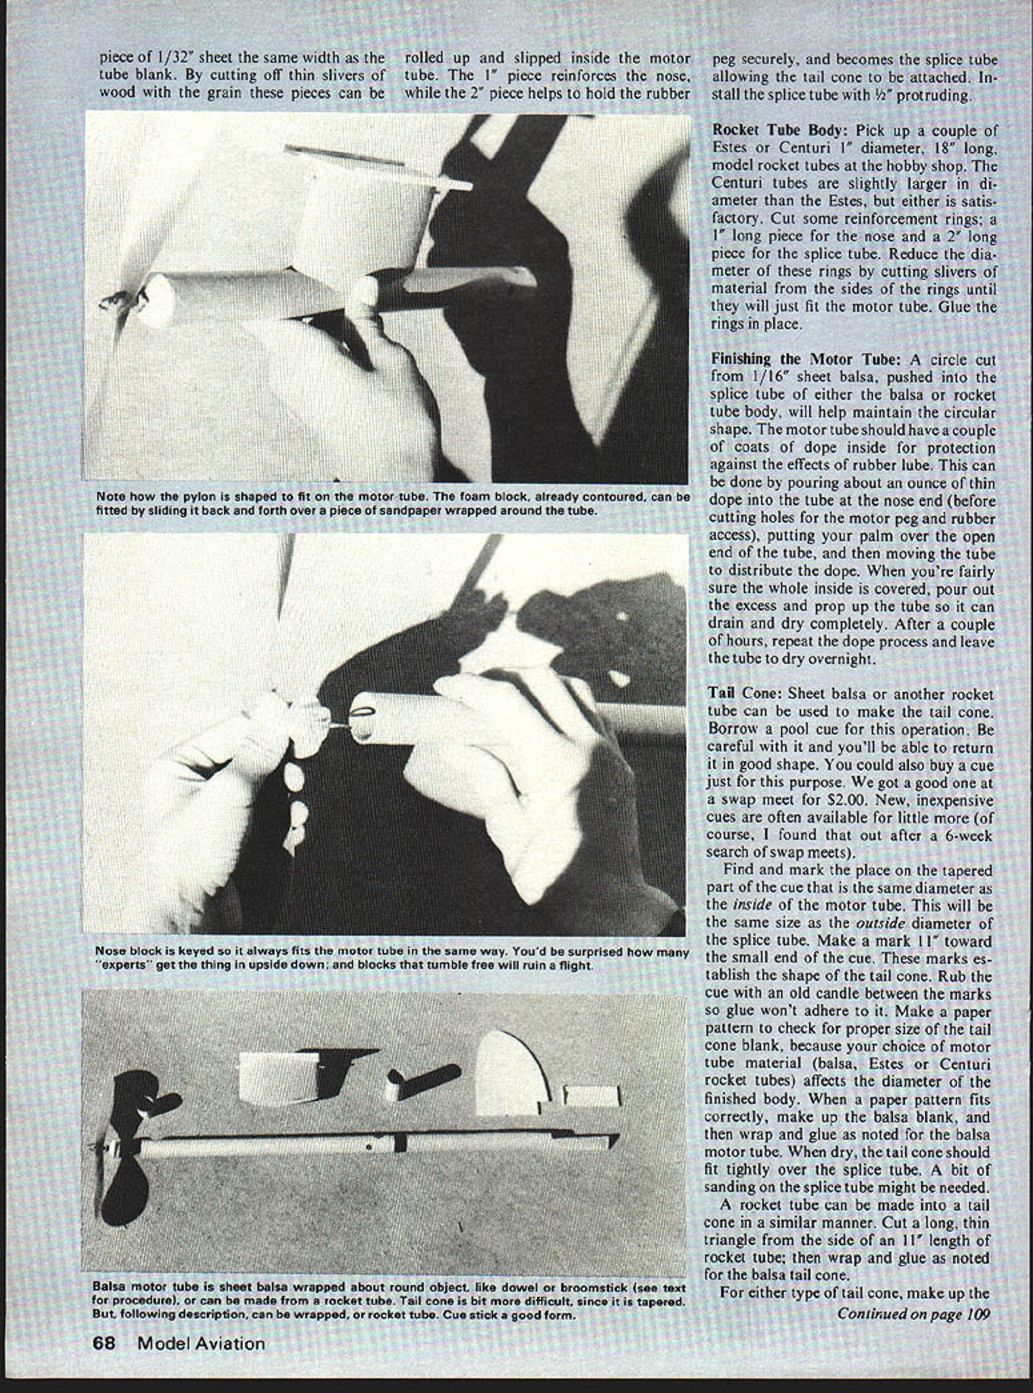
- Cut strips of 1/32" sheet: one 1" long and one 2" long. Glue them lengthwise along the inside of the tube to reinforce the nose and the rubber peg area. Sand joints smooth.
- Cut a piece of 1/16" sheet as a circular disc to push into the splice area to help maintain circular shape.
- Install the 2" splice tube so that about 1/2" protrudes for tail cone attachment.
Coating:
- Put a couple coats of dope inside the motor tube to protect against rubber lube. Pour ~1 ounce of thin dope into the tube, cover the other end with your palm, rotate to coat, pour out excess, drain and dry. Repeat and leave to dry overnight.
Rocket tube body
- Use Estes or Centuri 1" diameter, 18" long rocket tubes. Centuri tubes are slightly larger but both are acceptable.
- Cut reinforcement rings (1" long for the nose, 2" long for the splice). Reduce ring diameter by trimming thin slivers from the sides until they just fit the tube.
- Glue rings in place inside the rocket tube where indicated.
- Install a 1/16" sheet circle inside the splice area to keep the tube circular.
- Dope the inside as described above.
Tail cone
- Tail cones may be built from sheet balsa or fashioned from another rocket tube.
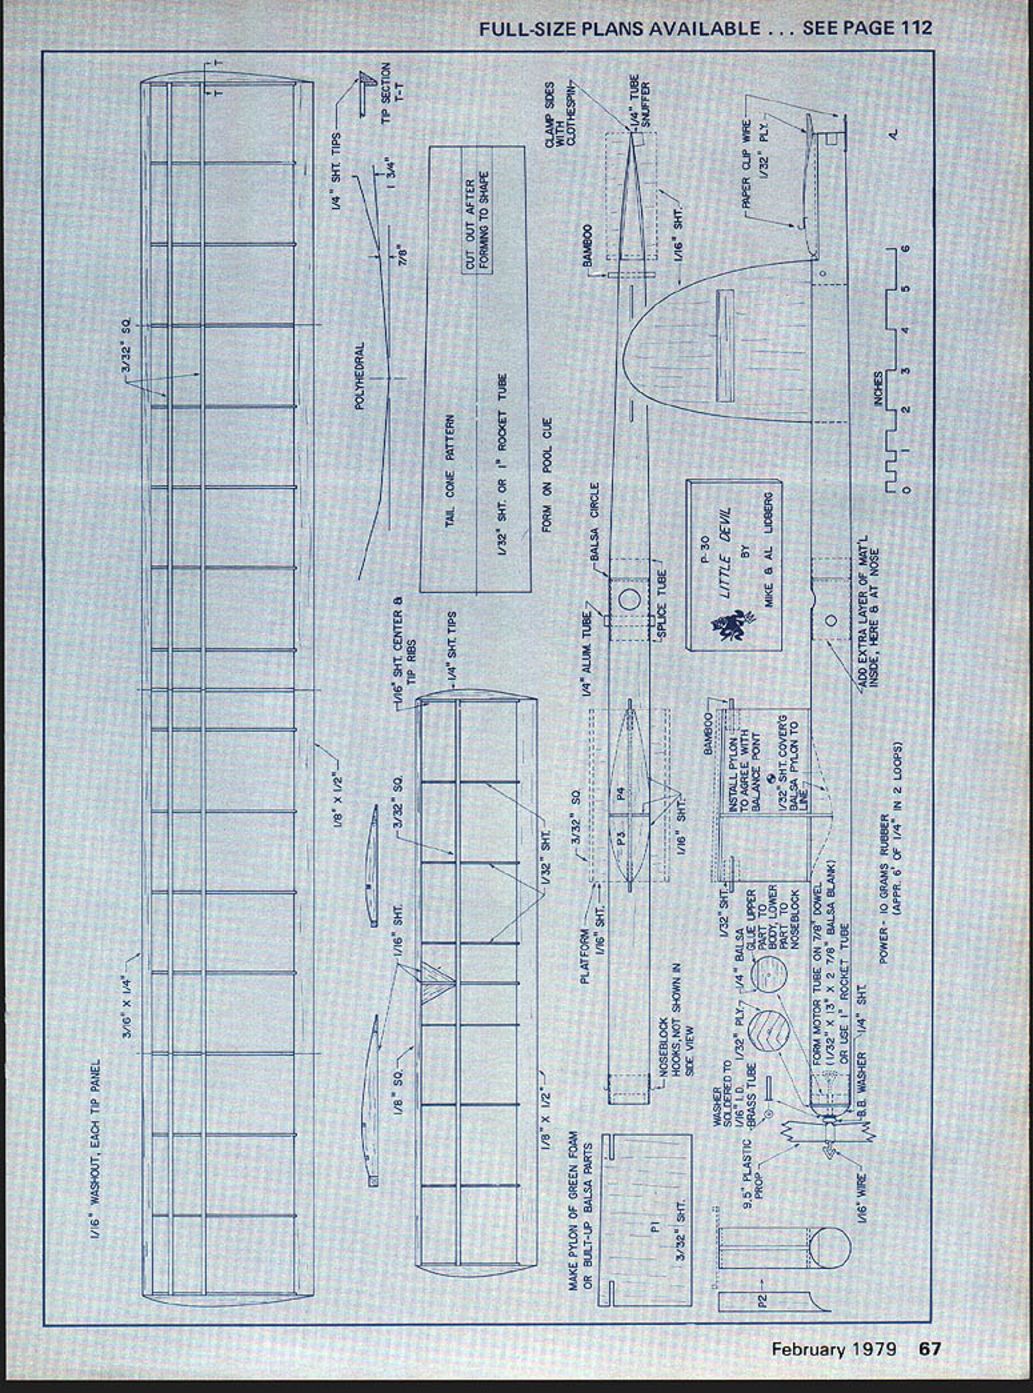
- If using a pool cue as a form: find the tapered cue segment whose diameter matches the motor tube interior/outside diameter of splice tube. Mark 1-1/8" toward the small end to establish cone length. Rub the cue with a candle between marks to prevent glue adhesion. Make a paper pattern to check fit for the motor tube used (balsa, Estes or Centuri).
- Make up a balsa blank to the pattern, wrap and glue as for the balsa motor tube. When dry, the tail cone should fit tightly over the splice tube; sand the splice tube if needed.
- To make a tail cone from a rocket tube: cut a long thin triangular piece from the side of an 11" length of rocket tube, then wrap and glue into a cone as above.
Stabilizer platform and tail assembly
- Make the stabilizer platform and cut the tail cone to accept it (see plan).
- Use a clothes pin to pull the small end of the cone together and glue the platform in place.
- Make a 1/16" wide slot and glue the fin into the slot.
- Drill holes for the 1/4" aluminum tube motor peg and provide a rubber access slot for motor installation.
- Glue the tail cone to the motor tube (after installing the splice tube and internal reinforcements).
Noseblock and prop
- Make the noseblock as shown on the plan to fit the motor tube. The upper/rear piece should be glued to the tube to key the noseblock so it always fits the same.
- Solder a washer onto a piece of 1/16" inside-diameter brass tube to make the prop bearing.
- Drill the noseblock bearing hole at a slight angle (about 10°) to produce the required down-and-right thrust.
- Use the required 9-1/2-in. plastic prop with bead and washers; a ball-bearing washer is recommended between the prop and the bearing.
- Drill the prop hub for a 1/16" wire shaft to help avoid bent prop shafts.
Pylon
- The pylon may be carved from green polyurethane foam or built up from balsa. Green polyurethane foam is preferred because it resists glue and dope better than white beaded foam. If you use white beaded foam, skip doping the pylon.
- Handle foam gently; it is very soft. Use balsa blocks for shaping and sanding.
- Reinforce foam pylons by gluing bamboo sticks (or halves of round toothpicks) into the foam as wing hold-down pegs; add a film of glue where the sticks enter the foam.
- For a balsa pylon:
- Cut the core piece P1, add bamboo sticks and reinforce with scraps of 1/32" sheet.
- Glue on two vertical pieces P2, add four P3 ribs and four P4 ribs.
- Cover the sides of the pylon with 1/32" sheet, leaving the side covers slightly oversize.
- Sand the saddle on the bottom of the pylon using sandpaper wrapped around the motor tube.
- Do not glue the pylon in place yet; it will be positioned later when the balance point is located.
- Make up the wing platform and glue it to the pylon (temporarily secure the pylon with a rubber band until balance is set).
Wing and stabilizer construction
- Make cardboard templates for the ribs and use them to cut ribs from 1/16" and 1/32" sheet as shown on the plan.
- Pin all wing ribs together in a stack so they can be sanded to the same shape; while stacked, cut notches for an exact fit for the spars and notch trailing edges for better spar fit and warp resistance.
- When the basic structure is dry, cut the wing into four panels and rejoin per the polyhedral detail. If polyhedral joints are well-fitted and glued, no additional bracing is required.
- The flying surfaces are conventional and should take minimal time to build.
Incidence, washout and finishing
- Provide 1/16" washout at each wing tip (trailing edge 1/16" higher than the leading edge at the tip).
- Cover wing and stabilizer with thin Japanese tissue. Use three or four thin coats of plasticized dope (Sig Lite-Cote or nitrate dope with 6–8 drops of castor oil per ounce).
- Cover the body with Japanese tissue; use two layers on the balsa motor tube to help it survive motor bursts. Cut tissue strips about 2" wide and spiral-wrap around the body.
- Cover the balsa or green foam pylon with tissue. Give the body three or four coats of dope.
- Sand and finish per the drawings. Locate the balance point of the completed model as shown on the plan before final assembly.
Motor construction and care
- Make up a 10-gram motor. Typical motors are about 6 feet of Sig 1/4" rubber per motor; thickness varies by brand.
- Example motor build: tie two 6' strips together to make a 3' loop, then double on itself to make an 18" long 4-strand motor (the usual motor used). You may also try a 12" long 6-strand motor (fewer turns, steeper climb).
- Buy enough rubber to experiment (50' makes ~8 motors). Wind a couple to destruction outside the model to find burst turn limits. Only wind to about 85–90% of the burst figure in flight.
- Wash motors between flying sessions and inspect for hairline cracks or checks at edges. Discard motors showing damage.
- Always use rubber lubricant (Sig, Peck, or equivalent) to make motors last and perform better.
Assembly and trimming
- Install the motor and noseblock/prop assembly.
- Add fittings for the dethermalizer and noseblock hooks.
- Use a small rubber band to hold the noseblock to the motor tube and another to attach the stabilizer.
- Strap the wing to the pylon and temporarily hold the pylon to the motor tube with a rubber band for balancing.
- Move the pylon to place the center of gravity at about 60% of the wing chord, then glue the pylon in place.
- Check wing and stabilizer for warps and steam out if necessary.
- Steam in ~1/16" washout into each wing tip panel if needed.
Glide trimming:
- Try test glides with shims of file card stock or 1/32" sheet under the stabilizer's leading or trailing edge to obtain a slow, steady glide.
- Ensure the free-wheeling prop turns freely when the rubber is unwound; a stuck prop degrades the glide.
- A natural, gentle turn in the glide is acceptable; 50–75' diameter is about right. The model turns toward the high side in the glide.
- Tilting the stabilizer helps control glide turn without changing climb trim much.
Winding and flying:
- Try low-power flights first with about 100 turns. Use a wire hook securely chucked into a hand drill to wind.
- Have a helper hold the model by a piece of 1/8" wire pushed through the 1/4" aluminum motor peg. Hook the motor and stretch it out to 3–4 times its normal length before winding. Start winding at that length, moving toward the model as you add turns; at full winds the noseblock should be just in front of the motor tube.
- A safer winder: remove the chuck from an inexpensive hand drill, drill a hole near the threaded shaft end and form a tall "C"-shaped hook from 1/16" wire. This eliminates the danger of the hook slipping from the chuck.
- Add turns in stages and compensate for any strong climb-trim changes before adding more power.
Flight behavior:
- The Little Devil tends to turn in a large circle to the right during climb, transitioning to a left glide turn as power runs out (your results may vary).
- Adjust with shims behind the noseblock (tacked in place) or by bending the aft 1/2" of the fin for power-trim changes.
Final notes
- Each brand and batch of rubber behaves differently; experiment and keep records of burst turns and best results.
- Use the dethermalizer — it helps retrieve the model from thermals during testing.
- Inspect motors frequently, use lubricant, and replace motors at the first sign of damage.
The Little Devil has proven enjoyable and dependable. Have fun building and flying it.
Transcribed from original scans by AI. Minor OCR errors may remain.

