
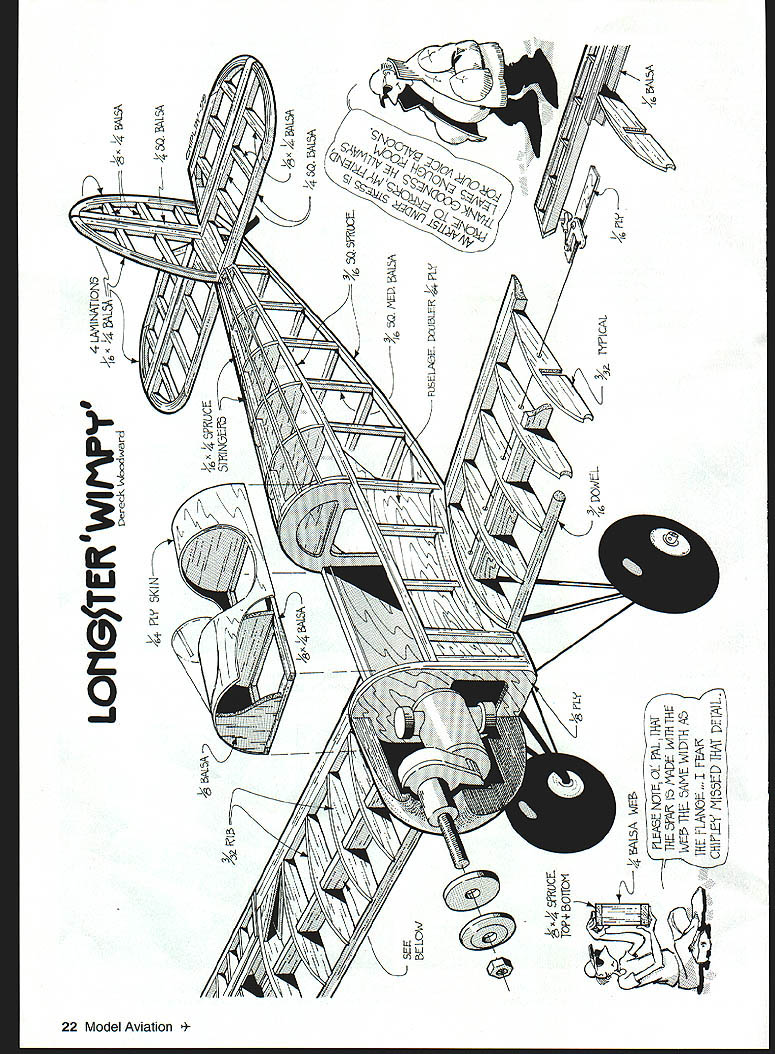
Longster Wimpy
Dereck (Derek) Woodward
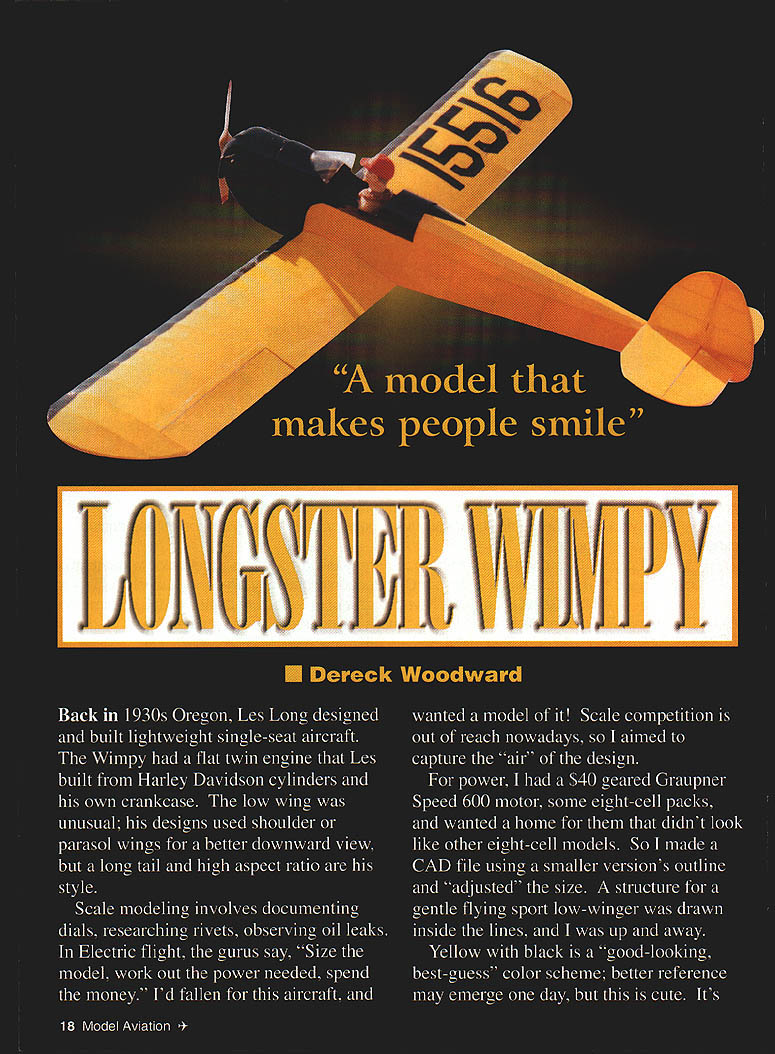
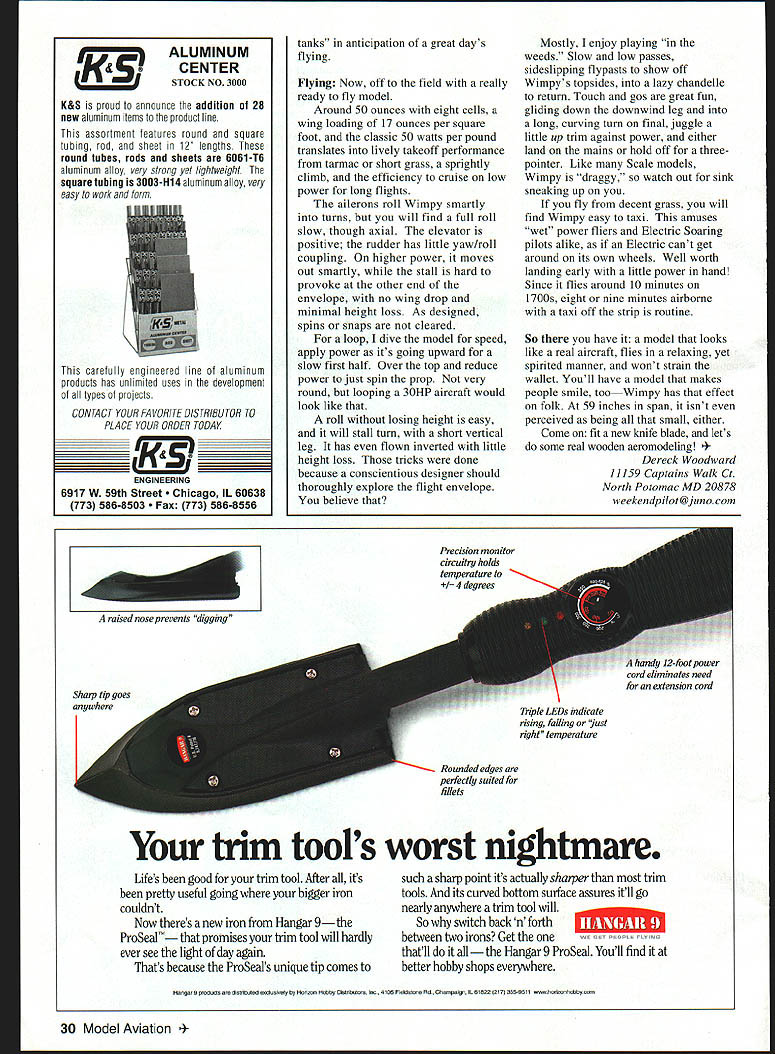
Back in 1930s Oregon, Les Long designed and built lightweight single-seat aircraft. The Wimpy had a flat-twin engine Les built from Harley-Davidson cylinders and his own crankcase. The low wing was unusual for his designs, which often used shoulder or parasol wings for a better downward view, but a long tail and high aspect ratio are his style.
Scale modeling is about documenting dials, researching rivets, and observing oil leaks. For electric flight the gurus say, "Size the model, work out the power needed, spend the money." I fell for this aircraft and wanted a model of it. Scale competition is out of reach for many of us, so I aimed to capture the "air" of the design rather than a museum-quality scale replica.
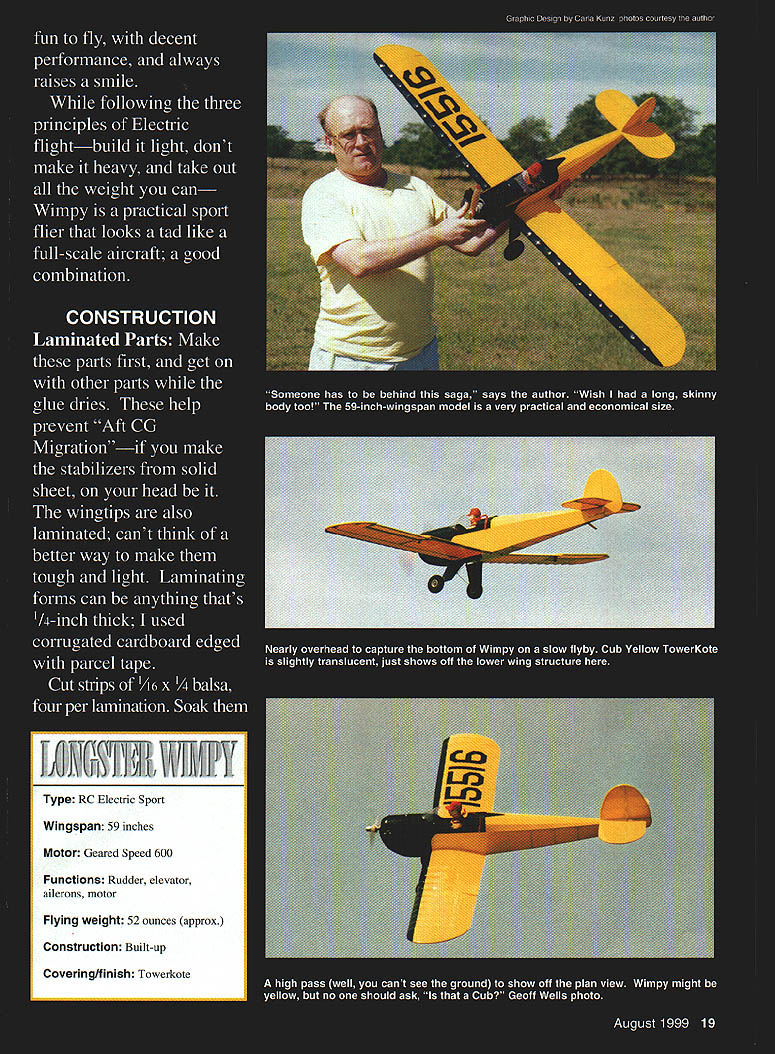
For power I had an S40-geared Graupner Speed 600 motor, some eight-cell packs, and wanted a home for them that didn't look like other eight-cell models. I made a CAD file using a smaller version's outline, adjusted the size, and drew a structure for a gentle-flying sport low-winger inside the lines. The result is yellow with black trim — a best-guess color scheme that looks cute, flies well, and always raises a smile.
While following the three principles of electric flight—build it light, don't make it heavy, and remove every unnecessary ounce—Wimpy is a practical sport flier that looks a tad like a full-scale aircraft: a good combination.
Type: RC Electric Sport
- Wingspan: 59 inches
- Motor: Geared Speed 600
- Functions: Rudder, elevator, ailerons, motor
- Flying weight: ~52 ounces
- Construction: Built-up
- Covering/finish: Towerkote
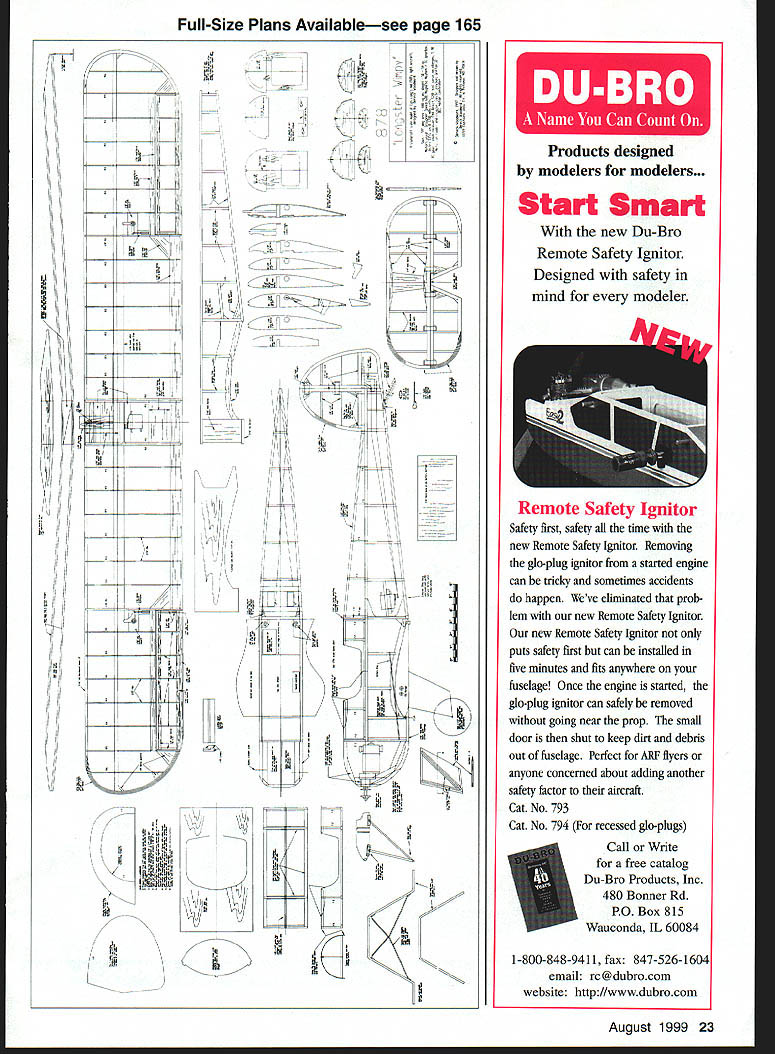
CONSTRUCTION
Laminated parts
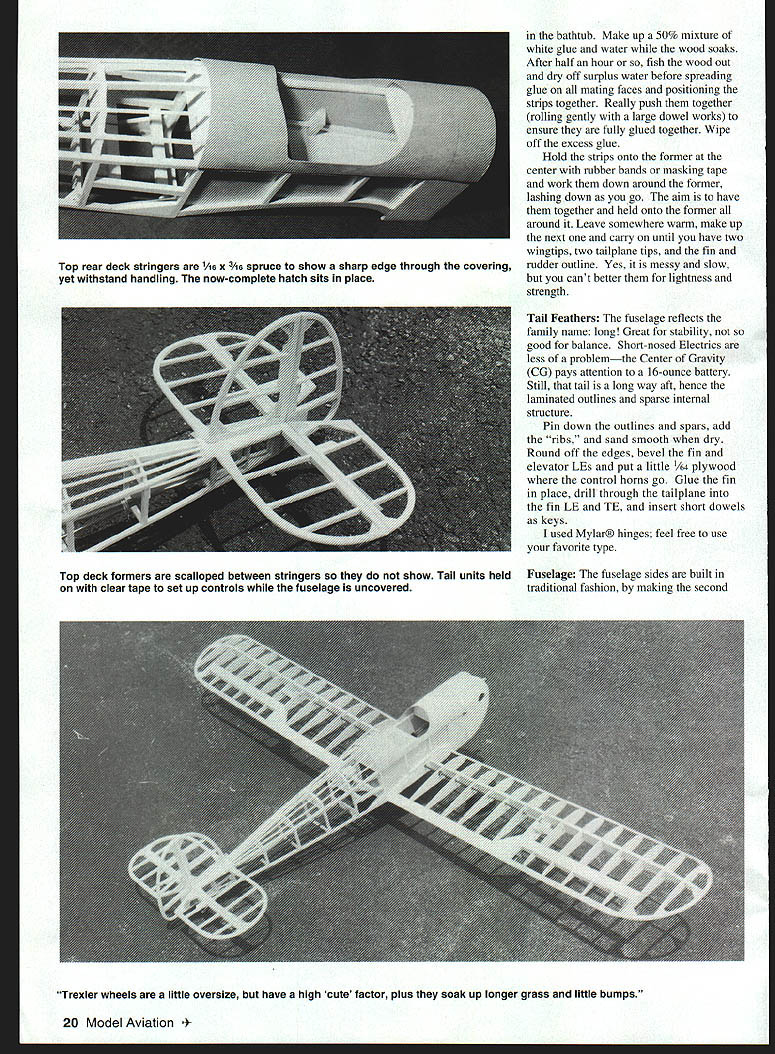
Make laminated parts first and get on with other work while the glue dries. Laminated stabilizer outlines and wingtips prevent "aft CG migration" that can occur if stabilizers are made from solid sheet. Use any 1/4-inch-thick former — I used corrugated cardboard edged with parcel tape.
- Cut strips of 1/16 x 1/4 balsa, four strips per lamination.
- Stack and glue the strips over the former, holding them in place with rubber bands or masking tape.
- After drying, remove and trim to shape. Wingtips and tail outlines laminated this way are tough and light.
After laminating, sand the outlines smooth and proceed to build the internal structure (spars and ribs) as shown on the plan.
Tail feathers
The Longster family name is reflected in a long fuselage and long tail moment. That gives great stability but requires attention to balance.
- Pin down the laminated outlines and spars, add ribs, then sand smooth when dry.
- Round off edges and bevel the leading edges of the fin and elevator.
- Fit 1/64" plywood where the control horns go.
- Glue the fin in place, then drill through the tailplane into the fin LE and TE and insert short dowels as keys.
- I used Mylar® hinges; use your preferred hinge type.
Use a sparse internal structure in the stabilizers to keep weight low; the laminated outlines provide the necessary stiffness.
Fuselage
Build the fuselage sides in the traditional fashion: make the second set over the plan, then join them with formers.
- Use 1/16 x 3/16 (or 1/16 x 1/16 in later references) spruce stringers on the rear deck to give a sharp edge through the covering while resisting handling damage.
- Top-deck formers are scalloped between stringers so they do not show after covering.
- The hatch fits in place when complete; the fuselage top over the wing is removable so you don't have to remove the wing to swap battery packs (just undo two screws).
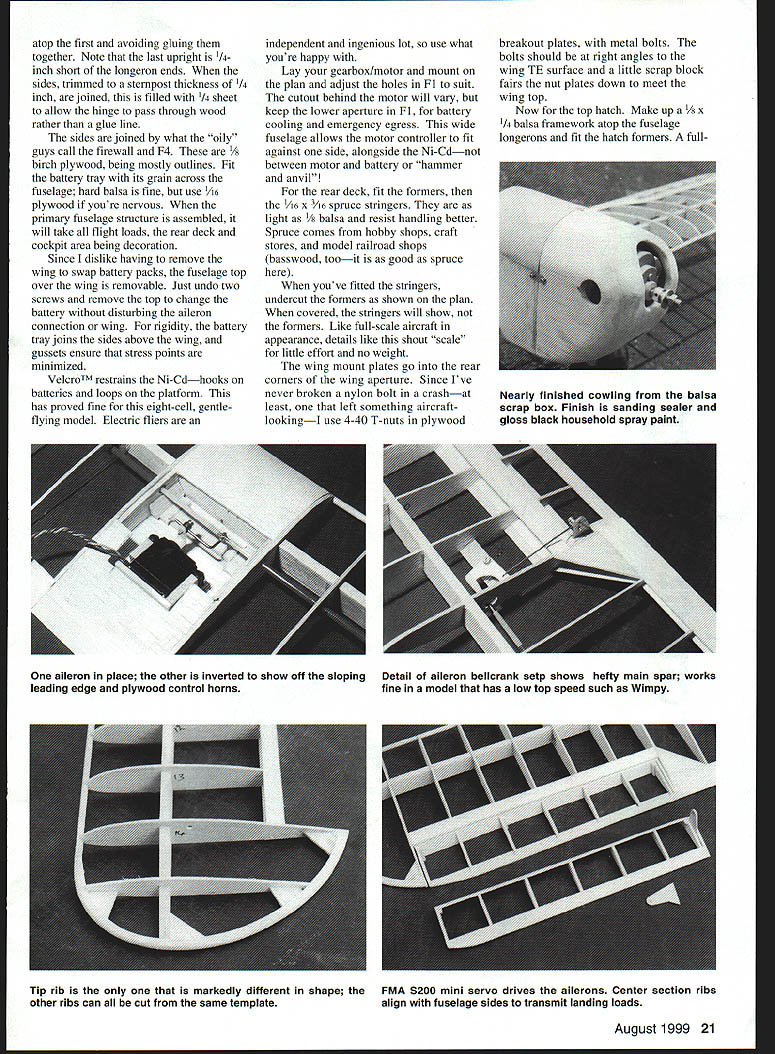
- Fit a battery tray with its grain across the fuselage — hard balsa is fine; use plywood if you prefer.
- Lay out the gearbox/motor mount per the plan and adjust holes to suit your motor. Keep a lower aperture in F1 for battery cooling and emergency egress.
- The wide fuselage allows the motor controller to fit against one side alongside the battery rather than between motor and pack, aiding cooling and access.
When assembling the sides, note that the last upright on the longeron is intentionally short; trim longeron ends and fill the sternpost area with 1/4" sheet so hinges pass through wood rather than a glue line. Use 1/8" birch plywood for firewall and F4 where appropriate.
Finish the fuselage:
- Fit rear-deck formers and 1/16 x 3/32 spruce stringers (spruce resists handling better than thin balsa).
- Undercut formers so covered stringers show but formers don't — a small appearance trick that adds scale appeal for little weight.
- Fit wing-mount plates into the rear corners of the wing aperture. I use 4-40 T-nuts in plywood breakout plates with metal bolts; bolts should meet at right angles to the wing TE surface and be faired with a scrap block.
- Make up a 3/8 x 1/4 (or 3/32 x 1/4 depending on the build) balsa framework for the top hatch atop the longerons and fit hatch formers.
Top hatch and decking
Use 1/64" plywood for the top decking — it's light, flexible, and resists handling better than very thin balsa.
- Coat the framework lightly with white glue, place the plywood, roll it into position, separate, then check glue coverage and let set.
- When dry, use a hot iron to "iron" the plywood down onto the frame: heat melts the glue and seals the plywood to the longerons. Practice on scrap first.
- For the cowl I used balsa built-up over a boxed nose. Finish with sanding sealer and spray gloss black. Secure the cowl with straps and 2-56 screws top, bottom, and sides. Allow clearance around the gearbox for cooling and include the necessary cowling aperture.
Dummy cylinders (jugs) can be purchased or built from card and balsa — they don't need an oil bath, so detail them to taste.
Wing
You made the tips earlier; now build the main spar and ribs.
- Make a plywood template for R3 and cut ribs to the template.
- The wing center section is sheeted only — this saved weight and is adequate for a gentle sport flyer.
- Wimpy uses a hardwood dowel leading edge to resist damage. To make round holes for the dowel, a short length of 3/16" OD steel tube with one end sharpened will cut clean holes in plywood and balsa. Use care and protective tape on the other end.
- Build both panels over the plan, then build the center section between them. The section aft of the spar is flat, so locate the spar, pin down the lower TE sheet, glue in ribs, then add top TE sheet and LE dowel.
- The aileron bellcranks sit on plywood plates in the center section. A wire pushrod runs between them.
Ailerons:
- Build the ailerons with the wing, then cut them free. My ailerons are top-hinged with clear adhesive tape — light, effective for oil-free electrics, and seals the hinge gap.
- Plywood control horns are adequate for the modest loads of this model.
- An FMA S200 mini servo (or microservo) drives the ailerons via bellcrank; for future builds one servo per wing may be preferable and eliminate long pushrods.
Center-section ribs align with the fuselage sides to transmit landing loads. Sheeting only the center saved weight and the wing handles normal sport stresses comfortably.
Undercarriage
This is a simplified version of the original birdcage gear.
- Make the front and rear legs from music wire, fit and solder them together on the model, and check axle alignment against the wing LE.
- Bind joints with soft wire or tinplate. Since 3/32" wire is too small for commercial wheels, solder brass tubing onto the wire: the wire stops inside the wheel and the tube extends about 1/8" with a 1/16" hole drilled through for a clevis pin.
- Make a clevis pin from a paper clip for a removable, secure wheel that allows easy service.
- Fairings are sides of 1/4" plywood over 3/32" square balsa frames, added after the wire joints are true and soldered.
- Use light wheels sized for your field. I used 2-1/2" Trexlers initially, then 2-1/4" foam wheels. Gear is retained with alloy strip clips and 2-56 sheet-metal screws.
Radio and electrics
I fit RC gear early so I can check clearances before covering.
- Tail controls: Goldenrod snakes with microservos on rudder and elevator.
- Ailerons: FMA Direct S200 mini servo driving bellcranks in the center section.
- Receiver: HiTec 535 micro used early; power was a 250 mAh Ni-Cd with an Astro 210 controller initially, later upgraded to a Castle Creations Griffin 50 with BEC.
- Velcro restrains the Ni-Cd/NiMH battery pack; loops on the platform work well for an eight-cell gentle-flying model.
- Lay out gearbox and motor mount on the plan and adjust holes in F1 to suit. Keep the lower aperture for cooling and emergency egress. The wide fuselage allows the ESC to be mounted alongside the battery for better cooling.
Covering and finish
- Covering: Towerkote — light, economical, and durable. I used Cub yellow with black trim.
- Finish: Finish the cowl and painted areas with sanding sealer and gloss household spray where appropriate.
- Appearance details such as exposed stringers and scalloped formers offer scale appeal with little added weight.
Cockpit and detailing
- No scale model should fly without a pilot: I used a lightweight latex pilot from Pete's Pilots (UK). A little glued-on headwear and a ribbon turned into an extra-long scarf add charm.
- Instrument panel detail can be sourced from donor kits; mine came from a deceased Speedy Bee.
Motor and performance
A proven power package:
- Graupner Speed 600 with 3:1 gearbox
- Eight cells (1,700 mAh cells in early flights)
- Master Airscrew 10x6 wood prop
Performance:
- Full power is mainly for takeoff and aerobatics; flights last 8–10 minutes on the older 1,700 mAh cells.
- Wimpy also flew acceptably on seven cells with a larger prop for slower climb; seven-cell flight was demonstrated to show capability.
- All power measurements were taken with an AstroFlight wattmeter in the model (real measurements, not computed).
Preflight
- When finished, set the model aside overnight and recheck control throws and CG the next day.
- With electric models you can do a motor-running range check in the yard — neighbors are usually fascinated rather than annoyed by the quiet motor.
- Final check control throws, CG, and battery security before heading to the field.
FLYING
- Wimpy weighs around 50 ounces with eight cells, giving a wing loading of about 7 oz/ft². At the classic 50 W/lb, it has lively takeoff performance from tarmac or short grass, a sprightly climb, and the efficiency to cruise on low power for long flights.
- Ailerons roll the model smartly into turns, though a full roll is relatively slow. Elevator is positive; rudder has little yaw/roll coupling.
- The stall is benign with no wing drop and minimal height loss. Spins and snaps are not cleared in this design.
- For loops: dive for speed, apply power as you pull up, and reduce power over the top to just spin the prop — not very round, but effective.
- Wimpy is happy with slow and low passes, sideslips to show off topsides, lazy chandelles, and touch-and-goes. Expect about 8–10 minutes airborne on 1,700 mAh cells; taxiing and ground runs are cheerful extras.
- Because the model is somewhat "draggy," watch for sink rate on final and plan accordingly.
BUILD NOTES & TIPS
- Use spruce stringers for better resistance to handling compared to thin balsa.
- Undercut formers so stringers show after covering.
- Consider putting one servo in each wing and running leads up the wing rather than long pushrods in future builds.
- Practice plywood deck ironing on scrap before doing the real thing.
- Keep the fuselage top removable for easy battery changes and access.
Derek Woodward 11159 Captains Walk Ct. North Potomac, MD 20878 weekendpilot@juno.com
Transcribed from original scans by AI. Minor OCR errors may remain.

