
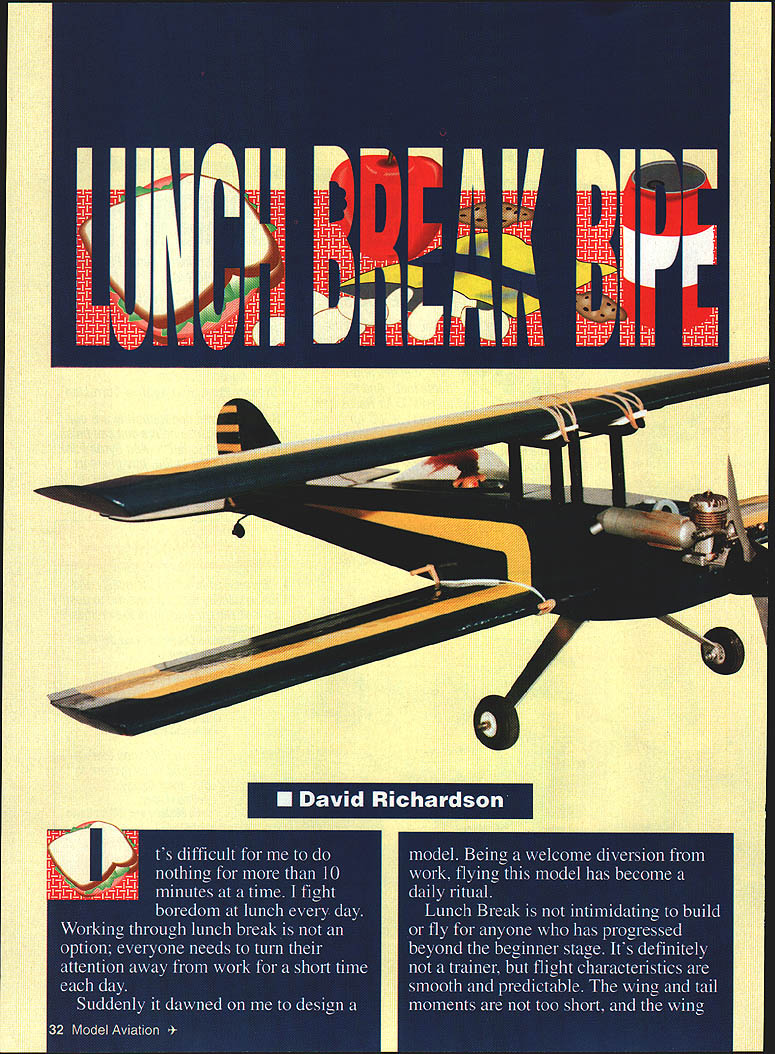
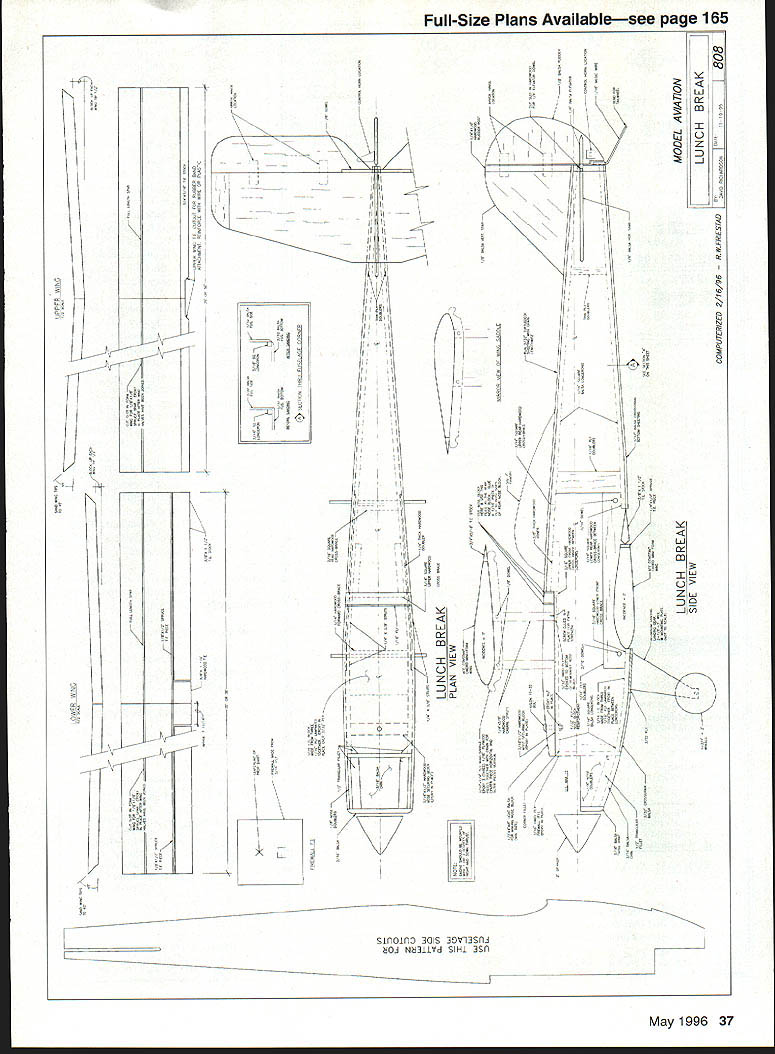
Lunch Break Bipe
David Richardson
It's difficult for me to do nothing for more than 10 minutes at a time. I fight boredom at lunch every day. Working through lunch is not an option; everyone needs to turn their attention away from work for a short time each day.
Suddenly it dawned on me to design a model. Being a welcome diversion from work, flying this model has become a daily ritual.
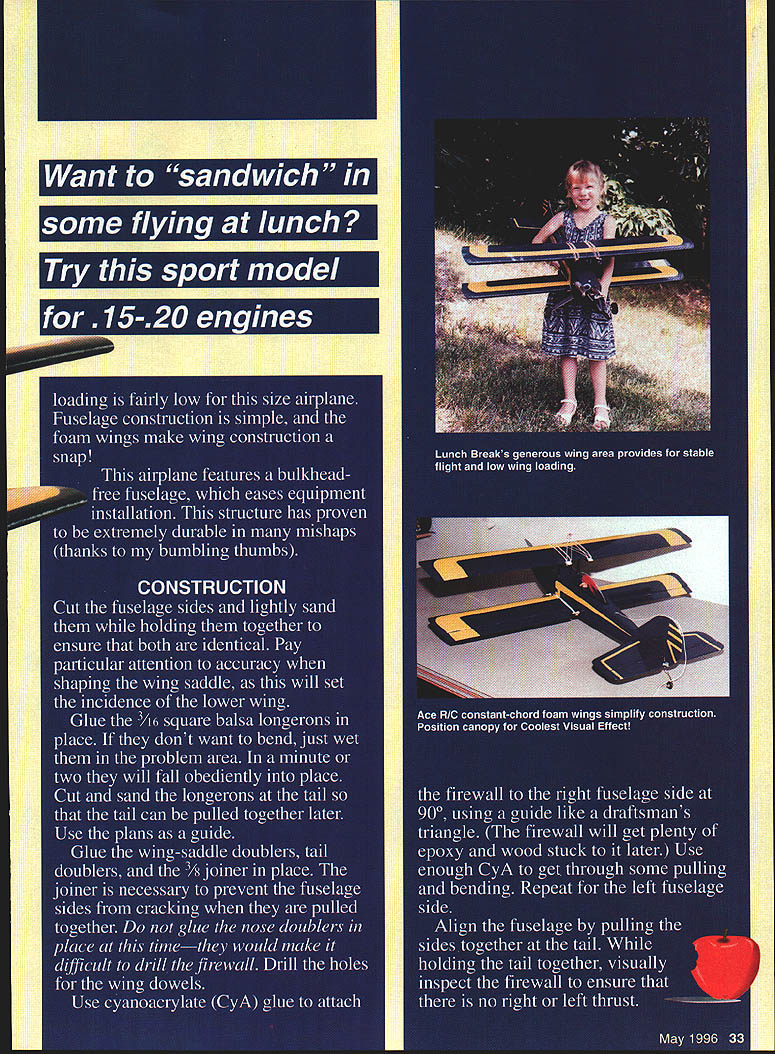
Lunch Break is not intimidating to build or fly for anyone who has progressed beyond the beginner stage. It's definitely not a trainer, but its flight characteristics are smooth and predictable. The wing and tail moments are not too short, and the wing loading is fairly low for this size airplane. Fuselage construction is simple, and the foam wings make wing construction a snap.
This airplane features a bulkhead-free fuselage, which eases equipment installation. This structure has proven to be extremely durable in many mishaps (thanks to my bumbling thumbs).
Construction
Fuselage sides and longerons
Cut the fuselage sides and lightly sand them while holding them together to ensure both are identical. Pay particular attention to accuracy when shaping the wing saddle, as this will set the incidence of the lower wing.
Glue the 3/16" square balsa longerons in place. If they don't want to bend, wet them in the problem area; in a minute or two they will fall obediently into place. Cut and sand the longerons at the tail so the tail can be pulled together later. Use the plans as a guide.
Glue the wing-saddle doublers, tail doublers, and the 3/8" joiner in place. The joiner is necessary to prevent the fuselage sides from cracking when they are pulled together. Do not glue the nose doublers in place at this time—they would make it difficult to drill the firewall. Drill the holes for the wing dowels.
Firewall, alignment and crossbraces
Use cyanoacrylate (CyA) glue to attach the firewall to the right fuselage side at 90°, using a guide like a draftsman's triangle. (The firewall will get plenty of epoxy and wood stuck to it later.) Use enough CyA to get through some pulling and bending. Repeat for the left fuselage side.
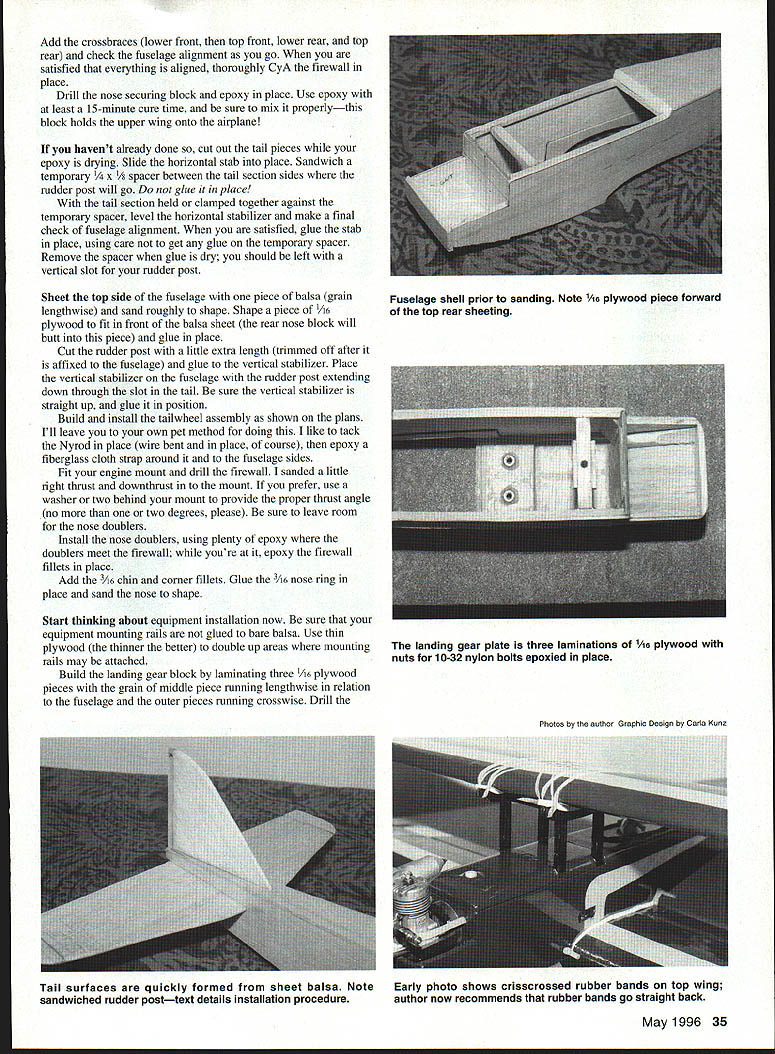
Align the fuselage by pulling the sides together at the tail. While holding the tail together, visually inspect the firewall to ensure that there is no right or left thrust. Add the crossbraces (lower front, then top front, lower rear, and top rear) and check the fuselage alignment as you go. When satisfied everything is aligned, thoroughly CyA the firewall in place.
Drill the nose securing block and epoxy it in place. Use epoxy with at least a 15-minute cure time, and be sure to mix it properly—this block holds the upper wing onto the airplane.
Tail assembly
If you haven't already done so, cut out the tail pieces while your epoxy is drying. Slide the horizontal stabilizer into place. Sandwich a temporary 1/4" x 1/8" spacer between the tail section sides where the rudder post will go. Do not glue this spacer in place.
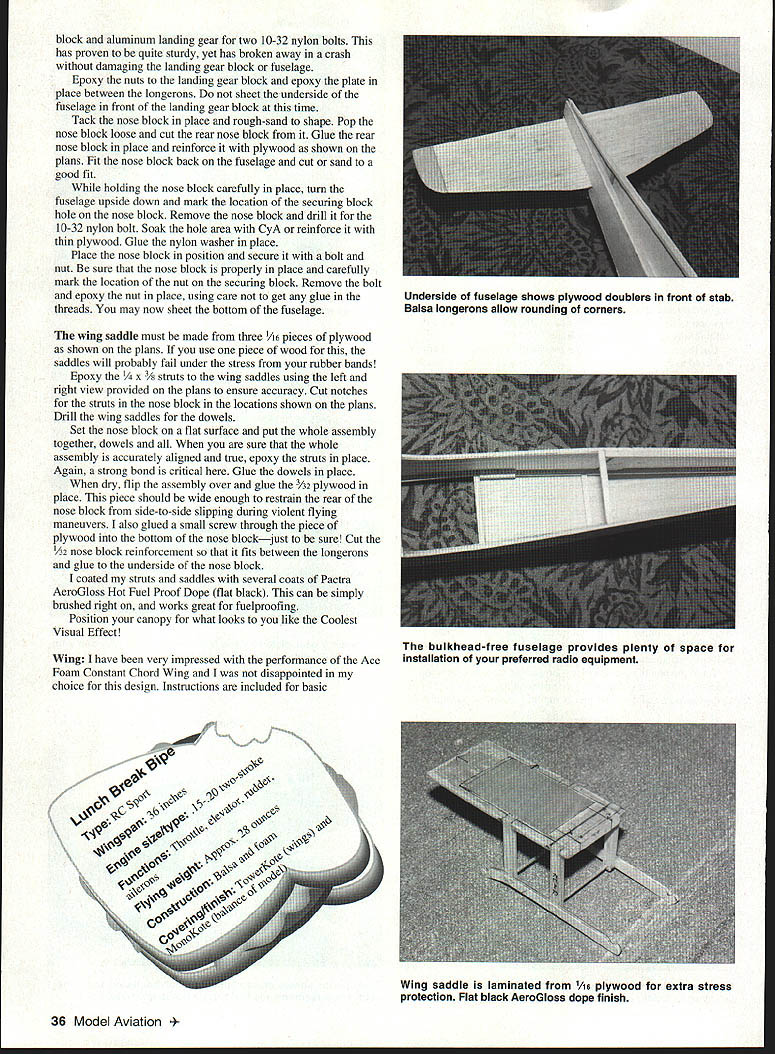
With the tail section held or clamped together against the temporary spacer, level the horizontal stabilizer and make a final check of fuselage alignment. When satisfied, glue the stabilizer in place, using care not to get any glue on the temporary spacer. Remove the spacer when glue is dry; you should be left with a vertical slot for your rudder post.
Cut the rudder post with a little extra length (trimmed off after it is affixed to the fuselage) and glue it to the vertical stabilizer. Place the vertical stabilizer on the fuselage with the rudder post extending down through the slot in the tail. Be sure the vertical stabilizer is straight up, and glue it in position.
Build and install the tailwheel assembly as shown on the plans. Use your preferred method. The author likes to tack the nyrod in place, then epoxy a fiberglass cloth strap around it and to the fuselage sides.
Nose, firewall and equipment mounts
Fit your engine mount and drill the firewall. The author sanded a little right thrust and downthrust into the mount. If you prefer, use a washer or two behind your mount to provide the proper thrust angle (no more than one or two degrees). Be sure to leave room for the nose doublers.
Install the nose doublers, using plenty of epoxy where the doublers meet the firewall; while you're at it, epoxy the firewall fillets in place. Add the 3/16" chin and corner fillets. Glue the 3/16" nose ring in place and sand the nose to shape.
Start thinking about equipment installation now. Be sure your equipment mounting rails are not glued to bare balsa. Use thin plywood (the thinner the better) to double up areas where mounting rails may be attached.
Build the landing gear block by laminating three 1/8" plywood pieces with the grain of the middle piece running lengthwise in relation to the fuselage and the outer pieces running crosswise. Drill the holes for the landing gear bolts and epoxy the nuts for the 10-32 nylon bolts in place.
Epoxy the landing gear plate between the longerons and sheet the underside of the fuselage forward of the landing gear block.
Tack the nose block in place and rough-sand to shape. Pop the nose block loose and cut the rear nose block. Glue the rear nose block in place and reinforce with plywood as shown on the plans. Fit the nose block back to the fuselage, cut and sand for a good fit.
Holding the nose block carefully in place, turn the fuselage upside down and mark the location of the securing-block hole in the nose block. Remove the nose block and drill the hole for a 10-32 nylon bolt. Soak the hole area with CyA to reinforce the thin plywood. Glue a nylon washer in place.
Place the nose block, position the securing bolt and nut, and be sure the nose block is properly positioned. Carefully mark the location of the nut securing block. Remove the bolt and epoxy the nut in place, using care to keep glue off the threads. You may now sheet the bottom of the fuselage.
Wing saddle, struts and nose reinforcement
The wing saddle must be made from three 1/16" pieces of plywood as shown on the plans. Use solid wood saddles—plywood saddles will probably fail under stress from the rubber bands. Epoxy the struts to the wing saddles using the left and right views provided on the plans to ensure accuracy. Cut notches in the struts for the nose block locations shown on the plans. Drill the wing-saddle dowels.
Set the nose block on a flat surface, put the whole assembly together with the dowels, and be sure the whole assembly is accurately aligned and true. Epoxy the struts in place. A strong bond is critical. Glue the dowels in place and, after dry, flip the assembly over and glue a 3/32" plywood piece in place. The piece should be wide enough to restrain the rear nose block side-to-side, preventing slipping during violent flying maneuvers. Also glue a small screw through the piece of plywood into the bottom of the nose block for extra security. Cut the 3/32" nose block reinforcement to fit between the longerons and glue to the underside of the nose block.
Coat the struts and saddles with several coats of Pactra AeroGloss Hot Fuel Proof Dope (flat black). This can be brushed on and works well for fuelproofing.
Position your canopy for the visual effect you like best.
Wing
I have been very impressed with the performance of the Ace Foam Constant Chord Wing and was not disappointed in my choice for this design. Instructions are included for basic construction, but some deviation is necessary, so here are a few notes:
- I highly recommend using one of the odorless CyA glues for foam construction, but use epoxy for joining the wing at the center.
- The spars may be full- or half-length, whichever you prefer.
- The lower wing trailing edge must be sanded back to accommodate the ailerons. If you don't have much experience with biplanes, the ailerons may seem rather large. They are enlarged to compensate for the lack of ailerons on the top wing and to provide good control without being overly sensitive.
- Since the lower wing is unsheeted, do not substitute balsa for the trailing edge; use spruce or other hardwood.
- Use a wide band of fiberglass around the center of each wing. Epoxy is fine, but Elmer's white glue also provides good strength and is inexpensive.
- Cut the top wing trailing edge in the center as shown on the plans to accommodate your rubber bands.
- Remember, the wings are drawn at 1/2 scale. Use 6–8 rubber bands on each side to attach the top wing to the saddles. Do not screw the top wing rubber bands—the saddles aren't designed to withstand the sideways stress. The lower wing bands may be crisscrossed.
Although a 5–6 ounce fuel tank could probably be crammed into this model, I really don't believe it's necessary. I was pleasantly surprised that a four-ounce tank proved to be quite adequate.
Finish
I used TowerKote low-temperature film on the wings, and MonoKote for the balance of the model.
Equipment
I highly recommend using microservos and a 270 mAh battery pack. The gain in performance is well worth it. You should get five or six flights out of this arrangement.
Recommended tank size:
- Four-ounce tank is adequate; 5–6 ounces is possible but not necessary.
Flying
Lunch Break Bipe was designed with a .15 engine in mind, and I believe this is the best power-to-weight ratio for the model. If you like the performance of a light model, this is the way to go.
- Hold a little up in the elevator as you accelerate to keep the tail pinned to the ground until some speed is built up; then let it out just as the airplane hops off the ground.
- With a little headwind, the takeoff roll is nearly nonexistent; however, don't yank in full up after takeoff. Make a shallow ascent to build up plenty of speed before you push it hard.
- Landing is easy, as the model does not have much tendency to tip-stall. Deadstick landings are straightforward.
If authoritative power is your preference, a .20 engine is the choice for you. Speed and overall performance are increased with the .20. Lunch Break is still well behaved with this engine, but it will be necessary to use a little more "sky" for aerobatics.
- The airplane will be heavier with the .20, so expect a longer takeoff roll. Use some up elevator as the airplane accelerates to maintain positive steering during the roll.
- The climb may be fairly steep with the .20—avoid attempting steep maneuvers on your first flight with this engine.
- Although very strong vertical performance can be expected, pulling indefinite vertical climbs is unlikely.
- The landing approach will be steeper; be prepared to abort on your first try or two. On deadstick landings with the .20, keep the speed up and get the nose into the wind. Bring it down quickly and decisively.
David Richardson 1821 West Dr. High Ridge, MO 63049
Transcribed from original scans by AI. Minor OCR errors may remain.

