
Making Trophies
Graham Hicks
TROPHIES can be expensive! Your club can spend more than $300 for a single contest with two or three rulebook events, and this kind of outlay will eat up much of your profits.
The Grande Ronde Bush Pilots, a sport-scale radio-control club of eastern Oregon, has made its own trophies for its annual Class AA scale contests, and many contestants tell us that the handmade first-place trophies are one of the main reasons they keep coming back.
I wish I could claim credit for this idea, but it's not mine. Many years ago I was fortunate to become acquainted with Dave Platt, who was Top Flite's model designer at that time. On a visit to his home, I noticed a very attractive Scale Masters plaque, about five by seven inches. On it were mounted a small brass plate giving the name and date of the contest and "First Place," and below that half of a 1/2-scale fighter model, sprayed solid silver and glued to the plaque. The memory stuck with me, and when it came time for our club to decide what kind of prizes to award at our first contest, the idea caught on here. This article describes our method of building these delightful little awards.
The trophies are simplicity itself. Following are a few of the techniques we use to make them unique.
Materials and tools (typical)
- Nice piece of wood, roughly 5" high by 7" long (minimum)
- Router (optional, for edge detail)
- Stain or clear lacquer (we use Deft satin)
- Model kit (choose a simple subject in 1/2 scale)
- Paints and brushes or an airbrush
- MicroScale Micro Sol
- Small saucer of lukewarm water
- Soft camel-hair paintbrush (~1/8" wide)
- Cotton-tipped swabs
- Strong desk light, tweezers, hemostats
- Dremel Moto-Tool with cutoff disk and sanding discs
- Scratch awl or knife, small burr for Dremel
- Cyanoacrylate (thick CyA)
- Clear acetate sheet and scissors (for propeller disk)
- Small 2-56 screw and nut, drill or drill press
- Straightedge
- Information plate (engraved by trophy shop)
Preparing the plaque
Begin with a nice piece of wood, in the neighborhood of five inches high by seven inches long as a minimum. You can square the edges, or, if you have access to a router, put a small cove or bead along the edges to dress it up a bit.
Now you can stain it or simply finish it with a clear coat. We have found that Deft, a lacquer-based clear coat, does a fine job. It is available in spray cans and brushing consistency, in gloss or satin finish. We like the satin finish best. Take your choice, follow the can directions, and put two or three coats of Deft on the plaque, then leave it to dry thoroughly.
Choosing and preparing the model
Pick out the model you want to feature in 1/2 scale. Keep in mind that the best subjects are the simplest. Until you reach a degree of proficiency with this technique, stay away from the WWI biplanes and other complex (rigged) models. Mustangs, Hellcats, Me109s, Fw-190s, and other WWII airplanes seem to make the best and easiest trophies—and in my opinion, they are the most popular with contestants.
We'll use an Airfix Spitfire Mk IX for this project. When you open the box, take a look at the left and right sides of the fuselage. Many models have a tailwheel molded on one half only. If you're going to do an "in-flight" version and the airplane had a retractable tailwheel, choose the side without the tailwheel. If you plan to do the model sitting on a platform, use the other side.
Unless you are building a "sitting on the ground" model, do not build or paint the propeller or try to install it in the dummy engine. We will get to this part later.
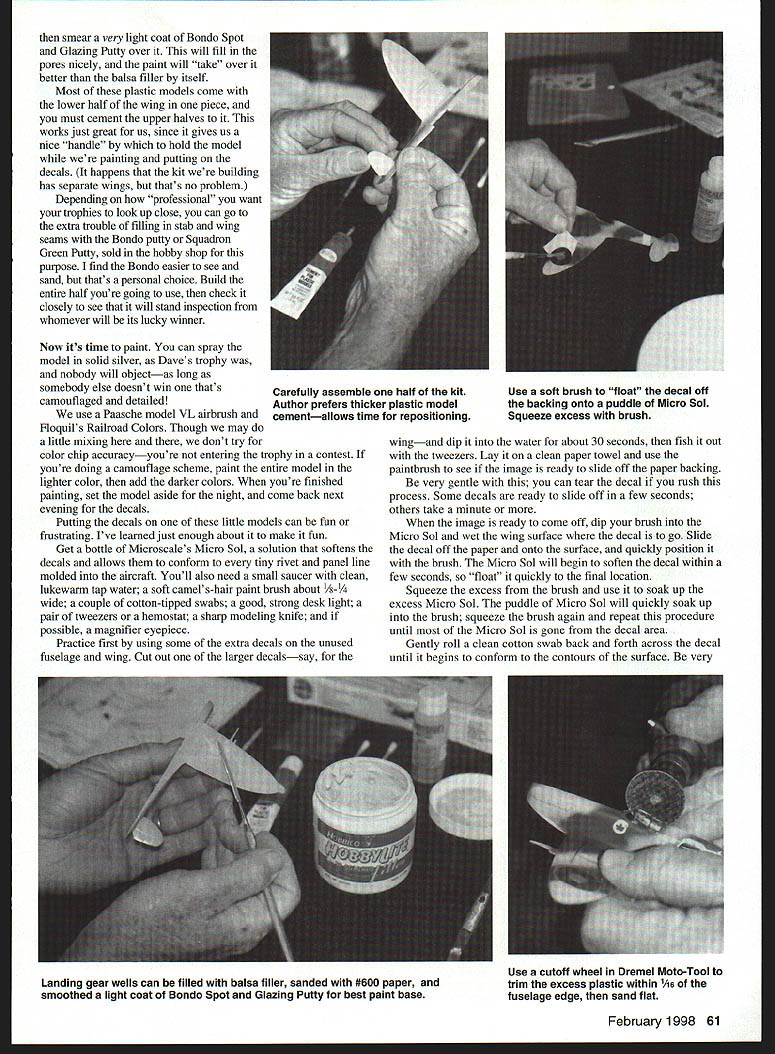
Once you have chosen which side you're going to present, build up that side carefully according to the plans. Use your own judgment as to how much cockpit detail to include; use none and simply glue the canopy on after painting. Paint the frames the same color as the airframe. If your model comes with "gear down" parts, you can glue them in the "up" position, or it may be easier to fill in the gear holes under the wing with a balsa filler. Let this dry and then trim with a sharp knife. Sand very lightly with #600 paper.
When it is clean, spray the model solid silver. If you want a camouflaged, detailed model, use a Paasche model airbrush and Floquil or railroad colors. Though it may take a little mixing, don't try to achieve exact color-chip accuracy—you are making a trophy and doing a camouflage scheme. Paint the entire model a lighter color first and then add the darker colors. When you've finished painting, set the model aside overnight and come back the next evening for decals.
Decals and finishing
Putting decals on little models can be fun or frustrating. I've learned just enough about them to make it fun. Get a bottle of MicroScale's Micro Sol solution; it softens decals and allows them to conform to tiny rivet and panel lines molded on the aircraft. You'll also need a small saucer of clean lukewarm tap water, a soft camel-hair paintbrush about 1/8" wide, a couple of cotton-tipped swabs, a good strong desk light, a pair of tweezers, and hemostats.
Practice first by using some of the extra decals on the unused fuselage and wing. Cut out one of the larger decals—say, for the wing—and dip it into the water for about 30 seconds, then fish it out with the tweezers. Lay it on a clean paper towel and use the paintbrush to see if the image is ready to slide off the paper backing. Be very gentle with this; you can tear the decal if you rush this process. Some decals are ready to slide off in a few seconds; others take a minute or more.
When the image is ready to come off, dip your brush into the Micro Sol and wet the wing surface where the decal is to go. Slide the decal off the paper and onto the surface, and quickly position it with the brush. The Micro Sol will begin to soften the decal within a few seconds, so "float" it quickly to find the final location.
Squeeze the excess from the brush and use it to soak up the excess Micro Sol. The puddle of Micro Sol will quickly soak up into the brush; squeeze the brush again and repeat this procedure until most of the Micro Sol is gone from the decal area.
Gently roll a clean cotton swab back and forth across the decal until it begins to conform to the contours of the surface. Be very careful; the decal will stretch and tear if you press too hard. If the image won't seat to your satisfaction, a second small coat of Micro Sol will usually do the trick.
If a decal still needs help, wet the area again with Micro Sol and work it gently until it conforms. Some decals require several applications to fully settle. After all decals are in place, let them dry for several hours. A thin coat of Future floor finish will hide minor decal edges and give the model a nice sheen.
Trimming and mounting the half-model
Now we have our half-model with the entire canopy, and in some cases the entire cowl and engine still attached. Using a Dremel Moto-Tool and cutoff disk, carefully cut away the extra material to within about 1/16" of the fuselage edge. This begins probably the most delicate part of the operation.
Using a motorized sanding disk or a flat sanding block with about #180 paper, carefully sand this remaining plastic away until you are left with a flat fuselage and rudder-fin to glue to the wood. Check the outer edges of the fuselage to be sure no ragged plastic edges are present.
Position the half-model along the bottom or top edge of the plaque, leaving room for whatever type of metal or plastic plate you will attach. Do not try to glue the model to the plaque at this time. We must first prepare the gluing surface on the wood.
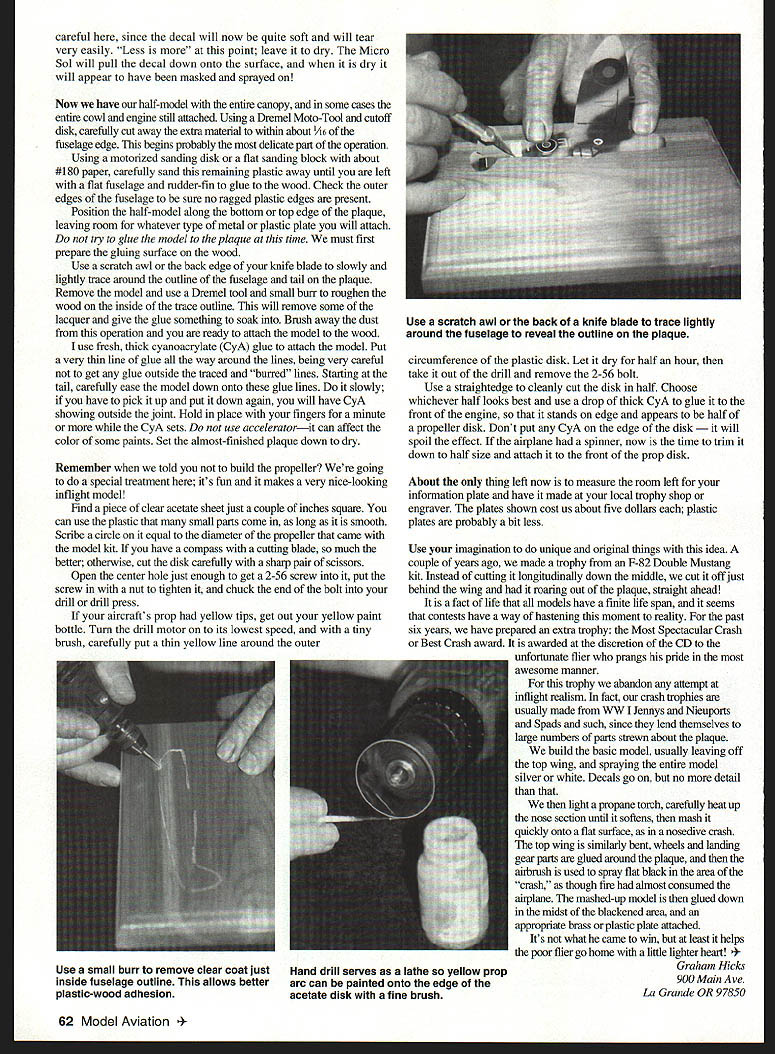
Use a scratch awl or the back edge of your knife blade to slowly and lightly trace around the outline of the fuselage and tail on the plaque. Remove the model and use a Dremel tool and small burr to roughen the wood on the inside of the traced outline. This will remove some of the lacquer and give the glue something to soak into. Brush away the dust from this operation and you are ready to attach the model to the wood.
I use fresh, thick cyanoacrylate (CyA) glue to attach the model. Put a very thin line of glue all the way around the lines, being very careful not to get any glue outside the traced and "burred" lines. Starting at the tail, carefully ease the model down onto these glue lines. Do it slowly; if you have to pick it up and put it down again, you will have CyA showing outside the joint. Hold in place with your fingers for a minute or more while the CyA sets. Do not use accelerator—it can affect the color of some paints. Set the almost-finished plaque down to dry.
The propeller trick (in-flight models)
Remember when we told you not to build the propeller? We're going to do a special treatment here; it's fun and it makes a very nice-looking in-flight model.
Find a piece of clear acetate sheet just a couple of inches square. You can use the plastic that many small parts come in, as long as it is smooth. Scribble a circle on it equal to the diameter of the propeller that came with the model kit. If you have a compass with a cutting blade, so much the better; otherwise, cut the disk carefully with a sharp pair of scissors.
Open the center hole just enough to get a 2-56 screw into it, put the screw in with a nut to tighten it, and chuck the end of the bolt into your drill or drill press.
If your aircraft's prop had yellow tips, get out your yellow paint. Turn the drill motor on to its lowest speed, and with a tiny brush, carefully put a thin yellow line around the outer circumference of the plastic disk. Let it dry for half an hour, then take it out of the drill and remove the 2-56 bolt.
Use a straightedge to cleanly cut the disk in half. Choose whichever half looks best and use a drop of thick CyA to glue it to the front of the engine, so that it stands on edge and appears to be half of a propeller disk. Don't put any CyA on the edge of the disk — it will spoil the effect. If the airplane had a spinner, now is the time to trim it down to half size and attach it to the front of the prop disk.
Information plate and finishing touches
Measure the room left for your information plate and have it made at your local trophy shop or engraver. The plates shown cost us about five dollars each; plastic plates are probably a bit less.
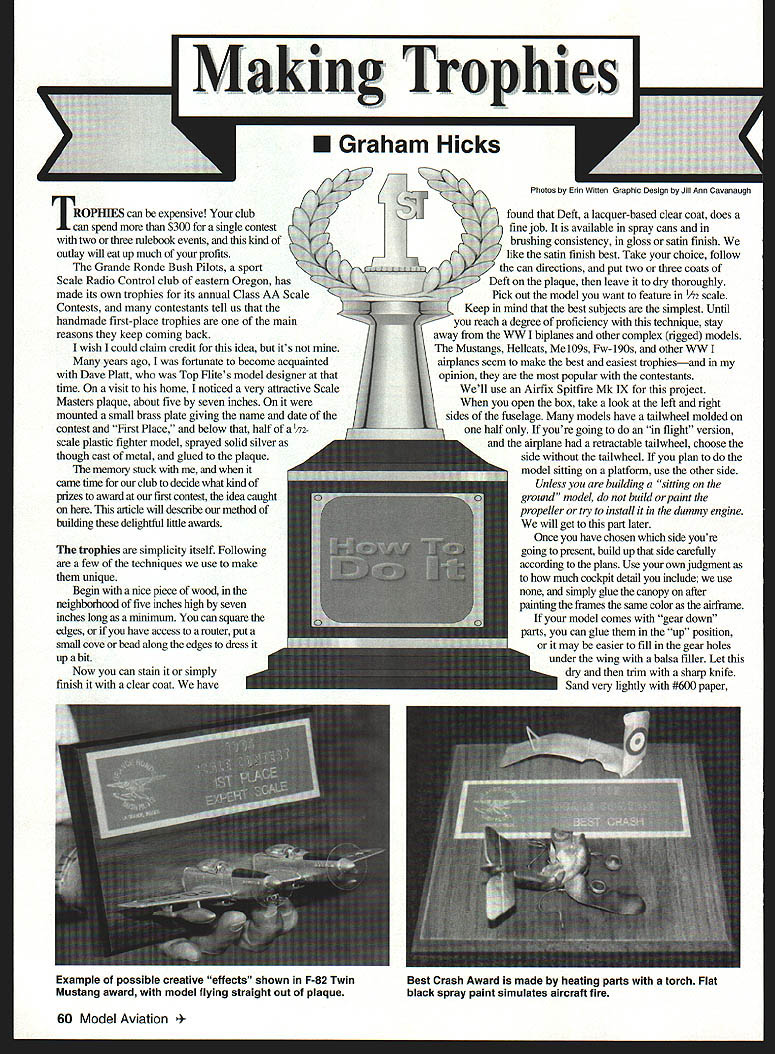
Use your imagination to do unique and original things with this idea. A couple of years ago we made a trophy from an F-82 Double Mustang kit. Instead of cutting it longitudinally down the middle, we cut it off just behind the wing and had it roaring out of the plaque, straight ahead!
Crash trophies (Most Spectacular Crash)
It is a fact of life that all models have a finite life span, and it seems that contests have a way of hastening this moment to reality. For the past six years we have prepared an extra trophy: the Most Spectacular Crash or Best Crash award. It is awarded at the discretion of the CD to the unfortunate flier who prangs his pride in the most awesome manner.
For this trophy we abandon any attempt at in-flight realism. In fact, our crash trophies are usually made from WWI Jennys, Nieuports, Spads, and such, since they lend themselves to large numbers of parts strewn about the plaque.
We build the basic model, usually leaving off the top wing, and spray the entire model silver or white. Decals go on, but no more detail than that.
We then light a propane torch, carefully heat up the nose section until it softens, then mash it quickly onto a flat surface, as in a nose-over crash. The top wing is similarly bent, wheels and landing-gear parts are glued around the plaque, and the model is sprayed flat black in the area of the "crash," as though fire had almost consumed the machine. The mashed-up model is then glued down in the midst of the blackened area, and an appropriate brass or plastic plate attached.
It's not what he came to win, but at least it helps the poor flier go home with a lighter heart.
Graham Hicks 900 Main Ave. La Grande, OR 97850
Transcribed from original scans by AI. Minor OCR errors may remain.

