
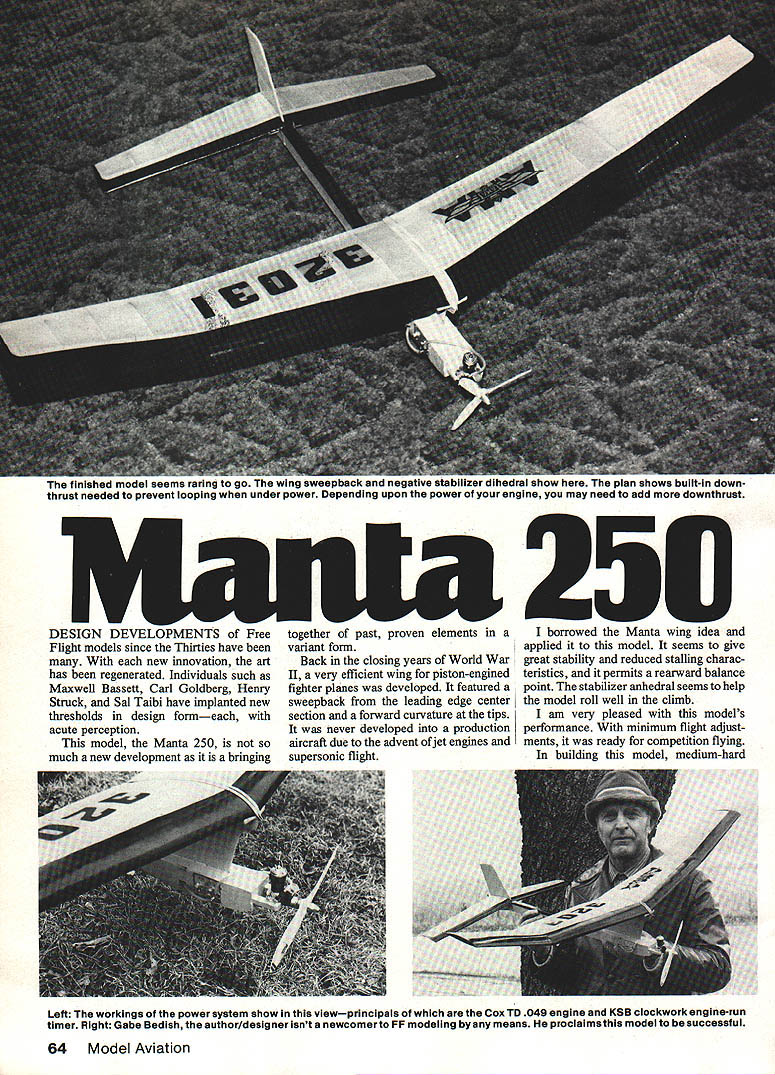
Manta 250
Design developments of Free Flight models since the Thirties have been many. With each new innovation, the art has been regenerated. Individuals such as Maxwell Bassett, Carl Goldberg, Henry Struck, and Sal Taibi have implanted new thresholds in design form—each with acute perception.
The Manta 250 is not so much a new development as a bringing together of past, proven elements in a variant form. Back in the closing years of World War II, a very efficient wing for piston-engined fighter planes was developed that featured sweepback from the leading-edge center section and a forward curvature at the tips. It was never developed into a production aircraft because of the advent of jet engines and supersonic flight. I borrowed the Manta wing idea and applied it to this model. It gives great stability and reduced stalling characteristics, and permits a rearward balance point. The stabilizer anhedral helps the model roll well in the climb.
You can tell from the size of this 1/2A Free Flight that it's meant to move out in the climb. The wing shape combined with the model's proportions and anhedraled stabilizer make for an easier-to-trim model than the norm. I am very pleased with this model's performance — with minimum flight adjustments it was ready for competition flying.
Balsa is used throughout. Use medium-hard, straight-grained strip wood.
Materials and general notes
- Leading-edge sheeting: 1/16 in. balsa.
- Spar: single spar.
- Use straight-grained strip wood throughout.
- Use Saran Wrap over the plan to prevent glued parts from sticking.
- Use 5-minute epoxy for speed work on critical joints.
Construction
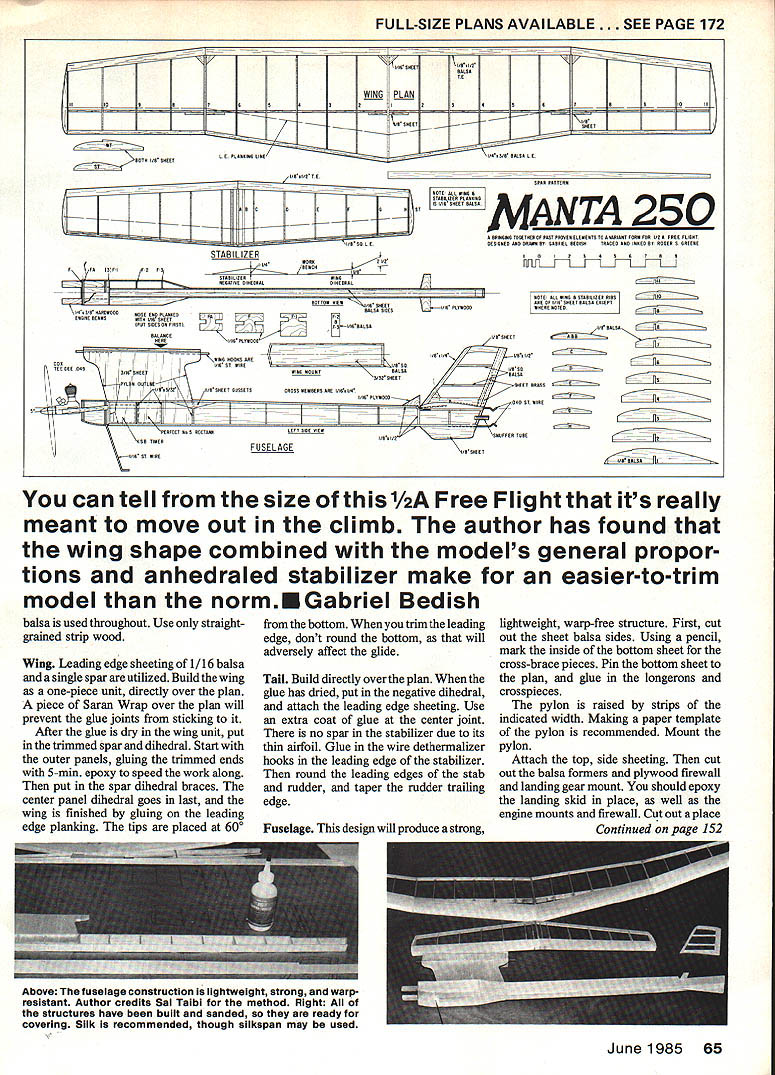
Wing
- Build the wing as a one-piece unit directly over the plan, with Saran Wrap between the parts and the plan to prevent sticking.
- Use 1/16 in. leading-edge sheeting and a single spar.
- After the glue is dry in the wing unit, put in the trimmed spar and begin the dihedral.
- Start with the outer panels, gluing the trimmed ends with 5-minute epoxy to speed the work.
- Insert the spar dihedral braces next.
- Install the center-panel dihedral last.
- Finish the wing by gluing on the leading-edge planking and placing the tips. The tips are placed at about 60° from the bottom.
- When trimming the leading edge, do not round the bottom — rounding the bottom will adversely affect the glide.
Tail
- Build the stabilizer and rudder directly over the plan.
- When glue has dried, set the negative dihedral and attach the leading-edge sheeting.
- Use an extra coat of glue at the center joint.
- There is no spar in the stabilizer because of its thin airfoil.
- Glue the wire dethermalizer hooks into the leading edge of the stabilizer.
- Round the leading edges of the stabilizer and rudder.
- Taper the rudder trailing edge.
Fuselage
- Cut out the sheet-balsa sides.
- Mark the inside of the bottom sheet for the cross-brace pieces with a pencil.
- Pin the bottom sheet over the plan and glue in the longerons, crosspieces, pylon, and raised strips to the indicated width.
- Make a paper template for the pylon (recommended). Mount the pylon and attach the top and side sheeting.
- Cut out the balsa formers, plywood firewall, and landing-gear mount.
- Epoxy the landing skid in place and fit the engine mounts to the firewall.
- Cut and mount a place for the fuel tank, and mount it.
- Cover the front fuselage section with hard balsa sheeting.
- Epoxy-glue the wire wing hooks, then attach the wing mount. Run a fillet of glue in the corner joint of the wing mount and pylon for added strength.
- Round the corners of the fuselage and trim the stabilizer mount. Glue the stabilizer mount brace in place.
- You may need a ballast box in the front of the fuselage due to the light weight of a Cox TD .049.
Covering and finishing
- Smooth the entire model with fine sandpaper and trim away any surface glue blobs.
- Cover the model with silkspan or silk; silk is more resistant to punctures. The author covered his model with silk.
- Apply three coats of clear nitrate dope (recommended because it allows steaming-out warps that won’t come back).
- The fuselage was brushed with two coats of clear dope and then sanded smooth; follow with two coats of color.
- Install the engine, KSB timer, and fuel tubing.
- Install the dethermalizer snuffer tube and rear hooks. Recess the top hook into the bottom of the rudder, then cement the rudder on top of the stabilizer.
Flying and trimming
- Start with 2° left thrust and 3/32 in. right rudder for a right turn in the climb and glide. The model will turn either way, but it is very sensitive to rudder changes; use rudder adjustment sparingly.
- The necessary downthrust is drawn into the plan. The large stabilizer helps overcome any looping tendency.
- Balance the model as indicated by adding lead shot or BBs to the nose ballast box.
- Hand-glide the model until you obtain a long, smooth descent.
- Under power, use bottom-low throttle with the 3/32 in. rudder offset and a 5-second engine run. Even with bottom-low throttle the model will spiral up steeply; after everything trims out, you can gradually open the engine for full power.
I believe the Manta wing holds great potential for high-performance Free Flight models. If you build this design, you will have a real contender for contest work. Good luck with your Manta 250.
Transcribed from original scans by AI. Minor OCR errors may remain.

