
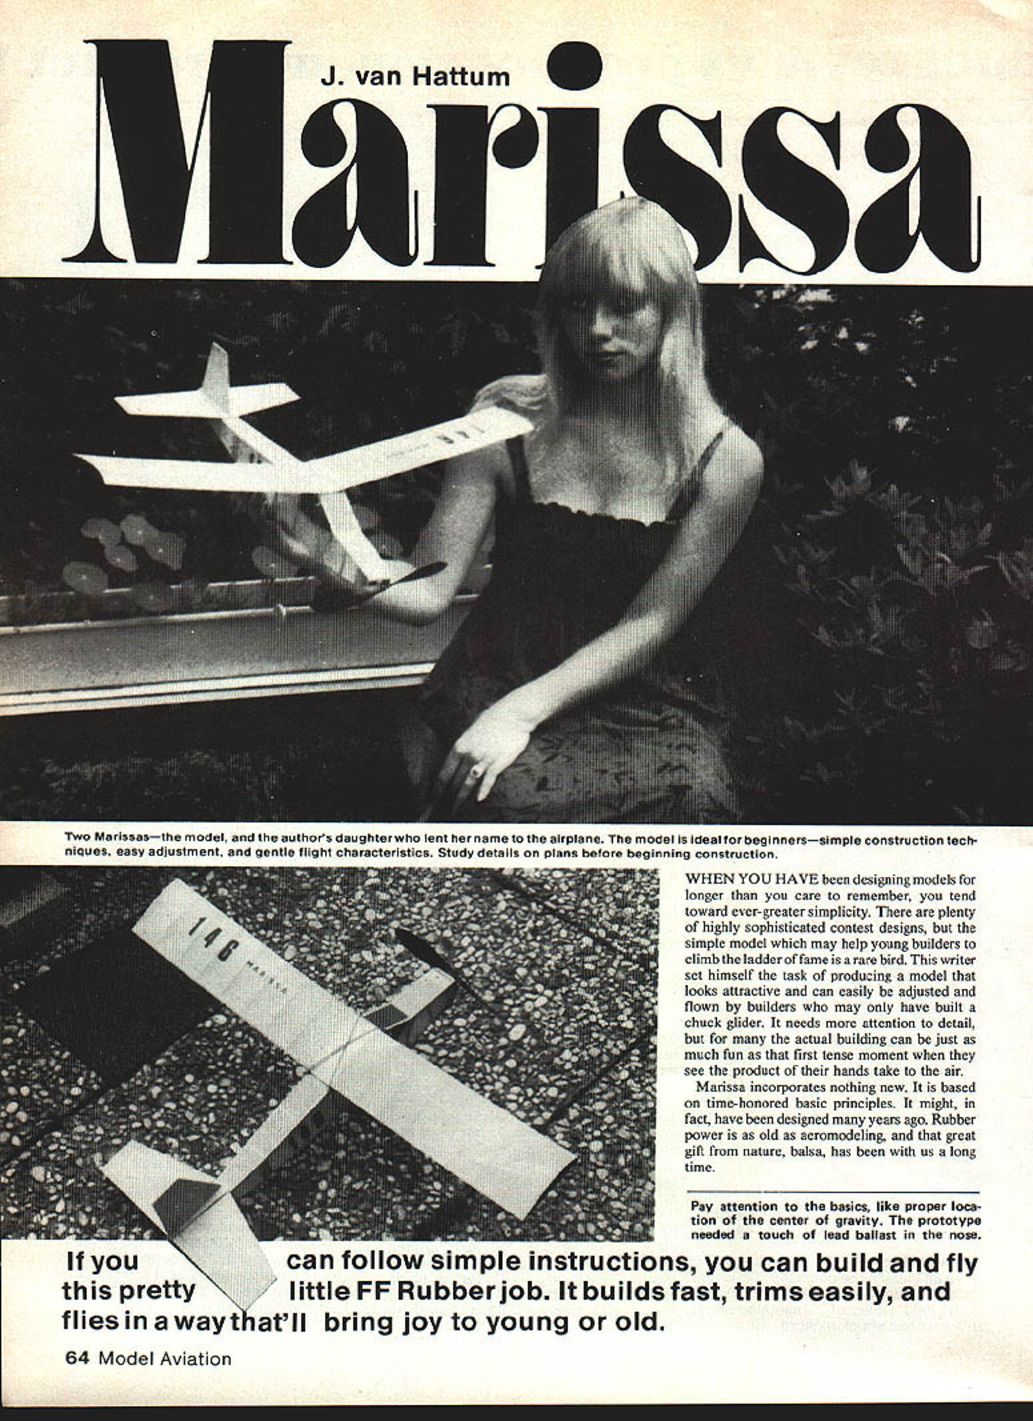
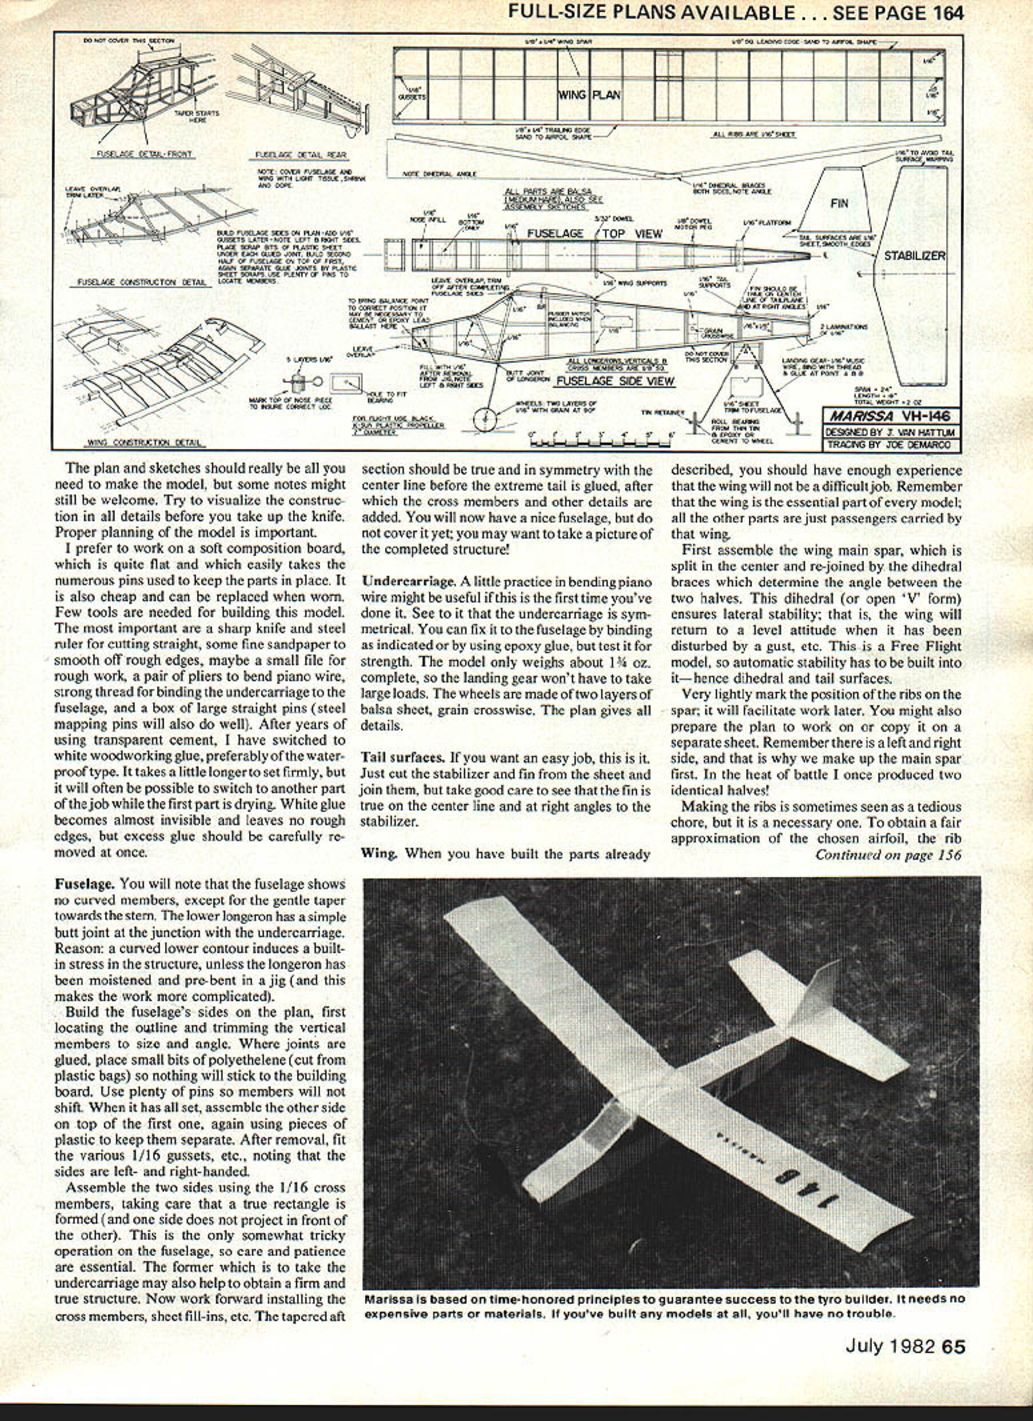
Marissa
J. van Hattum
When you have been designing models for longer than you care to remember, you tend toward ever-greater simplicity. There are plenty of highly sophisticated contest designs, but the simple model which may help young builders climb the ladder of fame is a rare bird. I set myself the task of producing a model that looks attractive and can easily be adjusted and flown by builders who may only have built a chuck glider. It needs attention to detail, but for many the actual building can be just as much fun as that first tense moment when they see the product of their hands take to the air.
Marissa incorporates nothing new; it is based on time-honored basic principles and could easily have been designed many years ago. Rubber power is as old as aeromodeling, and that great gift from nature, balsa, has been with us a long time.
Pay attention to the basics, like proper location of the center of gravity (C.G.). The prototype needed a touch of lead ballast in the nose. If you can follow simple instructions, you can build and fly this pretty little Free Flight (FF) rubber job. It builds fast, trims easily, and flies in a way that will bring joy to young or old.
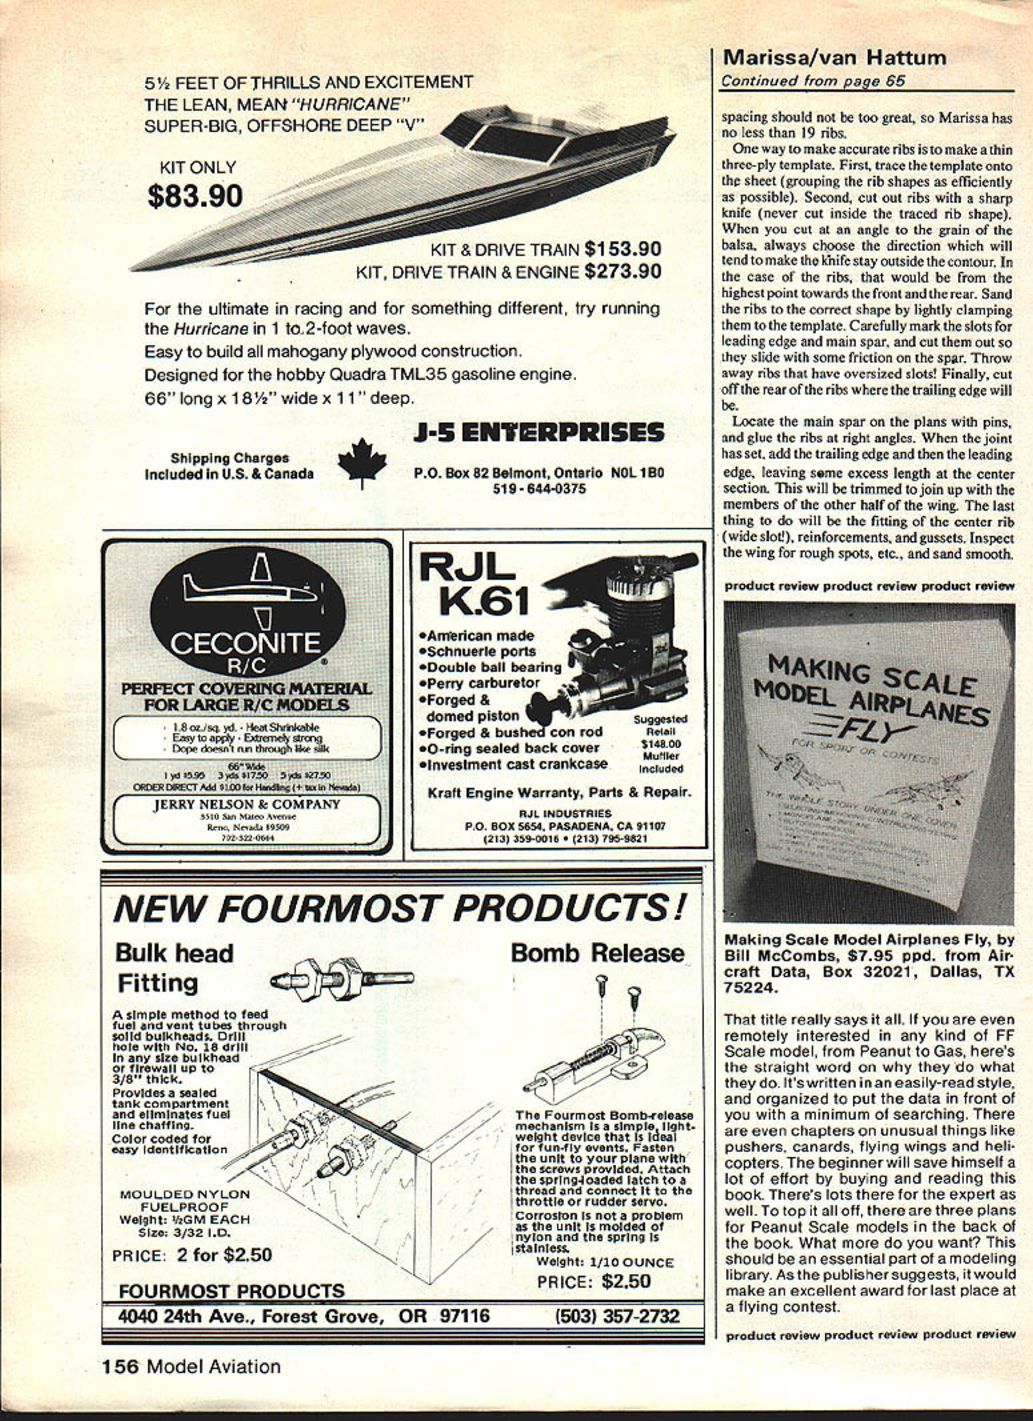
Full-size plans available — see page 164.
Planning and Workshop
Try to visualize the construction in all details before you take up the knife. Proper planning of the model is important.
I prefer to work on a soft composition board, which is quite flat and easily takes the numerous pins used to keep parts in place. It is cheap and can be replaced when worn.
Few tools are needed for building this model:
- A sharp knife and a steel ruler for cutting straight.
- Fine sandpaper to smooth off rough edges; a small file for rough work.
- A pair of pliers to bend piano wire.
- Strong thread for binding the undercarriage to the fuselage.
- A box of large straight pins (steel mapping pins will also do well).
After years of using transparent cement, I have switched to white woodworking glue, preferably waterproof. It takes a little longer to set firmly, but you can often move on to another part of the job while the first part is drying. White glue becomes almost invisible and leaves no rough edges, but excess glue should be carefully removed at once.
Fuselage
You will note the fuselage shows no curved members, except for the gentle taper towards the stern. The lower longeron has a simple butt joint at the junction with the undercarriage. Reason: a curved lower contour induces built-in stress in the structure unless the longeron has been moistened and pre-bent in a jig, and that makes the work more complicated.
Build the fuselage sides on the plan, first locating the outlines and trimming the vertical members to size and angle. Where joints are glued, place small bits of polyethylene (cut from plastic bags) so nothing will stick to the building board. Use plenty of pins so members will not shift. When it has all set, assemble the other side on top of the first one, again using pieces of plastic to keep them separate. After removal, fit the various 1/16" gussets and other details, noting that the sides are left- and right-handed.
Assemble the two sides using the 1/16" cross members, taking care that a true rectangle is formed (and that one side does not project in front of the other). This is the only somewhat tricky operation on the fuselage, so care and patience are essential. A firm and true structure follows from careful work.
Work forward installing the cross members and sheet fill-ins. The tapered aft section should be true and symmetric with the center line before the extreme tail is glued; then add the remaining cross members and details. Do not cover the fuselage yet — you may want to take a picture of the completed structure.
Undercarriage
A little practice in bending piano wire might be useful if this is the first time you've done it. See that the undercarriage is symmetrical. You can fix it to the fuselage by binding as indicated or by using epoxy glue, but test it for strength.
The model only weighs about 1 3/4 oz complete, so the landing gear won't have to take large loads. The wheels are made of two layers of balsa sheet with the grain crosswise. The plan gives all details.
Tail Surfaces
This is an easy job. Cut the stabilizer and fin from sheet and join them, but take good care to see that the fin is true on the center line and at right angles to the stabilizer.
Wing
The wing is the essential part of every model; all the other parts are passengers carried by that wing.
First assemble the wing main spar, which is split in the center and re-joined by the dihedral braces that determine the angle between the two halves. This dihedral (open "V" form) ensures lateral stability — the wing will return to a level attitude when disturbed by a gust. As a Free Flight model, automatic stability must be built in, hence the dihedral and tail surfaces.
Very lightly mark the position of the ribs on the spar; it will facilitate work later. Prepare a separate copy of the plan to work on, and remember there is a left and right side — that is why we make up the main spar first.
Making the ribs may seem tedious, but it is necessary. To obtain a fair approximation of the chosen airfoil, rib spacing should not be too great; Marissa has no less than 19 ribs.
One way to make accurate ribs:
- Make a thin three-ply template and trace the rib shapes onto the sheet, grouping them efficiently.
- Cut out ribs with a sharp knife (never cut inside the traced shape). When cutting across the grain, cut so the knife will tend to stay outside the contour.
- Sand the ribs to shape by lightly clamping them to the template.
- Carefully mark and cut the slots for the leading edge and main spar so ribs slide with some friction on the spar. Discard ribs with oversized slots.
- Cut off the rear of the ribs where the trailing edge will be.
Locate the main spar on the plan with pins and glue the ribs at right angles. When the joints have set, add the trailing edge and then the leading edge, leaving some excess length at the center section to trim and join with the other half. Finish by fitting the center rib (wide slot), reinforcements, and gussets. Inspect the wing for rough spots and sand smooth.
Nose block: the plan shows it built up of layers of 1/16" sheet. It should fit snugly inside the fuselage. A hole provides a fairly tight fit for the bearing supplied with the 7-in. Kaysun propeller.
Covering
Tissue covering is almost a lost art these days, but with care and patience you will master it.
Fuselage covering:
- Each side is covered in one piece; trace the shape with a generous overlap.
- I prefer to stick tissue to a framework with white office paste, though some use a 50/50 mix of dope and thinner.
- Stick tissue to the nose first. Let it dry, then stick it to the tail end, pulling it fairly tightly.
- Tissue can be stronger in one direction; always take the stronger direction lengthwise and spanwise.
- Trim the outside, leaving enough overlap to stick the tissue around the longerons. Then cover top and bottom. Leave openings where indicated (the rear opening gives access to the motor peg).
Wing covering:
- Start with the bottom (flat). When covering the top, fix the tissue at the highest point of the center and tip rib, stretching as usual.
- Stick to corners at the leading and trailing edges, then finish the contour with a moderate pull chordwise.
Shrink the covering by spraying lightly with water, then finish with clear dope thinned 50/50. Use a large, soft brush and start with the bottom surface. The tissue will sag at first but will end up tight as a drum. While the top is still moist, pin down the wing to keep it flat. Some builders like to finish one wing half before the other.
Finally, add decals if desired and stick a small label on each part with your name, address, and telephone number — you may have one long flight and lose it; identification can help get it back.
Trimming and Flying
Thoroughly inspect your model for proper alignment: wing and tail true when viewed from the front, and fin dead on the center line. Rubber bands stretched from peg to peg hold down the wing, and a crosswise rubber band slid over the fuselage and anchored at the stern post fixes the tail unit.
Carefully inspect the wing for any twist. This can be corrected with another coat of dope, or by steaming the wing, twisting it in the opposite direction and holding it for a time.
Prepare the rubber motor:
- Make up the rubber motor into four strands using a square knot, some 3–4 inches longer than the distance between the prop hook and the rear motor peg.
- To avoid bunching after unwinding, plait the motor: make it into two strands, wind one half the "wrong" way, then double it. It will twine together much shortened but capable of the same number of turns.
- Lubricate the rubber with castor oil, rolling it between your hands to ensure every strand is coated.
Fit the motor:
- Hook the motor over the prop shaft, tie a thread with a small weight to the other end, drop it through the fuselage, pull the thread and rubber through the rear opening, remove the thread, and slip the rubber over the peg.
Balance the complete model on your fingertips at the point shown on the plan. If the tail drops, the C.G. is too far back and lead ballast may be required in the nose. Our prototype needed a small nose ballast.
Flying tips:
- Choose a quiet day with little wind and fly over grass, not too near houses and trees which cause turbulence.
- With the relatively big prop the glide is not impressive, so give the motor some 30 turns and launch Marissa straight into the wind.
- Watch behavior closely; an interested helper, preferably another modeler, will be a great help.
- Our model required a tiny bit of side-thrust; a strip of heavy paper slipped behind the nose provided the required amount. Avoid relying on bent noseblocks or wheel pants.
- Mounting the small wheels requires them to be true and balanced. If you use the 7-in. Kaysun prop, don't forget the spinner washer and collar.
Enjoy building and flying Marissa — it builds fast, trims easily, and rewards careful attention with pleasant flights.
Transcribed from original scans by AI. Minor OCR errors may remain.

