

The Mentor
J. Van Hattum
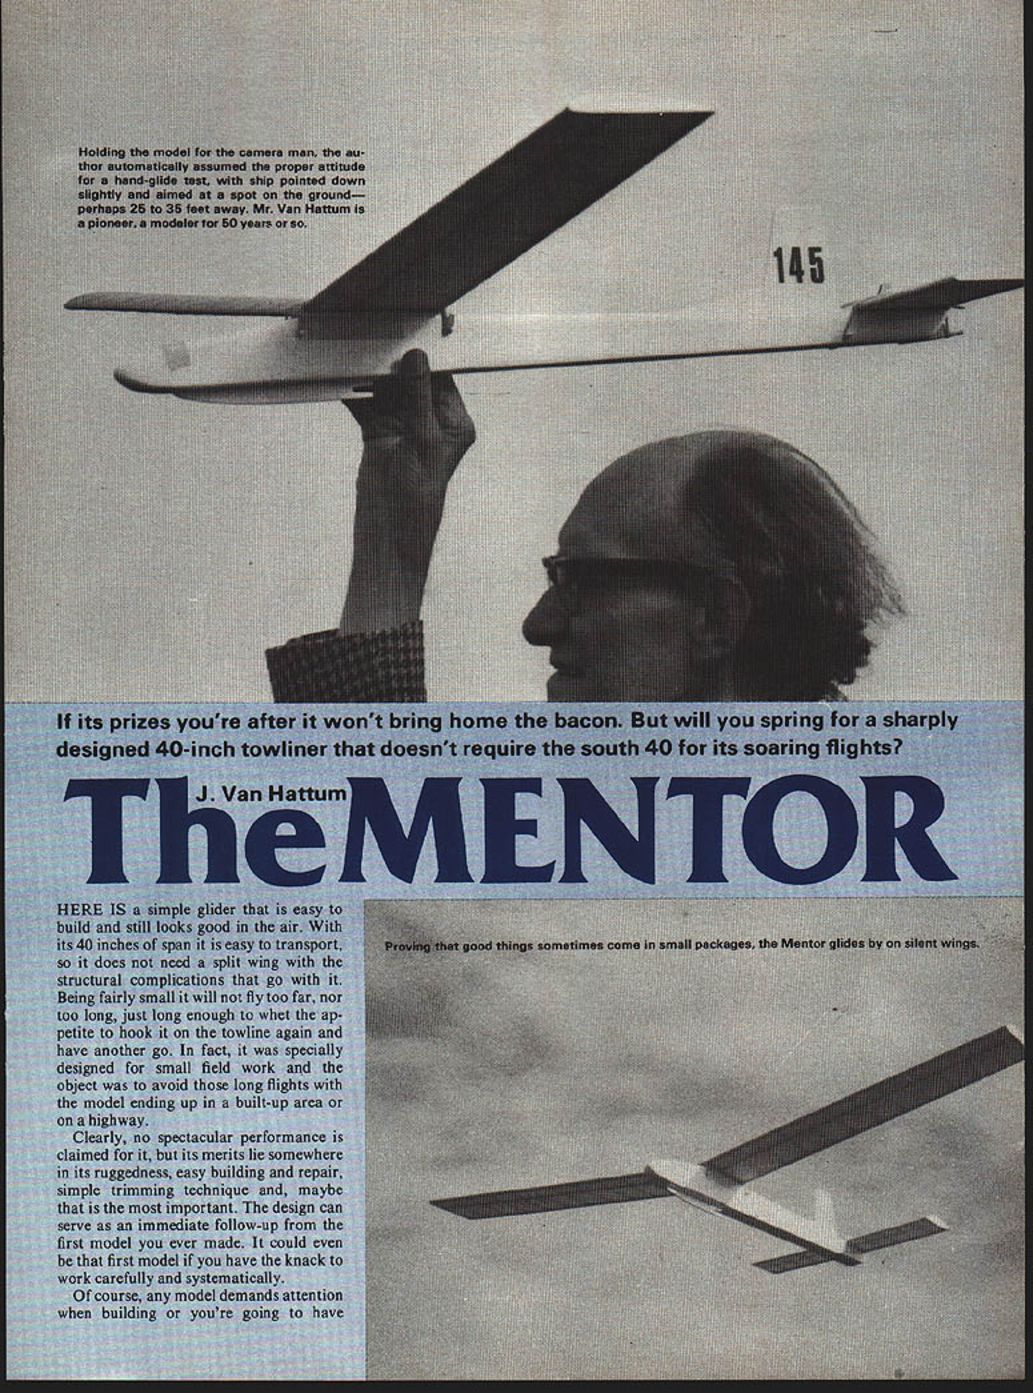
If it's prizes you're after it won't bring home the bacon. But will you spring for a sharply designed 40-inch towliner that doesn't require the south 40 for its soaring flights?
Here is a simple glider that is easy to build and still looks good in the air. With its 40 inches of span it is easy to transport, so it does not need a split wing with the structural complications that go with it. Being fairly small it will not fly too far, nor too long, just long enough to whet the appetite to hook it on the towline again and have another go. In fact, it was specially designed for small-field work and the object was to avoid those long flights with the model ending up in a built-up area or on a highway.
Clearly, no spectacular performance is claimed for it, but its merits lie in its ruggedness, easy building and repair, simple trimming technique and—maybe most important—the fact that the design can serve as an immediate follow-up from the first model you ever made. It could even be that first model if you have the knack to work carefully and systematically.
Of course, any model demands attention when building or you're going to have trouble. Keep these points in mind:
- First, study the plan and sketches until every part and its function are fixed in your mind. When things are not clear, see if they are explained in the text.
- Try to set up a logical sequence of work. Many useful hints are found in the text.
- This is not a kit, so you will have to make all the parts yourself. That makes one feel more responsible for the whole thing, but it also means you can only blame yourself when some detail comes out wrong. Be critical always; if you pass a shoddy job you will be sorry afterwards.
- Copy the larger parts onto the material economically, so the smaller ones can be made from leftovers, but always take care to have the grain of the balsa run as shown on the plan.
- Remember that, even if flying may attract you most of all, a lot of fun can be had from building. This is not a model that can be stuck together in a couple of hours.
Mentor has a long pedigree. A larger model, very much like it, was designed and built around twenty years ago and variants have appeared since. Aiming at simplicity, this version was developed and it won't be the last.
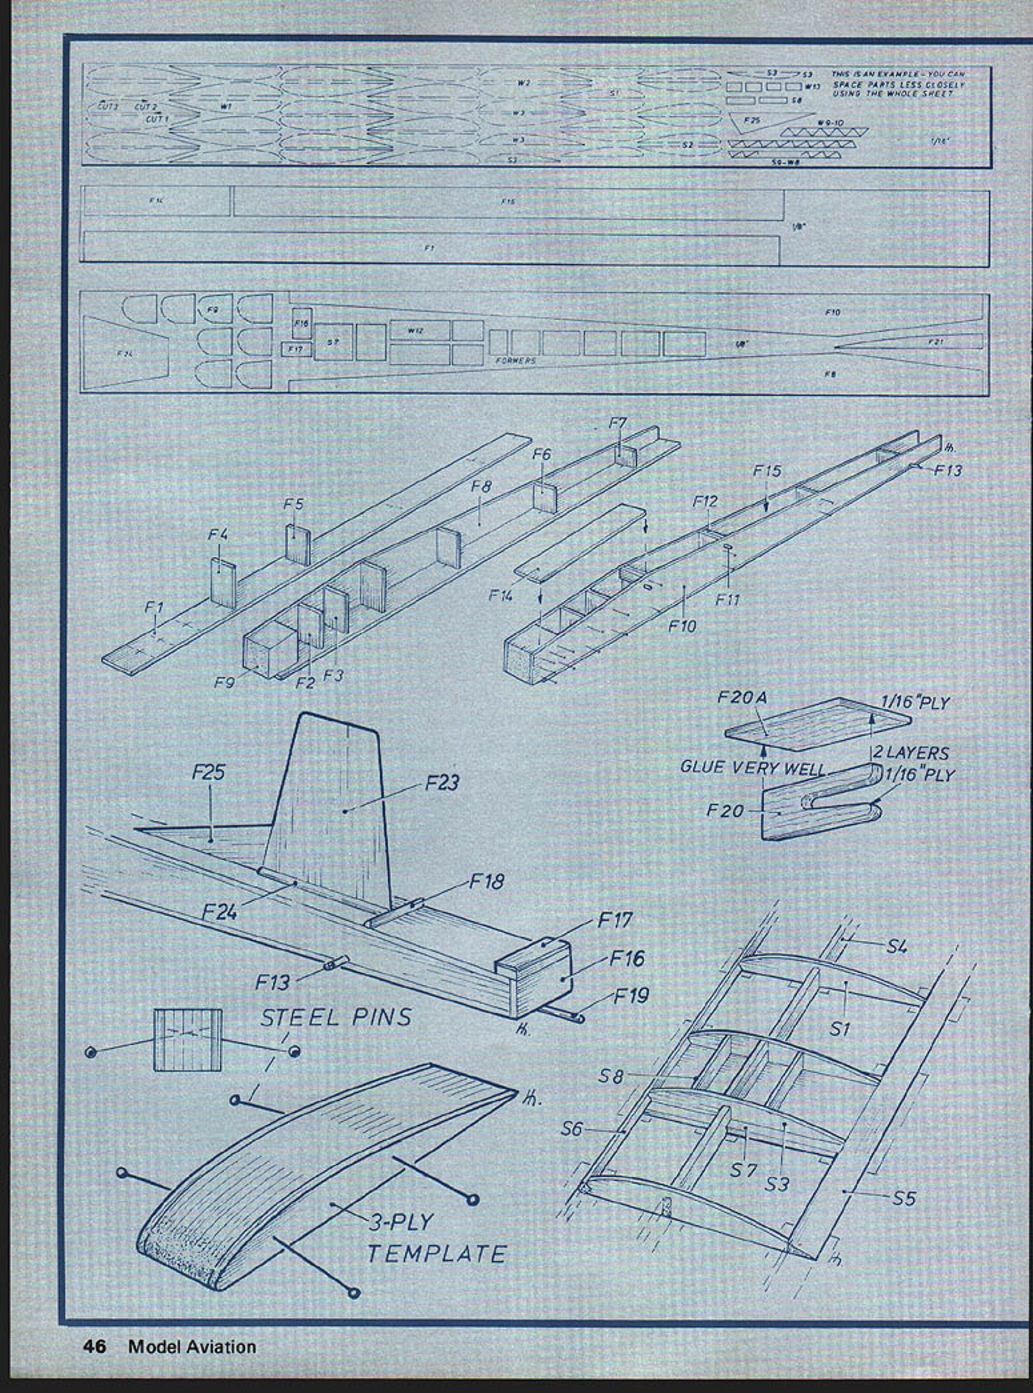
Parts and Templates
THIS IS AN EXAMPLE — YOU CAN SPACE PARTS LESS CLOSELY USING THE WHOLE SHEET
Formers:
- F1, F2, F3, F4, F5, F6, F7, F8, F9, F10, F11, F12, F13, F14, F15, F16, F17, F18, F19, F20, F20A, F21, F23, F24, F25
Other parts:
- W12, W2
- S1, S3, S5, S6, S7, S8, SL
Materials/notes on templates:
- GLUE VERY WELL
- 1/16" PLY
- 2 LAYERS 1/16" PLY
- STEEL PINS
- 3-PLY TEMPLATE
Tools and Materials
The model is made almost entirely of balsa, with the exception of the wing spars, dihedral keepers which join the wing halves, and the towhook—these are highly stressed parts and may need a little work with a jigsaw. The main wing spars are made of spruce. A high safety factor was intentionally built into the design: a trainer should be robust.
- Cutting: Balsa cuts easily with a sharp hobby knife. Insert a new blade (suggested: X-Acto No. 11) as soon as the old one dulls. Always cut along a stout steel ruler to get a perfectly straight line. Choose the cut direction so the knife tends to follow the grain, moving away from the part you are cutting.
- Fit: All parts should be a "sliding fit" but not so tight they must be forced into place. If a part has a sloppy fit, replace it.
- Smoothing: Use a sanding block (a wooden block with sandpaper glued on) for smoothing. For rough contours, a small plane and file are useful. If inexperienced, cut parts oversize and trim to fit.
- Glues and pins: White glue (carpenter's PVA) was used. It gives strong joints, does not tighten while drying, and allows time for positioning. Apply glue to one part only, use enough but avoid excess. Your dealer will sell steel pins for holding parts while glue dries.
- Building board: The author prefers softboard to a wooden building board. It is cheap and you can stick pins in it easily. Pin copies of parts to the board and put wax paper or Saran Wrap underneath to prevent parts from sticking to the plan.
Fuselage
The plan and perspective views show the build sequence. Steps:
- Make the base F1 and glue formers F4 and F5 in position, ensuring they stand at 90 degrees.
- Add F8 or F10 to give a solid basis.
- The extreme nose is made of eight layers of 1/8" sheet glued together; they may be roughly shaped at first. It may be easier to make a jig to get the correct shape.
- The fuselage sides are made from two pieces each glued together for required thickness; glue them over the plan and keep flat with pins until dry.
- When gluing fuselage sides to the base and formers, make sure they are square and true; use a set square if necessary.
- Fit the top longeron, the top formers, and add the removable decking pieces.
- Fit the tailplane and fin, checking alignment.
- The rudder and elevator are built over the plan and hinged with tissue or silk hinge.
The towhook F20, of two layers of 1/16" three-ply, can be added after the fuselage is done. Make sure it is in the right position and very well glued, as it must take the pull of the towline.
Note: You could buy a block of balsa that fits between the fuselage sides to avoid laminating, but the 1/8" sheet noseblock gives a strong result. Trimming requires plane, file, knife, and sanding block. Aim for a nicely rounded nose.
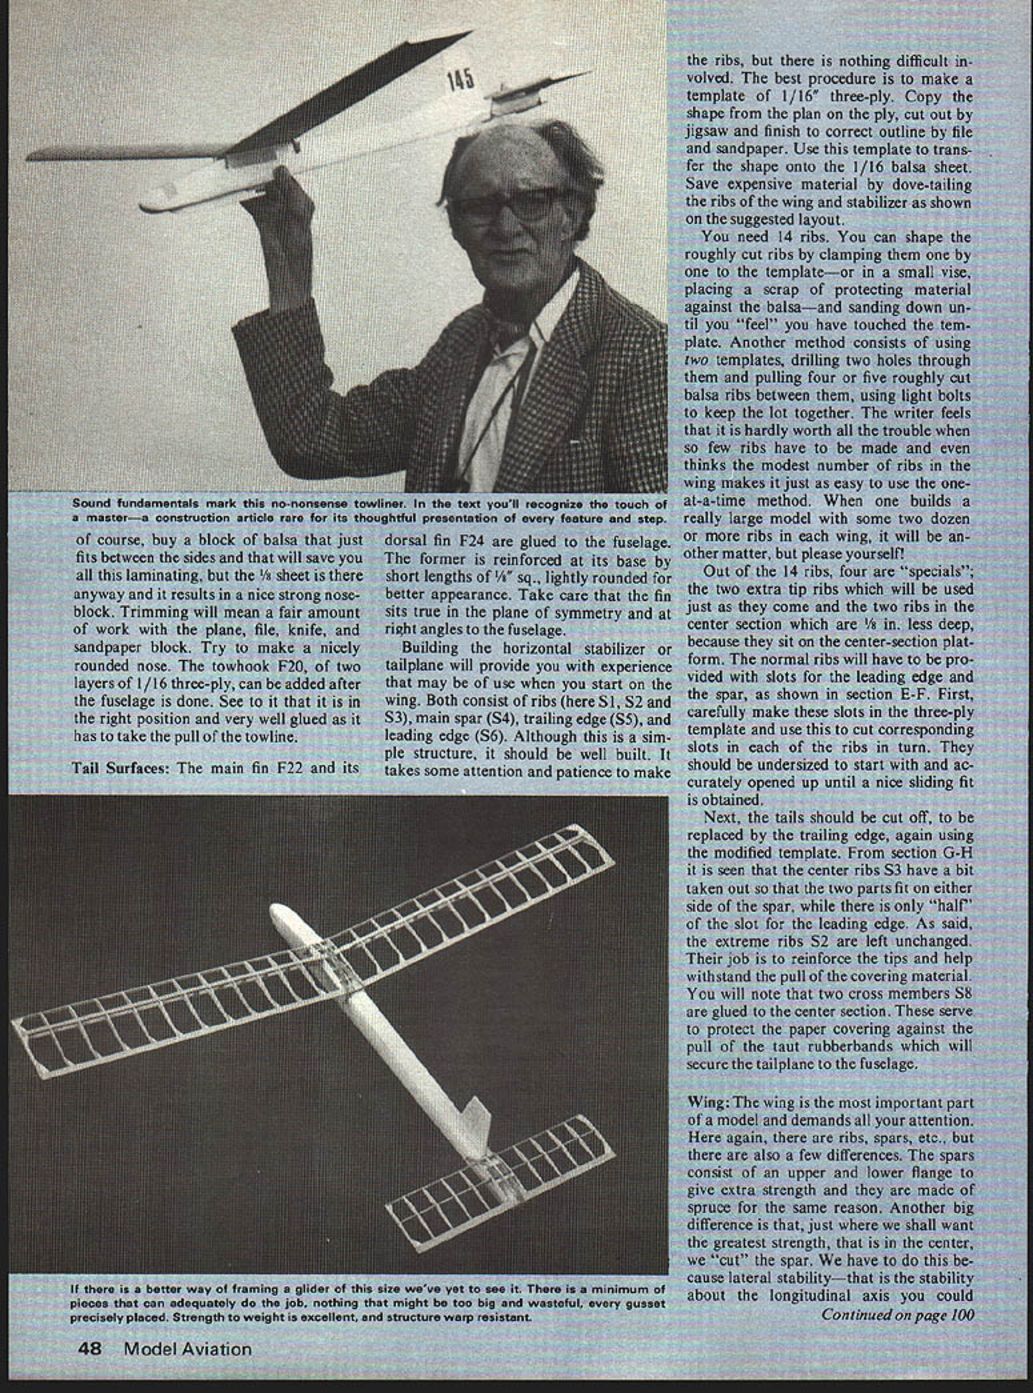
Tail Surfaces
Make a 1/16" three-ply template for the fin and ribs. Procedure:
- Copy the shape from the plan onto ply, cut out with jigsaw, and finish by file and sandpaper.
- Use this template to transfer shapes to 1/16" balsa sheet.
- Save expensive material by dovetailing the ribs as shown on the layout.
Ribs:
- You need 14 ribs for the wing. Four are "specials": two extra tip ribs (used as-cut) and two center ribs reduced by 1/8" in depth because they sit on the center-section platform.
- Normal ribs need slots for the leading edge and the spar. Make these slots in the three-ply template first, then cut corresponding slots in each rib. Start undersized and open up to a sliding fit.
- Center ribs (S3) have material removed so the two parts fit on either side of the spar; there is only half of the leading-edge slot. Extreme ribs S2 are left unchanged to reinforce the tips and help withstand the pull of covering material.
- Two cross members S8 are glued to the center section to protect the paper covering against rubberband loads securing the tailplane.
Methods for shaping ribs:
- Clamp each rough rib to the template and sand down to match.
- Alternatively, use two templates with holes, pull multiple rough ribs between them on light bolts, and sand them together. For only 14 ribs, one-at-a-time is fine.
Wing
The wing is the most important part and demands attention. Key points:
- Spars: The spars have upper and lower flanges for extra strength and are made of spruce. Where the greatest strength is needed—the center—we "cut" the spar because lateral stability (stability about the longitudinal axis, running fore and aft through the model) is achieved by building the wing as an open Vee for dihedral. We must join the spars of both wings and make a strong center joint.
- Center joint: The simplest method is to cut the spars at the center and glue the wing panels together at the proper dihedral in a slight recess in the fuselage underside. A better method is to make a solid plywood "box" in the center of the wing with top and bottom sheeting forming the upper and lower surfaces and ply sides forming vertical webs. The wing panels butt into the box and are glued and screwed to it; insert spruce blocks in the box to take the rubberband loads.
- Dihedral keepers: The spars are joined and held solidly together by dihedral keepers (W11). Make two dihedral keepers from 1/16" three-ply, carefully obtaining the exact dihedral angle. Rough-cut with a jigsaw and finish by filing. Use one as a template for the other. Check height so they fit exactly from the top of the upper flange to the bottom of the lower one.
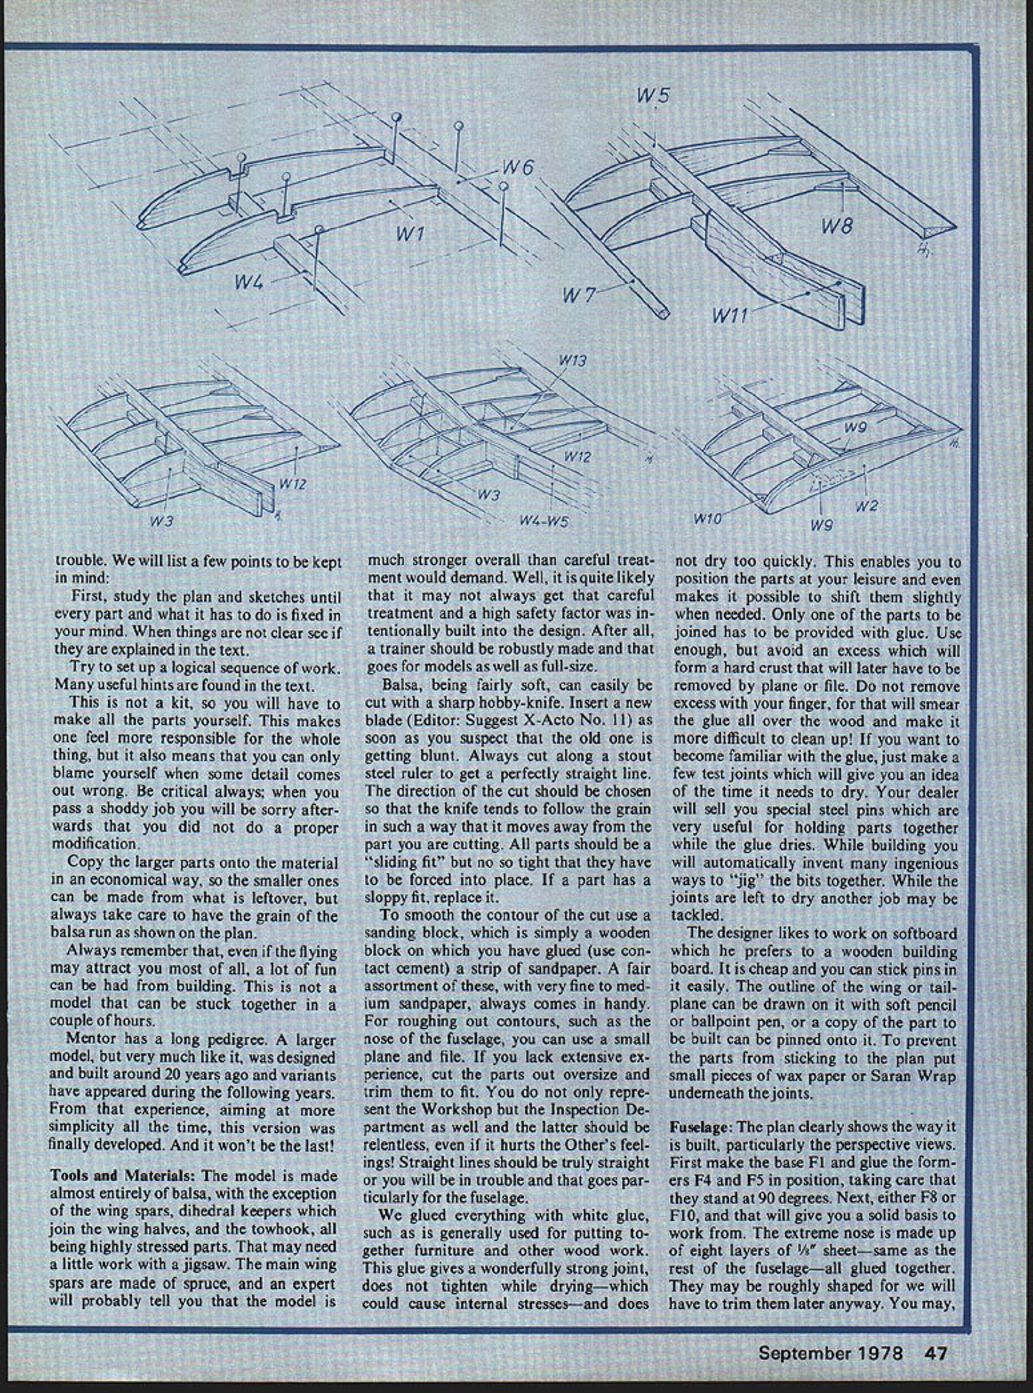
Building sequence (summary):
- Put the plan on the building board.
- Fix the lower flange of the main spar W4 and glue ribs W1 in place, except the center ones. Ensure ribs are at right angles to the spar.
- Fit trailing edge W6 and small triangular pieces W8 to provide a good connection. Note grain direction so any wood contraction tends toward the gusset corner.
- Fit top flange W5 and leading edge W7. Note how much the spar flanges should project beyond the innermost rib.
- Sand the tip rib surface smooth and glue on the finishing rib W2.
- Fit the leading edge into rib slots and sand to follow the airfoil contour.
- Glue dihedral keepers to the spars of one wing and align accurately.
- Block up the finished half to the correct dihedral and join the wings. Trim leading and trailing edges so they butt properly. Keep checking while glue dries.
The dihedral join is the trickiest part; with the plan, cross-sections, and sketches, finishing the center section should present no difficulties.
Covering
Covering requires planning and care.
- Prepare: Sand away rough spots and remove glue remains. Cut two panels of medium-heavy tissue for the stabilizer with about 1 inch overlap. Colors are optional—white or bright colors aid visibility.
- Application: Lightly moisten tissue to shrink during drying for a taut surface. Some builders apply damp; the author prefers to dampen the tissue after it is applied using a wet nailbrush or plant spray. Fix first from tip to tip with a fairly strong pull using white glue (slightly thinned) or white office paste. These are preferred to dope for initial fixation because dope dries too quickly to correct wrinkles.
- Stabilizer: Cover the lower surface first and trim with a sharp blade. Apply two coats of clear dope. Do not pull too hard in the rib direction as it can sag the airfoil.
- Wing: Cover each half separately using a similar technique. Take care at the center section to obtain a good finish.
- Dope: If you use silkspan and dope (original Mentor used silkspan), be careful: multiple coats of dope can make the structure heavy. To avoid excessive weight increase, thin the dope slightly.
For visibility and recovery, stick labels with your name, address, and telephone number on all main parts. Your dealer will have decals for model name and AMA number.
Finishing
- Inspect the whole structure carefully. Correct details where required and add glue to any weak joints.
- Sand rough spots smooth.
- The fuselage, including the fin, is given two coats of clear dope, sanding between coats. Then apply a couple of coats of colored dope (white or a striking color). Thin dope slightly to limit weight gain.
Balancing and Checking
- Assemble the model with rubberbands to fix wing and stabilizer in place. They should sit firmly but allow displacement in a hard landing. Bands should be crossed over the wing.
- Add shot (or pieces of strip solder) in the nose compartment to bring the center of gravity (C.G.) to the point shown on the plan. Final adjustment follows during flight tests. The author’s model needed about 2½ ounces of shot; yours may differ.
- Check rigging angles: wing and tail should differ by about three degrees. Final adjustment is found during testing. If incorrect, glue a sliver of wood under the leading or trailing edge of the stabilizer as required.
- Watch for twists in wing or stabilizer that cause turning. Cure by steaming the drooping side or by doping, twisting the surface in the opposite direction and holding firmly until it sets.
- If the model turns too sharply in one direction, a temporary trim tab of stiff paper or cardboard can be bent and glued to correct it.
- Always prepare a small repair outfit for the field: glue, pins, covering tissue, dope, thin balsa slices, plenty of rubberbands, shot for trimming, and tape.
Repairs
- Keep spare parts for common crash items: wing tips, tailplane tips, and leading edges.
- Replace spruce spars if broken.
- Two cross members S8 protect the covering against rubberband pull; check these in repairs.
- After any landing, check that wing and stabilizer positions are correct and rubberbands are intact.
Flying and Flight Tests
- Choose a fair-sized field free from obstacles that cause turbulence or damage. Always launch dead into wind from the windward side of the ground.
- Begin with a few hand launches to check trim:
- Hold the model just behind the C.G., slightly nose-down, and move it in an accelerated arc.
- Adjust launch speed to wind velocity. Too slow and the model will stall and dive.
- If it noses down on hand launch, try a faster launch. If it flies nose-heavy, add a tiny sliver under the trailing edge of the stabilizer. If tail-heavy, add a thin strip under the leading edge. Do not move the C.G. yet.
- When hand launches look good, glue the trim slivers permanently.
- Towline launch requires a helper and clear signals:
- Use a light but strong non-elastic line about 100 feet long, attached to a block or bracket, and to the wing with a rubber band loop around the inboard rib.
- Tie a ring at the free end with a small vane (a strip of cloth) below it so the ring can be seen and will slip off the towhook.
- The helper holds the model just behind the C.G., wings level, nose slightly up. You take the other end of the line, right into wind.
- At the signal, start walking at a fair pace (not running) and the helper takes a few steps forward, letting you pull the model gently out of his hand. Do not let him push the model because that may make the ring slide off the towhook.
- From line tension you will feel whether speed is correct. If the model sinks back, you were too slow—try again.
- In strong wind, the starter may have to stand still or even run toward the model, like launching a kite.
- When the model comes overhead, reduce towing speed until it stands right over you and the ring slips off the hook. Then the model is free.
- Observe behavior critically. Expect small turns; a trim tab on the fin can help. If the model rears up with stalls, reduce the difference in rigging angles by raising the leading edge of the stabilizer slightly. If the descent is too steep, raise the trailing edge a bit.
- If abrupt release from the towline causes a stall, the model may have been pulled up too fast.
- If the model swerves off to one side, check for asymmetry or crosswind towing. Try to save it by stopping and gently pulling at right angles so the model turns toward you. If that fails, release the line immediately to avoid a crash.
- Practice progressively: work up to the full 100-foot towline as you gain confidence. Longer flights let you observe and refine trim and balance.
When the trim satisfies you, permanently attach whatever bits determine the stabilizer angle. Keep notes of changes and reasons for them. With experience on the Mentor you will be well prepared to build more complicated models, perhaps even a radio-controlled glider. The Mentor is a solid basis to build on.
Transcribed from original scans by AI. Minor OCR errors may remain.

