
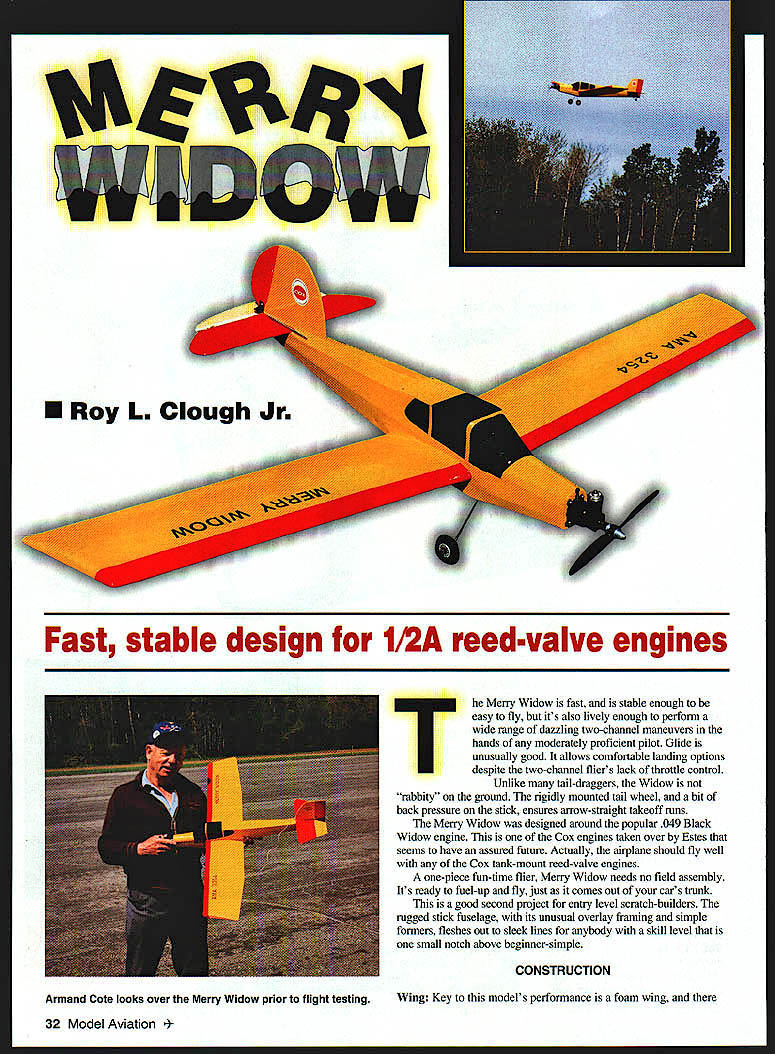
Merry Widow: Fast, stable design for 1/2A reed-valve engines
Roy L. Clough Jr.
The Merry Widow is fast and stable enough to be easy to fly, yet lively enough to perform a wide range of dazzling two-channel maneuvers in the hands of any moderately proficient pilot. Glide is unusually good, which allows comfortable landing options despite the two-channel flier's lack of throttle control.
Unlike many tail-draggers, the Widow is not "rabbity" on the ground. The rigidly mounted tail wheel and a bit of back pressure on the stick ensure arrow-straight takeoff runs.
The Merry Widow was designed around the popular .049 Black Widow engine. This is one of the Cox engines taken over by Estes that seems to have an assured future. The airplane should fly well with any of the Cox tank-mount reed-valve engines.
A one-piece fun-time flier, the Merry Widow needs no field assembly. It's ready to fuel up and fly just as it comes out of your car's trunk.
This is a good second project for entry-level scratch-builders. The rugged stick fuselage, with its unusual overlay framing and simple formers, fleshes out to sleek lines for anybody with a skill level a notch above beginner.
Construction
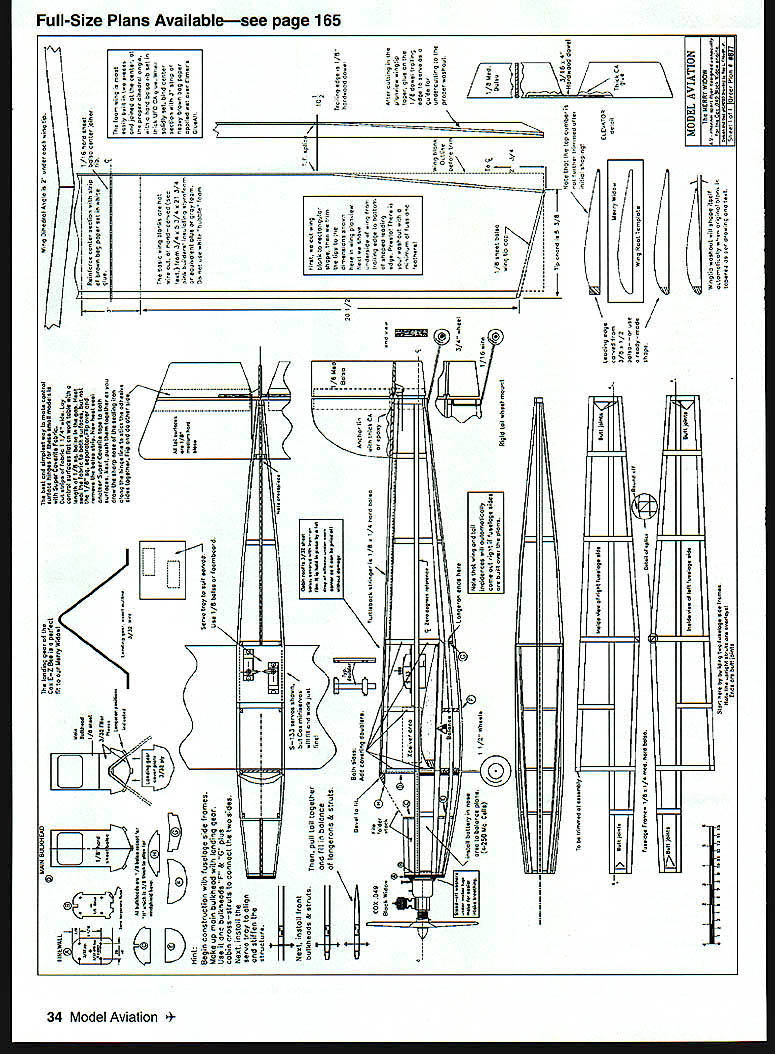
Key to this model's performance is the foam wing. There are two practical ways to make it—using a hot-wire cutter or by hand-carving from a rectangular blank. Lack of a cutter is no reason to eschew the advantages of foam wings.
Wing
If you have access to a hot-wire cutter:
- Make the wing as a rectangular blank, then cut the tips to shape and skive off the underside washout, using the wooden leading and trailing edges as guides.
If you don't have a cutter:
- Start with a rectangular blank and hand-carve and sand it to shape with a kitchen carving knife (blade at least 6–8 inches long). This is easier than building a rib-and-sheet wing.
- Use a draw-through knife sharpener or stacked hardened-steel disks to produce a micro-raggedy edge that cuts foam well.
- Glue the shaped leading-edge dowel and the trailing-edge dowel/strip to the foam blank before carving; they make excellent carving guides for the flat of the knife.
- Take long, smooth slices to approximate the airfoil, then bring the final curvature with long strokes of a hard-backed 100-grit sanding block. Do not use a flexible block (it can produce a wavy surface). Avoid scouring or back-and-forth scrubbing—use smooth draws over the foam.
- Check frequently with a cardboard template and wear a dust mask during sanding.
When the blank has been brought to the airfoil section:
- Lay it flat and trim it to the taper and tip rake shown on the plan. This will likely slice the trailing-edge dowel about halfway at the tip.
- Splice and glue a piece of trailing-edge dowel so the tip end is flush with the new upper camber line.
- Skive off a foam wedge beneath the tip to create the washout without changing the upper camber.
The wing is built in halves and joined at the middle to obtain the proper dihedral. Use a hard balsa rib in the joint and glue the finished halves together.
Merry Widow
- Type: RC Sport
- Wingspan: 44 inches
- Engine: Cox .049 Black Widow
- Functions: Rudder, elevator
- Weight: 21 ounces
- Construction: Balsa and foam
- Covering/finish: Film
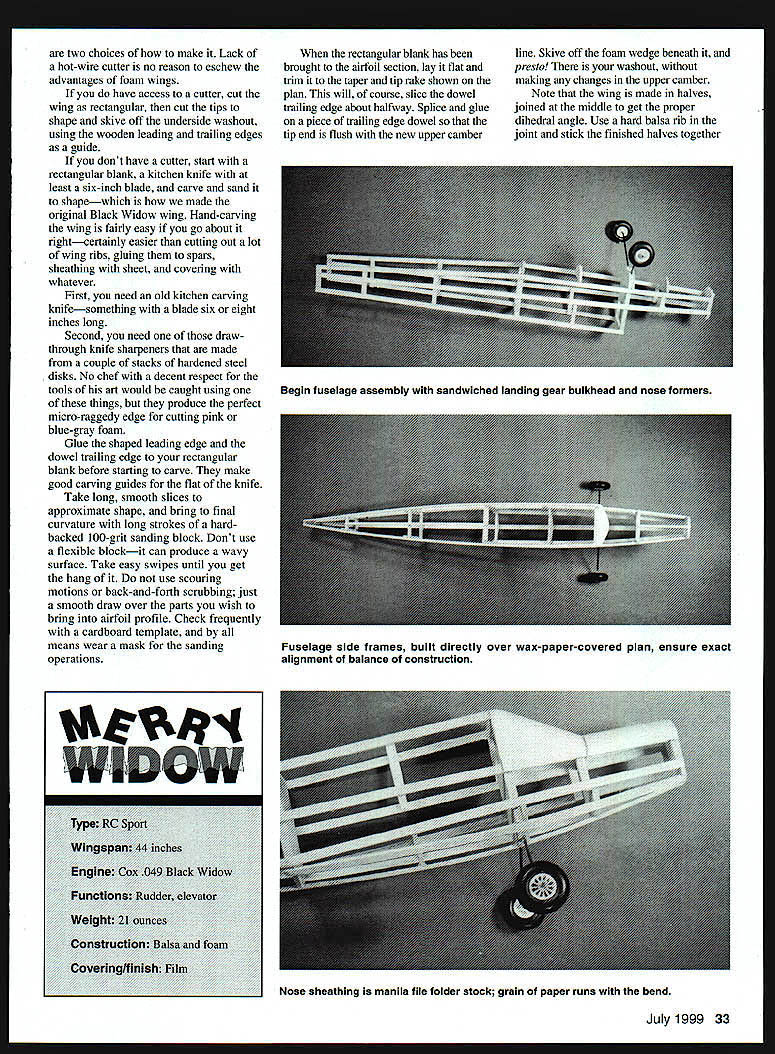
Begin fuselage assembly
- Sandwich the landing-gear bulkhead and nose formers when assembling the nose.
- Build the fuselage side frames directly over the wax-paper-covered plan to ensure exact alignment.
- Glue up the main longerons, stringers, and cabin crossstruts to connect the two sides. Use pins through the wax paper to align and stiffen the structure.
- Install the front nacelle formers and struts, then pull the tail together. Fill and sand the longerons and struts to fair the fuselage.
Nose sheathing is cut from manila file-folder stock. The grain of the paper should run fore-and-aft. Cement the sheeting to the bulkheads and formers and sand to shape.
The simplest way to make control-surface hinges is with fabric hinge tape:
- Use 1/4-inch-wide fabric strips.
- Lay the control surfaces together and cut the required length of hinge material.
- Heat-seal the fabric to the surfaces, then fold over the hinge line and cement in place.
- Trim excess and seat the hinge line with a sharp edge so the surfaces move freely.
Flip the fuselage over and install other fittings and details as shown on the plan. Finish by checking alignment, balance, and control throws before covering and final assembly.
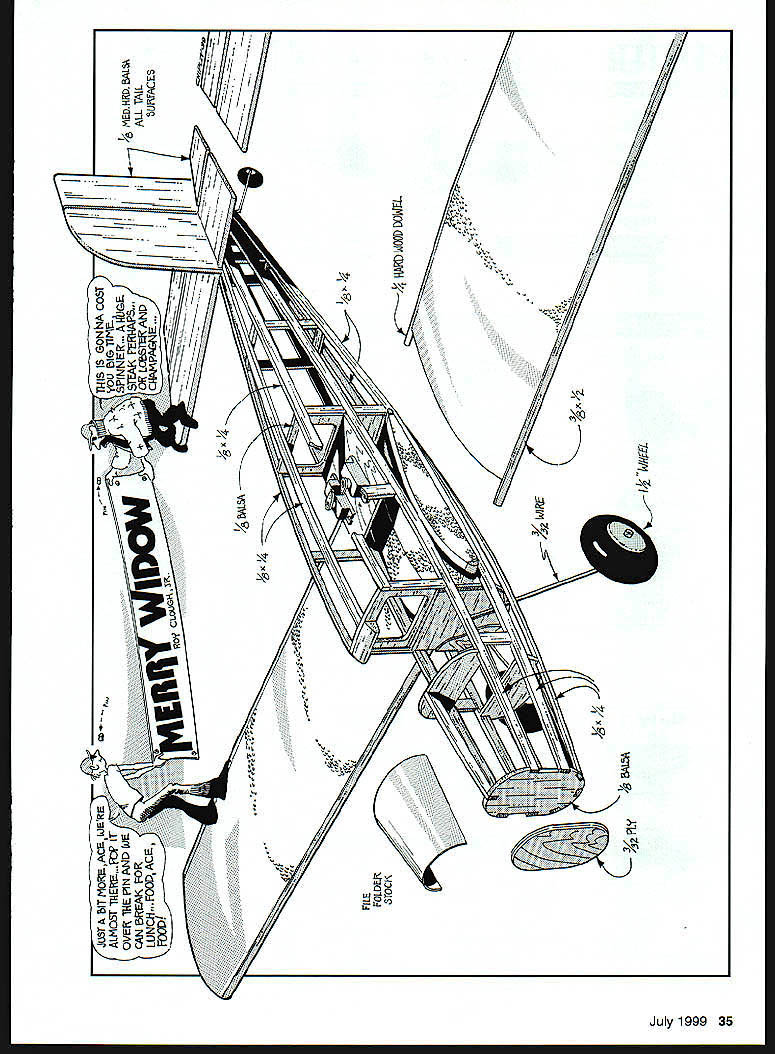
Fuselage
- Build the basic fuselage frames right over the wax-papered plan sheet.
- Make up the bulkhead formers, including the main bulkhead with its built-in landing-gear mount. The salvaged wheel assembly from a Cox E-Z Bee was a perfect fit for the original Merry Widow.
- Cross-struts and filler pieces are 1/8 x 1/4 in. balsa. Around the cabin and wing areas, use covering doublers where shown.
- The wing is not filleted; use a couple of triangular pieces of film to fill open seams before covering the balance of the fuselage.
Servo hookup:
- Use your preferred method. For small models, 1/8-in. dowel pushrods with lashed-and-glued wire ends work well.
- Note how the tail wheel is attached to the relatively heavy rear fuselage post.
Engine mounting tip:
- A trick for reed-valve engine installations is to mount the engine with washers under the tank lugs so the tank is moved slightly rearward (about 1/16 to 1/4 in.) from the firewall. This shifts the firewall and tank rearward slightly and can improve engine performance. Vary the number of washers under each lug to fine-tune the thrustline.
Tail
- Tail surfaces are 1/16-in. sheet balsa.
- Use the simplest and most durable hinges noted on the plan for small models.
- Cover tail surfaces with iron-on film. Leave gaps where the stabilizer, rudder, and top longeron gluing takes place.
Flying
- Reed-valve engines often perform best if you run a tankful of fuel through them first to loosen them up and get most needle-valve adjustments done before attempting serious flying.
- Because of the shallow resting angle and the built-in wing incidence, the model will take off "flat-footed" when released; it's not necessary to raise the tail for takeoff.
- Use a small amount of back stick to hold the tailwheel down for arrow-straight tracking; the model will lift easily into the air.
- Once aloft, explore the model's performance. When the engine starts making worrying noises, 100 feet of altitude will let you land almost anywhere you choose.
Roy L. Clough Jr. 1070 Upper City Rd. Pittsfield, NH 03263 royce6@juno.com
Transcribed from original scans by AI. Minor OCR errors may remain.

