
METAL RIB TEMPLATES
Introduction
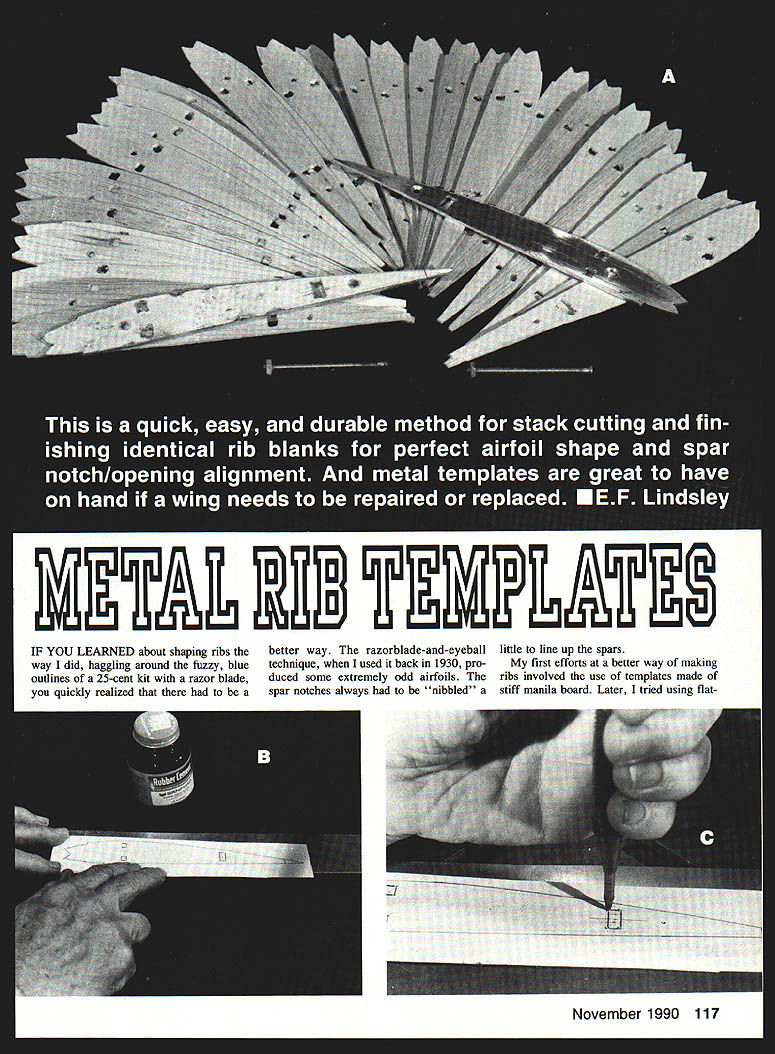
If you learned about shaping ribs the way I did — haggling around the fuzzy, blue outlines of a 25-cent kit with a razor-blade — you quickly realize there must be a better way. The razor-blade-and-eyeball technique often produced odd airfoils and required “nibbling” spar notches to line up spars.
Early experiments used stiff manila board and flattened tin cans as templates. The lessons learned were:
- A stiff template helps, but placing a template at each end of a stack of ribs works much better: you can final-sand against both templates and shape all the ribs between them.
- Two pins through the templates and ribs didn’t secure the stack adequately. Long, thin machine screws keep ribs from slipping and work far better.
- The method works on tapered wings; the tip rib can be smaller than the root rib and still align.
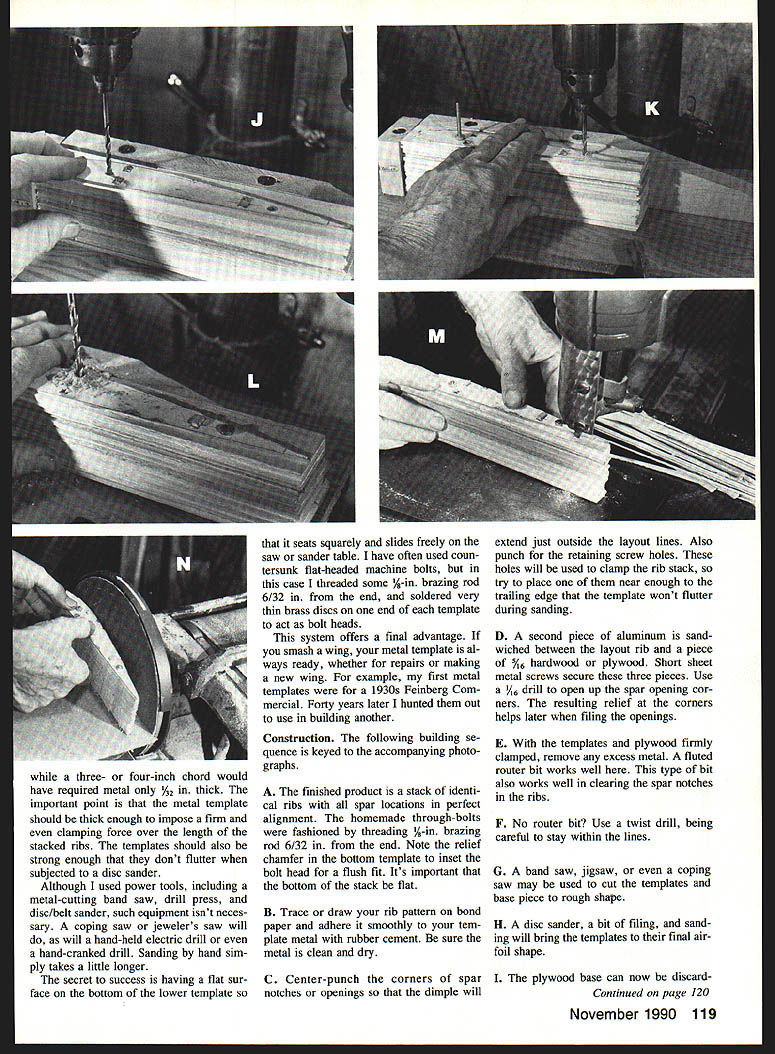
After a midlife break from modeling, my first modern rib-making experience came restoring the built-up ribs of a 1934 Douglas hardware-gas model. For a later 1/4-scale version I used sheet ribs with spars passing through the ribs. That arrangement, and modern RC practices, made a strong case for metal rib templates.
RC ribs often require a thin ply or balsa shear web glued between the faces of the upper and lower spars. Installation uses clothespins and thin CyA (cyanoacrylate) glue. Since CyA is not gap-filling, the spar faces must lie in the same plane for a correct fit. A stout metal template helps control spar location and the shaping process.
Materials and tools
- Template material: 1/16" (0.0625") soft aluminum is recommended; sheet brass or other aluminum will also work. Thickness should be enough to impose a firm clamping force over the length of the stacked ribs and resist fluttering against a disc sander.
- For larger chords (example: full-scale 14 in.) use thicker metal (e.g., .090" ). For very small chords (3–4 in.) 1/32" might be sufficient.
- Backing: 1/16" hardwood plywood for a base while cutting/template-making.
- Fasteners: countersunk flat-headed machine bolts, or homemade through-bolts made from 1/8" brazing rod with 6-32 threaded ends and thin brass discs soldered on as bolt heads.
- Drills: hand-held or drill press; 1/16" drill for corner relief holes.
- Cutting tools: metal-cutting band saw, jigsaw, coping saw, jeweler’s saw, or coping saw for hand cutting.
- Finishing tools: disc/belt sander, files, router with a fluted bit (optional), twist drill (if no router).
- Clamps and L-shaped backup blocks for drilling rib blanks.
The secret to success is a flat work surface so the bottom (lower) template seats squarely and slides freely on the saw or sander table.
Template construction
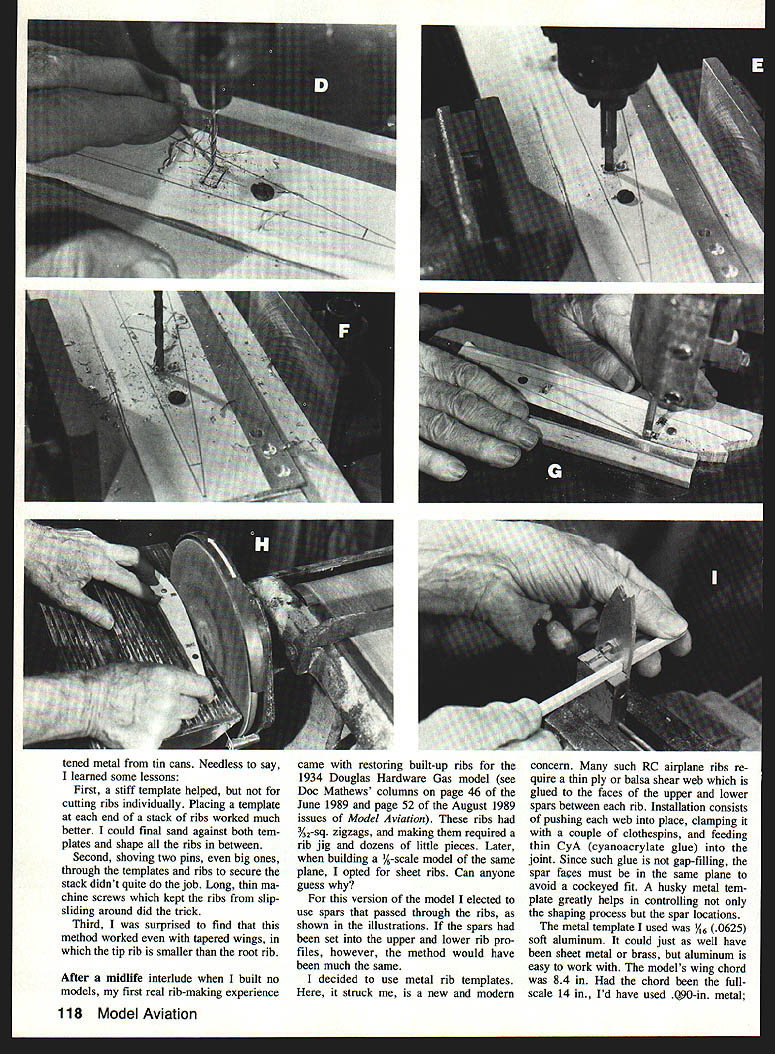
- Clean and dry the metal template surface. Trace or draw the rib pattern on bond paper and adhere it smoothly to the metal with rubber cement. Extend layout lines just outside the rib outline.
- Center-punch the corners of spar notches or openings so the dimple extends just outside the layout lines. Also punch the retaining screw holes; place one near the trailing edge so the template won't flutter during sanding.
- Sandwich a second piece of aluminum between the layout piece and a 1/16" hardwood plywood base. Secure the three pieces with short sheet-metal screws.
- Use a 1/16" drill to open up the spar-opening corners in the sandwich. The resulting relief helps later when filing the openings in the rib blanks.
- With templates and plywood clamped, remove excess metal. A fluted router bit works well and also clears spar notches in ribs. If no router is available, a twist drill (carefully) can be used to remove metal within the lines.
- Cut the template base roughly to shape using a band saw, jigsaw, or coping saw.
- Finish the template profile with a disc sander, files, and sanding until smooth. Provide a relief chamfer in the bottom template so inset bolt heads sit flush.
- Discard the plywood base after the template is finished, if desired.
Making ribs — step-by-step
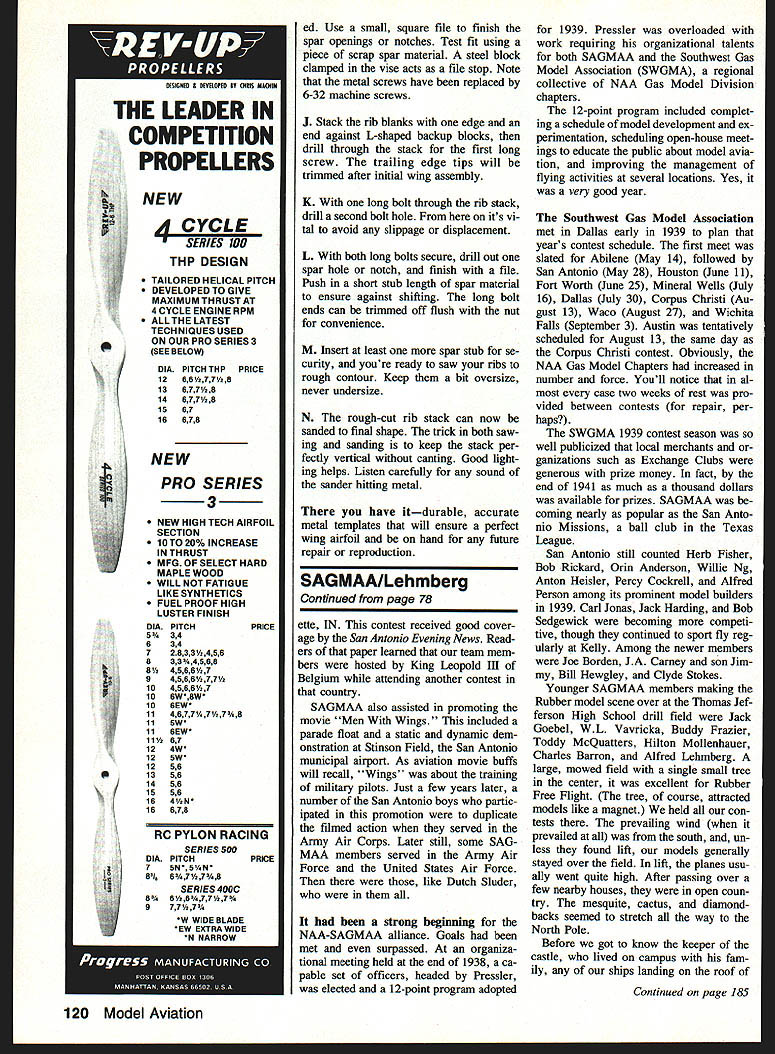
- Stack rib blanks with one edge and an end registered against L-shaped backup blocks to keep the stack square.
- Clamp the templates to the rib stack with long through-bolts (homemade brazing-rod bolts or machine bolts). Drill through the stack for the first long screw.
- With one long bolt in place, drill the second bolt hole. From this point on, avoid any slippage or displacement.
- With both long bolts secure, drill out the spar hole or notch through the stack and finish the openings with a file. Push in a short stub length of spar material in the notch to ensure against shifting while finishing.
- Trim the long bolt ends flush with the nut for convenience, if desired.
- Insert at least one more spar stub for security and you're ready to saw the ribs to rough contour. Keep the rough cut slightly oversize, never undersize.
- Sand the rough-cut rib stack to final shape while keeping the stack perfectly vertical and uncanted. Good lighting helps. Listen for any sound of the sander hitting metal — that indicates misalignment or contact with the template.
- After final sanding, trim the trailing edge tips as needed following initial wing assembly.
Tips and notes
- Homemade through-bolts: thread 1/8" brazing rod about 6-32 from the end and solder thin brass discs to one end to act as bolt heads. Countersink or chamfer the bottom template so the head fits flush.
- When using a disc sander, place the retaining holes and clamps so the templates do not flutter during sanding.
- If you damage a wing, metal templates are durable and ready for repair or reproduction work; well-made templates can last for decades.
- Keep the template material strong enough to resist flutter and maintain consistent spar locations across the rib stack.
There you have it — durable, accurate metal templates that ensure a consistent wing airfoil and are handy for future repairs or reproduction.
Transcribed from original scans by AI. Minor OCR errors may remain.

