
Mini Catapult Glider
- Chuck Markos
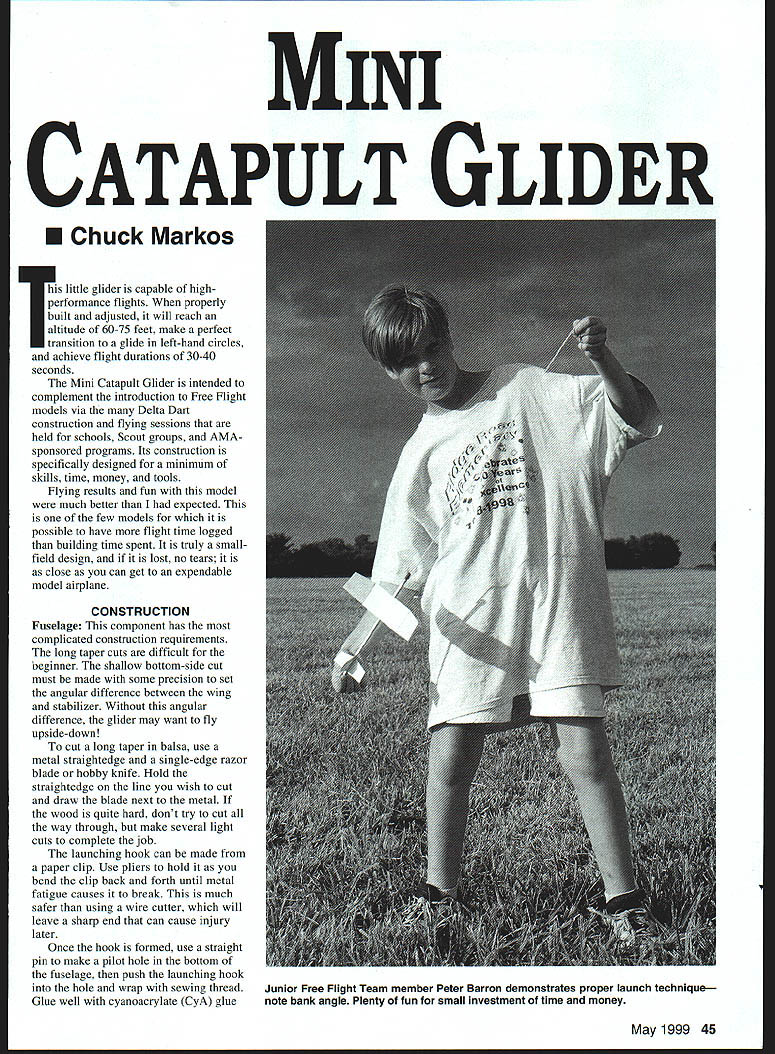
This little glider is capable of high-performance flights. When properly built and adjusted, it will reach an altitude of 60–75 feet, make a smooth transition to a glide in left-hand circles, and achieve flight durations of 30–40 seconds.
The Mini Catapult Glider is intended to complement introductions to Free Flight models via Delta Dart construction and flying sessions held for schools, Scout groups, and AMA-sponsored programs. Its construction is designed to minimize required skills, time, money, and tools.
Flying results and fun with this model were much better than expected. This is one of the few models for which it is possible to log more flight time than building time. It is truly a small-field design and, if lost, is essentially expendable.
Construction
Fuselage
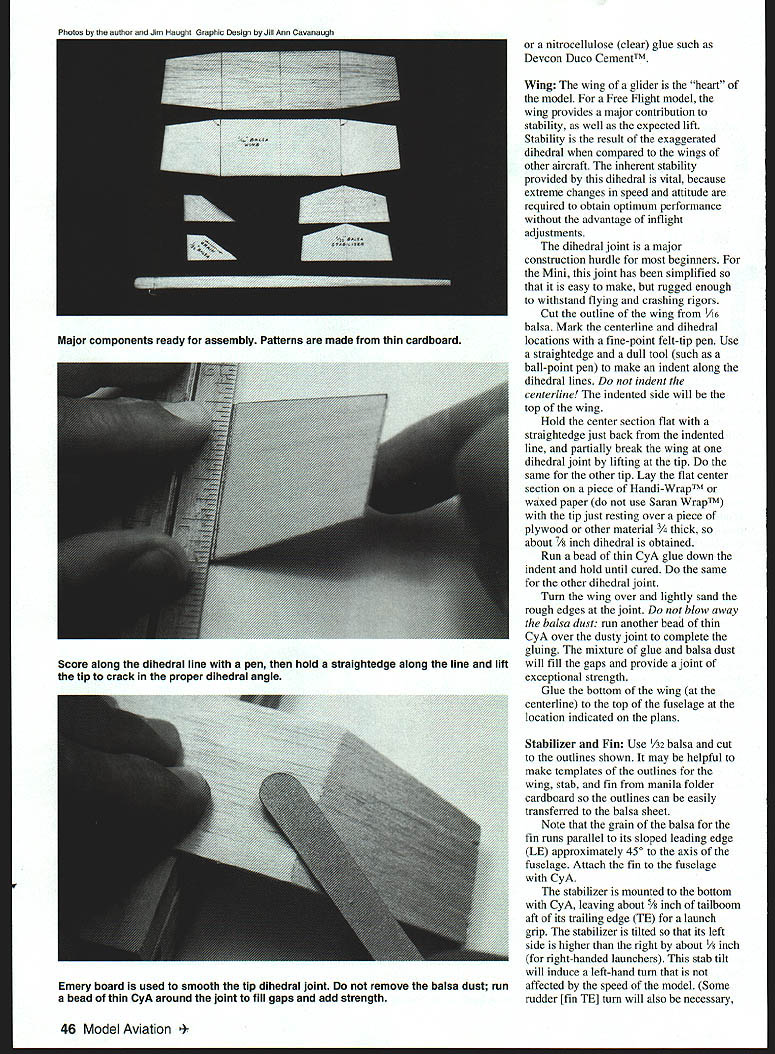
The fuselage has the most complicated construction requirements. The long taper cuts are difficult for beginners. A shallow bottom-side cut must be made with some precision to set the angular difference between the wing and stabilizer; without this angular difference the glider may want to fly upside-down.
- To cut a long taper in balsa, use a metal straightedge and a single-edge razor blade or hobby knife. Hold the straightedge on the line and draw the blade next to the metal. If the wood is hard, make several light cuts rather than trying to cut through in one pass.
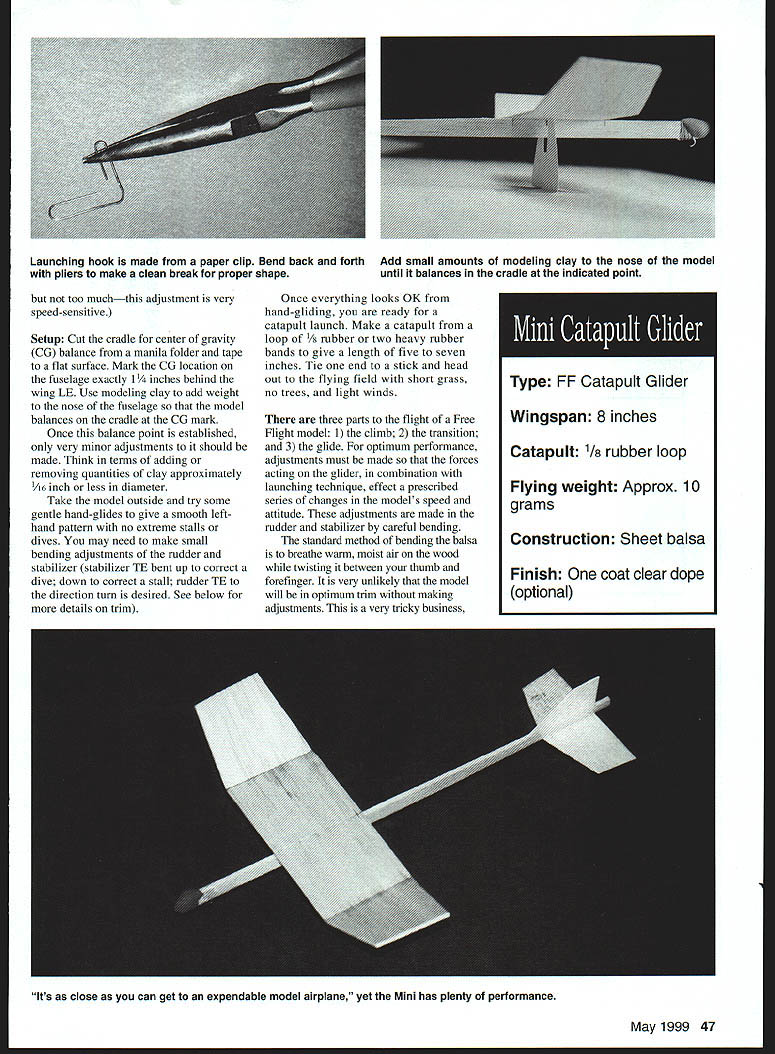
- The launching hook can be made from a paper clip. Use pliers to bend it back and forth until metal fatigue causes it to break off cleanly. This is safer than cutting, which can leave a sharp end.
- Once the hook is formed, use a straight pin to make a pilot hole in the bottom of the fuselage, push the launching hook into the hole, bind with sewing thread, and glue well with cyanoacrylate (CyA) glue.
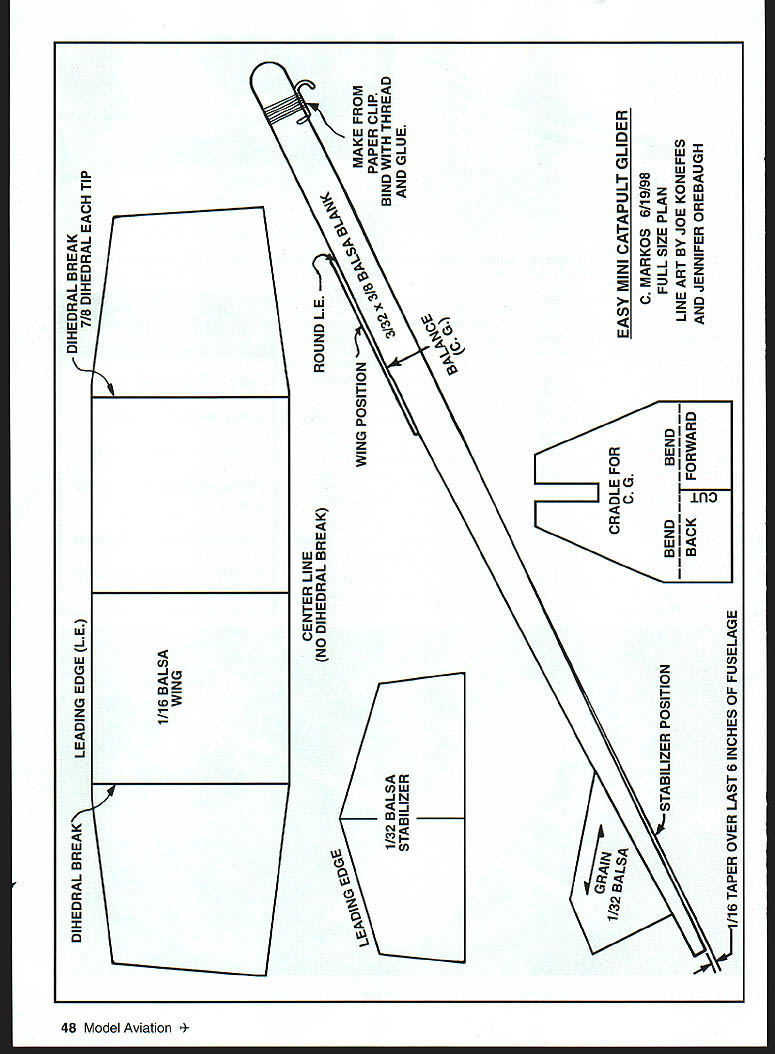
Make the 1/16-inch taper over the last 6 inches of the fuselage as shown on the plans.
Wing
The wing is the heart of the model. For a Free Flight glider, the wing provides most of the lift and contributes greatly to stability via dihedral. The exaggerated dihedral is vital because extreme changes in speed and attitude occur during optimal flight; it provides inherent stability without inflight controls.
- Cut the wing outline from 1/16-inch balsa.
- Mark the centerline and dihedral locations with a fine-point felt-tip pen. Do not indent the centerline.
- Use a straightedge and a dull tool (for example, a ball-point pen) to make an indent along each dihedral line. The indented side will be the top of the wing.
- Hold the center section flat with a straightedge just back from the indented line and partially break each dihedral joint by lifting the tip the same distance as the opposite tip.
- Lay the flat center section on waxed paper (Handi-Wrap™ or similar) with the tips just resting over a piece of plywood or other material about 3/4 inch thick so that approximately 7/8 inch dihedral is obtained at each tip.
- Run a bead of thin CyA down each indented joint and hold until cured.
- Turn the wing over, lightly sand rough edges at the joints, remove balsa dust, and run another bead of thin CyA over the dusty joint. The mixture of glue and balsa dust will fill gaps and produce exceptional strength.
- Glue the bottom of the wing (along the centerline) to the top of the fuselage at the location indicated on the plans.
Notes:
- The dihedral joint can be a major construction hurdle; this simplified method is rugged enough to withstand flying and crashing.
- Do not use Saran Wrap™ as your waxed surface; use waxed paper or equivalent.
Stabilizer and Fin
- Use 1/32-inch balsa for the stabilizer and fin (alternatively, 1/16-inch may be used for a sturdier stab for very young builders).
- Make templates from manila folder or cardboard to transfer outlines to the balsa.
- Note grain: the fin grain should run parallel to its sloped leading edge (approximately 45° to the fuselage axis).
- Attach the fin to the fuselage with CyA.
- Mount the stabilizer on the bottom of the fuselage with CyA, leaving about 5/16 inch of tailboom aft of its trailing edge for a launch grip.
- Tilt the stabilizer so its left side is higher than the right by about 1/8 inch for right-handed launchers; this induces a left-hand turn. Some rudder (fin TE) turn will also be necessary but not too much—this adjustment is very speed-sensitive.
To bend and trim balsa parts, breathe warm, moist air on the wood while twisting between thumb and forefinger to make small, controlled bends.
Setup
- Cut a cradle for center of gravity (CG) balance from a manila folder and tape it to a flat surface. Mark the CG location on the fuselage: exactly 1 1/4 inches behind the wing leading edge (LE).
- Use modeling clay to add weight to the nose so the model balances on the cradle at the CG mark. Once established, make only very minor adjustments—think in terms of adding or removing clay in quantities about 1/16 inch or less in diameter.
- Take the model outside and try gentle hand-glides to establish a smooth left-hand pattern with no extreme stalls or dives. Make small bending adjustments:
- Bend stabilizer trailing edge (TE) up to correct a dive; down to correct a stall.
- Bend rudder (fin TE) toward the direction you want the turn.
- When hand-glides look good, prepare for catapult launch.
Flying and Trim
There are three parts to the flight of a Free Flight model:
- The climb
- The transition
- The glide
For optimum performance, adjustments must be made so that the forces on the glider, together with launching technique, produce a prescribed series of changes in speed and attitude. These adjustments are made by careful bending of the rudder and stabilizer.
Control factors in the launch:
- How strong the catapult rubber is and how far it is stretched.
- The banking angle (twist) held for release.
- The vertical angle at release.
There is an optimum combination of these three factors for each trim. The classic pattern is a banking turn to the right at initial launch, followed by a roll to the left during the climb and a smooth transition to a left-hand glide (southpaws should reverse directions).
Catapult:
- Make a catapult from a loop of 1/8-inch rubber or two heavy rubber bands to give a length of 5–7 inches. Tie one end to a stick and launch from a field with short grass, no trees, and light winds.
Trimming tips:
- Warm, moist breath is an easy way to bend small amounts of balsa for trim changes.
- Small visual deviations can produce dramatic flight changes; make incremental adjustments and test.
- Once trimmed, try catching a thermal (rising warm air) on calm summer mornings (best between 9 and 11 a.m.). Thermal flights may exceed several minutes, and a strong thermal can carry the Mini out of sight.
Contest idea:
- Two fliers launch simultaneously; last one down wins. Use a stopwatch to record longest flights.
Souping Up the Mini
The following changes were tested and produced performance improvements of 10–20 seconds over the basic model:
- Choose lightweight wood for wing and stab, but keep the fuselage quite strong.
- Change the wing to a cambered airfoil.
- Sand tail surfaces thinner and lighter.
- Apply one coat of clear dope so the model resists dew on the grass.
For younger modelers:
- A version using 1/32-inch balsa for the wing and 1/16-inch for the fuselage was tried. This version uses a catapult rubber with a cross-section less than 1/16 inch.
Specifications
- Type: FF Catapult Glider
- Wingspan: 8 inches
- Catapult: 1/8-inch rubber loop (or two heavy rubber bands)
- Flying weight: Approx. 10 grams
- Construction: Sheet balsa
- Finish: One coat clear dope (optional)
Plans and Notes
- Leading edge: round
- Dihedral break: 7/8 inch dihedral at each tip
- Wing: 1/16 balsa
- Stabilizer: 1/32 balsa (alternative: 1/16 for sturdier version)
- Fuselage taper: 1/16 taper over last 6 inches
- CG: 1 1/4 inches behind wing LE
- Launch hook: make from paper clip, bind with thread, and glue
Easy Mini Catapult Glider C. Markos 6/1998 Plans line art by Joe Konefs and Jennifer O'Rebaugh
Let's have fun!
Chuck Markos 655 Carlisle Ave. Deerfield, IL 60015
Transcribed from original scans by AI. Minor OCR errors may remain.

