
Mini-electrics
What the author has done with this kind of power for FF models is purely astounding, as is evident from the pictures. You can do it, too, with the information provided about techniques and sources. — Don Srull
SINCE MY PREVIOUS article on Free Flight Mini-Electrics in the October 1987 issue of this magazine, much has happened in this fast-growing little corner of modeling. First of all, the response to that article was much greater than expected. Apparently, many of you out there are anxious to learn more about how to get started in Mini-Electrics. I'll attempt to answer some of your questions and provide you with additional incentives to give this type of flight a whirl. Based on questions I've received and some field experience gained over the last flying season, this article will touch on the following items:
- New Mini-Electric products
- Building a good charger
- Ways to get more power
- Multimotors
What's new?
A new Mini-Electric motor system is available—new, at least, to U.S. fliers. The power unit by Knight and Pridham Engineering, Ltd. of England offers several unique and useful features. Called the KPO1, the basic system employs the same Mabuchi motor as do the VL, MRC, and FE systems described in the last article.
Well-known British scale modeler Derek Knight is the individual behind the KPO1 system. Derek has won a number of national-level Free Flight Scale championships with several beautiful aircraft powered by his Mini-Electric motor system.
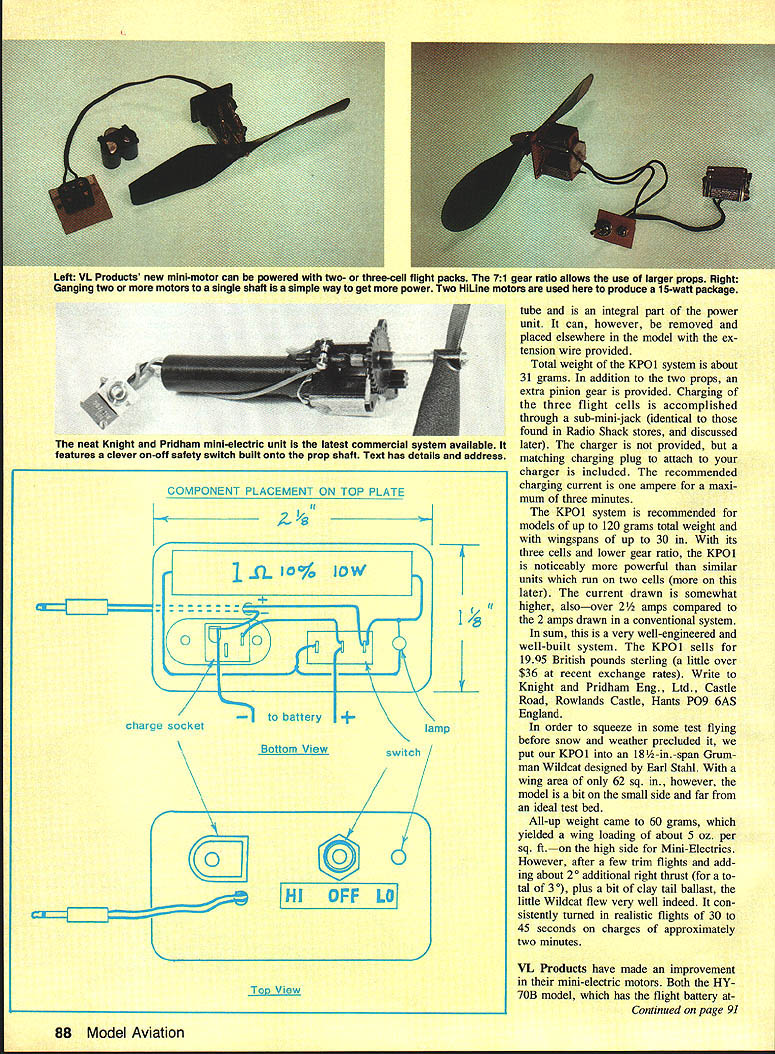
The KPO1 system uses three 50 mAh rechargeable cells and a gear ratio of 4.25:1 (motor to prop shaft). This is slightly less than the 4.5:1 ratio used on the Ferrell Enterprise and the MRC units, and well below the 7:1 ratio employed by VL. This Mini-Electric system also incorporates a clever, elegantly simple on-off switch. A set of brass contact points is mounted on the motor frame; when the prop is pushed rear the points are opened and the motor is shut off, and when the prop is pushed forward (flying position) the points are closed and the battery cells are activated through the charging socket. Wired for three cells, the flier, ready to launch, simply pulls the prop forward and the motor is turned on. I actually found I could simply flip the prop over, like starting a CO2 motor, for easy instant starts. If the model strikes an object less head-on, in theory the prop will be pushed rear shutting down the motor; in practice, however, this saving mechanism doesn't invariably work.
Included in the KPO1 system are two propellers manufactured by K&P Ltd. The propellers are about 5-1/2" diameter and made of stiff fiberglass-filled plastic. The three-cell battery is housed in a tube and is an integral part of the power unit. It can, however, be removed and placed elsewhere in the model with the extension wire provided.
Total weight of the KPO1 system is about 31 grams. In addition to the two props, an extra pinion gear is provided. Charging of the three flight cells is accomplished through a sub-mini jack (identical to those found in Radio Shack stores). The charger is not provided, but a matching charging plug to attach to your charger is included. The recommended charging current is 1 ampere for a maximum of three minutes.
The KPO1 system is recommended for models of up to 120 grams total weight and with wingspans of up to 30 in. With its three cells and lower gear ratio, the KPO1 is noticeably more powerful than similar units which run on two cells (more on this later). The current drawn is somewhat higher also—over 2.5 amps compared to the 2 amps drawn in a conventional system.
In sum, this is a very well-engineered and well-built system. The KPO1 sells for 19.95 British pounds sterling (a little over $36 at recent exchange rates). Write to Knight and Pridham Eng., Ltd., Castle Road, Rowlands Castle, Hants PO9 6AS, England.
In order to squeeze in some test flying before snow and bad weather precluded it, we put our KPO1 into an 18-1/2-in.-span Grumman Wildcat designed by Earl Stahl. With a wing area of only 62 sq. in., however, the model is a bit on the small side and far from an ideal test bed.
All-up weight came to 60 grams, which yielded a wing loading of about 5 oz. per sq. ft.—on the high side for Mini-Electrics. However, after a few trim flights and adding about 2° additional right thrust (for a total of 3°), plus a bit of clay tail ballast, the little Wildcat flew very well indeed. It consistently turned in realistic flights of 30 to 45 seconds on charges of approximately two minutes.
VL Products has made an improvement in their mini-electric motors. Both the HY-70B model, which has the flight battery attached to the motor frame, and the HY-70BR model, which uses a remote battery (separated from the motor), now have the plastic propeller shaft reinforced with a brass sleeve. This greatly strengthens the shaft which connects the spur gear to the prop.
The VL mini-electric motors still use what I believe is a very desirable feature for all such systems—an automatic freewheeling propeller which disengages the motor from the prop shaft when power is exhausted. This helps the model's glide, and also reduces the probability of the battery being damaged by the windmilling prop driving the motor. In addition, the freewheeling propeller ensures disengagement of the prop and motor in the event of a crash landing shortly after launch, thereby saving the battery and motor from overheating and possible pack damage.
VL now also offers three different flight batteries: the standard two 50 mAh cells, a pack of two 80 mAh cells for longer runs, and one containing three 50 mAh cells for shorter, zippier runs.
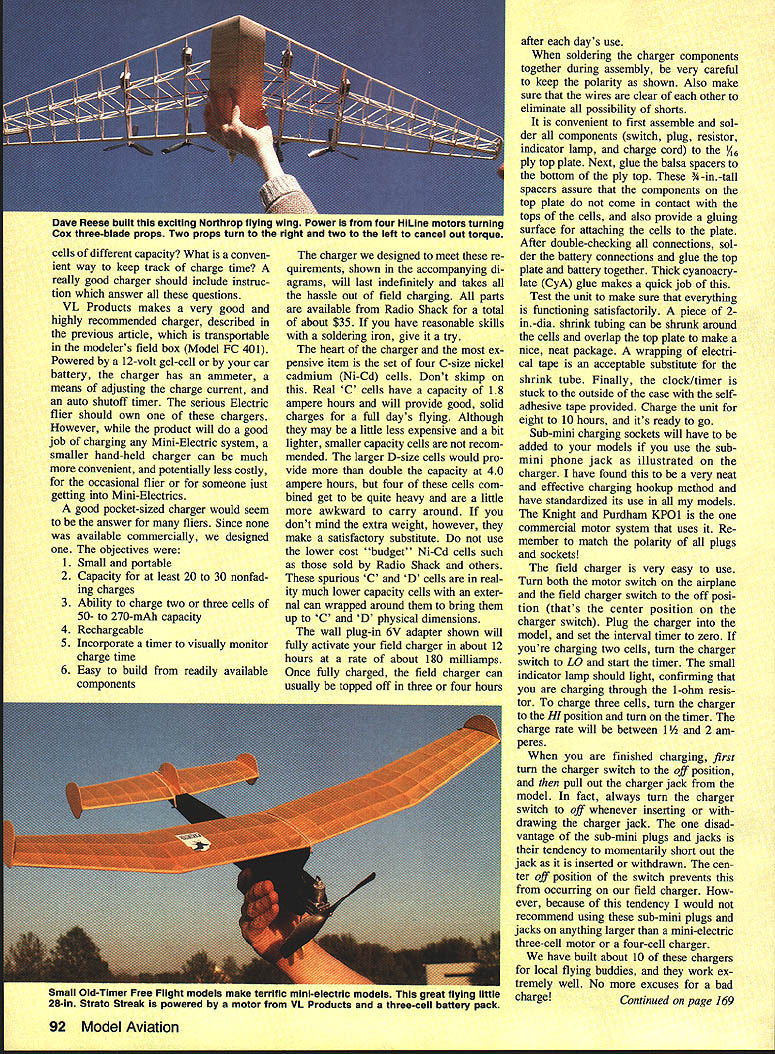
The HY-70B system is particularly well suited for short-nosed sport models, such as the little Strato Streak shown in one of the accompanying photos. Because of the high 7:1 gear ratio and the consequent ability to turn rather large props, VL motors are also ideal for short-nosed, high-drag Scale models such as World War I biplanes.
Still available from Model Rectifier Corporation, as reported last year, are the replacement motor system and the little ready-to-fly "foamie" airplane. However, I've learned that a heavy demand for the replacement motors following our article severely taxed the manufacturer's supply of spares. According to my understanding, current MRC policy is to sell up to two of the motors per customer, at a new price of $16.50—still a good bargain. Write to Model Rectifier Corporation, 2500 Woodbridge Ave., Edison, NJ 08817, attention Customer Service, for details.
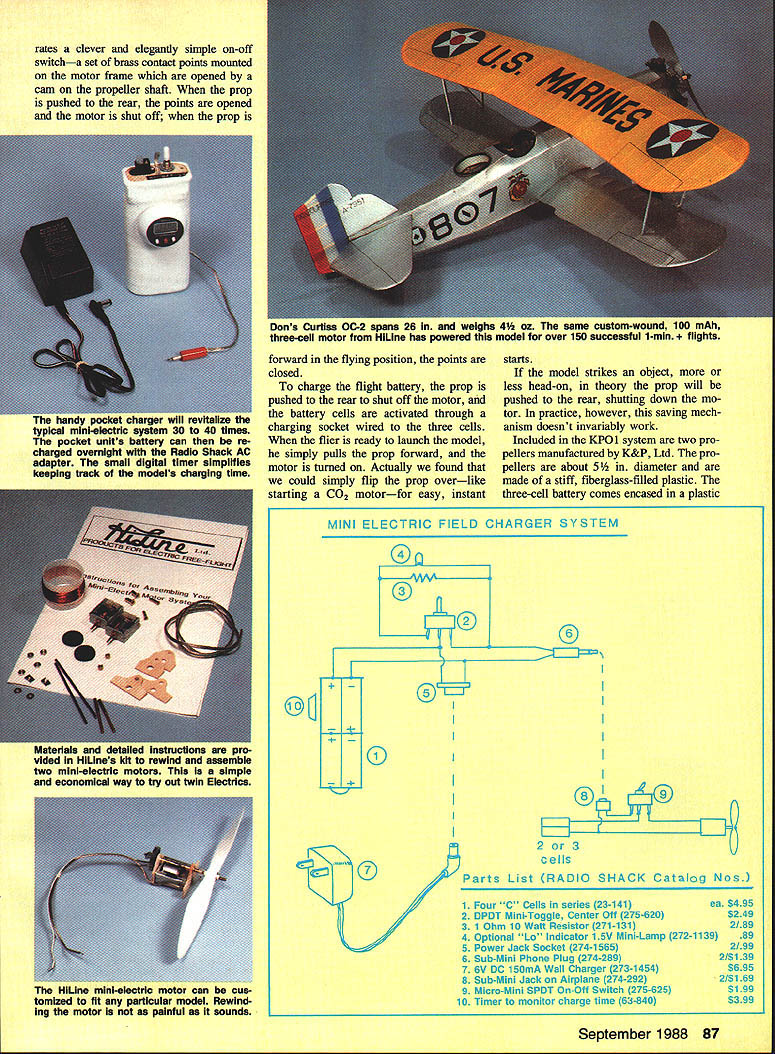
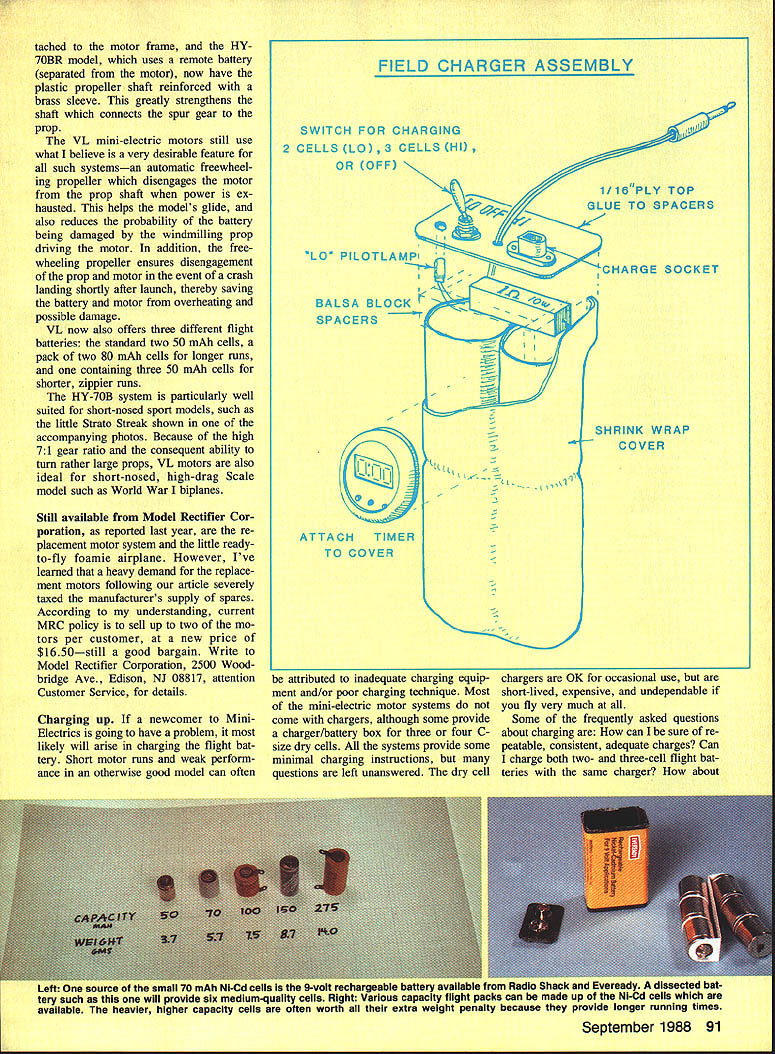
Mini Electric Field Charger System
Parts List (RADIO SHACK Catalog Nos.)
- Four "C" Cells in series (23-141) ea. $4.95
- DPDT Mini-Toggle, Center Off (275-620) $2.49
- 1 Ohm 10 Watt Resistor (271-131) $2.89
- Optional "Lo" Indicator 1.5V Mini-Lamp (272-1139) $0.89
- Power Jack Socket (274-2565) 2/$1.39
- Sub-Mini Phone Plug (274-2892) $1.39
- 6V DC 150mA Wall Charger (273-1454) $6.95
- Sub-Mini Jack on Airplane (274-2922) $1.69
- Micro-Mini SPDT On-Off Switch (275-625) $1.99
- Timer to monitor charge time (63-840) $3.99
The heart of the charger and the most expensive item is the set of four C-size nickel-cadmium (Ni-Cd) cells. Don't skimp on this. Real C cells have a capacity of about 1.8 ampere-hours and will provide good, solid charges for a full day's flying. Although they may be a little less expensive and a bit lighter, smaller capacity cells are not recommended. The larger D-size cells would provide more than double the capacity at about 4.0 ampere-hours, but four of these get to be quite heavy and are a little more awkward to carry around. If you don't mind the extra weight, however, they make a satisfactory substitute. Do not use the lower-cost "budget" Ni-Cd cells such as those sold by Radio Shack and others; these "C" and "D" budget cells are often much lower capacity cells with an external can wrapped around them.
The wall plug-in 6V adapter shown will fully activate your field charger in about 12 hours at a rate of about 180 milliamps. Once fully charged, the field charger can usually be topped off in three or four hours after each day's use.
When soldering the charger components together during assembly, be very careful to keep the polarity as shown. Also make sure that the wires are clear of each other to eliminate all possibility of shorts.
It is convenient to first assemble and solder all components (switch, plug, resistor, indicator lamp, and charge cord) to the 1/8-in. ply top plate. Next, glue the balsa spacers to the bottom of the ply top. The 5/16-in. tall spacers assure that the components on the top plate do not come in contact with the tops of the cells, and also provide a gluing surface for attaching the cells to the plate. After double-checking all connections, solder the battery connections and glue the top plate and battery together. Thick cyanoacrylate (CyA) glue makes a quick job of this.
Test the unit to make sure that everything is functioning satisfactorily. A piece of 2-in.-dia. shrink tubing can be shrunk around the cells and overlap the top plate to make a nice, neat package. A wrapping of electrical tape is an acceptable substitute for the shrink tube. Finally, the clock/timer is stuck to the outside of the case with the self-adhesive tape provided. Charge the unit for eight to 10 hours, and it's ready to go.
Sub-mini charging sockets will have to be added to your models if you use the sub-mini plug/microphone jack as illustrated on the charger. I have found this to be a very neat and effective charging hookup method and have standardized its use in all my models. The Knight and Pridham KPO1 is the one commercial motor system that uses it. Remember to match the polarity of all plugs and sockets!
The field charger is very easy to use. Turn both the motor switch on the airplane and the field charger switch to the off position (that's the center position of the DPDT timer switch). Plug the charger into the model, and set the interval timer to zero. If you're charging two cells, turn the charger switch to Hi and start the timer. The charge rate will be between 1.5 and 2.0 amperes.
When you are finished charging, first turn the charger switch to the off position, and then pull out the charger jack from the model. In fact, always turn the charger switch to off whenever inserting or withdrawing the charger jack. The one disadvantage of the sub-mini plugs and jacks is their tendency to momentarily short out the jack as it is inserted or withdrawn. The center-off position of the switch prevents this from occurring on our field charger. However, because of this tendency I would not recommend using these sub-mini plugs and jacks on anything larger than a mini-electric three-cell motor or a four-cell charger.
We have built about 10 of these chargers for local flying buddies, and they work extremely well. No more excuses for a bad charge!
More power
Has this ever happened to you? In spite of having worked hard to keep weight to a minimum, adding all those last-minute details and putting on a really nice finish often brings the flying weight of your Mini-Electric a little higher than intended. Or, the model you're building from that neat kit or set of great plans turns out just a little bit larger than the size recommended for Mini-Electric power. For many and sundry reasons, we sometimes find that the power available is not quite sufficient to get the hoped-for flying performance. Here are some simple things you can do to coax a little more power and endurance from your Mini-Electric system — and some things you should not try.
First of all, make sure your flight battery cells are OK — not vented, cooked, or leaking. Damaged ones will need to be replaced.
Second, make sure the propeller is the appropriate size and pitch. Above all, don't go to a larger, higher-pitch prop to obtain more power. Such a prop is likely to give you less thrust; worse, it can overheat and possibly damage the motor. Remember, the more you slow the motor down with a larger prop, the higher the current; and the converse also holds. The highest threshold of current at which we want our little motors to operate is about 2.5 to 2.75 amps — that is, under 3 amps. Sure, going above these levels for short periods, to 3.5 and even 4 amps, won't pose an immediate risk of cooking the motor or the battery. But for general sport flying and for decent longevity of your motors, stay at 3 amps or below. This maximum recommended current refers to the current drawn while operating on the ground in a bench test (so-called static load). In the air, the prop will unload a little and will speed up, causing the current to drop about 0.5 amp. If you have access to a meter that can measure up to 5 amps of current, fine-tuning these little electric motors and finding the right prop for safe maximum power becomes very easy. Otherwise, stick to the recommended prop size.
Third, make sure the motor bearings are free (a tiny drop of oil helps), and the gear mesh between pinion and spur gear is free and not binding at all. A little on the loose side is much better than a tight fit, as the least bit of binding will render your Mini-Electric a gutless blob. If your motor has a plastic pinion, make sure it is not cracked. The slightest hairline crack, while often difficult to detect, will distort under load and sap a tremendous amount of power.
Higher-capacity flight cells
One of the easiest ways to obtain a little additional power (and an endurance boost as well) is by using higher-capacity flight cells. Most motors make use of small 50 mAh cells in the interest of weight savings. In general, the last place to look for weight savings is in the flight battery. It's equivalent to saving weight in a rubber model by skimping on rubber—usually a bad idea. In the case of Mini-Electrics, it's a mistake for another reason: the very small 50 mAh cells have much higher internal resistance than do the larger cells. As a result they deliver less energy in proportion to their weight than do larger (e.g., 100 mAh) cells. For example, a 40% (7-g) savings in flight battery weight could be counteracted by a 60% loss of the delivered energy.
Try this: if your system uses 50 mAh cells, substitute 70 mAh cells—or better yet, 100 mAh cells. You will notice an immediate small increase in power, and a potential for much longer runs. In addition, since you will be charging to a lower percentage of a maximum charge, the larger cells will be less sensitive to overcharge and therefore significantly less vulnerable to incurring damage. All this for a mere 4 to 7 g extra weight in a 60- to 90-g model.
Where to get the larger cells? If your motor supplier doesn't sell a 70 mAh pack (sometimes referred to as 80 mAh, but my measurements indicate closer to 70 mAh), you can obtain six 'C' cells for about $10 by dissecting a nine-volt rechargeable battery. Radio Shack sells a "transistor" nine-volt rechargeable battery as catalog No. 32-126 for $9.95. General Electric and EverReady also market similar 9V rechargeable batteries. Some larger RC supply houses carry 100 mAh cells. ARC RC, for example, offers high-quality Sanyo 100 mAh cells for $3.50 each. SR Batteries also handles excellent 50 and 150 mAh cells.
Adding more cells
How about the strategy of more cells for more power? If done with care, this simple move can really add punch to your mini system. First, a few basics.
All of the commercial mini-electric motor systems use essentially the same motor, although with differing gear ratios. Most are intended primarily for use with two cells; the one exception is the Knight and Pridham KPO1 which comes with three 50 mAh cells. The motors are usually geared and propped to draw static current at a safe level of approximately 2 amps. Remember, the more the motor is loaded and slowed down, the more current it will draw. Consequently the lower the gear ratio (motor-to-prop turning rate) and the bigger the prop, the higher the current. Therefore, we can add cells, provided we make sure that the propeller size is small enough to keep the current below 3 amps.
My tests showed the following:
- VL: Three cells seem to be perfectly OK with the VL; in fact, because of its high 7:1 gear ratio it performs much better on three cells than it does on two. With the stock prop, it draws just about 3 amps on three cells. VL sells a 50 mAh three-cell battery which works well, but I would recommend a 70 mAh or 100 mAh pack. You might also experiment with a 6-in. Peck prop instead of the Trexan Aero prop provided. Don't go to a larger prop, however, as current may get too high.
- MRC: The MRC system really peps up with three cells of 70 mAh capacity, but I suggest you go to a small 5-1/2-in. prop (or trim the 6-in. prop that comes with the unit) to keep the current down. Unfortunately, the plastic pinion gear on the MRC is a weak link which may not last indefinitely with three-cell power.
- Ferrell Enterprise: The Ferrell Enterprise motor works very well on three cells of 70 or 100 mAh capacity. Try the smaller 4-1/2-in. Williams Bros. nylon prop instead of the standard 5-1/2-in. one. Use the smallest prop that does the job for you.
- KPO1: A three-cell 50 mAh battery is standard with the KPO1 system. Don't go to four cells! However, using three cells with a 70 or 100 mAh pack will provide a real boost in power. The battery of the KPO1 is designed to easily unclip from the motor unit so that it can be located anywhere in the model. It's very simple to replace the 50 mAh pack with a 70 or 100 mAh one. You can also, if you wish, easily introduce a conventional switch into the harness at this time. A 70 or 100 mAh pack results in a slight increase in motor run, extending the usefulness of this fine motor system to even larger aircraft.
Custom motors (rewound camera motors)
One other obvious idea for added Mini-Electric power is to go to a slightly larger motor. Unfortunately, such a motor is not available in a commercial ready-to-use system at the present time. However, those of you who like tinkering have a means of devising one: a large number of Kodak disc camera motors have recently found their way into the surplus market. These camera motors are exactly like the standard mini-electric motors except for two differences. First, they are about 1/2 longer than the mini-electric ones, with correspondingly longer magnets and rotors—an advantage because you can coax a little more power out of this larger version. The second difference is a disadvantage, but one which can be corrected: camera motors are often wound with very fine wire and hence will not produce much power at higher voltages. However, if rewound with heavier-gauge wire, these motors make terrific Mini-Electrics.
By selecting appropriate pinion and spur gears for a rewound mini-camera motor, you can pick a gear ratio specifically tailored to your model's needs. High ratios of 6:1 to 7:1 are best for swinging large props on high-drag models (such as WW I biplanes); lower ratios down to 2.5:1 or 3:1 are used for smaller, higher-revving props (such as on multi-motor projects). RC servo gear sets are excellent for this purpose.
Sources for the mini-camera motor include Edmond Scientific, 101 E. Gloucester Pike, Barrington, NJ 08007 and Jayson, Inc., 601 Linden Pl., Evanston, IL 60202. Write for their catalogs.
Winding your own motor should be a snap for those who go back to slot-car days when rewinding motors was a favorite pastime. I've built about 25 of these little custom motors, which tells you it can't be all that difficult. Two custom motor combinations we have found to work well:
- Rewind with #30 wire: 3:1 gear ratio with a 6-in. Peck-Polymers prop and two 100 mAh cells.
- Rewind with #32 wire: 6:1 gear ratio with a 7-in. Peck-Polymers prop and three 100 mAh cells.
The latter motor system powers a 26-in. span Curtiss OC-2 biplane. With 150 sq. in. area and 4-1/2 oz. weight, it flies great. The three 100 mAh cells routinely provide beautiful flights of 1 to 2 minutes.
If you want to try your hand at making a couple of custom mini-motors (and don't mind rewinding your own), a new company called HiLine Ltd. (P.O. Box 1283, Bethesda, MD 20817) sells a tinkerer’s double mini-motor kit for $12.95 plus $1.50 postage. It contains three Kodak motors (in case you goof up one), rewind wire, two sets of gears and shafts, etc., plus rewinding/assembly instructions. HiLine also sells a parts kit for the hand-held field charger described earlier (without the timer) for $19.95 plus $2.00 shipping. Send a pre-addressed, stamped envelope for a price list of all their items.
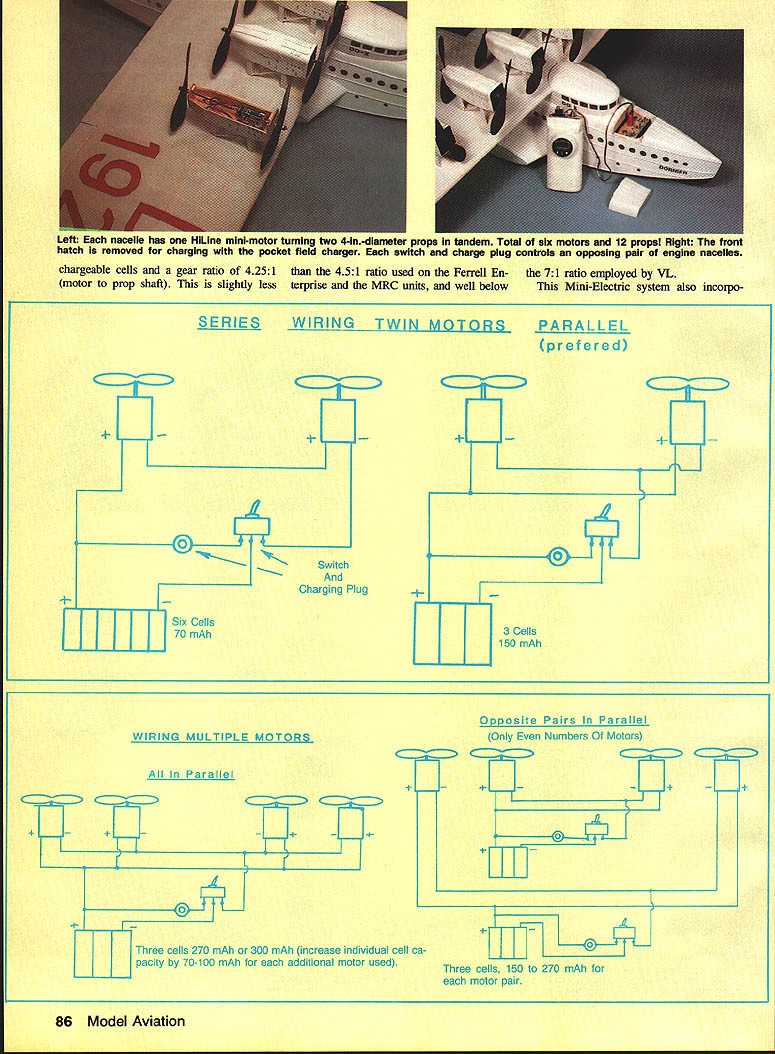
A way of doubling the power of mini-electric motors, of course, is to gang two (or more) of the motors to a single spur gear. The photos show one such dual motor system which couples two rewound HiLine motors to a 6:1 ratio spur gear. Power with three 150 mAh cells and an 8-in. Peck prop is enough for a 250 sq. in. model weighing 8 to 10 oz. Total weight of the illustrated dual motor system is 60 grams. Dual motors, of course, will draw twice the power from a flight battery as does a single motor.
Multimotors
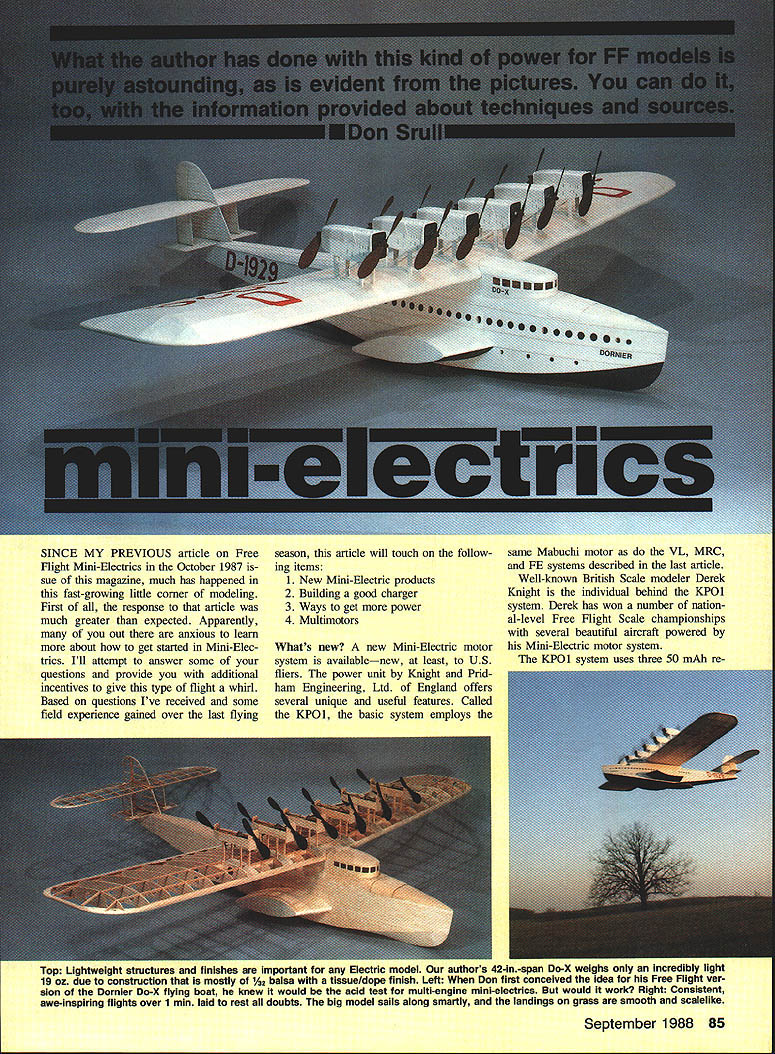
Multi-motor systems are ideal for multi-engined Free Flight Scale models. Scale subjects that heretofore were unthinkable for Free Flight are now no big deal. To demonstrate this point to ourselves, we built and flew a 42-in.-span Do-X! Here are a few tips on typical multi-engine models to be powered by Mini-Electrics.
- Wing area for a multi should be scaled up roughly by the number of motors. For two-cell twin motors, try for a model with wing area between 150 and 240 sq. in. For three-cell twin motors go for 200 to 280 sq. in. Wing loading should be kept between 3 and 5 oz. per sq. ft. (the lower the better).
- Prop diameter on multis is often limited. For this reason the lower-gear-ratio motors are usually more suitable. In some cases even lower gear ratios than those found on commercial units will be beneficial. That's one advantage to customizing your own motors. Suitable plastic props for multis with diameters of 4 to 5 in. are made by Kaysun (Oldtimer Models carries these), North Pacific (from Peck-Polymers), and Williams Brothers. Of course you can also make your own props, even to scale—like three- and four-bladers.
Rule one in wiring a multimotor is that the motors should be wired together. Otherwise one of the primary advantages of multis—redundancy of power—will be lost: almost perfect, automatic synchronization. Basically we wire multis together in parallel or in series.
Example: say we have a twin using three-cell motors, each drawing 2.5 amps current. In either case we need double the battery energy of the single-motor system.
- Series arrangement: use a battery of six cells (e.g., 70 mAh each) and draw 2.5 amps current. The advantage of the series setup with higher voltage is lower losses in the battery because of the lower current.
- Parallel arrangement: use three cells of 150 mAh capacity and draw 5 amps current from the battery. The advantage of the parallel setup includes easier charging (with three cells we still can use our standard field charger) and a much more reliable, robust battery (less chance for a single cell to go bad, less problem of cell "balance," etc.).
Overall I prefer the parallel system for its simplicity and reliability.
For four-motor and six-motor airplanes (even eight, 10, 12, etc.), these same principles apply, although many more options are available. The basic requirement is to pair up opposite-side motors (for example outboard left and outboard right) on the same cells.
For parallel-wired multis, the cells used in the flight battery pack have to be of higher capacity than those commonly used for the conventional single-motor Mini-Electric. Cells of 150, 270, and even higher capacity may be necessary. For twins, 150 mAh and 270 mAh capacity cells are about the correct size. Radio Shack sells a 150 mAh "N" size in packages of two for $4.99 (catalog #23-121). Ace RC sells Sanyo 270 mAh cells for $3.90 each. SR Batteries carries high-quality cells of 150 mAh, 300 mAh, and higher capacity.
If you would like to give twins a try, and don't mind building two wings, the Handley Page W8b construction article illustrates one example of the new breed of Mini-Electric Free Flight Scale models. Remember, a Free Flight Dornier Do-X is now a practical reality. Let's cut balsa!
Transcribed from original scans by AI. Minor OCR errors may remain.

