
Mini-F-16
By Dick Sarpolus
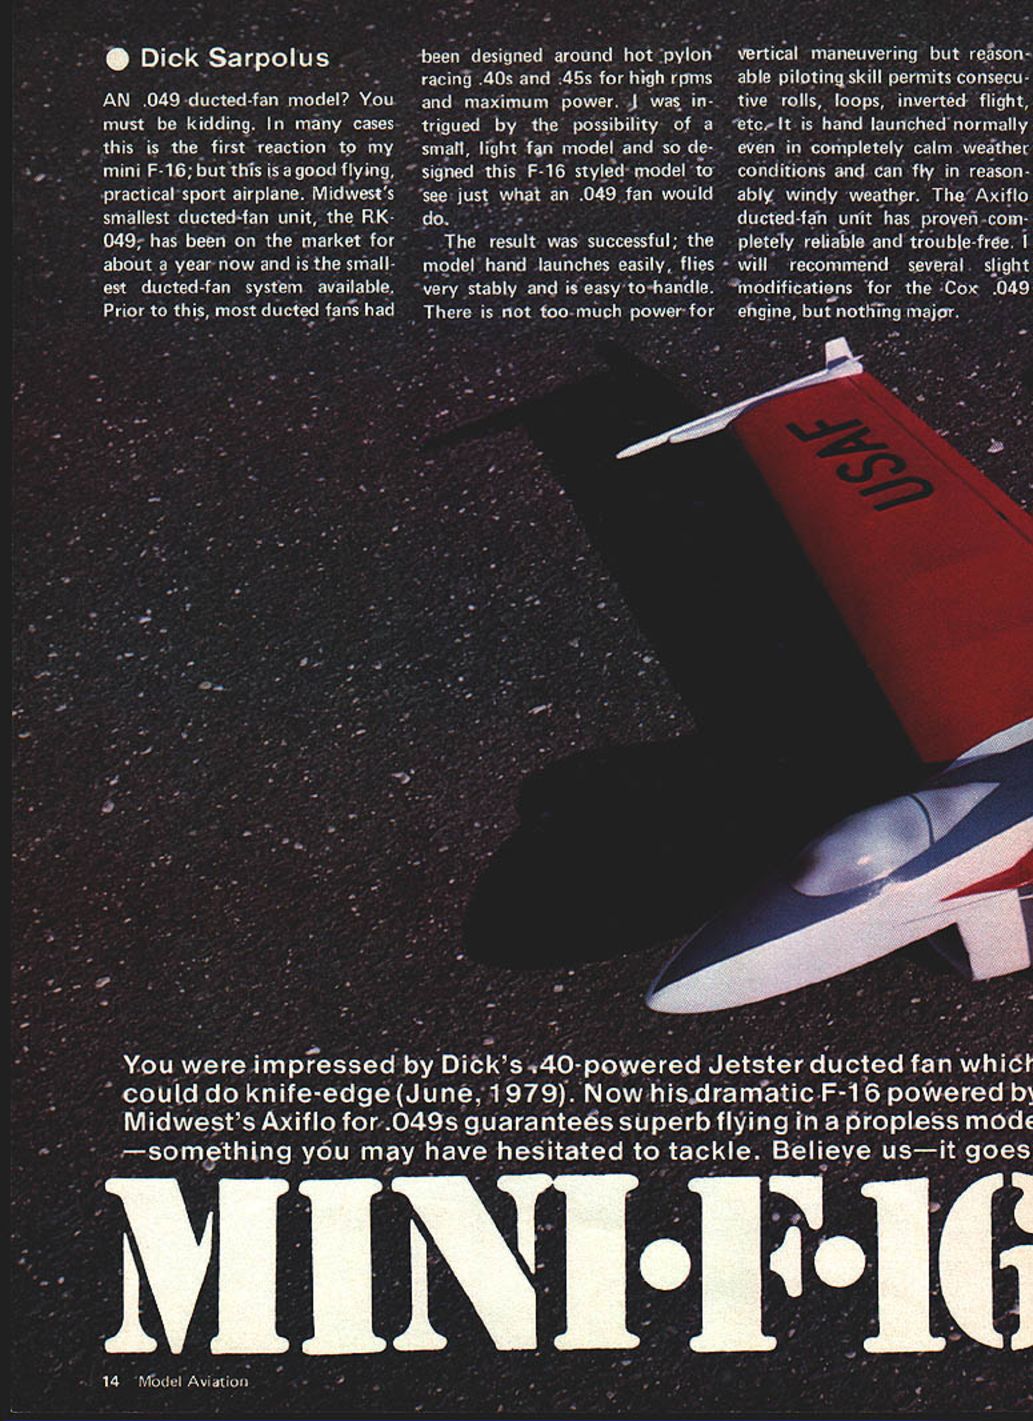
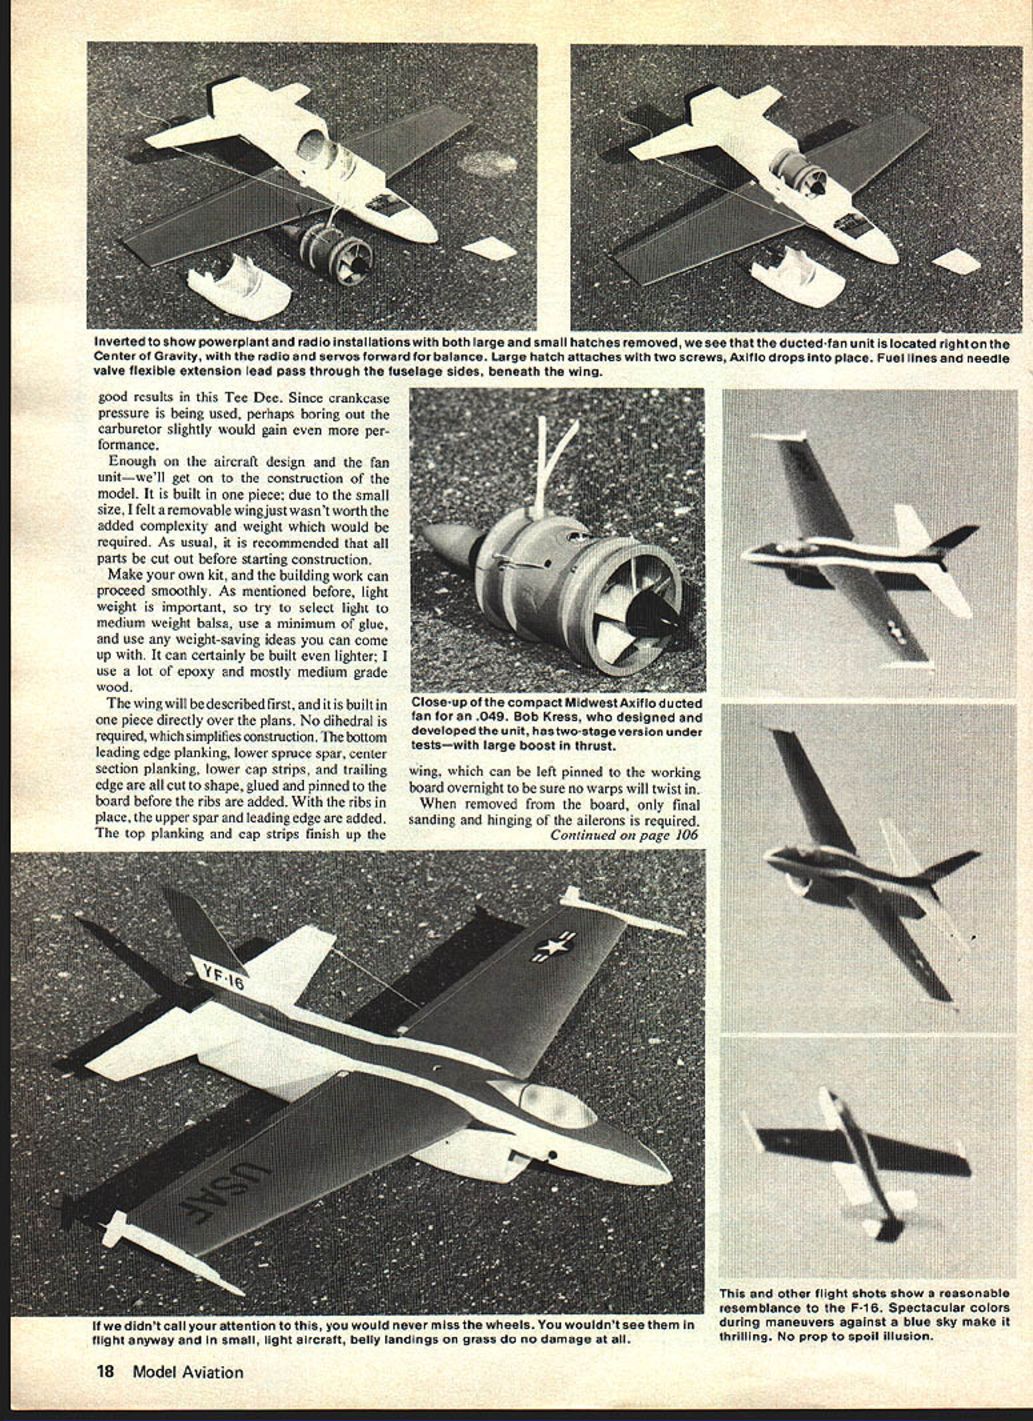
AN .049 ducted-fan model? You must be kidding. In many cases this is the first reaction to my mini F-16; but this is a good flying, practical sport airplane. Midwest's smallest ducted-fan unit, the Axiflo RK-049, has been on the market for about a year and is the smallest ducted-fan system available. Prior to this, most ducted fans were designed around hot pylon-racing .40s and .45s for high rpm and maximum power. I was intrigued by the possibility of a small, light fan model and designed this F-16–styled model to see just what an .049 fan would do.
The result was successful: the model hand-launches easily, flies very stably and is easy to handle. There is not excessive power for vertical maneuvering but reasonable piloting skill permits consecutive rolls, loops, inverted flight, etc. It hand-launches normally even in calm conditions and can be flown in reasonably windy weather. The Axiflo ducted-fan unit has proven completely reliable and trouble-free. I recommend several slight modifications for the Cox Tee Dee .049 engine, but nothing major.
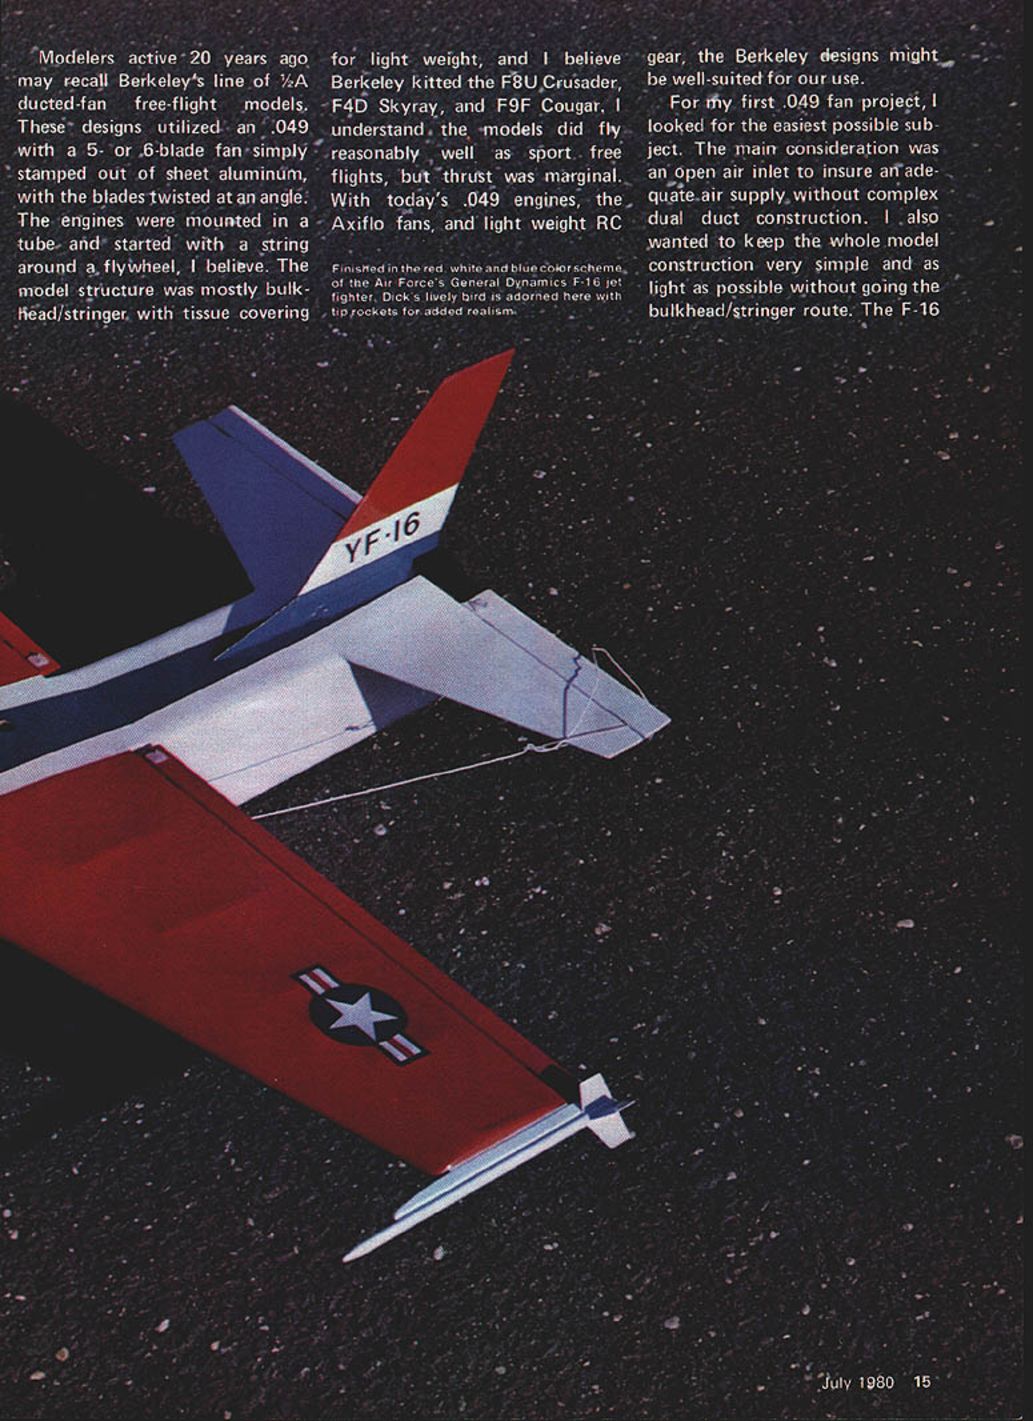
You may remember Berkeley's line of 1/2A ducted-fan free-flight models from years ago. Those used an .049 with a multi-blade fan stamped from sheet aluminum and mounted in a tube. Thrust was marginal then. With modern .049 engines, the Axiflo fans, and light RC gear, the Berkeley designs are well suited to radio control sport use.
Design overview
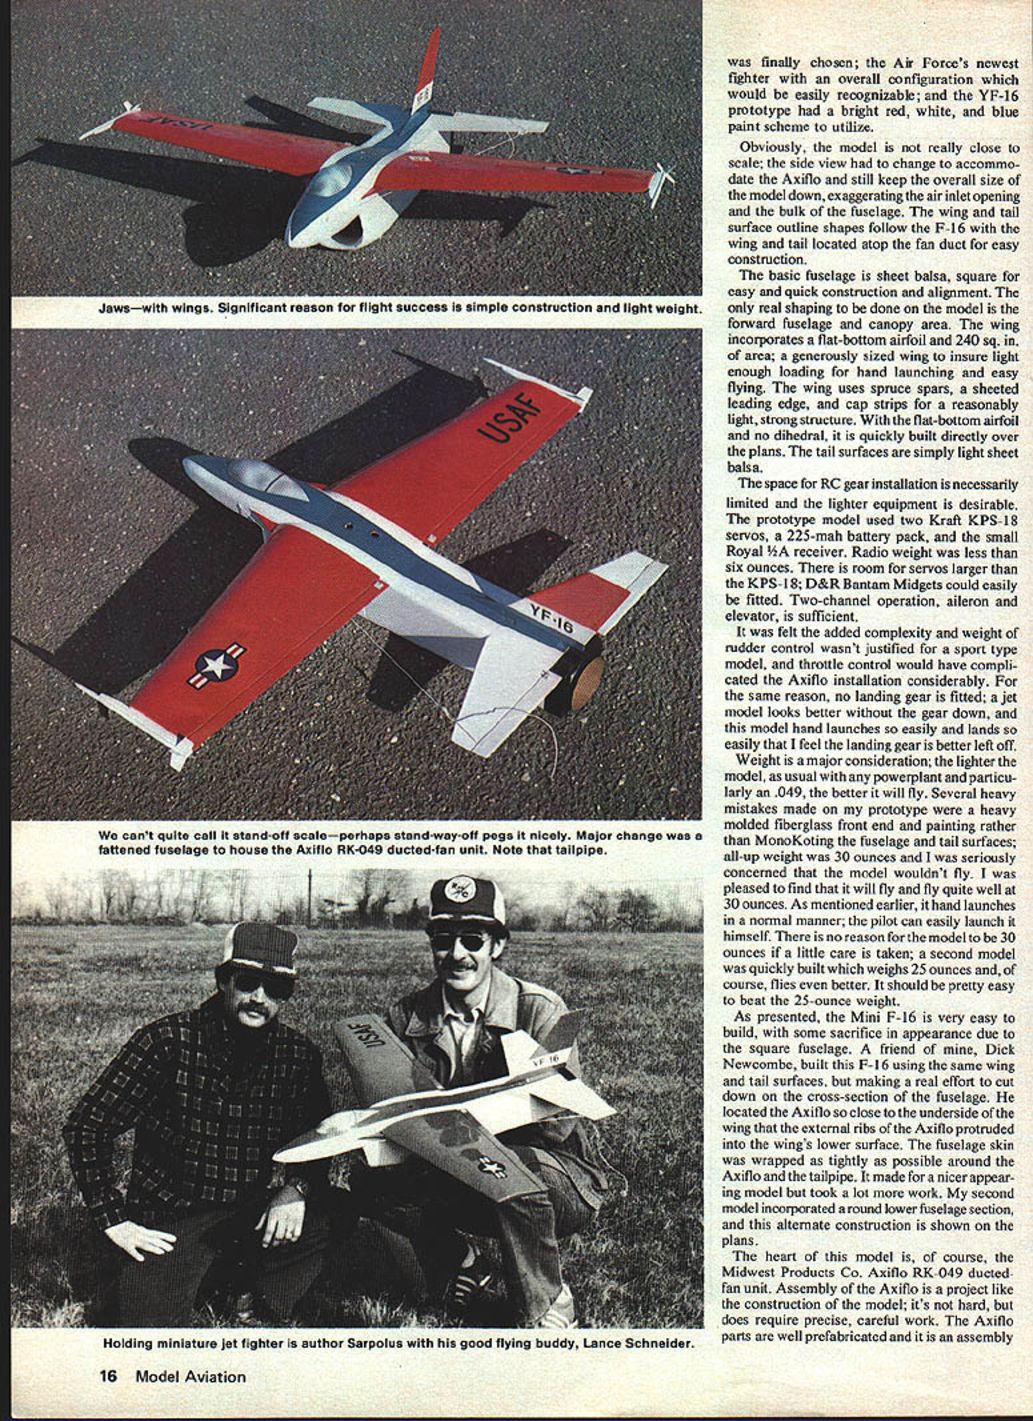
The YF-16 prototype's bright red-white-blue paint scheme was used to keep the model close to scale. The model is not strictly scale: the side view was altered to accommodate the Axiflo while keeping overall size down, which exaggerated the air-inlet opening and the bulk of the fuselage. Wing and tail outlines follow the F-16, and both are located atop the fan duct for easy construction.
The basic fuselage is sheet balsa, built square for easy, quick construction and alignment. Most shaping is in the forward fuselage and canopy area. The wing incorporates a flat-bottom airfoil and about 240 sq. in. of area — a generously sized wing to ensure light loading for easy hand-launching and gentle flying. The wing uses spruce spars, sheeted leading edge, and cap strips for a reasonably light, strong structure. The flat-bottom airfoil has no dihedral and is built directly over the plans. Tail surfaces are simple light sheet balsa.
Space for RC gear is limited, so lighter equipment is desirable. The prototype used:
- Two Kraft KPS-18 servos
- A 225 mAh battery pack
- A small Royal 1/4A receiver
Total radio weight was under six ounces. There is room for larger servos such as D&R Bantam Midgets if desired. Two-channel operation (ailerons and elevator) is sufficient; rudder control adds complexity and weight that I did not feel was justified. Throttle control would have complicated the Axiflo installation, so none was fitted. For the same reason, no landing gear was fitted — the model hand-launches and lands easily and looks better without gear.
Weight is a major consideration: the lighter the model, especially with an .049 powerplant, the better it will fly. Several heavy mistakes were made on the prototype — a heavy molded fiberglass front end and painting rather than using MonoKote covering — resulting in a 30-ounce all-up weight. I was concerned it wouldn't fly, but it flew quite well at 30 ounces and hand-launches normally. A second model was built at 25 ounces and flew even better; it should be easy to beat 25 ounces with careful building.
A friend, Dick Newcombe, built a version using the same wing and tail but with a reduced cross-section fuselage. He located the Axiflo close to the wing underside, with external ribs where the Axiflo protruded into the wing lower surface. He wrapped the fuselage skin tightly around the Axiflo tailpipe for a nicer appearance, though it required much more work. An alternate rounded lower-fuselage construction is shown on the plans.
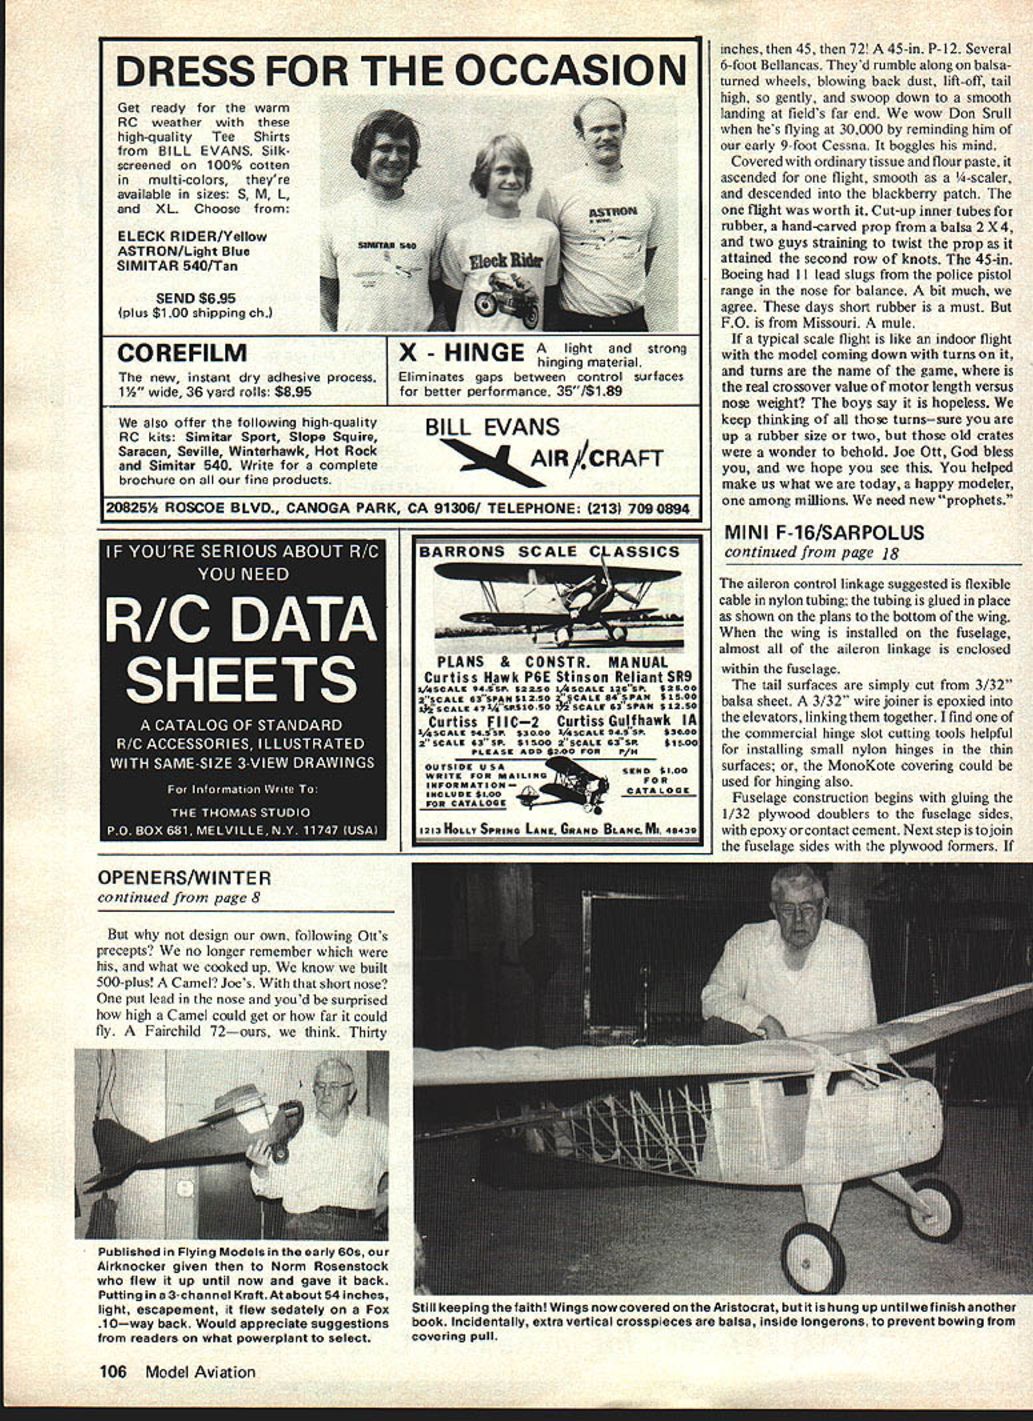
The Axiflo RK-049 ducted fan
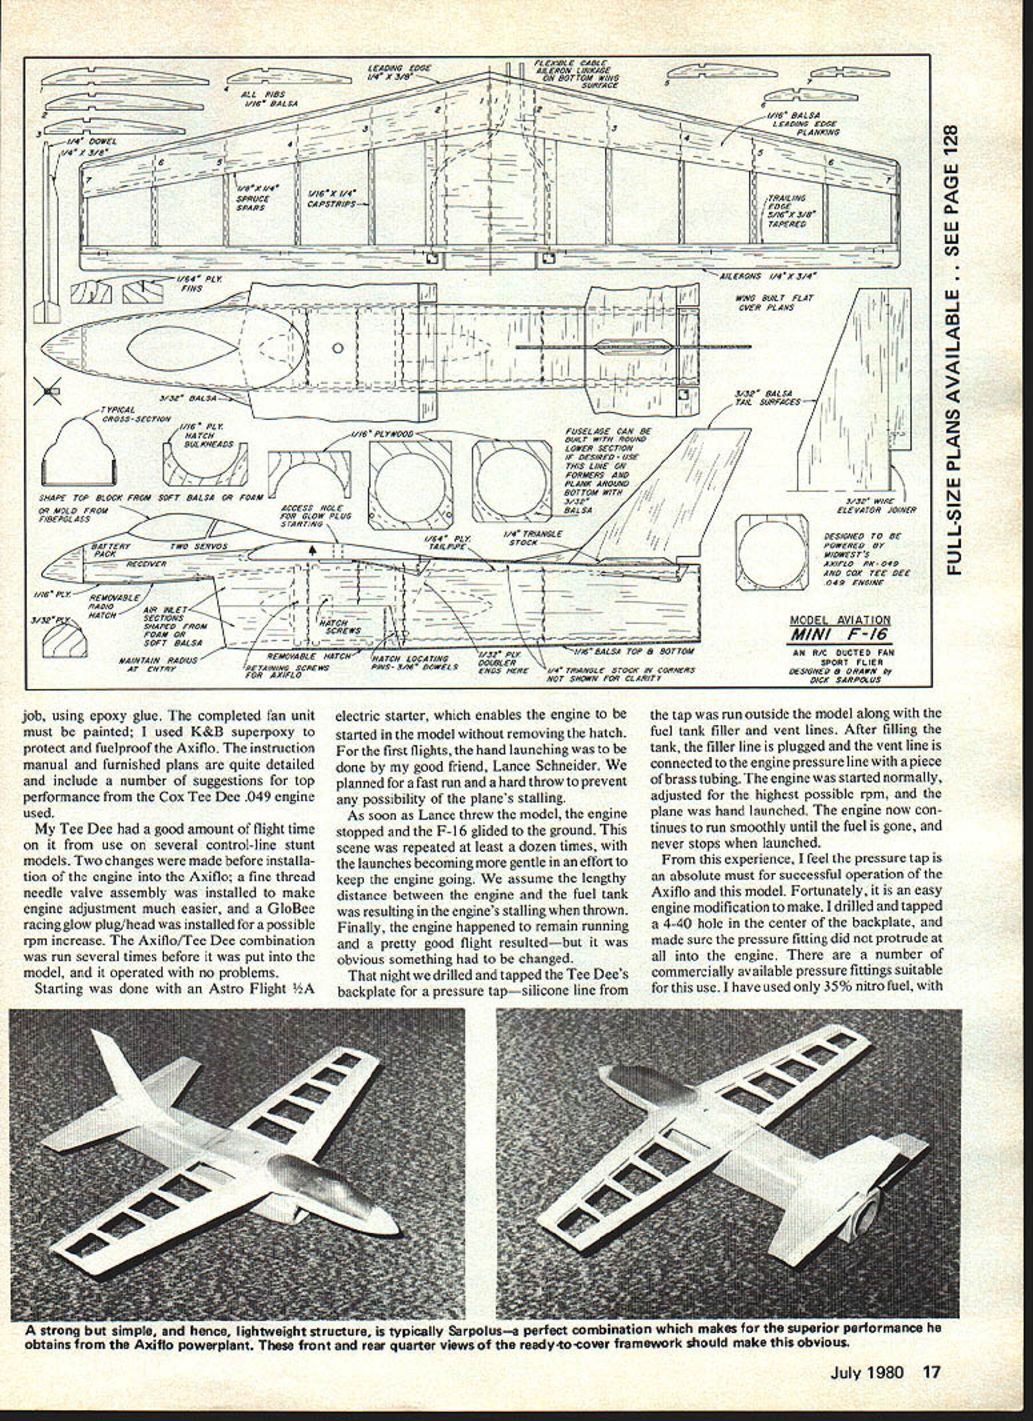
The heart of the model is the Midwest Products Co. Axiflo RK-049 ducted-fan unit. Assembly of the Axiflo is like building the model: not hard, but requiring precise, careful work. The Axiflo parts are well prefabricated for assembly. The completed fan unit should be painted and protected/fuelproofed — I used K&B super epoxy.
The Axiflo instruction manual and furnished plans are detailed and include suggestions for top performance with the Cox Tee Dee .049 engine.
Engine modifications and preparation
My Tee Dee had prior flight time on control-line stunt models. Before installation in the Axiflo I made two changes:
- Installed a fine-thread needle-valve assembly to make engine adjustment easier.
- Installed a Globe racing glow plug/head for possible rpm increase.
I ran the Axiflo/Tee Dee combination several times before installing it in the model; it operated without problems. Starting was done with an Astro Flight 1/4A electric starter, which allows starting without removing the hatch.
Flight testing and the pressure-tap fix
For the first flights my friend Lance Schneider did the hand-launching. We planned fast run-ups and hard throws to prevent stalling. However, on the first several throws the engine stalled and the model glided to the ground. After repeated attempts we concluded the long distance between the engine and the fuel tank caused fuel-feed problems when the model was thrown.
That night we drilled and tapped the Tee Dee backplate for a pressure tap. Silicone tubing from the tap was run outside the model along with the tank filler and vent lines. After filling the tank, the filler line is plugged and the vent line is connected to the engine pressure line with a small brass tube. With the pressure line in place the engine started, was adjusted for maximum rpm, and the plane was hand-launched: the engine now continued to run smoothly until fuel exhaustion and never stalled on launch.
From this experience I feel a pressure tap is an absolute must for successful operation of the Axiflo and this Mini F-16. It is an easy engine modification: drill and tap a 4-40 hole in the center of the backplate and ensure the pressure fitting does not protrude into the engine. There are many commercially available pressure fittings suitable for this use. I used 35% nitro fuel with good results in this Tee Dee. Since crankcase pressure is used, slightly boring out the carburetor may yield additional performance.
Other useful engine items:
- Consider a fine-thread needle valve for precise tuning.
- Use a high-performance glow plug/head (e.g., Globe racing plug) for higher rpm.
Construction overview
The model is built in one piece; due to its small size I felt a removable wing was not worth the added complexity and weight. As usual, cut out all parts before starting construction. Use light to medium-weight balsa, minimum glue, and any weight-saving ideas you can.
Wing construction (built in one piece over the plans):
- Pin and glue the bottom leading-edge planking, lower spruce spar, center-section planking, lower cap strips, and trailing edge to the board.
- Add ribs.
- Add upper spar and leading edge.
- Finish with top planking and cap strips.
- Leave pinned overnight to prevent warps; final sanding and hinging of ailerons complete the wing.
Aileron control linkage: use flexible cable inside nylon tubing glued to the bottom of the wing as shown on the plans. When installed on the fuselage, most of the linkage is enclosed within the fuselage.
Tail surfaces: cut from 3/32" balsa sheet. Epoxy a 3/32" wire joiner into the elevators to link them together. Use a commercial hinge-slot cutter or MonoKote for hingeing.
Fuselage construction:
- Glue 1/32" plywood doublers to fuselage sides with epoxy or contact cement.
- Join fuselage sides with plywood formers.
- If building the rounded-fuselage version, do not roll the fuselage bottom until the 1/64" plywood tailpipe is installed.
- Fabricate the tailpipe by rolling 1/64" plywood around a tapered form or hardwood strip and epoxy the 1/4" overlap seam. Lighter alternate materials can be used.
- Glue the tailpipe into the fuselage, checking alignment with the Axiflo unit.
- Relieve bulkheads as needed to clear aileron linkage and install elevator linkage.
- Add fuselage top and bottom planking, then glue wing and stabilizer in place.
Forward fuselage/canopy/nose:
- The forward fuselage can be made in several ways: carved foam covered with thin fiberglass and epoxy, fiberglass molded from a foam plug, or carved/hollowed from soft balsa blocks. Choose based on builder ambition and weight goals.
- Glue and carve the nose block. Provide a plywood hatch for radio gear access in the nose.
- Glue on the vertical fin, reinforcing with 1/4" triangle stock.
- The fuselage hatch over the Axiflo uses dowel locating pins and small plywood mounting tabs and is secured with two small screws.
Air inlet and finish:
- The air-inlet area in front of the Axiflo can be shaped from foam or built up of wood. Maintain a smooth inlet with rounded leading edges.
- Seal the tailpipe and engine area with several coats of clear epoxy (I used K&B super epoxy) to protect against fuel and oil.
- Paint the nose section and air inlet; cover the rest of the model with MonoKote for a quick, light finish.
- The prototype YF-16 paint scheme was red, white, and blue; Air Force gray/blue camouflage or other national markings (Belgium, Denmark, Norway, Netherlands) can also be used.
- Wing-tip missiles may be fabricated from 1/4" dowels, thin plywood fins, and balsa mounting rails for added appearance.
Additional construction tips
- The fuselage bulkheads must be relieved as necessary to permit aileron linkage clearance.
- Use dowel pins or light plywood tabs to ensure accurate hatch alignment and secure mounting.
- The Axiflo installation requires attention to inlet shape and alignment; refer to the Axiflo instructions for additional tips.
Conclusion
I consider this Mini F-16 a "first-generation" .049 ducted-fan project and hope its success encourages more .049-powered jet designs. The model is an easy build with sport-flying capability, and with attention to weight and the pressure-tap modification it offers reliable, enjoyable flying.
For further information on the Axiflo, contact: Kress Technology, Inc. Bob Kress 27 Mill Road Lloyd Harbor, New York 11743
Transcribed from original scans by AI. Minor OCR errors may remain.

