

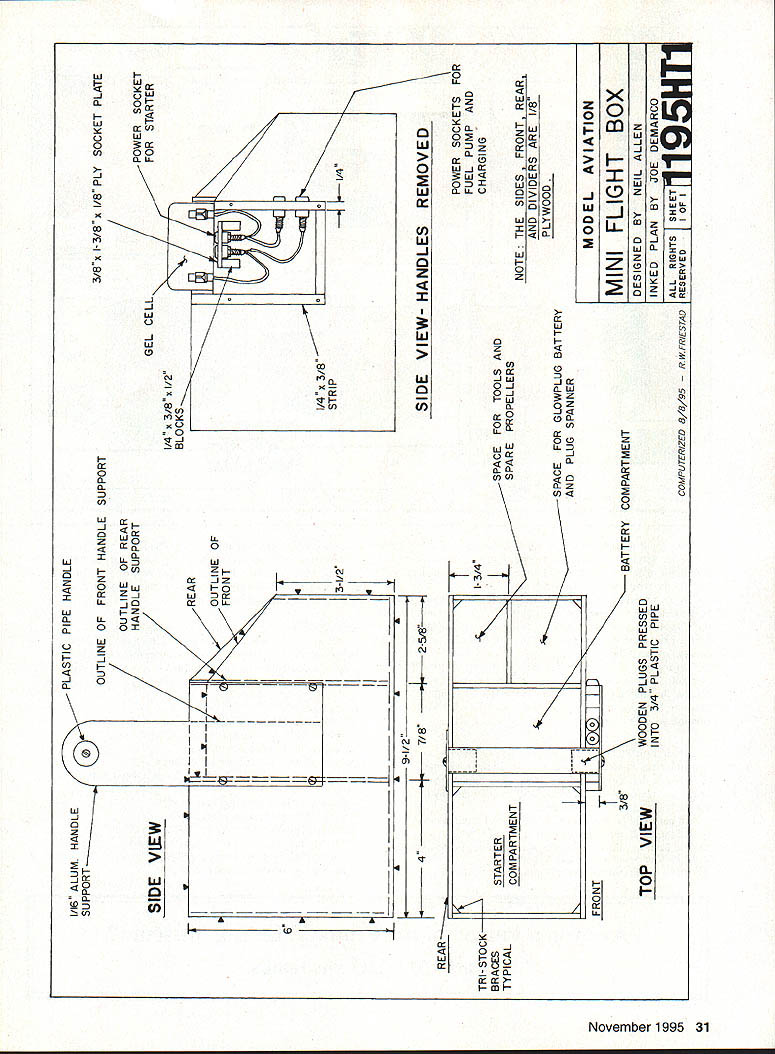
Mini Field Box
Neil Allen
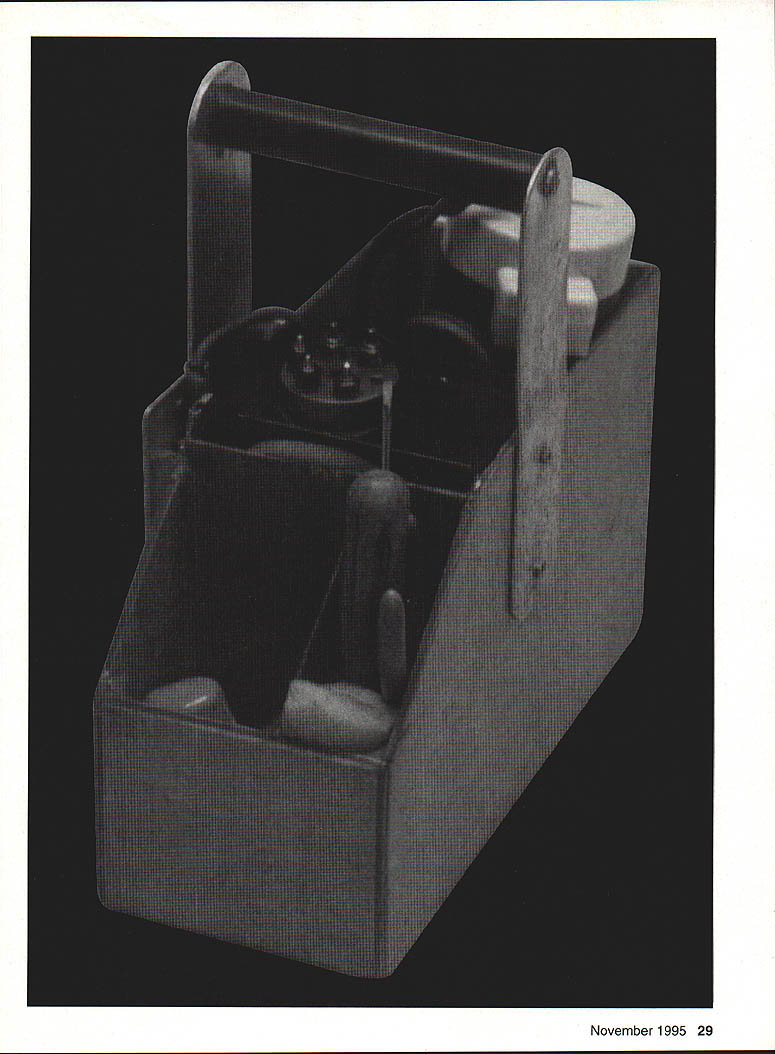
In some competition events, like Scale, Pattern, or Pylon Racing, the model's engine is started on the runway, not in the pits. Sometimes the runway is quite a long walk from your pit position, and a lightweight, compact starter box is a great help. You certainly can't lug your huge field box (with a gallon of fuel and half of your workshop) back and forth for each round!
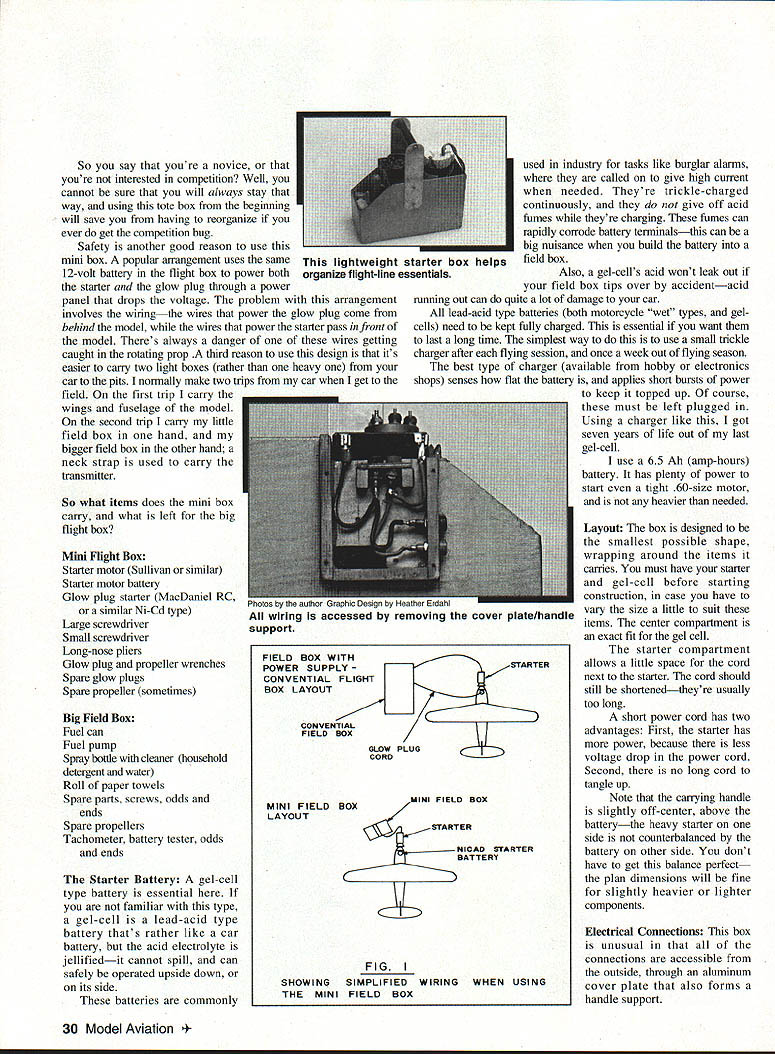
There is no continuation text on the scanned page — it is a full-page photograph — but the tote box design is useful whether you're a novice or a competitor. Using a compact field box from the beginning will save you from having to reorganize if you ever catch the competition bug.
Safety is another good reason to use a mini box. A popular arrangement uses the same 12-volt battery in the flight box to power both the starter and the glow plug through a power panel that drops the voltage. The problem with this arrangement involves the wiring: the wires that power the glow plug come from behind the model, while the wires that power the starter pass in front of the model. There's always a danger of one of these wires getting caught in the rotating prop.
A third reason to use this design is that it's easier to carry two light boxes rather than one heavy one from your car to the pits. I normally make two trips from my car when I get to the field. On the first trip I carry the wings and fuselage of the model. On the second trip I carry my little field box in one hand and my bigger field box in the other; a neck strap is used to carry the transmitter.
Mini Field Box
- Starter motor (Sullivan or similar)
- Starter motor battery (gel-cell)
- Glow-plug starter (MacDaniel RC or similar Ni-Cd type)
- Large screwdriver
- Small screwdriver
- Long-nose pliers
- Glow-plug and propeller wrenches
- Spare glow-plugs
- Spare propeller (sometimes)
Big Field Box
- Fuel can
- Fuel pump
- Spray bottle with cleaner (household detergent and water)
- Roll of paper towels
- Spare parts, screws, odds and ends
- Spare propellers
- Tachometer
- Battery tester
- Other odds and ends
The Starter Battery
A gel-cell battery is essential here. A gel-cell is a lead-acid battery similar to a car battery, except the electrolyte is jellified. It cannot spill and can safely be operated upside down or on its side. These batteries are commonly used in industry for tasks that require occasional high current, such as burglar alarms.
Gel-cells do not give off acid fumes while charging, unlike some wet lead–acid batteries; this makes them more suitable for a compact field box where corrosion of terminals could be a nuisance. Also, a gel-cell's electrolyte won't leak if the field box tips over — wet batteries can cause significant damage if they spill.
All lead-acid batteries (both wet types and gel-cells) should be kept fully charged to maximize life. The simplest maintenance method is to use a small trickle charger after each flying session, and once a week during the off season. The best chargers (available from hobby or electronics shops) sense how flat the battery is and apply short bursts of power to keep it topped up — the battery must be left plugged in. Using a charger like this, I got seven years of life out of my last gel-cell.
I use a 6.5 Ah (amp-hour) battery. It has plenty of power to start even a tight .60-size motor and is not heavier than necessary.
Layout
The box is designed to be the smallest possible shape, wrapping around the items it carries. You should have your starter and gel-cell before starting construction, in case you need to vary the size slightly to suit these items. The center compartment is an exact fit for the gel-cell.
The starter compartment allows a little space for the cord next to the starter. The cord should be shortened — they are usually too long. A short power cord has two advantages: first, the starter has more power because there is less voltage drop in the cord; second, there is no long cord to tangle up.
Note that the carrying handle is slightly off-center, above the battery — the heavy starter on one side is not counterbalanced by the battery on the other side. You don't need perfect balance; the plan dimensions will work for slightly heavier or lighter components.
Electrical Connections
All of the connections are accessible from the outside through an aluminum cover plate that also forms a handle support. The power sockets for the glow-plug starter and the starter motor are mounted on the cover plate, along with sockets for the fuel pump and for charging.
The two power sockets on the side of the box are dual-purpose. In the field, the fuel pump plugs into them to fill the tank; I keep the 12-volt pump strapped atop my fuel bottle with one heavy rubber band, with short electrical leads attached. At home, the sockets are used for charging.
The top pair of sockets power the starter and are usually left connected. They are easily reached if you want to remove the starter or swap the connections (for example, to start a model with reverse rotation, as with a pusher).
Designing the connections on an accessible plate allows easy service or alteration and makes the box more compact; the box would have been noticeably larger if the wires and sockets were buried inside.
Construction
The mini field box is a simple plywood box constructed of 1/8-inch plywood. Cut out all the parts and ensure they fit together correctly and that your battery fits in the space provided before assembly. Drill and countersink the holes for the back support plate screws.
All parts can be glued together with wood glue at the same time. Strap or clamp them together until set.
The front handle-support plate is removable and is held in place by four 1/2-inch long self-tapping screws. The back handle-support plate is attached permanently with two 1/8-inch countersunk machine screws; the heads are countersunk on the inside of the box. Attach the plate with nuts on the outside, cut off excess bolt thread, and file smooth. Use a drop of cyanoacrylate (CyA) glue to secure the nuts. You can add small feet or two hardwood strips if desired.
Your field box may be with you for many happy years of modeling, so it is worth doing a neat job and giving it a good, fuelproof finish. Clear, fuelproof varnish is recommended — scratches are less visible than with bright paint, but the choice is yours.
Parts List
- 1 sheet 10 in. × (size) of 1/8-inch plywood
- 12 in. of 1/4 × 3/8-inch strip (pine or hardwood)
- 32 in. of 1/4-inch triangular strip
- 1/16-inch aluminum plate for handle supports
- 4–1/2 inches of 3/4-inch PVC pipe (or 3/4-inch wood rod) for the handle
- 4 single-pin electrical plugs and sockets
- Wiring (red and black recommended)
- 2 electrical push-on clips for gel-cell terminals
- 4 self-tapping screws for front handle support
- 2 countersunk 1/8-inch screws and nuts for back handle support
- 2 self-tapping screws for the handle
Transcribed from original scans by AI. Minor OCR errors may remain.

