
Mini Max
Eric Clutton
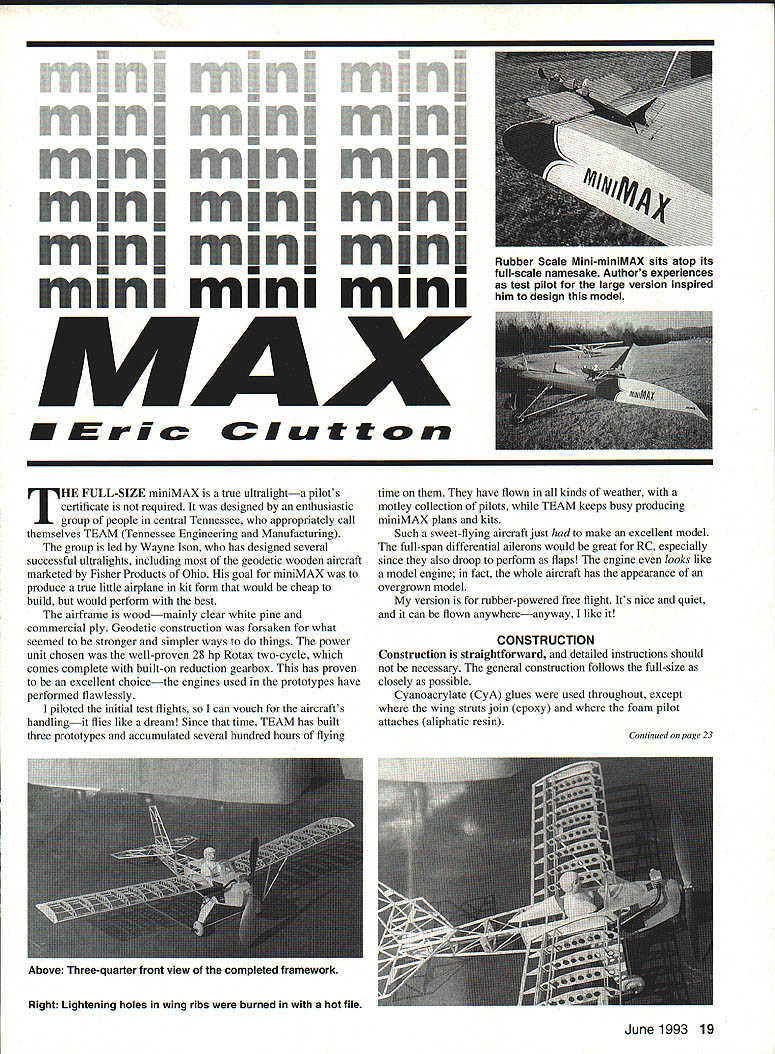
The full-size miniMAX is a true ultralight—a pilot's certificate is not required. It was designed by an enthusiastic group of people in central Tennessee, who appropriately call themselves TEAM (Tennessee Engineering and Manufacturing).
The group is led by Wayne Ison, who has designed several successful ultralights, including most of the geodetic wooden aircraft marketed by Fisher Products of Ohio. His goal for miniMAX was to produce a true little airplane in kit form that would be cheap to build but would perform with the best.
The airframe is wood—mainly clear white pine and commercial ply. Geodetic construction was forsaken for what seemed to be stronger and simpler ways to do things. The power unit chosen was the well-proven 28 hp Rotax two-cycle, which comes complete with built-on reduction gearbox. This has proven to be an excellent choice—the engines used in the prototypes have performed flawlessly.
I piloted the initial test flights, so I can vouch for the aircraft's handling—it flies like a dream! Since that time, TEAM has built three prototypes and accumulated several hundred hours of flying time on them. They have flown in all kinds of weather, with a motley collection of pilots, while TEAM keeps busy producing miniMAX plans and kits.
Such a sweet-flying aircraft just had to make an excellent model. The full-span differential ailerons would be great for RC, especially since they also droop to perform as flaps. The engine even looks like a model engine; in fact, the whole aircraft has the appearance of an overgrown model.
My version is for rubber-powered free flight. It's nice and quiet, and it can be flown anywhere—anyway, I like it!
Construction
Construction is straightforward, and detailed instructions should not be necessary. The general construction follows the full-size as closely as possible.
Cyanoacrylate (CyA) glues were used throughout, except where the wing struts join (epoxy) and where the foam pilot attaches (aliphatic resin).
Mini-miniMAX / Clutton
The fuselage sides are built flat, then are joined together in the usual manner. I used 3/32 sq. for the longerons instead of hard 1/16 sq. because the larger size gives more gluing area and is more resistant to general handling damage.
The top of the fuselage at the nose is covered with 1/32 sheet with the grain chordwise. This sheet includes the small triangles at the front corners of the cockpit, which are pierced to accept the windshield frame.
The windshield acetate can be very thin, because it is supported by the tube frame. The undercart is made rigid, just like the full-size miniMAX, but I reinforced it with thin wire. The tail wheel is mounted on the same size wire.
I built up the dummy engine from squares of 1/32 balsa and scrap. I then glued a short piece of 5/64 dowel in the right side of the cylinder to form an attachment point for the black fuel-tube exhaust.
Wing
Use reasonably hard C-grain balsa for the 1/32 wing ribs. The holes are optional, but they do save some weight. I made the holes by heating an old round file with a butane torch and burning them in. This reduces the chances for splits and other stress-makers in the ribs and does a neat job. The hole-making tool does not have to be red hot!
The spars are positioned to simulate the full-size miniMAX. The spars that simulate the ailerons may be omitted to save a little weight if desired.
The wings are positioned on the fuselage with the short 5/64 dowels in the root ribs. Get one wing’s incidence right first, then install the other one to match it. The holes in the fuselage may be slotted for adjustment.
Don’t worry too much about the dihedral until the angle of incidence has been fixed for both wings. When the incidence is correct, use the dihedral jig shown on the plans.
The wing struts are left long so they poke through the wing. When the dihedral is established, the struts are trimmed so they are inset 1/8 inch. It is easier to do this before the wing is covered.
Details and Trim
Black fuel tubing is perfect to simulate the forward part of the exhaust pipe. It should be painted silver where used at the bottom of the wing struts. All struts on the full-size aircraft are aluminum tube, and the dowels on the model should be painted silver.
The balsa wheels are laminated from 1/32 ply sandwiched between two pieces of 1/8 balsa. The wheels can easily be sanded to shape on a Dremel Moto-Tool or any type of power drill. Make the center bushing with about 1/2 inch additional length on one side to use as a chuck.
I always use an aluminum tube rear peg for a rubber anchor because it fits my winding stooge; a hardwood peg may be substituted. Keep the tail light so that only a small amount of clay will be needed in the nose to balance the model.
My model weighs 46 grams without rubber. It was covered with white superfine tissue. Three coats of plasticized dope thinned 50% were used. Color trim was sprayed on from a can. The only white paint on my model is on the headrest.
Flying
Power can be varied to suit the performance desired. My model flies well on four 12-inch strands of 1/8 FAI Model Supply rubber.
My model “flew off the board” with no adjustments required. It flies to the left under power, so I have since added a slight amount of right thrust to open up the left turn and allow for a later change to a bigger motor.
This model is of the second/third prototype, and the colors are royal blue and white. Other miniMAXes may, of course, be any color the builder desires. Some may also have “N” license numbers, although these are not compulsory on ultralights.
Transcribed from original scans by AI. Minor OCR errors may remain.

