
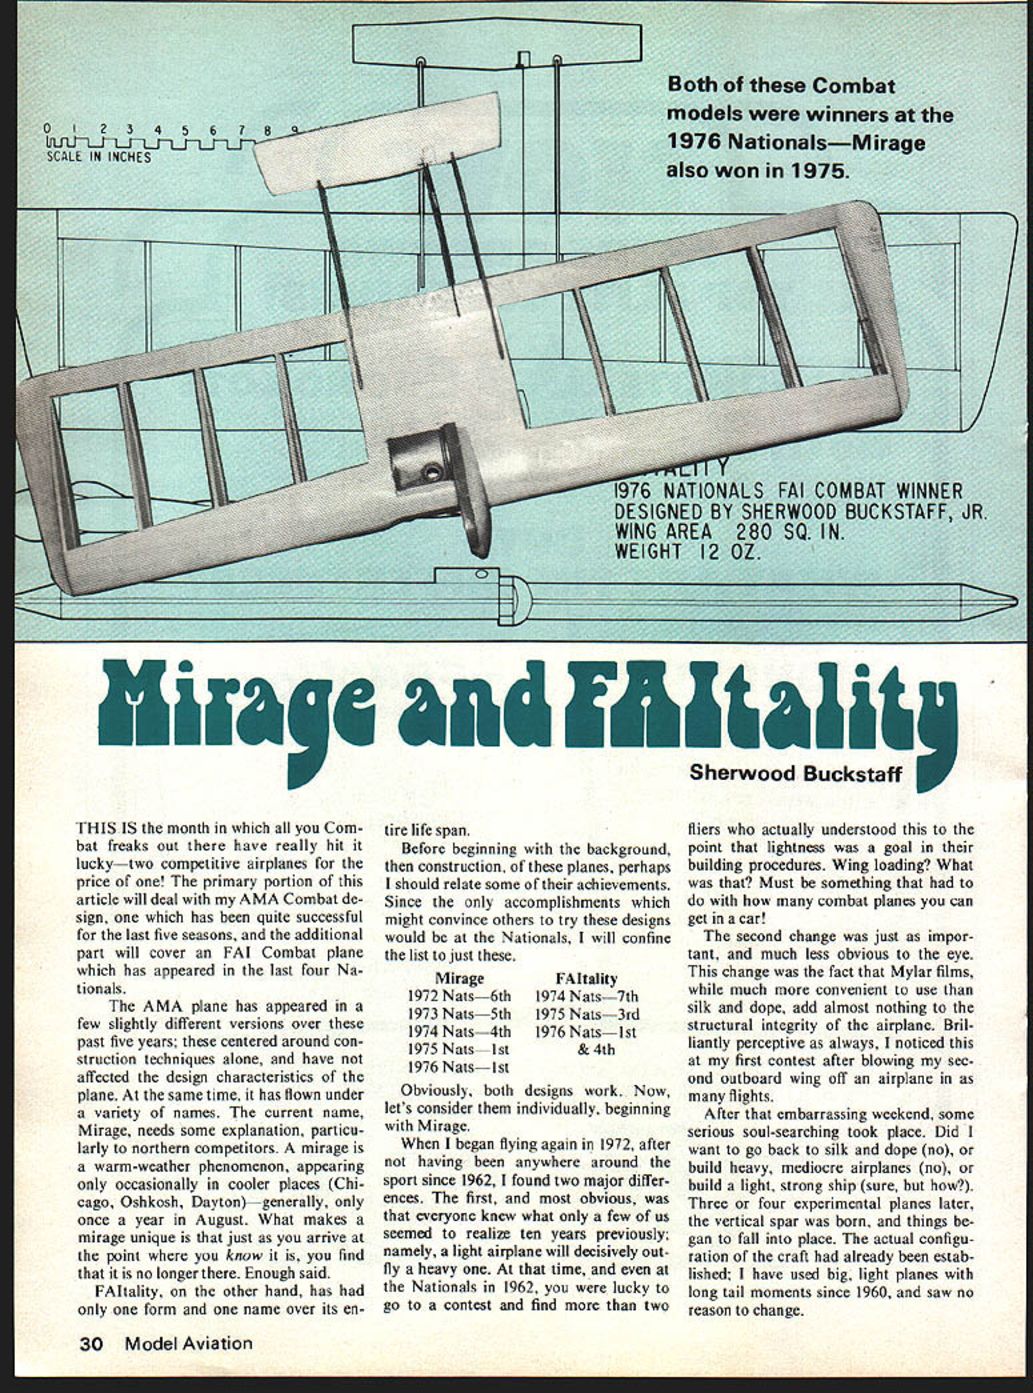
Mirage and FAItality
Sherwood Buckstaff
THIS IS the month in which all you Combat freaks out there have really hit it lucky—two competitive airplanes for the price of one! The primary portion of this article will deal with my AMA Combat design, one which has been quite successful for the last five seasons, and the additional part will cover an FAI Combat plane which has appeared in the last four Nationals.
The AMA plane has appeared in a few slightly different versions over these past five years; these centered around construction techniques alone, and have not affected the design characteristics of the plane. At the same time, it has flown under a variety of names. The current name, Mirage, needs some explanation, particularly to northern competitors. A mirage is a warm-weather phenomenon, appearing only occasionally in cooler places (Chicago, Oshkosh, Dayton)—generally, only once a year in August. What makes a mirage unique is that just as you arrive at the point where you know it is, you find that it is no longer there. Enough said.
FAItality, on the other hand, has had only one form and one name over its entire life span.
Before beginning with the background, then construction, of these planes, perhaps I should relate some of their achievements. Since the only accomplishments which might convince others to try these designs would be at the Nationals, I will confine the list to just these.
Mirage 1972 Nats — 6th 1973 Nats — 5th 1974 Nats — 4th 1975 Nats — 1st 1976 Nats — 1st
FAItality 1974 Nats — 7th 1975 Nats — 3rd 1976 Nats — 1st & 4th
Obviously, both designs work. Now, let's consider them individually, beginning with Mirage.
When I began flying again in 1972, after not having been anywhere around the sport since 1962, I found two major differences. The first, and most obvious, was that everyone knew what only a few of us seemed to realize ten years previously; namely, a light airplane will decisively outfly a heavy one. At that time, and even at the Nationals in 1962, you were lucky to go to a contest and find more than two fliers who actually understood this to the point that lightness was a goal in their building procedures. Wing loading? What was that? Must be something that had to do with how many combat planes you can get in a car!
The second change was just as important, and much less obvious to the eye. This change was the fact that Mylar films, while much more convenient to use than silk and dope, add almost nothing to the structural integrity of the airplane. Brilliantly perceptive as always, I noticed this at my first contest after blowing my second outboard wing off an airplane in as many flights.
After that embarrassing weekend, some serious soul-searching took place. Did I want to go back to silk and dope (no), or build heavy, mediocre airplanes (no), or build a light, strong ship (sure, but how)? Three or four experimental planes later, the vertical spar was born, and things began to fall into place. The actual configuration of the craft had already been established; I have used big, light planes with long tail moments since 1960, and saw no reason to change.
Construction
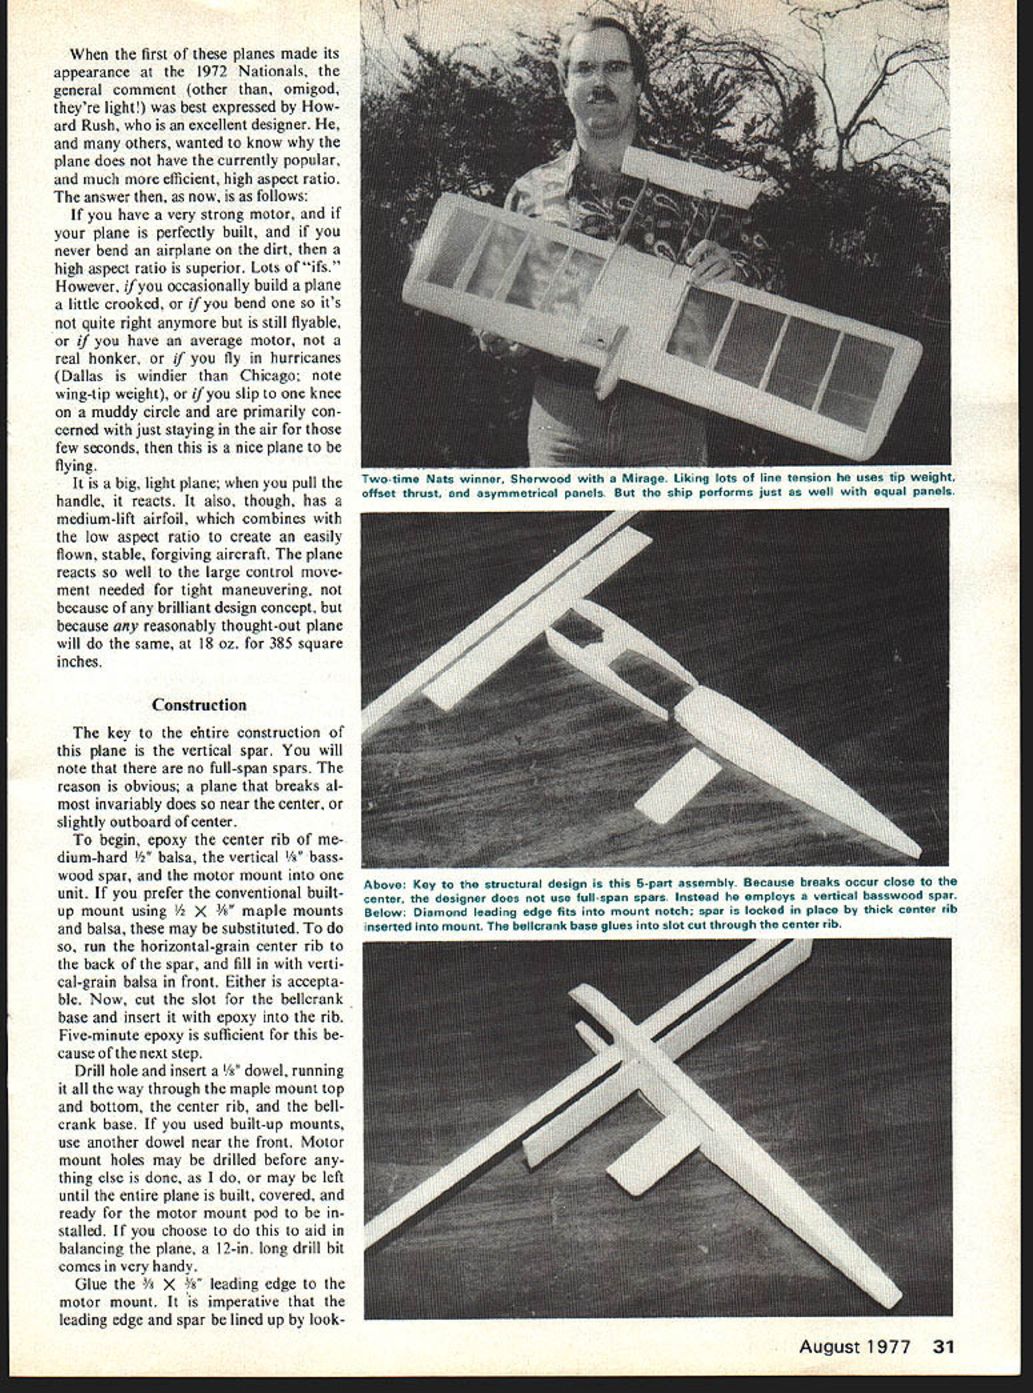
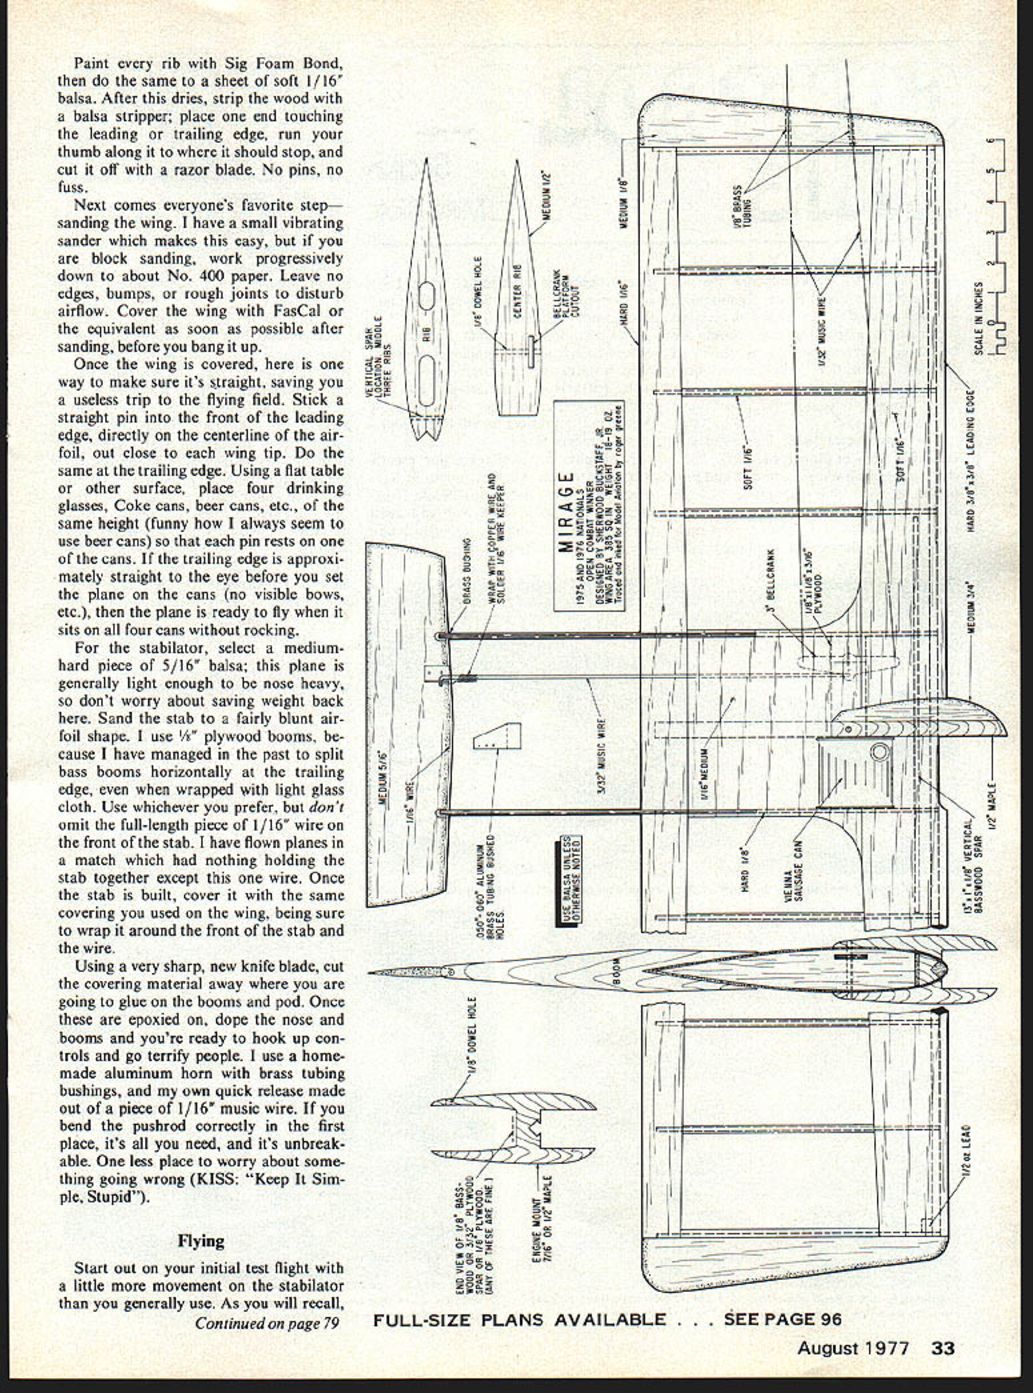
The entire construction of the plane centers around the vertical spar. You will note no full-span spars. The reason is obvious: the plane breaks almost invariably near the center, slightly outboard of center. Begin by epoxy-ing the center rib to a medium-hard 1/8" basswood vertical spar.
Motor-mount unit: I prefer the conventional built-up mount using maple mounts. Balsa may be substituted. Run a horizontal-grain center rib back; fill vertical-grain balsa front. Either acceptable. Now cut slot for bellcrank base and insert epoxy rib. Five-minute epoxy is sufficient. The next step: drill a hole and insert a 1/8" dowel running all the way through the maple mount top to bottom center rib. If the bellcrank base used built-up mounts, use another dowel near the front. Motor-mount holes may be drilled before anything else is done, or may be left until the entire plane is built and covered and the ready motor-mount pod is installed to aid balancing. Plane 12-in long Glue the 3/8" x 3/8" leading edge to the motor mount. It is imperative that the leading edge and spar be lined up by look- ing at them from the front. They must be parallel in that view. The rib and mount may be offset as a unit if so desired, for engine offset. Mine always are, just as my planes always have tip weight.
The remainder of the airframe may be built with one of the cyanoacrylates, if you can afford it. My technique, which is almost as easy, is as follows:
Using contact cement, paint each rib position on the leading edge, using a small brush. Then, holding the ribs stacked together, paint the notch where they will match the leading edge, and about 1¼ in. top and bottom where the trailing edge will be. While this dries, cut the trailing edge, chamfer the inside edges at the rear, and paint both the chamfered surfaces as well as each rib location. Omit only the ribs which will touch the vertical spar. Once dry, stick the ribs to the leading edge, and lay one side of the trailing edge on a table. Stick down the ribs beginning with the two tip ribs to line up the others, put on the top of the trailing edge, and the whole unit may be picked up at once. Now put in the three ribs which will touch the spar.
Using the small brush, paint with contact cement approximately the front 2½ in. of each rib (top and bottom), the leading edge, and the corresponding positions on each of the four sections of planking. If you are building several planes at once, as I do, you can paint them all at once, after which you will find the first one dry enough to assemble. If you are only building one plane, now is an ideal time to install the controls, since you have to wait for the contact cement to dry.
You will note that my controls use 1/32" stiff leadouts, instead of the usual braided cable. This, of course, is a matter of preference, but stiff leads are faster to make, and never wear out at the bellcrank. They do kink, so be careful when landing in grass. Also, notice that the pushrod is .075" music wire, not 1/16". Since this plane takes a greater amount of control movement than many others, 1/16" wire is not stiff enough.
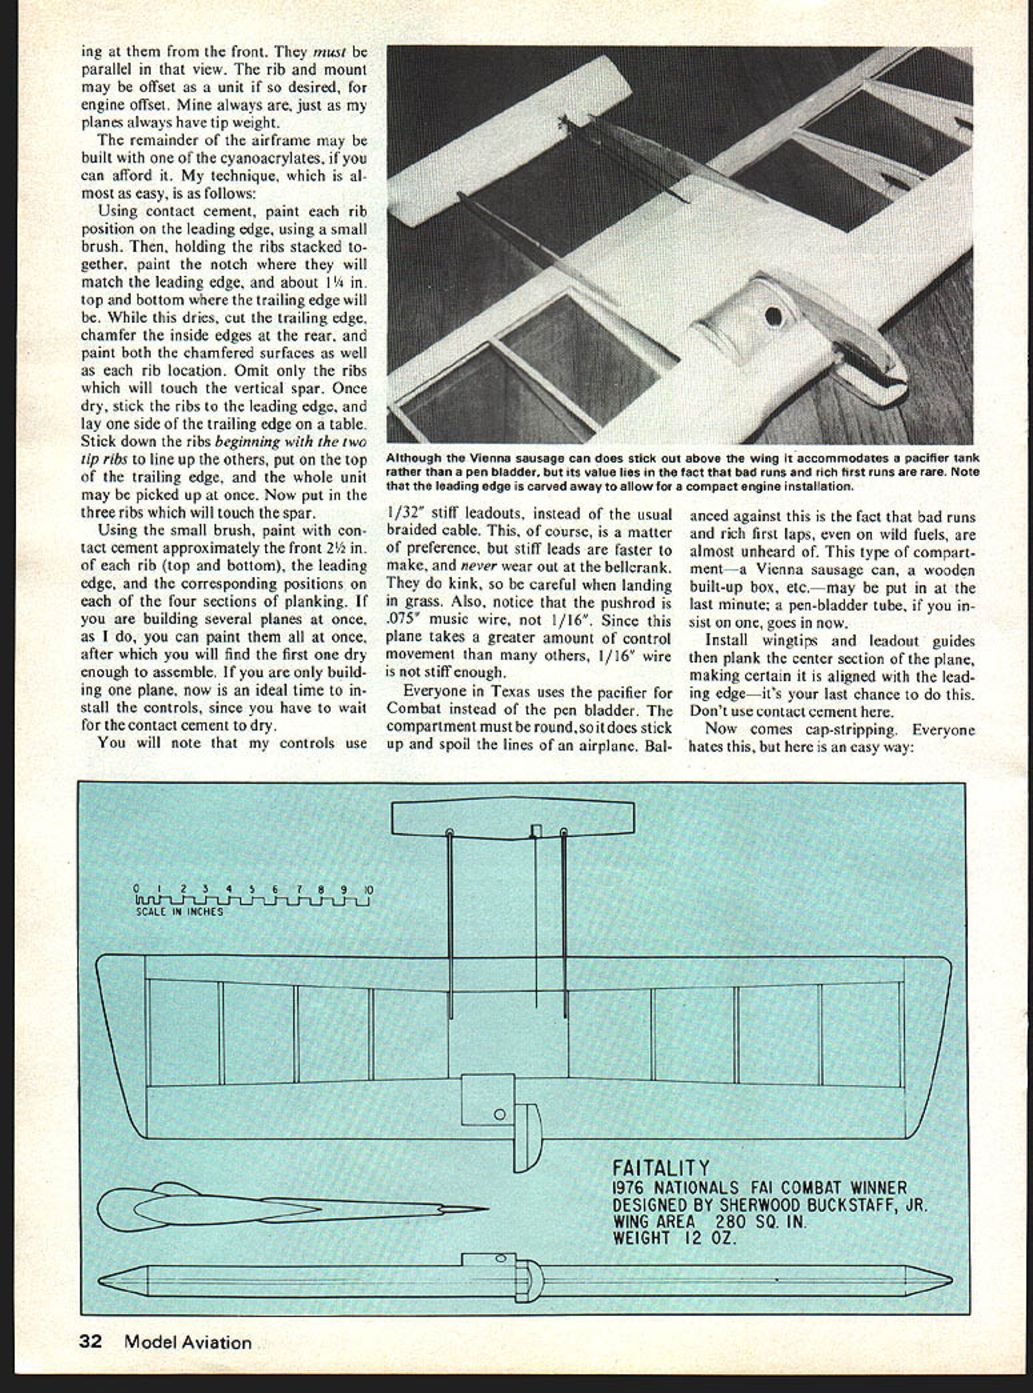
Everyone in Texas uses the pacifier for Combat instead of the pen bladder. The compartment must be round, so it does stick up and spoil the lines of an airplane. Balanced against this is the fact that bad runs and rich first laps, even on wild fuels, are almost unheard of. This type of compartment—a Vienna sausage can, a wooden built-up box, etc.—may be put in at the last minute; a pen-bladder tube, if you insist on one, goes in now.
Install wingtips and leadout guides then plank the center section of the plane, making certain it is aligned with the leading edge—it's your last chance to do this. Don't use contact cement here.
Now comes cap-stripping. Everyone hates this, but here is an easy way: Paint every rib with Sig Foam Bond, then do the same to a sheet of soft 1/16" balsa. After this dries, strip the wood with a balsa stripper; place one end touching the leading or trailing edge, run your thumb along it to where it should stop, and cut it off with a razor blade. No pins, no fuss.
Next comes everyone's favorite step—sanding the wing. I have a small vibrating sander which makes this easy, but if you are block sanding, work progressively down to about No. 400 paper. Leave no edges, bumps, or rough joints to disturb airflow. Cover the wing with FasCal or the equivalent as soon as possible after sanding, before you bang it up.
Once the wing is covered, here is one way to make sure it's straight, saving you a useless trip to the flying field. Stick a straight pin into the front of the leading edge, directly on the centerline of the airfoil, out close to each wing tip. Do the same at the trailing edge. Using a flat table or other surface, place four drinking glasses, Coke cans, beer cans, etc., of the same height (funny how I always seem to use beer cans) so that each pin rests on one of the cans. If the trailing edge is approximately straight to the eye before you set the plane on the cans (no visible bows, etc.), then the plane is ready to fly when it sits on all four cans without rocking.
For the stabilator, select a medium-hard piece of 5/16" balsa; this plane is generally light enough to be nose heavy, so don't worry about saving weight back here. Sand the stab to a fairly blunt airfoil shape. I use 1/8" plywood booms, because I have managed in the past to split bass booms horizontally at the trailing edge, even when wrapped with light glass cloth. Use whichever you prefer, but don't omit the full-length piece of 1/16" wire on the front of the stab. I have flown planes in a match which had nothing holding the stab together except this one wire. Once the stab is built, cover it with the same covering you used on the wing, being sure to wrap it around the front of the stab and the wire.
Using a very sharp, new knife blade, cut the covering material away where you are going to glue on the booms and pod. Once these are epoxied on, dope the nose and booms and you're ready to hook up controls and go terrify people. I use a homemade aluminum horn with brass tubing bushings, and my own quick release made out of a piece of 1/16" music wire. If you bend the pushrod correctly in the first place, it's all you need, and it's unbreakable. One less place to worry about something going wrong (KISS: "Keep It Simple, Stupid").
Flying
Start out on your initial test flight with a little more movement on the stabilator than you generally use. As you will recall, early in this article I mentioned that the plane needs lots of control; hopefully, you realized from this that it would be nice to have lots of room for the bellcrank to swing. You may not need this room, because Mirage is not a very touchy airplane; my own planes have slow controls so that I can really yank on them, but again this is personal preference.
If you can handle a plane set up in the following manner without panicking, try the way mine are done. I use enough control so that, by really pulling hard, one can turn one super-tight half-loop or loop, after which the plane slows down considerably. In other words, put in too much control and be very careful how you use it. Naturally, this takes a careful touch, slow controls, and unceasing attention to what you're doing, but if you use full control once in an entire day of matches and it saves you, it was worth it.
I feel that this particular design has withstood the changes of the last five years in Combat designs quite well. Many of the same people who snickered at the "big fat airplane" in 1972 are flying similar size and shape planes now. An advantage of this particular plane is that, built light, it flies exceptionally well; built heavier, the C.G. moves back from where it generally happens to come out to where it ought to be, and it still flies the same. There is a range from about 18 oz. to 19-1/2 oz. where the plane's weight has literally no effect.
Build your first one with Hot Stuff, Jet, etc. After you fly it you'll want lots more, and that's when you can find out how nice contact cement can be.
FAltality
During the summer of 1973, a year after my unorthodox construction appeared, I decided to build and fly some .15-powered Combat planes, since Oshkosh was having FAI Combat. Having no idea what was a large FAI plane and what was a small one, all I could do was guess. My proposed dimensions, and what I actually did build these planes to, were 33 in. from end rib to end rib, plus tips, by 8-in. chord. I claim no real wisdom in picking these numbers, but they turned out to be good, enough so that the design has remained unchanged throughout four full seasons of flying. Design weight of this plane has stabilized at about 5-1/2 oz. for the plane alone, or 11 oz. wt. motor.
From a construction standpoint, the major differences between FAltality and my large plane are designed to keep the weight down, since I am quite satisfied with the results of using the building techniques described earlier. The leading edge is 1/4 x 1/2, a 2-in. bellcrank is used, along with .025" stiff leadouts and 1/16" pushrod. The vertical spar is used only outboard of the motor mount, and a wooden pacifier compartment is used in place of the slightly heavier aluminum can.
On your initial flight, beware—this plane is not slow to react. If you build one of each and intend to test fly them on the same day, brace yourself for the difference, or expect to pull your .15 out of the mud.
When I began to run .15's, the immediate problem I encountered was to keep them running consistently, with no change in setting from insides to outsides. Anyone suffering from similar problems may wish to try my solution: use a smaller pitch prop to keep the rpm range up, and use a standard pacifier tied off much shorter to ensure a constant flow of fuel. Since switching to this system, I have still had occasional minor problems, but most of these stem from the fact that in our area FAI is a forgotten event, and the engines get run about twice a year.
Give one or both of these planes a fair trial, enough so you are well acquainted with their characteristics, then put them up in a match. All I can do now is wish you good luck. I hope I don't have to fly against either one of them!
Transcribed from original scans by AI. Minor OCR errors may remain.

