
Model Photography Q&A: Camera Selection
Dave Garwood & Jim Haught
This is the first installment of an occasional series on model photography. It is intended to help "raise the bar" for quality photos of model aircraft whether for personal or magazine use. If you have questions, comments, or suggestions for future topics, please contact the author(s).
CAMERA SELECTION
Q. Both of you seem to prefer the older, manual-style cameras to the modern automatic versions. Why?
DG: Familiarity and simplicity. I've been using manual cameras for 30 years and I'm comfortable with their capabilities and limitations.
Older cameras are also cheaper. I buy mine from KEH Camera Brokers (2310 Marietta Blvd NW, Atlanta GA 30318; Tel.: (404) 892-5522; Web site: www.keh.com). I can have two camera bodies and a full set of lenses for the price of a single modern camera with one lens.
I like the Minolta SRT series because most models include a depth-of-field preview button. What I'm lacking is autofocus and autoexposure.
I don't miss autoexposure because I'm thoroughly familiar with the match-needle exposure meter in my old cameras, and when in doubt I rely on a separate handheld meter. Autofocus is a hindrance for my moving-subject work because it's slower and sometimes frustratingly inaccurate for photographing flying models in the sky.
JH: I have loved the rugged simplicity of the old Pentax Spotmatic series since I first used them in 1970. Nothing fancy, but they are highly functional, work great, and are still available relatively cheap. People laugh and call me "Mr. Retro," but the fact is, the Spotmatics are still capable of excellent results, and they are easy to use.
I also deal with KEH, as well as Jack's Camera Shop here in Muncie (www.jackscamera.com). I can cross-check prices and see which source has the best deal. I also check out some of the local/regional used-equipment shows, though you have to be more careful with whom you deal at those venues. You can get some great buys, but there is more risk, because you're usually dealing with someone you don't know well.
With KEH and Jack's, there's a trust—a comfort level—built up that gives reassurance that the equipment has been checked out and is represented as advertised. Each of those dealers backs that with a limited warranty, which helps too.
And the "grading system" that KEH uses for equipment is conservative, which almost always leads to a pleasant surprise upon receipt. The equipment is almost always in better condition than you'd think, judging just by the rating. Some very affordable equipment is available in their BARGAIN and UGLY categories that will work just fine, as long as the cosmetic appearance is not a big deal.
LENS SELECTION
Q. What lens or lenses do you use most often, and why?
DG: I generally use three lenses: normal, wide-angle, and telephoto. Occasionally I use a cardboard panoramic camera for product shots and construction shots; sometimes I use a close-up lens set.
- 50mm normal: Designed to capture a scene as the eye sees it. It balances including a wide view and showing detail in the main subject. It gives a generous amount of depth of field, making focusing easier. Useful for groups, people with airplanes, or portions of a scene like a flying field. Versatile enough that you could photograph an event or a kit-building project with this lens alone.
- 35mm or 28mm wide-angle: Captures a wide view, including more of a scene. Immensely useful indoors where you must be close to the subject, and often used in outdoor model-and-people photography. Short lenses have greater depth of field, so focusing is easier.
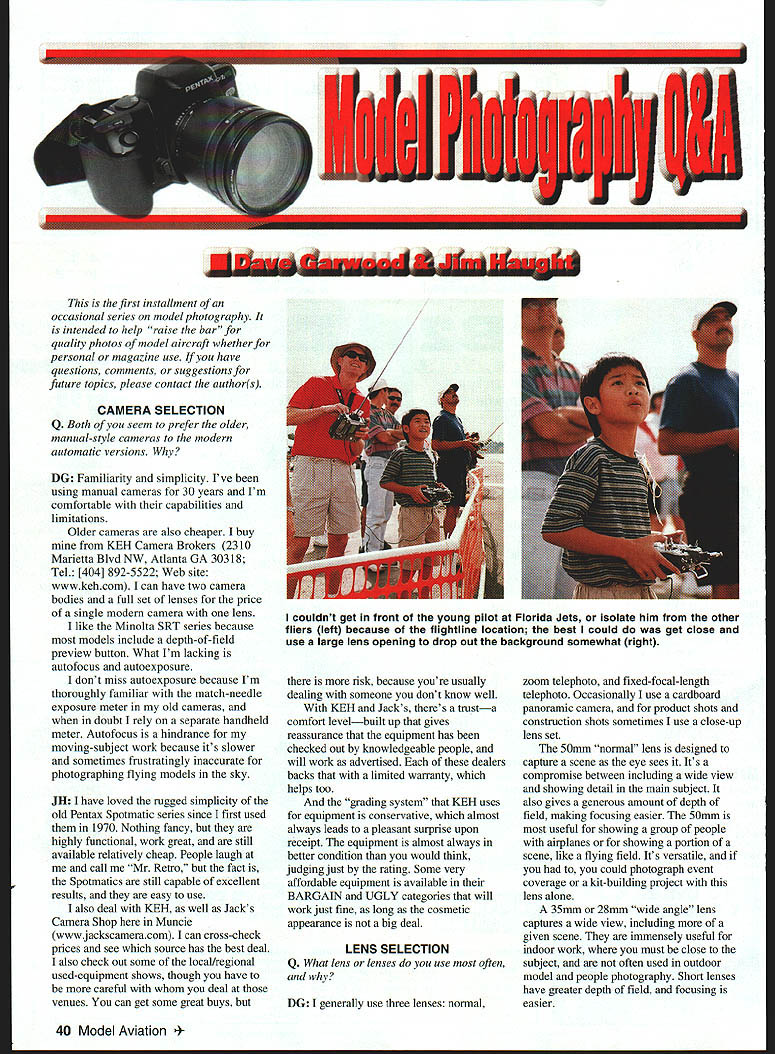
- 90–120mm short telephoto: Cuts extraneous material out of the scene and concentrates attention on the central subject. Often called a portrait lens; from about 12–15 feet it yields a pleasing head-and-shoulders portrait. To show a person with an airplane, 20–25 feet is about right.
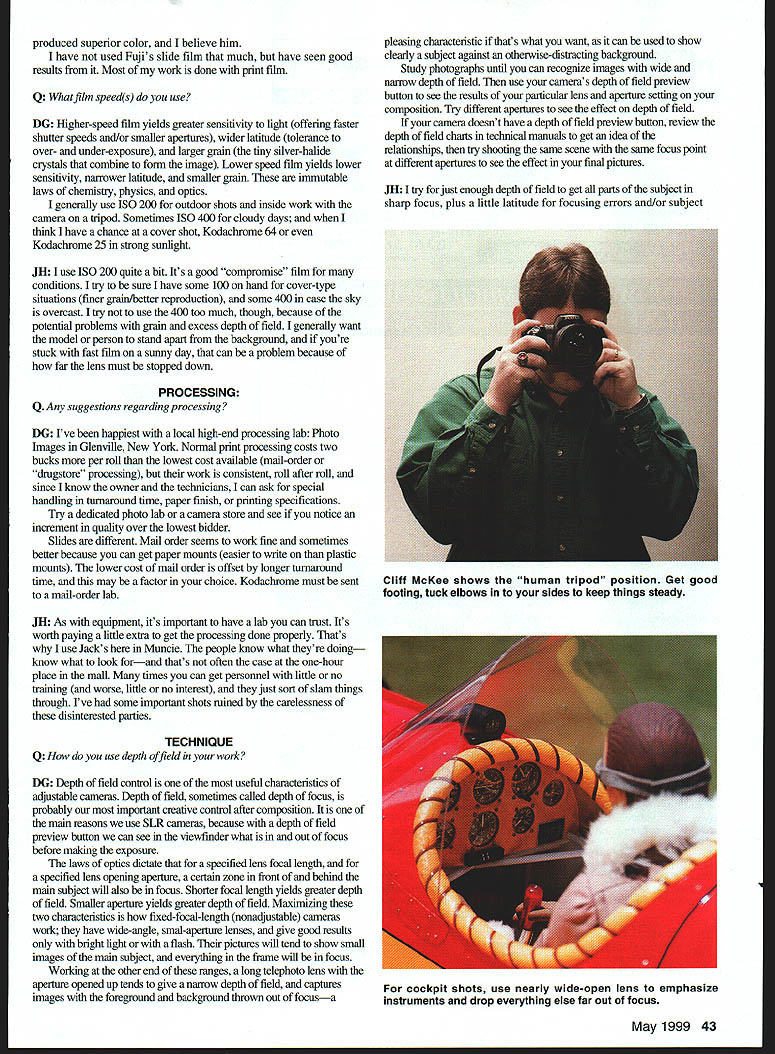
- 200–300mm long telephoto: The choice for photographing models in the air. It narrows the view, excludes distracting elements, and produces a larger image of the main subject. Care must be given to holding the camera steady and to focusing.
- Zoom lenses: Offer variable focal lengths—several lenses in one. The convenience comes at a slight cost in sharpness compared with fixed focal-length lenses. I frequently use a 90–230mm for flight shots. A modern 35–200mm zoom might be the only lens you need to carry.
- Close-up lenses: For very close work (less than about 20 inches), screw a set of close-up lenses onto the front of a 50mm lens to get as close as four inches. Depth of field is very shallow at this distance, so use a tripod, small apertures, and slow shutter speeds.
If I have only one lens mounted, it's the 90–230. If I'm carrying two cameras, usually the 50mm is on one and the 90–230 or 200 is on the other. The 200 is sharper; the zoom is more flexible.
JH: My "normal" lens is usually a 50mm f/1.4. I also keep a 28mm on hand for tight spots, and either a 70–210mm zoom telephoto or a fixed 300mm telephoto.
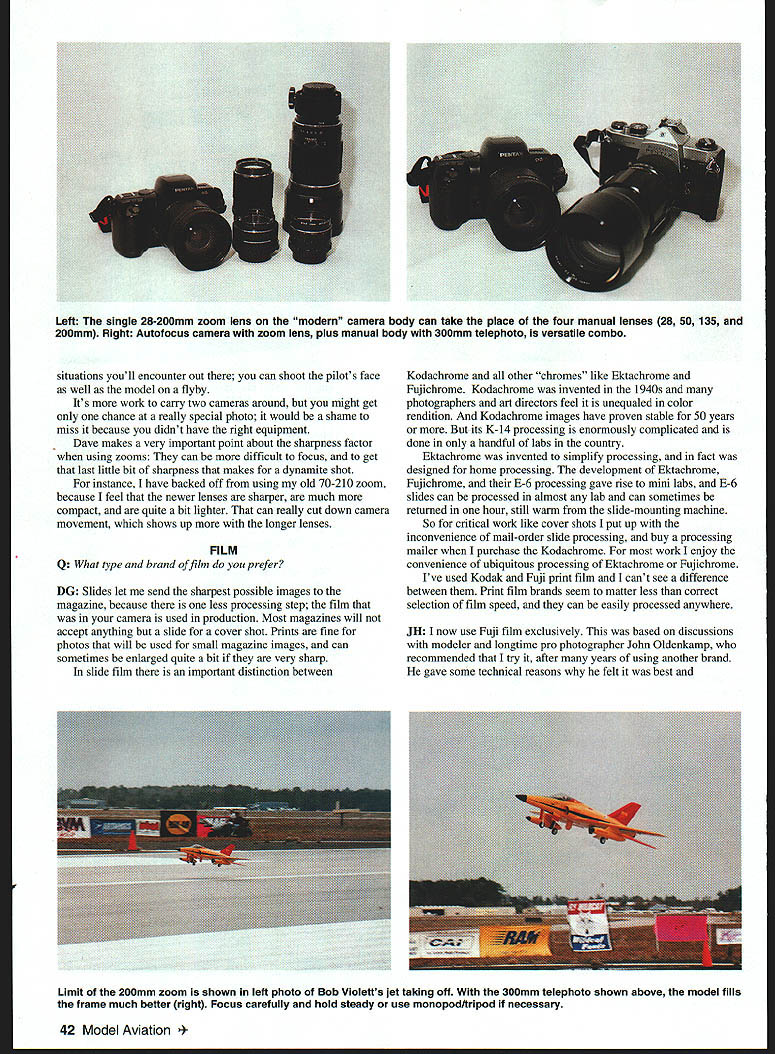
My lone "modern" Pentax has a 28–200mm zoom, which cuts down on the number of lenses needed. Still, there are times—like many flightline situations—where a little longer lens is needed to get a decent shot of the model in flight.
A combination that has worked well for me is to put the 300mm on one of the Spotmatic bodies and go to the flightline with it and the 28–200 on the other body. This covers about 90% of the situations you'll encounter; you can shoot the pilot's face as well as the model on a flyby.
It's more work to carry two cameras around, but you might get only one chance at a really special photo; it would be a shame to miss it because you didn't have the right equipment.
Dave makes a very important point about sharpness when using zooms: they can be more difficult to focus and it can be harder to get that last bit of sharpness that makes for a dynamite shot. I have backed off from using my old 70–210 zoom because newer lenses are sharper, more compact, and lighter. That can cut down camera movement, which shows up more with longer lenses.
FILM
Q. What type and brand of film do you prefer?
DG: Slides let me send the sharpest possible images to the magazine because there is one less processing step; the film that was in your camera is used in production. Most magazines will not accept anything but a slide for a cover shot. Prints are fine for photos that will be used for small magazine images and can sometimes be enlarged quite a bit if they are very sharp.
In slide film there is an important distinction between Kodachrome and other "chromes" like Ektachrome and Fujichrome. Kodachrome was invented in the 1940s and many photographers and art directors feel it is unequaled in color rendition. Kodachrome images have proven stable for 50 years or more. But its K-14 processing is enormously complicated and is done in only a handful of labs in the country.
Ektachrome was invented to simplify processing and was designed for home processing. Ektachrome, Fujichrome, and their E-6 processing gave rise to mini labs, and E-6 slides can be processed in almost any lab and can sometimes be returned in one hour, still warm from the slide-mounting machine.
So for critical work like cover shots I put up with the inconvenience of mail-order slide processing, and buy a processing mailer when I purchase Kodachrome. For most work I enjoy the convenience of ubiquitous processing of Ektachrome or Fujichrome.
I've used Kodak and Fuji print film and I can't see a difference between them. Print film brands seem to matter less than correct selection of film speed, and they can be easily processed anywhere.
JH: I now use Fuji film exclusively. This was based on discussions with modeler and longtime pro photographer John Oldenkamp, who recommended I try it after many years with another brand. He gave some technical reasons why he felt it was best and produced superior color, and I believe him.
I have not used Fuji's slide film that much, but have seen good results from it. Most of my work is done with print film.
Q. What film speed(s) do you use?
DG: Higher-speed film yields greater sensitivity to light (offering faster shutter speeds and/or smaller apertures), wider latitude (tolerance to over- and under-exposure), and larger grain (the tiny silver-halide crystals that combine to form the image). Lower-speed film yields lower sensitivity, narrower latitude, and smaller grain. These are immutable laws of chemistry, physics, and optics.
I generally use ISO 200 for outdoor shots and inside work with the camera on a tripod. Sometimes ISO 400 for cloudy days; and when I think I have a chance at a cover shot, Kodachrome 64 or even Kodachrome 25 in strong sunlight.
JH: I use ISO 200 quite a bit. It's a good compromise film for many conditions. I try to be sure I have some ISO 100 on hand for cover-type situations (finer grain/better reproduction) and some ISO 400 in case the sky is overcast. I try not to use ISO 400 too much because of potential problems with grain and excess depth of field. I generally want the model or person to stand apart from the background, and if you're stuck with fast film on a sunny day, that can be a problem because of how far the lens must be stopped down.
PROCESSING
DG: I've been happiest with a local high-end processing lab: Photo Images in Glenville, New York. Normal print processing costs two bucks more per roll than the lowest cost available (mail-order or "drugstore" processing), but their work is consistent, roll after roll, and since I know the owner and the technicians, I can ask for special handling in turnaround time, paper finish, or printing specifications.
Try a dedicated photo lab or a camera store and see if you notice an increment in quality over the lowest bidder.
Slides are different. Mail order seems to work fine and sometimes better because you can get paper mounts (easier to write on than plastic mounts). The lower cost of mail order is offset by longer turnaround time, and this may be a factor in your choice. Kodachrome must be sent to a mail-order lab.
JH: As with equipment, it's important to have a lab you can trust. It's worth paying a little extra to get the processing done properly. That's why I use Jack's here in Muncie. The people know what they're doing—know what to look for—and that's not often the case at the one-hour place in the mall. Many times you can get personnel with little or no training (and worse, little or no interest), and they just sort of slam things through. I've had some important shots ruined by the carelessness of these disinterested parties.
TECHNIQUE
Q. How do you use depth of field in your work?
DG: Depth of field control is one of the most useful characteristics of adjustable cameras. Depth of field, sometimes called depth of focus, is probably our most important creative control after composition. It is one of the main reasons we use SLR cameras, because with a depth-of-field preview button we can see in the viewfinder what is in and out of focus before making the exposure.
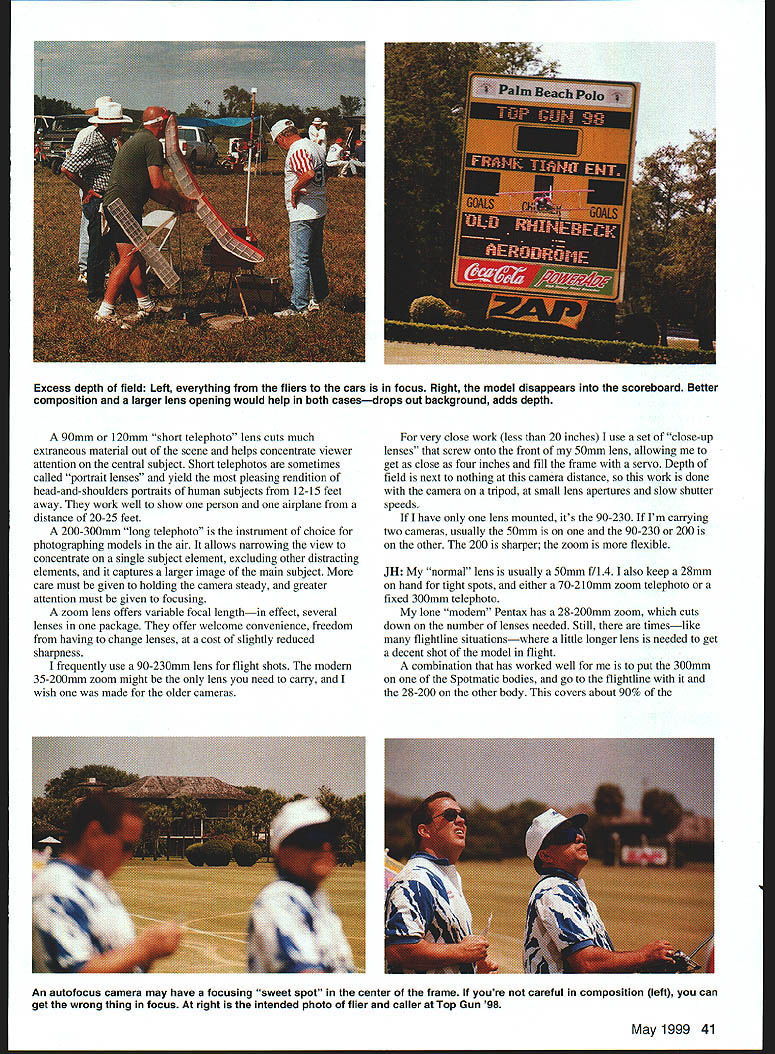
The laws of optics dictate that for a specified lens focal length and for a specified lens opening (aperture), a certain zone in front of and behind the main subject will also be in focus. Shorter focal length yields greater depth of field. Smaller aperture yields greater depth of field. Maximizing these two characteristics is how fixed-focal-length (nonadjustable) cameras work; they have wide-angle, small-aperture lenses, and give good results only with bright light or with a flash. Their pictures will tend to show small images of the main subject, and everything in the frame will be in focus.
Working at the other end of these ranges, a long telephoto lens with the aperture opened up tends to give a narrow depth of field, and captures images with the foreground and background thrown out of focus—a pleasing characteristic if that's what you want, as it can be used to show clearly a subject against an otherwise-distracting background.
Study photographs until you can recognize images with wide and narrow depth of field. Then use your camera's depth-of-field preview button to see the results of your particular lens and aperture setting on your composition. Try different apertures to see the effect on depth of field.
If your camera doesn't have a depth-of-field preview button, review the depth-of-field charts in technical manuals to get an idea of the relationships, then try shooting the same scene with the same focus point at different apertures to see the effect in your final pictures.
JH: I try for just enough depth of field to get all parts of the subject in sharp focus, plus a little latitude for focusing errors and/or subject movement.
Movement: keeping the subject slightly separated from the background makes it stand apart; if the background is also in focus, it flattens the picture and hurts the presentation. It's easy to use a tiny aperture and fast film "to be sure I get things in focus," but that's exactly what will happen: everything from the pits to the trees will be sharp, and oh-by-the-way, there's a model in there somewhere, too. If you cannot relocate, shorten the depth of field (open up the lens and use a faster shutter speed) to minimize background distraction.
Q. What camera-steadying methods do you use?
DG: First and most common is breath control. I hold my breath when releasing the shutter.
Second is bracing. I tuck one or both elbows against my chest to steady the camera, and I also lean against a solid object when one is available.
For the most critical work, and any exposure slower than 1/60 second, I use a tripod. Camera-steadying techniques have a greater effect on final image sharpness than lens quality and film selection, I think.
JH: I disagree with holding your breath; I feel it's better to relax your muscles rather than tensing them, to avoid blur from camera movement. With the older, heavier lenses I often use, keeping still is critical. I do this by slowly exhaling as I release the shutter. I remember being told that when firing a gun, the movement should be smooth enough so that there's a little bit of a surprise at the exact instant of fire; that's really what we're doing here—"firing" the camera at the subject.
Bracing yourself is very important. Your elbows can help form what's called the "human tripod" to keep things still. Be sure of your footing, and by all means brace any portion of yourself against a solid object—especially when you get below 1/2 second shutter speed. I have shot 1/60 without much problem, and occasionally 1/30, but in general, get a tripod or monopod and give yourself some help.
Dave Garwood 5 Birch Lane Scotia NY 12302
Jim Haught c/o Model Aviation E-mail: jhaught@modelaircraft.org
Transcribed from original scans by AI. Minor OCR errors may remain.

