
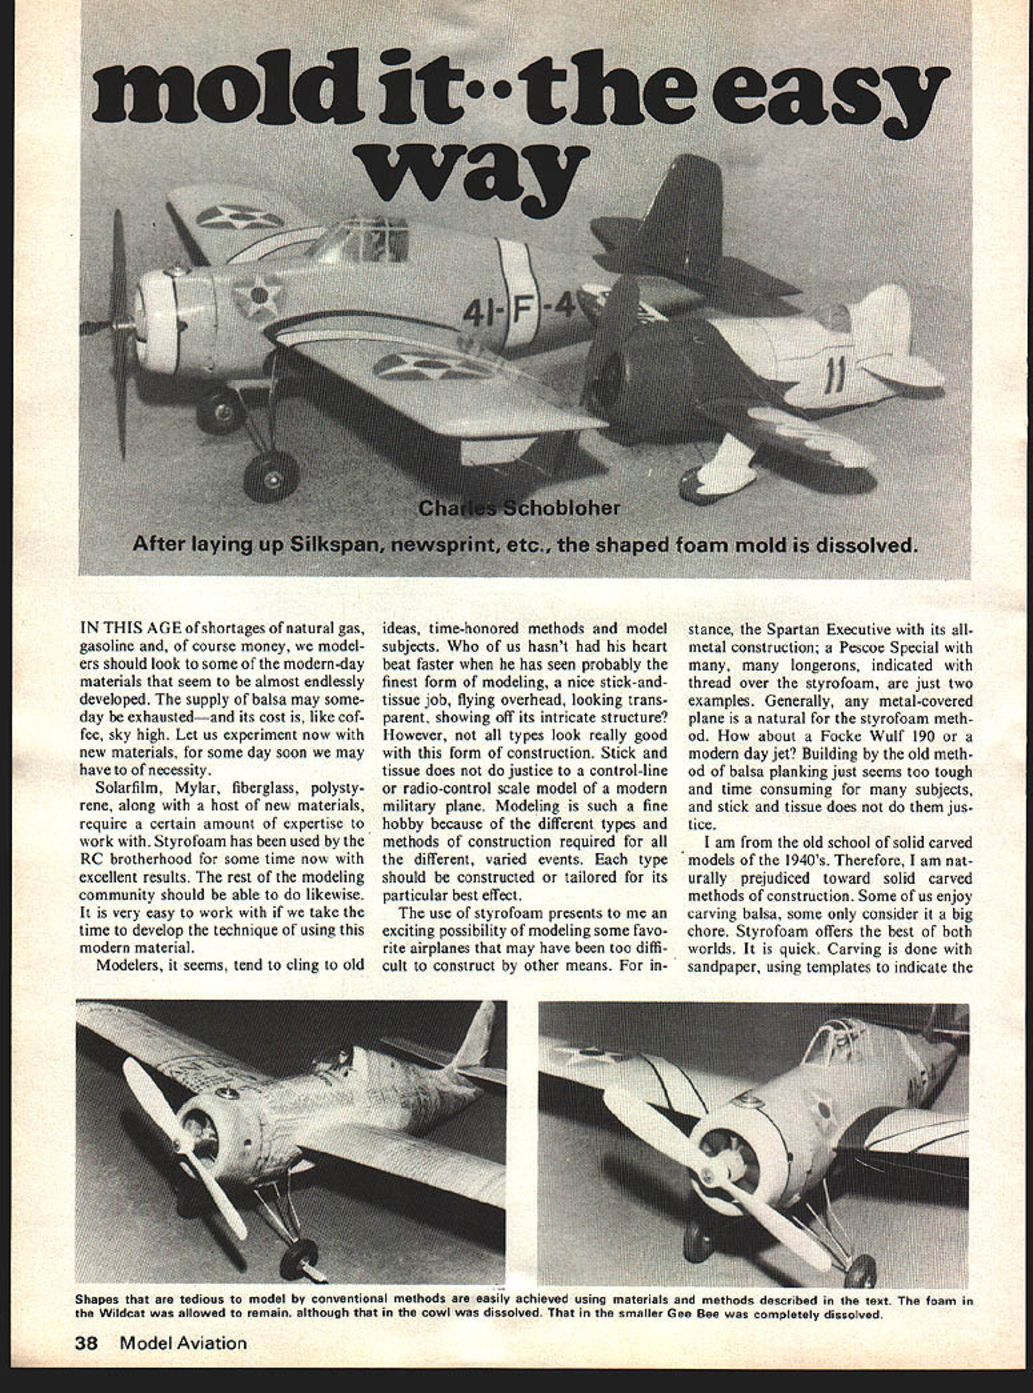

Mold it - the Easy Way
Charles Schobloher
IN THIS AGE of shortages of natural gas, gasoline and, of course, money, we modelers should look to some of the modern-day materials that seem to be almost endlessly developed. The supply of balsa may some day be exhausted—and its cost is, like coffee, sky high. Let us experiment now with new materials, for some day soon we may have to, of necessity.
Solarfilm, Mylar, fiberglass, polystyrene, along with a host of new materials, require a certain amount of expertise to work with. Styrofoam has been used by the RC brotherhood for some time now with excellent results. The rest of the modeling community should be able to do likewise. It is very easy to work with if we take the time to develop the technique of using this modern material.
Modelers, it seems, tend to cling to old ideas, time-honored methods and model subjects. Who of us hasn't had his heart beat faster when he has seen probably the finest form of modeling, a nice stick-and-tissue job, flying overhead, looking transparent, showing off its intricate structure? However, not all types look really good with this form of construction. Stick and tissue does not do justice to a control-line or radio-control scale model of a modern military plane. Modeling is such a fine hobby because of the different types and methods of construction required for all the different, varied events. Each type should be constructed or tailored for its particular best effect.
The use of styrofoam presents to me an exciting possibility of modeling some favorite airplanes that may have been too difficult to construct by other means. For instance, the Spartan Executive with its all-metal construction; a Pescoe Special with many, many longerons, indicated with thread over the styrofoam, are just two examples. Generally, any metal-covered plane is a natural for the styrofoam method. How about a Focke Wulf 190 or a modern day jet? Building by the old method of balsa planking just seems too tough and time consuming for many subjects, and stick and tissue does not do them justice.
I am from the old school of solid carved models of the 1940's. Therefore, I am naturally prejudiced toward solid carved methods of construction. Some of us enjoy carving balsa; some only consider it a big chore. Styrofoam offers the best of both worlds. It is quick. Carving is done with sandpaper, using templates to indicate the shape at contour sections along the model. Almost any size fuselage can be carved (sanded) in one hour.
Recently, our club, the Cloudbusters M.A.C., Inc., decided on a club project, a scale contest for 1/4A control line. The goal was to show how cheaply and simply control-line scale models could be. They did not have to be museum quality, full-blown .60-.80 powered scale jobs. It was to be a fun event demonstrating economy, small size, rapid building time and generally encourage others to try their hand at scale control line. The club promotes scale because they feel that's what modeling is really all about.
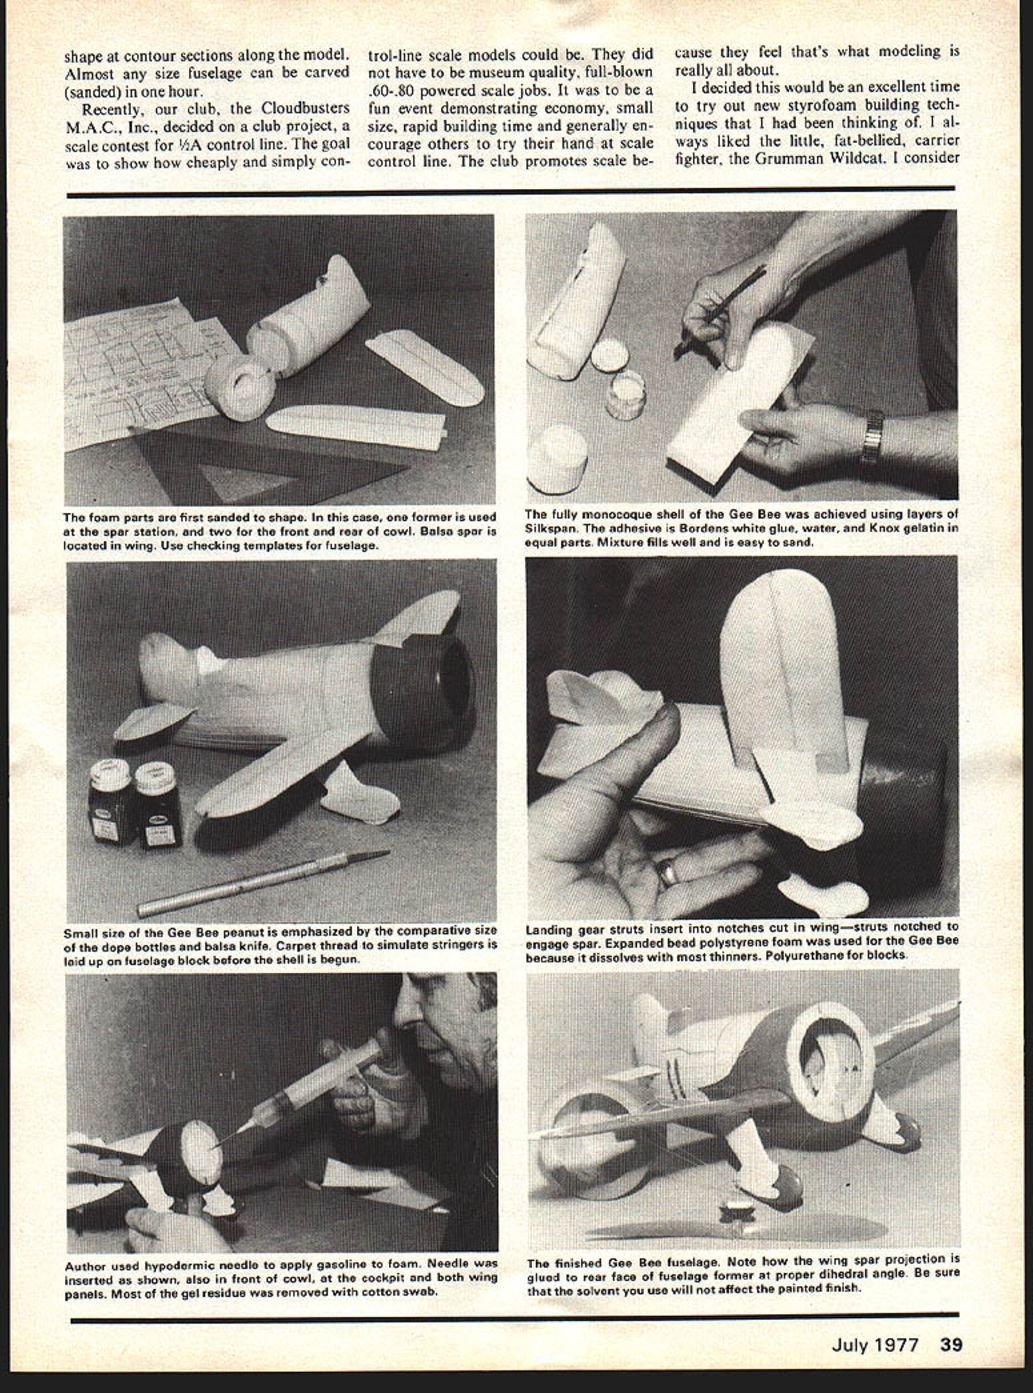
I decided this would be an excellent time to try out new styrofoam building techniques that I had been thinking of. I always liked the little, fat-bellied, carrier fighter, the Grumman Wildcat. I consider it a classic and it is of those planes I always wanted to build, but never had the time.
I purchased some sheets of expanded-bead styrofoam from K-Mart. This is sold as insulation to fit between wall joists, and comes in 1/2-in. thick sizes. I originally purchased a bundle of five sheets, to make odd-size boxes for storing my airplanes and didn't know what to do with the excess. They seemed ideal for fabricating wings, or the components for a model.
I cut out the wing outlines for the Wildcat, and with a rough 80-100 grit sandpaper block, fashioned the airfoil section. Be very careful to stroke the sanding block in one direction only, because sanding fore and aft will cause beads of foam to "chunk out." I tried to sand the trailing edge to within 1/16th with finer sandpaper and didn't worry too much about the jagged edge, because the paper covering I intended to use would cover the flaws. The wing was put together via the hand-launch glider method of propping up for the dihedral and sanding the chord along the edge of the building board.
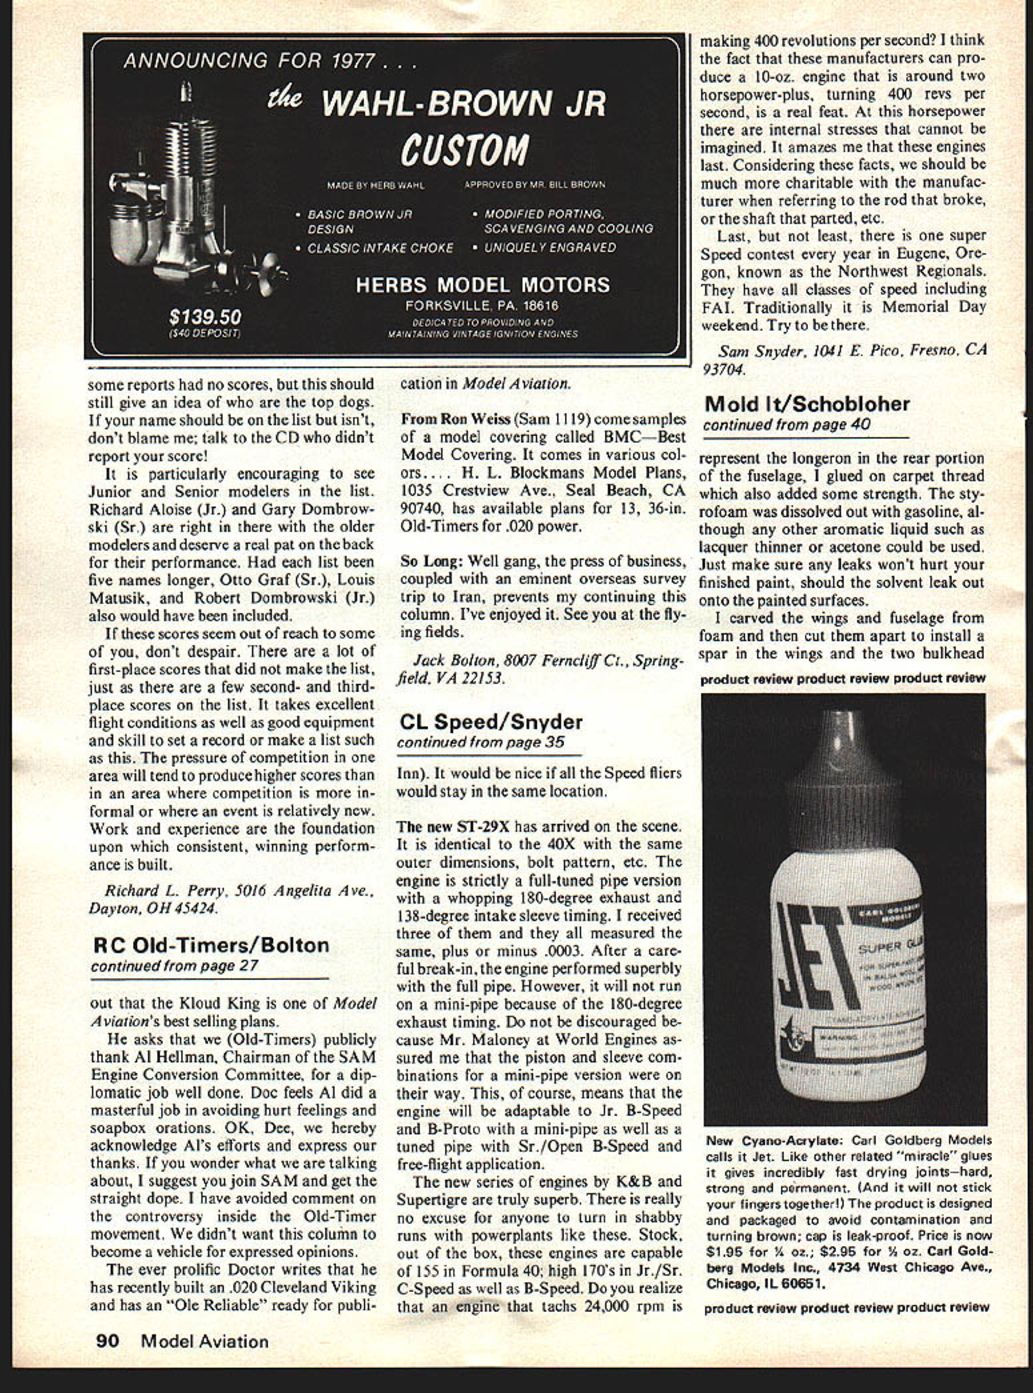
The fuselage was made by laminating enough pieces of 1/2-in. sheet foam, held together with Scotch Spraymount Adhesive for the width required on the Wildcat. Using a very sharp knife, I rough cut a round, tapered shape to the laminated block of foam, leaving plenty of material to be sanded. With careful sanding in one direction only, and frequent use of templates, the fuselage took shape.
The wings and fuselage were then covered with newspaper. I made a mixture of Bordens white glue, water and Knox gelatin. The gelatin acts as a filler and is fairly easy to sand smooth, as opposed to using the white glue alone. The proportions are all approximately equal. This was brushed on to the styrofoam and two layers of newspaper added and covered again with the mixture. After overnight drying it sure looked ugly, but had surprising strength. The paper, backed up against compression with the foam, prevented any twist whatsoever. The weights of the cured pieces were now about four times heavier than the uncovered foam. The Wildcat was assembled using five-minute epoxy. Do not use any glues that dry by evaporation of solvent, such as model cement, as they will attack the foam. The rudder and stab, fabricated of balsa; landing gear, control mechanism, firewall were then added.
I was quite happy with the results as my working schedule does not permit much time for modeling. The paper-and-foam method is exceedingly fast.
The fillets for the wing, rudder and stab were made from common drywall spackle and water-type paste. The recesses for the wheels, when retracted, also were smoothed out with the drywall paste.
After sanding, I sprayed on several coats of enamel automotive primer, sanding well between coats. It was then masked as required and sprayed with final color coats. I used Testors enamel, found in most drug stores. After a coat or two of wax the surfaces were pretty much hot-fuel-proof.
It began to look better. Then, for the fun part, the cowling, and how to get an engine inside. I made a balsa nose ring and a rounded block of styrofoam covered with Handiwipes (paper-cloth towels) and liberally coated and brushed in well with Hobby Poxy Formula #2.
When dry, the cowl was sanded smooth and painted. I then poured a small amount of dope thinner into the styrofoam. This dissolved the styrofoam leaving a thin 1/16-in. shell of epoxy and Handiwipes.
To me this is the simplest way to make a really thin, yet strong, cowling or any other difficult-to-duplicate shape. A pilot, canopy and some color paint, and you would never know it was fabricated from newspaper and foam.
I have used two types of styrofoam. Polyurethane, which is a rigid foam, not affected by airplane glues and lacquer thinners, and the expanded-bead type polystyrene foam, which will dissolve with most thinners. Each has its own unique uses. The polyurethane for blocks and the styrene for cowls, etc., where you want to remove the foam when the cowl is done. They weigh approximately one to three pounds per cubic foot, which makes them much lighter than balsa. However, their strength leaves much to be desired. The covering material must provide the structural element; a truly monocoque type of construction is required.
I have used the polyurethane foam as a replacement for balsa blocks because it is so easy to work with. Consider using it around the nose block or cabin area, or how about a wing fillet or tail cone? It is sure to be lighter than today's soft balsa blocks. It can be hollowed out very, very thin and weigh very little.
Having had what I consider much success building the Wildcat, I tried a more complicated method of construction on a peanut-sized model of the famous Gee Bee Racer. It was to be made almost completely out of Silkspan. We had discussed this method in hangar-talk sessions, but never tried it.
The method used was to carve out the fuselage and wings from a styrofoam block, cover with Silkspan and dissolve out the styrofoam leaving just the tissue form. represent the longeron in the rear portion of the fuselage. I glued on carpet thread which also added some strength. The styrofoam was dissolved out with gasoline, although any other aromatic liquid such as lacquer thinner or acetone could be used. Just make sure any leaks won't hurt your finished paint, should the solvent leak out onto the painted surfaces.
I carved the wings and fuselage from foam and then cut them apart to install a spar in the wings and the two bulkheads. formers in the fuselage. I should have installed the formers in the fuselage first as they could be used as templates when sanding to shape.
I covered the foam with Silkspan because of its wet strength, needed when trying to smooth it out with the white glue mixture. Perhaps tissue would work just as well and be lighter.
The model was then completely finished prior to the foam dissolving attempt. It was a joy to put on details, such as trim colors, inked outlines of control surfaces, working against a solid foam core. I now had visions of a peanut plane that would not have holes in the covering from weed and tree contact to be patched.
A hypodermic type syringe was used to apply the gasoline deep into the fuselage and also through some holes in the wings. The gasoline did a good job of dissolving the foam without attacking the finish paint. Most of the gel residue from the foam was removed with a cotton swab. Not all of the foam, after it is dissolved, can be removed as it coats the inside of the Silkspan with a coating of styrene. Not too much weight can be removed by this method; be careful in covering the foam in the first place.
The plane was a bit heavy, for a peanut-sized airplane. The Silkspan saturated with the Knox gelatin-white glue mixture is really strong, but tends to be a little brittle. Perhaps another filler in place of the gelatin is in order. The method does work and I feel justifies building other peanuts of this type.
Every part of the country has a K-Mart, hardware or drug store that carries all the necessary materials. I urge all the modelers to build their favorite scale plane via the styrofoam method, be it control line, free flight, or just a shelf model for display only. If you won't try a complete model of foam, at least make a styrofoam pilot for your next scale job. We try hard to duplicate an exact scale model and then, strangely, forget the scale pilot.
I am sure modelers can come up with better ideas, methods or materials, if I can only heighten your interest. Let your mind wander, ponder, scheme, plan. I would be most anxious to hear your ideas. My address is 1371 Ashover, Bloomfield Hills, Mich. 48013.
Editor's Note: The reader is directed to the December 1976 issue which contained an illustrated article, Super Fiberglass Fuselages—by Dan Mauch. His system was basically similar and more suited for Pattern and Scale RC types.
Transcribed from original scans by AI. Minor OCR errors may remain.

