
Molding Canopies
By Windy Urtnowski
For the last ten years or so, most of the models I've designed and built have had a "scalelike" theme, with the canopy and detailed cockpit being a prominent focal point. The exact size and shape canopies I've required have seldom (actually, never) been available commercially, so I've had to make my own. What follows is a summary of my experience making canopies, using several different methods and the final "leading edge" way that has evolved.
Early methods and their limits
The late Harold Price showed me his method of making a male canopy "plug" from plaster. The canopy of his superb Defiant was made this way, and while plaster is still a suitable material, it poses some tough problems with water content of the plaster and the heat usually used in the forming process.
In the 1980s Bob Gialdini helped me make a neat canopy for the Nobler I was building. I carved a balsa plug and finished it with several coats of auto primer. Bob pulled heated sheets of clear plastic over the plug and sent me a few spare canopies. The plug wasn't heatproof, however, and heat had ruined the smooth finish in only a few "pulls."
The lesson learned here is that there are some "classic" techniques and materials that can be used to make canopies, but they are really suited for only one or two moldings before the male plug has to be refinished.
When I wanted to do a canopy for my Spitfire in 1995, I remembered how heat had caused the problem with the auto primer finish on a plug, so this time I used an epoxy finish over the wooden plug; but that wasn't a whole lot better. I also tried thin cyanoacrylate (CyA) to seal the wood, but still the life span was only a few pulls, and then the plug surface needed to be redone.
I have special canopy requirements that not every modeler would share. I am an absolute fanatic for perfection in my competition models, so it's not unusual for me to discard several canopies during the building and finishing stages. I also sell some specialty precision CL Stunt products and make the canopies for my "scalelike" models' sale items, so I need to be able to make perfect replicas over and over again.
Seafire project — detail and durability problems
There was no commercially available "scale" canopy for my 1996 Seafire, so once again I needed to make my own. For this model's canopy, I wanted to simulate the bulletproof glass front and metal frame outlines all around. I also wanted it to be molded out of thick enough material that I could make an opening/sliding canopy.
I tried a wooden plug with 1/64" plywood frame detailing, but the results were disappointing. It wasn't possible to get sharp enough detail with the plywood, and I knew that I still hadn't found a way to get a smooth finish on the plug that would be durable enough to allow it to be used to make dozens of identical canopies.
The detail problem was solved by using thin wire solder instead of 1/64" plywood. I used 1/32" diameter Stay-Brite silver solder (a little tougher than normal lead-type solder) to form the roll cage and canopy edges. It wasn't hard to bend the solder to follow the canopy surface contours and take the necessary bends, with thin CyA securely holding the solder.
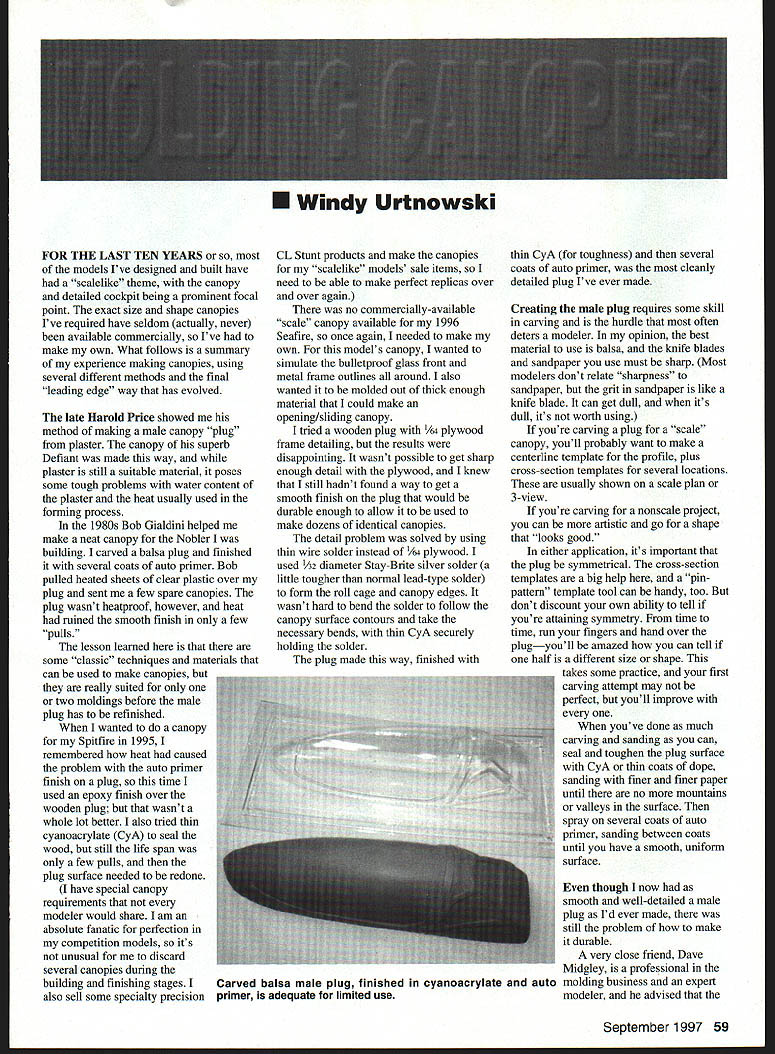
The plug made this way, finished with thin CyA (for toughness) and then several coats of auto primer, was the most cleanly detailed plug I've ever made.
Carving the plug — tips and technique
Creating the male plug requires some skill in carving and is the hurdle that most often deters a modeler. In my opinion, the best material to use is balsa, and the knife blades and sandpaper you use must be sharp. (Most modelers don't relate "sharpness" to sandpaper, but the grit in sandpaper is like a knife blade; when it is dull, it's not worth using.)
If you're carving a plug for a "scale" canopy, you'll probably want to make a centerline template for the profile, plus cross-section templates for several locations. These are usually shown on a scale plan or 3-view.
If you're carving for a nonscale project, you can be more artistic and go for a shape that "looks good."
In either application, it's important that the plug be symmetrical. The cross-section templates are a big help here, and a "pin-pattern" template tool can be handy, too. But don't discount your own ability to tell if you're attaining symmetry. From time to time, run your fingers and hand over the plug — you'll be amazed how you can tell if one half is a different size or shape. This takes some practice, and your first carving attempt may not be perfect, but you'll improve with every one.
When you've done as much carving and sanding as you can, seal and toughen the plug surface with CyA or thin coats of dope, sanding with finer and finer paper until there are no more mountains or valleys in the surface. Then spray on several coats of auto primer, sanding between coats until you have a smooth, uniform surface.
Even though I now had as smooth and well-detailed a male plug as I'd ever made, there was still the problem of how to make it durable.
Making a durable mold system (recommended method)
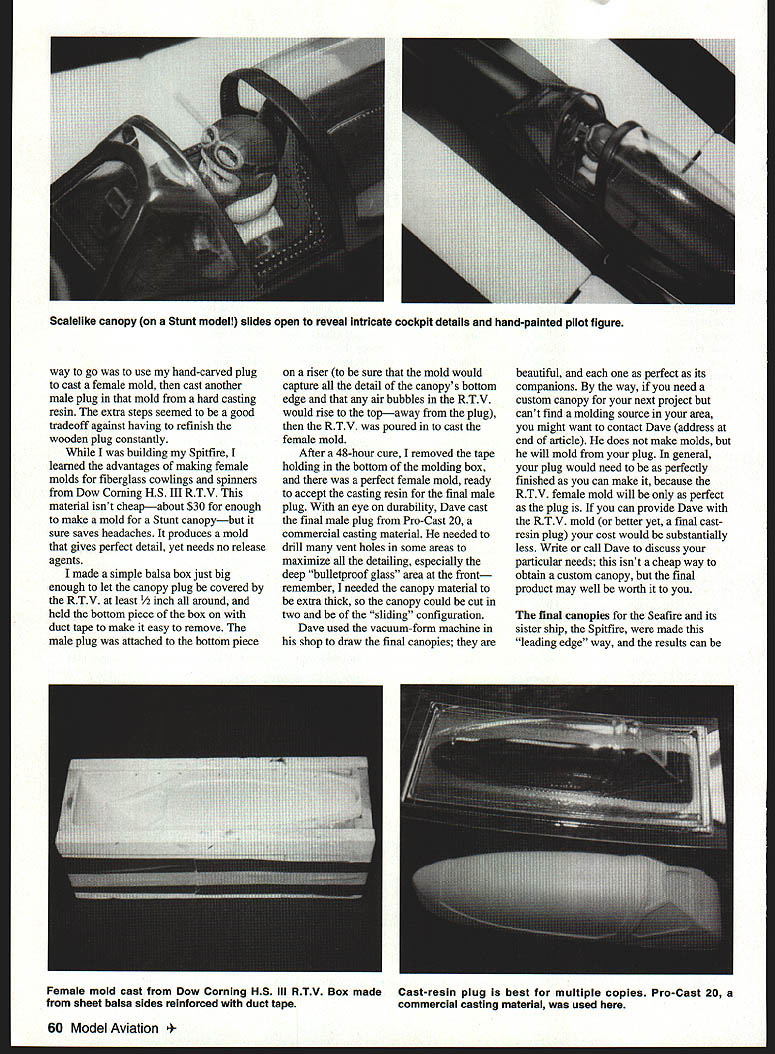
A very close friend, Dave Midgley, is a professional in the molding business and an expert modeler, and he advised that the way to go is to use a hand-carved plug to cast a female mold, then cast another male plug in a hard casting resin. The extra steps seemed a good tradeoff against having to refinish the wooden plug constantly.
While building the Spitfire, I learned the advantages of making female molds for fiberglass cowlings and spinners from Dow Corning HS III RTV. This material isn't cheap — about $30 for enough to make a mold for a Stunt canopy — but it sure saves headaches. It produces a mold that gives perfect detail, yet needs no release agents.
I made a simple balsa box just big enough to let the canopy plug be covered by the RTV at least 1/2 inch all around, and held the bottom piece of the box on with duct tape to make it easy to remove. The male plug was attached to the bottom piece on a riser (to be sure that the mold would capture all the detail of the canopy's bottom edge and that any air bubbles in the RTV would rise to the top — away from the plug), then the RTV was poured in to cast the female mold.
After a 48-hour cure, I removed the tape holding in the bottom of the molding box, and there was a perfect female mold, ready to accept the casting resin for the final male plug.
With an eye on durability, Dave cast the final male plug from Pro-Cast 20, a commercial casting material. He needed to drill many vent holes in some areas to maximize all the detailing, especially the deep "bulletproof glass" area at the front. Remember, I needed the canopy material to be extra thick, so the canopy could be cut in two and be of the "sliding" configuration.
Dave used the vacuum-form machine in his shop to draw the final canopies; they are beautiful, and each one is as perfect as its companions.
Getting canopies made (services and costs)
If you need a custom canopy for your next project but can't find a molding source in your area, you might want to contact Dave Midgley. He does not make molds for sale, but he will mold from your plug. In general, your plug would need to be as perfectly finished as you can make it, because the RTV female mold will be only as perfect as the plug is. If you can provide Dave with the RTV mold (or better yet, a final cast resin plug) your cost would be substantially less. Write or call Dave to discuss your particular needs; this isn't a cheap way to obtain a custom canopy, but the final product may well be worth it to you.
The final canopies for the Seafire and its sister ship, the Spitfire, were made this "leading edge" way, and the results can be seen in the photos. There are many ways to mold a custom, clear plastic canopy, but the one described here is by far the best I've ever tried. I hope this information is helpful to you in a future project, and if you use this technology, I hope you'll send me a photo or two of your efforts.
Videotape
I made a videotape of the entire Seafire canopy-making process, including some footage provided by Dave Midgley. The tape shows everything — including how I needed to completely redo the mold at one point! It's available from me for $15, plus $3 for shipping and handling.
Windy Urtnowski 93 Elliott Place Rutherford, NJ 07070
Sources
- Molding rubber:
Florida Glue Products 4015 Georgia Ave. West Palm Beach, FL 33405 (407) 833-1863 (800) 771-1863
- Canopy material:
Sig Manufacturing 401 S. Front Street Montezuma, IA 50171-9900 (515) 623-5154 (800) 247-5008 (orders only)
- Dave Midgley Vacuum Forming Service:
Welch Fluorocarbon ATTN: Dave Midgley 113 Crosby Road, Unit 10 Dover, NH 03820 (603) 742-7070
Transcribed from original scans by AI. Minor OCR errors may remain.

