
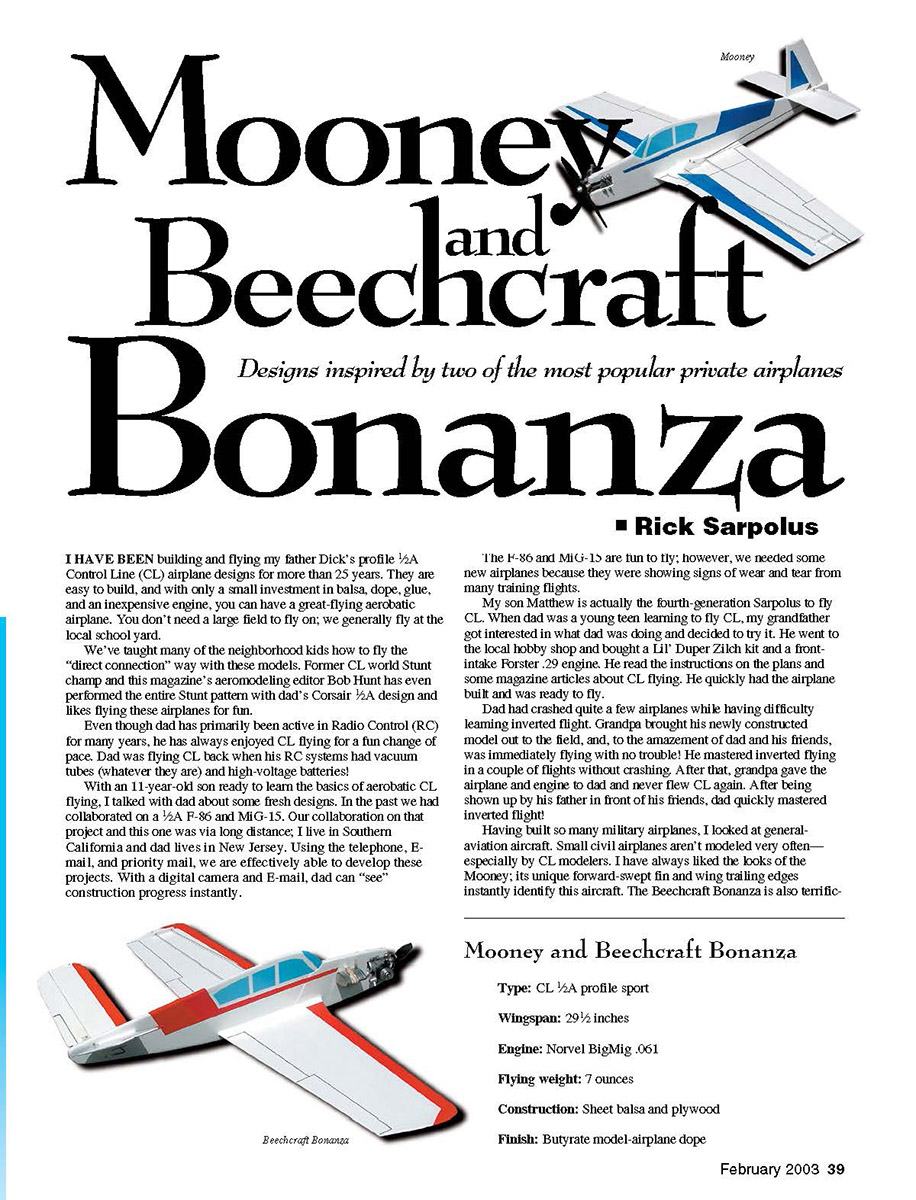

Mooney and Beechcraft Bonanza
Designs inspired by two of the most popular private airplanes
by Rick Sarpolus
I have been building and flying my father Dick’s profile 1/2A Control Line (CL) airplane designs for more than 25 years. They are easy to build, and with only a small investment in balsa, dope, glue, and an inexpensive engine, you can have a great-flying aerobatic airplane. You don’t need a large field to fly on; we generally fly at the local schoolyard.
We’ve taught many of the neighborhood kids how to fly the “direct connection” way with these models. Former CL world Stunt champ and this magazine’s aeromodeling editor Bob Hunt has even performed the entire Stunt pattern with Dad’s Corsair 1/2A design and likes flying these airplanes for fun.
Even though Dad has primarily been active in Radio Control (RC) for many years, he has always enjoyed CL flying for a fun change of pace. Dad was flying CL back when his RC systems had vacuum tubes (whatever they are) and high-voltage batteries!
With an 11-year-old son ready to learn the basics of aerobatic CL flying, I talked with Dad about some fresh designs. In the past we had collaborated on a 1/2A F-86 and MiG-15. Our collaboration on that project and this one was via long distance; I live in Southern California and Dad lives in New Jersey. Using the telephone, e-mail, and priority mail, we are effectively able to develop these projects. With a digital camera and e-mail, Dad can “see” construction progress instantly.
The F-86 and MiG-15 are fun to fly; however, we needed some new airplanes because they were showing signs of wear and tear from many training flights.
My son Matthew is actually the fourth-generation Sarpolus to fly CL. When Dad was a young teen learning to fly CL, my grandfather got interested in what Dad was doing and decided to try it. He went to the local hobby shop and bought a Lil’ Duper Zilch kit and a front-intake Forster .29 engine. He read the instructions and some magazine articles about CL flying, quickly had the airplane built, and was ready to fly.
Dad had crashed quite a few airplanes while having difficulty learning inverted flight. Grandpa brought his newly constructed model out to the field and, to the amazement of Dad and his friends, was immediately flying with no trouble! He mastered inverted flying in a couple of flights without crashing. After that, Grandpa gave the airplane and engine to Dad and never flew CL again. After being shown up by his father in front of his friends, Dad quickly mastered inverted flight!
Having built so many military airplanes, I started looking at general-aviation aircraft. Small civil airplanes aren’t modeled very often—especially by CL modelers. I have always liked the looks of the Mooney; its unique forward-swept fin and wing trailing edges instantly identify the aircraft. The Beechcraft Bonanza is also terrific-looking, with its classic lines and that neat V-tail. These airplanes are some of the most recognizable civil aircraft ever produced. Both have legions of loyal fliers; check out the many websites devoted to each.
As a youngster I got to ride in Bonanza and Mooney aircraft that belonged to my father’s friends, and I remember looking on both as great airplanes; it was a thrill to ride in them. These model designs are not specific Bonanza and Mooney models; they are generic airplanes as they would be recognized by most aircraft enthusiasts. Introduced in 1947 with its distinctive V-tail design, the Bonanza is still in production today but with a conventional tail surface since 1982. The Bonanza is generally regarded as sleek, fast, and high performance. The Mooney Aircraft Company was founded in 1946. The Mooney’s vertical-tail design has endured through the years and is as recognizable as the Bonanza’s V-tail. Still in production today, Mooneys are also regarded as clean, sleek, high-performance airplanes.
I called Dad and suggested that we build these two airplanes; he thought it was a good idea. Searching the Internet I could not find a reasonable three-view of either airplane to enlarge, despite the large amount of information and photographs available. After another call to Dad, two three-views copied from his vast airplane-magazine collection were in the mail. He also recommends Bob’s Aircraft Documentation (3114 Yukon Ave., Costa Mesa, CA 92626) for three-views, pictures, etc.
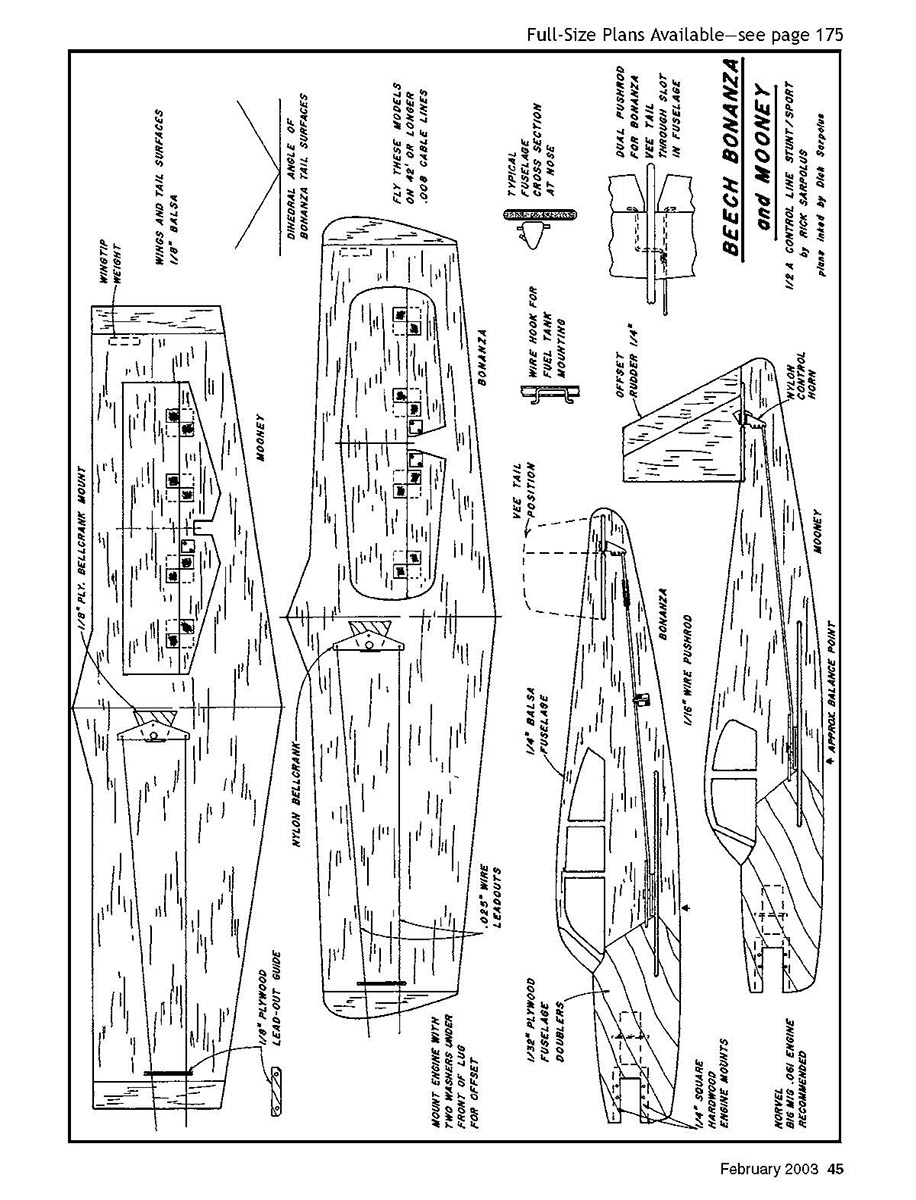
I followed the basic layout Dad originally developed for these 1/2A all-sheet-balsa Stunt models, which has been proven through the years. The wingspan is approximately 30 inches, the fuselage length is roughly 23 inches, and the wing area is approximately 170 square inches, with appropriate wing and tail moments. The blown-up three-views were easy to “stretch” into this layout, and they look great as profile Stunt airplanes.
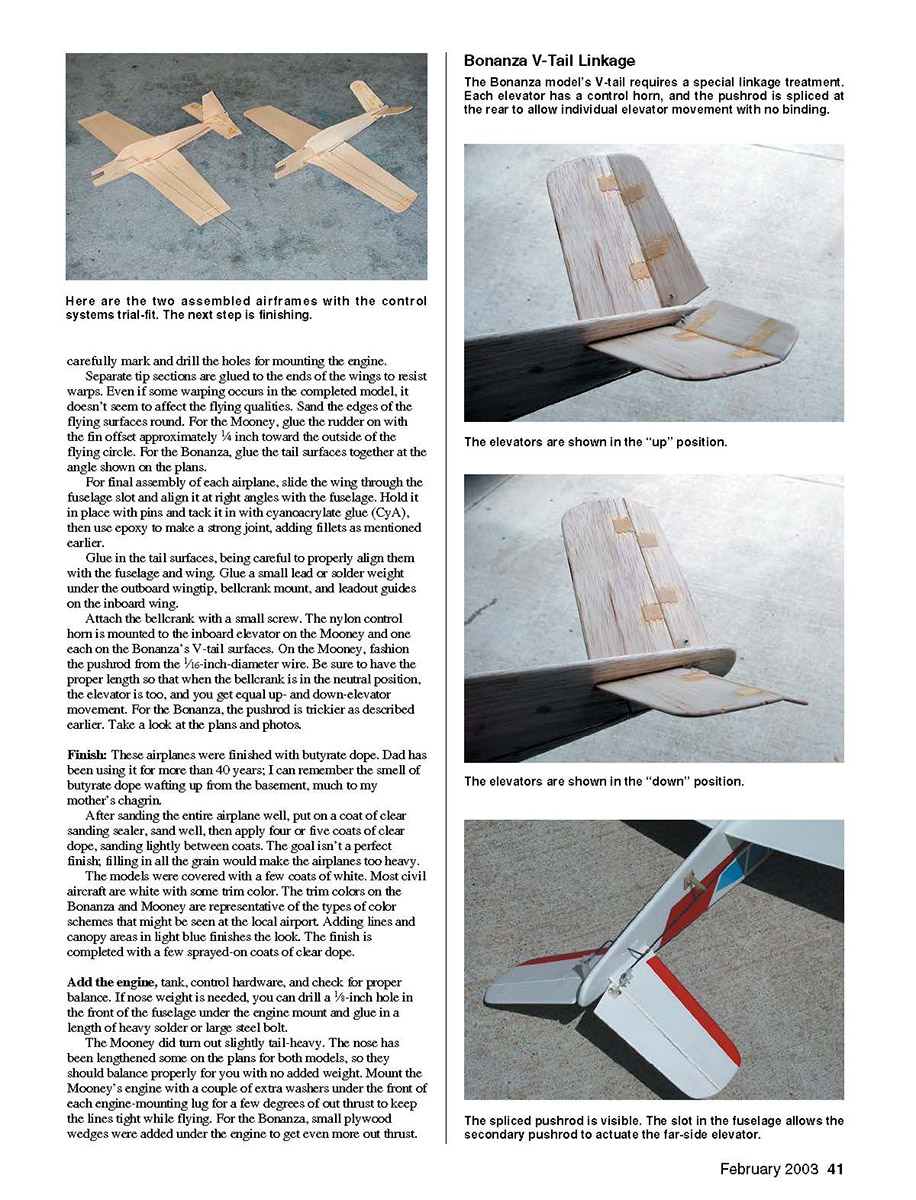
V-tail and control linkage
The Bonanza’s V-tail was tricky, but we developed a solution after yet another call to Dad. The pushrod runs down the side of the airplane, in the usual fashion, to a control horn on one side of the Bonanza’s tail. Through a slot in the fuselage underneath the tail, another pushrod is connected to the other side.
One addition after most of the pictures were taken was the pushrod brace on the fuselage side, halfway back to the tail. It’s a nylon control horn like those used on the elevators, and it’s mounted with two small screws in a piece of 1/16-inch plywood inset in the fuselage side. This brace prevents pushrod flexing within the V-tail setup.
Also, because of the V-tail, additional engine offset and leadout sweep were utilized to compensate for the absent fin offset. These changes to our traditional layout ensure that the airplane stays out on the lines well. The Bonanza with its V-tail flies just as well as its sister Mooney with its conventional tail.
Engines and lines
We used Cox .049 Tee Dees engines in the small models for many years. They are popular and have plenty of power to fly these airplanes. This time Dad suggested that I look at the Norvel engines; he had tried a few and found them to be reliable. I quickly navigated to Norvel’s website—www.norvel.com (or (800) 665-9375)—and ordered two Big Mig .061 C/L engines, extra glow plugs, and two starter springs. Within a couple of days they arrived on my doorstep.
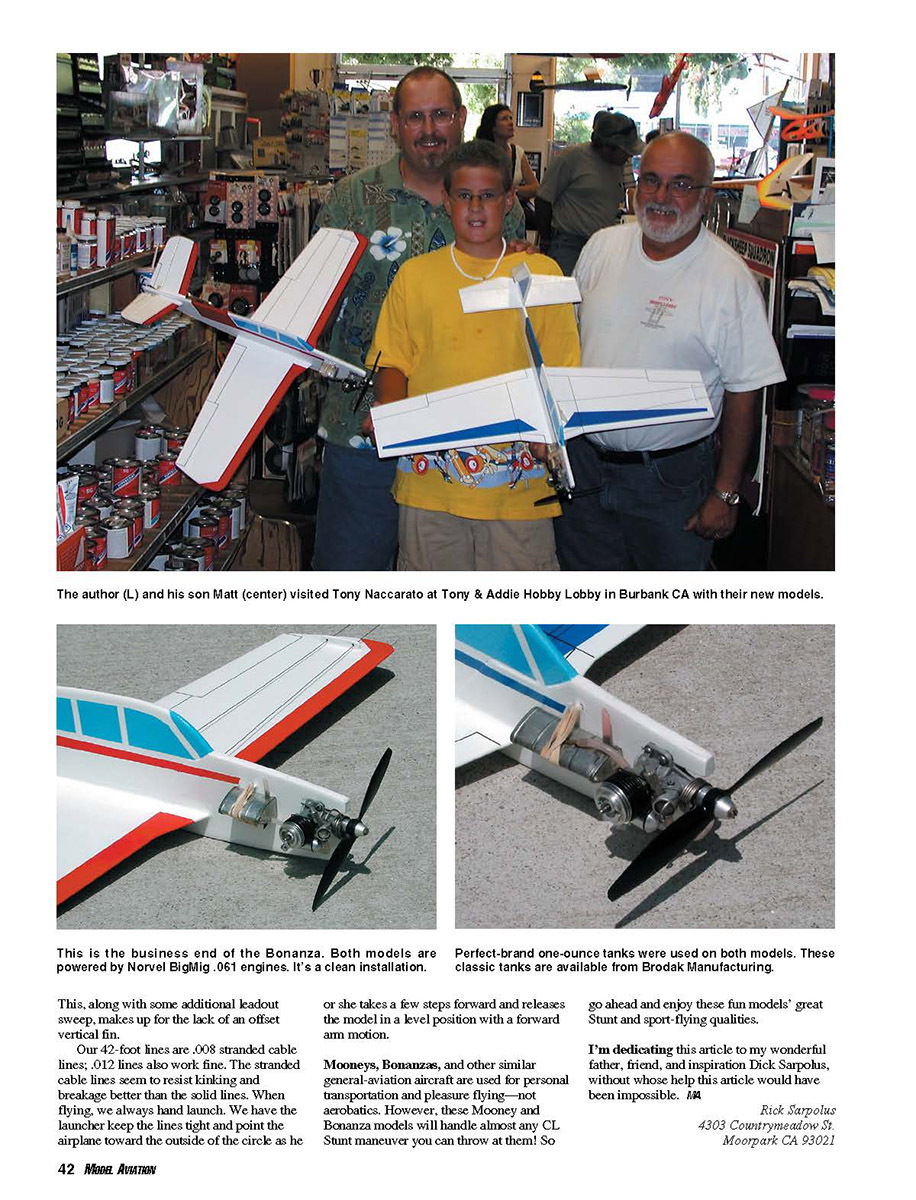
The Norvel engines have proved to be a delight. Easily started, they run flawlessly throughout a typical aerobatic flight. The Norvel’s extra power also allowed us to lengthen the lines on which we fly. Instead of the 35 feet we had been using with the Cox Tee Dees, we are able to fly on 42-foot lines, which gives us a 44% larger “flying surface”; this makes these airplanes even more enjoyable to fly and aerobatics easier to practice.
Our 42-foot lines are .008 stranded cable lines; .012 lines also work fine. The stranded cable lines seem to resist kinking and breakage better than solid lines. When flying, we always hand launch. We have the launcher keep the lines tight and point the airplane toward the outside of the circle as he or she takes a few steps forward and releases the model in a level position with a forward arm motion.
Materials and hardware
Medium-weight, firm balsa is fine; anything softer breaks too easily. Heavier pieces will survive crashes better, but they can add too much weight. I have seen these airplanes bounce back from many hard-looking crashes on grass fields. If they do break, you can generally get them back in the air quickly with five-minute epoxy.
The hardware is standard hobby-shop fare. Our favorite shop is Tony & Addie Hobby Lobby (3512 W. Victory Blvd., Burbank, CA 91505; Tel: (818) 842-5062) for its old-fashioned hobby-shop feel; Tony & Addie’s has been at its Burbank location since 1951! The store is usually full of experienced modelers hanging around, and you can count on wise advice and great service from Tony Naccarato. He stocks everything the CL modeler needs.
Pick up these items at your favorite shop:
- Two-inch bellcrank
- Bolt-on small nylon control horn
- 1/16-inch-diameter wire for pushrods
- 0.025-inch-diameter wire for leadouts
- Small metal fuel tank (Perfect brand has been around for years)
I also use other under-hinges glued on with old-fashioned model-airplane glue—techniques learned from Dad when I was a young builder.
Construction
Construction is straightforward. The fuselage is made from 1/8-inch balsa with 1/32-inch plywood doublers over the nose section for added strength. The doublers cover the 1/4-square hardwood engine mounts in the fuselage. Wing and tail surfaces are 1/8-inch balsa. We edge-glue whatever widths are on hand to get the sizes needed.
Assembly steps:
- Start assembly with the fuselage, gluing the engine mount in place. Glue the plywood doublers on, and cut the slots for the wing and tail surfaces.
- To install the wire hook that holds the gas tank on, cut a slot through the outboard doubler, epoxy the hook in place, and add a plywood filler piece to fill the slot.
- Before gluing the flying surfaces in place, carefully mark and drill the holes for mounting the engine.
- Separate tip sections are glued to the ends of the wings to resist warps. Even if some warping occurs in the completed model, it doesn't seem to affect the flying qualities.
- Sand the edges of the flying surfaces round. For the Mooney, glue the rudder on with the fin offset approximately 1/4 inch toward the outside of the flying circle. For the Bonanza, glue the tail surfaces together at the angle shown on the plans.
- Slide the wing through the fuselage slot and align it at right angles with the fuselage. Hold it in place with pins and tack it with cyanoacrylate glue (CyA), then use epoxy to make a strong joint, adding fillets of epoxy mixed with microballoons to strengthen joints and ease sanding.
- Glue in the tail surfaces, being careful to properly align them with the fuselage and wing.
- Glue a small lead or solder weight under the outboard wingtip, bellcrank mount, and leadout guides on the inboard wing.
- Attach the bellcrank with a small screw. Mount the nylon control horn to the inboard elevator on the Mooney and one on each of the Bonanza's V-tail surfaces.
- On the Mooney, fashion the pushrod from the 1/16-inch-diameter wire. Be sure to have the proper length so that when the bellcrank is in neutral, the elevator is too, and you get equal up- and down-elevator movement. For the Bonanza, the pushrod installation is trickier—refer to the plans and photos.
A jigsaw makes it easy to cut the parts, but if you don’t have one an X-Acto knife works fine for everything except the engine mount. Cut up the plans for patterns, trace the outlines onto the balsa pieces you have gathered, and edge-glue as necessary.
Assembly of almost everything is done with five-minute epoxy. Shape small fillets from epoxy mixed with microballoons for easier sanding around the wing and tail surfaces, and to strengthen joints. These fillets add strength and improve the appearance.
Finish
These airplanes were finished with butyrate dope. Dad has been using it for more than 40 years; I can remember the smell of butyrate dope wafting up from the basement, much to my mother's chagrin.
After sanding the entire airplane well, put on a coat of clear sanding sealer, sand well, then apply four or five coats of clear dope, sanding lightly between coats. The goal isn't a perfect, glass-smooth finish; filling in all the grain would make the airplanes too heavy.
The models were covered with a few coats of white. Most civil aircraft are white with some trim color. The trim colors on the Bonanza and Mooney are representative of the types of color schemes that might be seen at the local airport. Adding lines and canopy areas in light blue finishes the look. Complete the finish with a few sprayed-on coats of clear dope.
Add the engine, tank, and control hardware, and check for proper balance. If nose weight is needed, you can drill a 1/8-inch hole in the front of the fuselage under the engine mount and glue in a length of heavy solder or a large steel bolt.
The Mooney did turn out slightly tail-heavy. The nose has been lengthened some on the plans for both models, so they should balance properly for you with no added weight. Mount the Mooney's engine with a couple of extra washers under the front of each engine-mounting lug for a few degrees of out-thrust to keep the lines tight while flying. For the Bonanza, small plywood wedges were added under the engine to get even more out-thrust. This, along with some additional leadout sweep, makes up for the lack of an offset vertical fin.
Flying and handling
Mooneys, Bonanzas, and other similar general-aviation aircraft are used for personal transportation and pleasure flying—not aerobatics. However, these Mooney and Bonanza models will handle almost any CL Stunt maneuver you can throw at them! Our models fly well on 42-foot lines and hand launches are used exclusively.
Enjoy these fun models' great Stunt and sport-flying qualities.
Dedication
I'm dedicating this article to my wonderful father, friend, and inspiration Dick Sarpolus, without whose help this article would have been impossible.
Rick Sarpolus 4303 Countrymeadow St. Moorpark, CA 93021
Specifications
- Type: CL 1/2A profile sport
- Wingspan: 29-1/2 inches
- Engine: Norvel Big Mig .061
- Flying weight: 7 ounces
- Construction: Sheet balsa and plywood
- Finish: Butyrate model-airplane dope
Transcribed from original scans by AI. Minor OCR errors may remain.

