
MOUNTAINEER
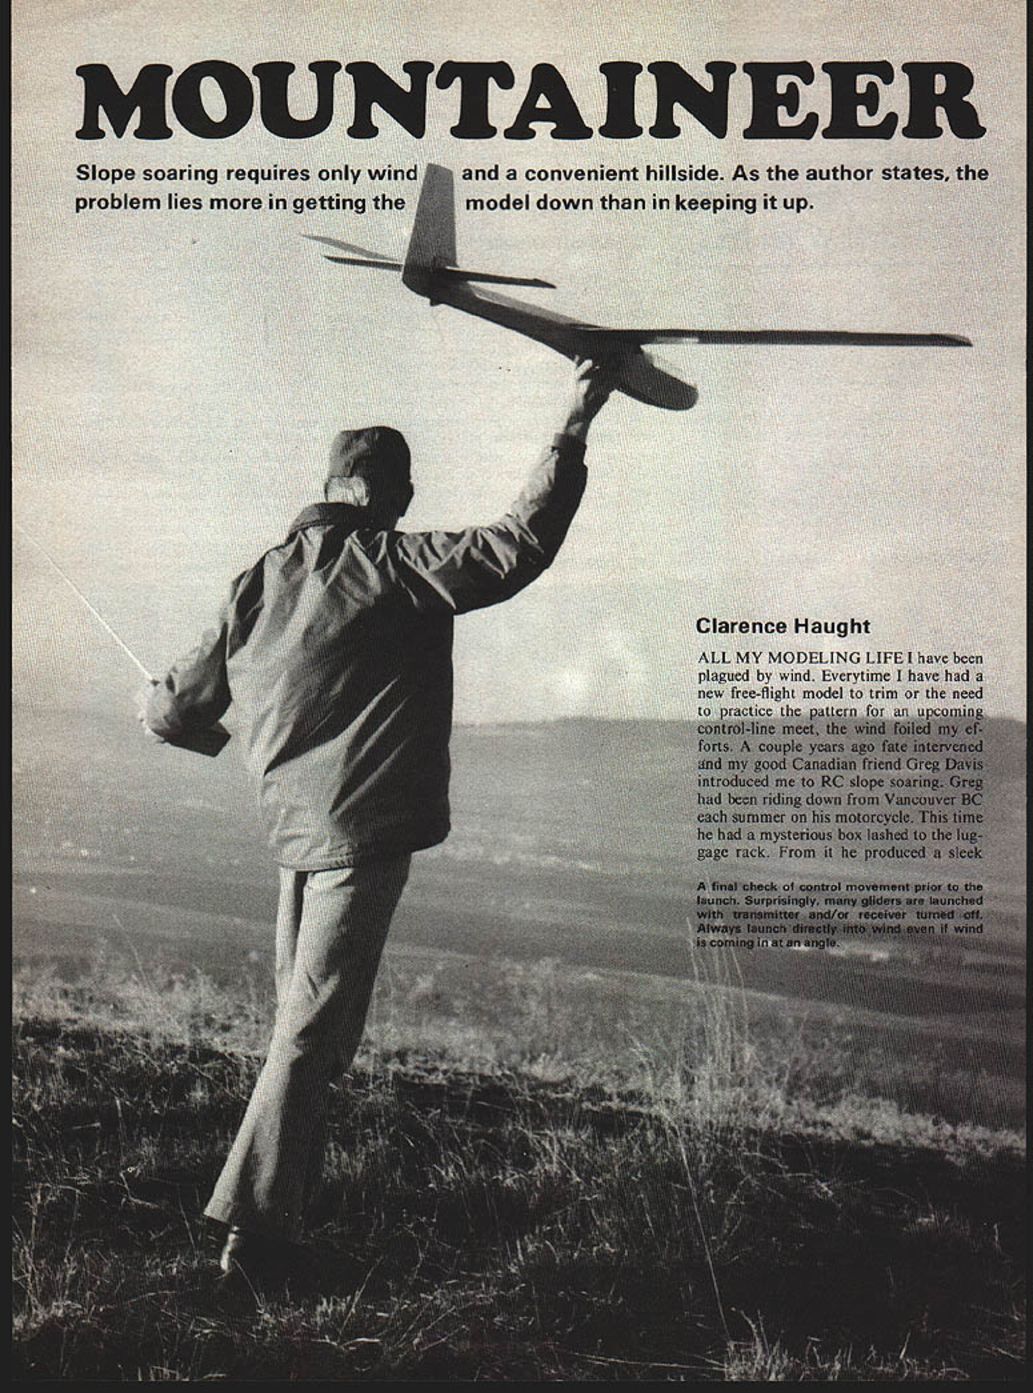
Slope soaring requires only wind and a convenient hillside. As the author states, the problem lies more in getting the model down than in keeping it up.
Clarence Haught
ALL MY MODELING LIFE I have been plagued by wind. Every time I have had a new free-flight model to trim or the need to practice the pattern for an upcoming control-line meet, the wind foiled my efforts. A couple years ago fate intervened and my good Canadian friend Greg Davis introduced me to RC slope soaring. Greg had been riding down from Vancouver, B.C., each summer on his motorcycle. This time he had a mysterious box lashed to the luggage rack. From it he produced a sleek looking glider with low aspect ratio wings. We proceeded to the top of a nearby hill and I watched in utter amazement as Greg put his sloper through its paces. At last I could enjoy my hobby on windy days! Slope soaring requires wind! It also requires a hillside facing the prevailing wind.
Surface winds follow the contour of the terrain and thus provide an upwards flowing air mass capable of supporting a model which is really constantly descending within this rising air mass.
The problem will be getting the model down rather than keeping it up. If your available site has a plateau on top you can fly from the edge out over the slope and simply walk back onto the plateau area and land out of the area of rising air. If, however, your site terminates in a ridge there will be a very turbulent area at the ridge and you should fly from a point down the slope away from this turbulence. This requires a "hillside landing" and begins to separate the relatively delicate thermal soarers from the more rugged slope design.
My flying site is of the "ridge" category and I tore up a lot of gliders learning to land among the rocks and dirt mounds on the hillside. The Mountaineer is the third in a series of gliders designed specifically for the intermediate flier operating in less than favorable conditions.
An enjoyable feature of slope soaring is the close proximity of the model to the flier. Most of the flight will be relatively into the wind so model orientation is easy to maintain. Slope soaring and aerobatics are very compatible and one can get a real workout on the slope as compared to the more gentle art of thermal soaring.
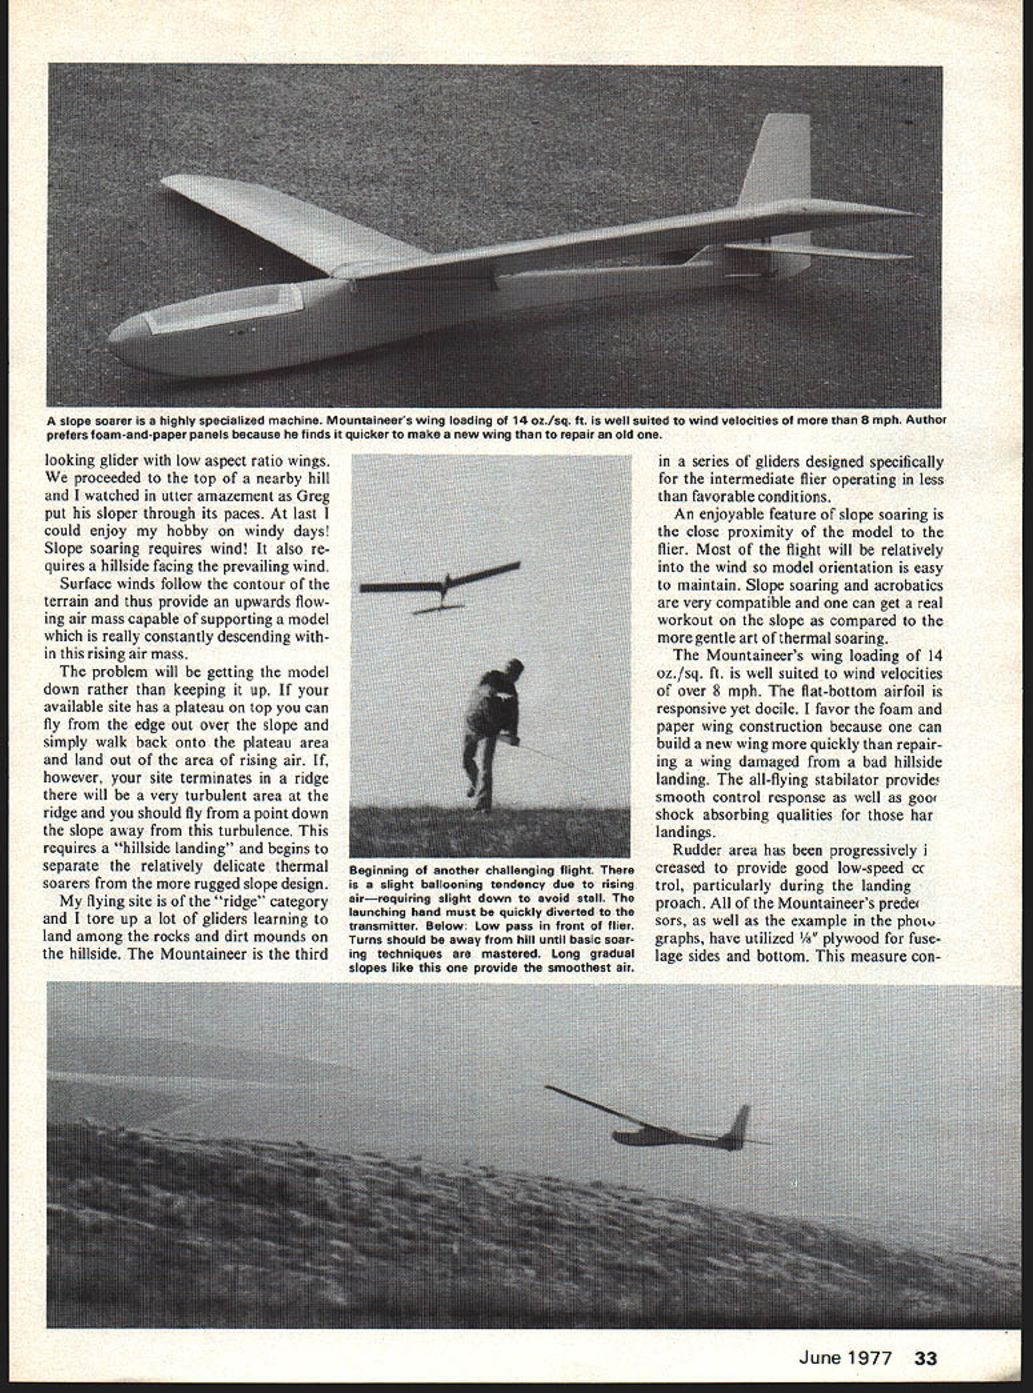
The Mountaineer's wing loading of 14 oz./sq. ft. is well suited to wind velocities of over 8 mph. The flat-bottom airfoil is responsive yet docile. I favor the foam-and-paper wing construction because one can build a new wing more quickly than repairing a wing damaged from a bad hillside landing. The all-flying stabilator provides smooth control response as well as good shock-absorbing qualities for those hard landings.
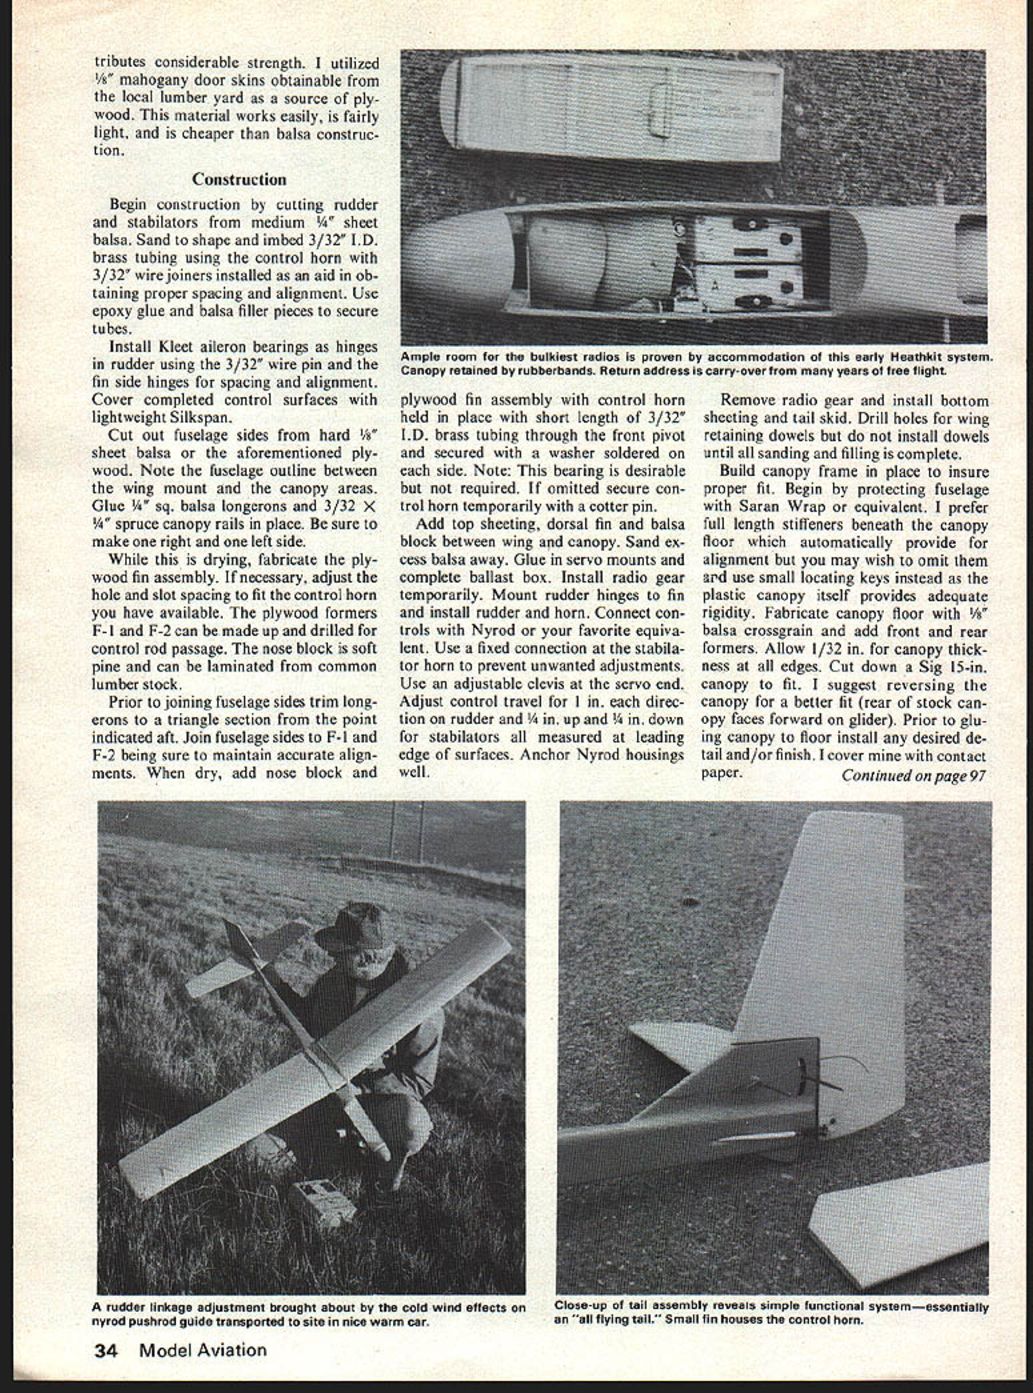
Rudder area has been progressively increased to provide good low-speed control, particularly during the landing approach. All of the Mountaineer's predecessors, as well as the example in the photographs, have utilized 1/8" plywood for fuselage sides and bottom. This measure contributes considerable strength. 1/8" mahogany door skins obtainable at the local lumber yard are a source of plywood material that works easily, is fairly light and is cheaper than balsa construction.
Construction
Begin construction by cutting rudder and stabilator from medium 1/8" balsa. Sand to shape and imbedd 3/32" ID brass tubing using the control horn. 3/32" wire joiners are installed to aid obtaining proper spacing alignment. Use epoxy glue and balsa filler pieces to secure tubes. Install Kleet aileron bearings and hinges; rudder uses 3/32" wire pin fin-side hinges with spacing alignment. Cover completed control surfaces with lightweight Silkspan.
Cut out fuselage sides from hard 1/8" balsa and the aforementioned plywood. Note fuselage outline between wing mount and canopy areas. Glue also longerons and 3/32" x ??? canopy rails; be sure to make right and left sides. While drying, fabricate plywood fin assembly; necessary to adjust hole and slot spacing to fit control horn. Have available plywood formers F-1, F-2; they can be made up and drilled for control rod passage. Nose block of soft pine can be laminated from common lumber stock.
Prior to joining fuselage sides, trim longerons to a triangle section at the point indicated aft. Join fuselage sides at F-1, F-2 being sure to maintain accurate alignments. Dry-fit and add nose block and plywood fin assembly. Control horn held in place with a short length of 3/32" ID brass tubing through front pivot secured with washer soldered to side. Note: bearing desirable; if required, omitted, secure control horn temporarily with cotter pin. Add top sheeting and dorsal fin balsa block between wing and canopy. Sand excess balsa away. Glue servo mounts and complete ballast box. Install radio gear temporarily. Mount rudder hinges; install rudder horn. Connect controls. Nyrod (or favorite equivalent) is recommended. Use fixed connection at stabilator horn to prevent unwanted adjustments. Use adjustable clevis at servo end. Adjust control travel 1 di Adjust control travel for 1 in. each direction on rudder and 1/4 in. up and 1/4 in. down for stabilators all measured at leading edge of surfaces. Anchor Nyrod housings well.
Remove radio gear and install bottom sheeting and tail skid. Drill holes for wing retaining dowels but do not install dowels until all sanding and filling is complete.
Build canopy frame in place to insure proper fit. Begin by protecting fuselage with Saran Wrap or equivalent. I prefer full length stiffeners beneath the canopy floor which automatically provide for alignment but you may wish to omit them and use small locating keys instead as the plastic canopy itself provides adequate rigidity. Fabricate canopy floor with 1/8" balsa crossgrain and add front and rear formers. Allow 1/32 in. for canopy thickness at all edges. Cut down a Sig 15-in. canopy to fit. I suggest reversing the canopy for a better fit (rear of stock canopy faces forward on glider). Prior to gluing canopy to floor install any desired detail and/or finish. I cover mine with contact paper. Slope soaring requires wind but also requires a hillside facing the prevailing wind. Surface winds follow the contour of the terrain, thus provide an upward-flowing air mass capable of supporting a model. The real problem will be getting the model down rather than keeping up. If the available site has a plateau on top, you can fly off the edge and simply walk back onto the plateau area to land. An area of rising air, however, if the site terminates in a ridge, will be very turbulent. Ridge flying should be done pointing down-slope away from the turbulence; this requires hillside landing. This begins to separate relatively delicate thermal soarers from rugged slope designs.
The Mountaineer, third in a series of gliders, is designed specifically for the intermediate flier operating in less favorable conditions. An enjoyable feature of slope soaring is the close proximity of model and flier. Most flight will be in relatively high wind and model orientation is easy to maintain. Slope-soaring acrobatics are very compatible and can give a real workout on the slope compared to the gentle art of thermal soaring.
Mountaineer’s wing loading is 14 oz/sq ft and is well suited to wind velocities over 8 mph. The flat-bottom airfoil is responsive yet docile. I favor foam-and-paper wing construction because a new wing can be built quickly and a damaged wing repaired after a bad hillside landing. The all-flying stabilator provides smooth control response and has good shock-absorbing qualities for hard landings. Rudder area has been progressively increased to provide good low-speed control, particularly during landing approach.
Beginning another challenging flight, there is a slight ballooning tendency due to rising air, requiring slight down-elevator to avoid a stall. Hand launching must be quickly followed by applying transmitter controls. Low passes in front of the flier should be avoided. Turns should be made away from the hill until basic soaring techniques are mastered. Long, gradual slopes provide the smoothest air.
Construction
Begin construction by cutting rudder and stabilators from medium 1/8" balsa. Sand to shape and embed 3/32" I.D. brass tubing for the control horn. Install 3/32" wire joiners to aid obtaining proper spacing and alignment. Use epoxy glue and balsa filler pieces to secure tubes. Install Kleet-type bearings or aileron hinges; for the rudder use 3/32" wire pin fin-side hinges, observing spacing and alignment. Cover completed control surfaces with lightweight Silkspan.
Cut out fuselage sides from hard 1/8" balsa or the aforementioned plywood. Note fuselage outline between wing-mount and canopy areas. Glue in longerons and 3/32" x ? canopy rails—be sure to make right and left sides identical. While drying, fabricate the plywood fin assembly, adjusting hole and slot spacing to fit the control horn. Have available plywood formers; F-1 and F-2 can be made up. Drill the control-rod passage. The nose block of soft pine can be laminated from common lumber stock.
Prior to joining the fuselage sides, trim the longerons to a triangular section to the point indicated aft. Join fuselage sides (F-1, F-2), being sure to maintain accurate alignments while drying. Add the nose block and the plywood fin assembly. The control horn is held in place with a short length of 3/32" I.D. brass tubing through the front pivot and secured with a washer soldered to the side. A bearing is desirable; if one is not used, secure the control horn temporarily with a cotter pin.
Add top sheeting and a dorsal fin balsa block between wing and canopy; sand excess balsa away. Glue servo mounts and complete the ballast box. Install radio gear temporarily. Mount rudder hinges, install the fin and rudder horn, and connect controls. Nyrod or an equivalent is recommended for pushrod housings. Use a fixed connection at the stabilator horn to prevent unwanted adjustments and an adjustable clevis at the servo end. Adjust control travel for 1" each direction on the rudder and 1/4" up and 1/4" down for the stabilator, all measured at the leading edge of the surfaces. Anchor Nyrod housings well.
Mountaineer/Haught
Final sand fuselage and fair in fin to fuselage with microballons in 5-minute epoxy. Shape fillets with a finger dipped in dope thinner before they set up. Cover fuselage, at least to rear wing dowel, preferably completely to tail post, with 1-oz. fiberglass cloth adhered with Hobby Poxy Formula II, epoxy glue thinned 100% with methanol. When dry, sand smooth and fit up aluminum landing skid with towhook, if desired for high-start or winch launching. If you do not want a towhook you may substitute 1/8" x 5/8" spruce for the landing skid. Apply a filler coat of thinned Hobby Poxy Stuff. Sand well.
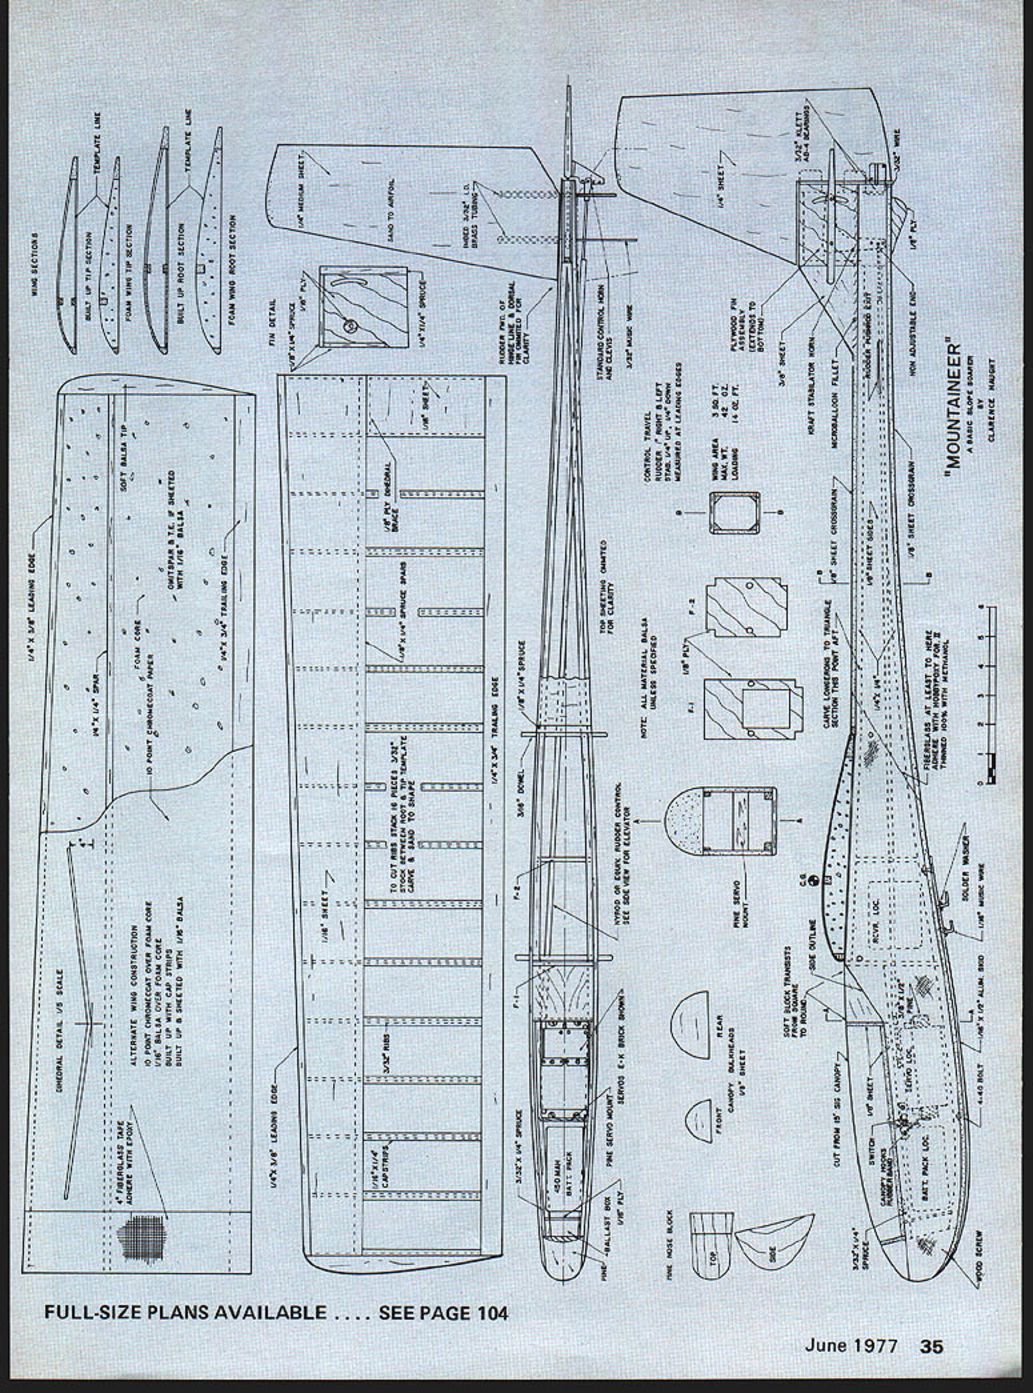
The plans indicate four optional wings for the Mountaineer: foam core with 10-point chromecoat paper, foam core with balsa built-up with capstrips, or built up with sheet.
I heartily recommend the foam core with chromecoat. This wing is strong and by far the cheapest. The 10-point chromecoat is obtained at the local printshop at around 35 cents for a 20 by 30" sheet. It is fairly stiff and has a very slick high gloss finish on one side and takes paint well. Foam insulation sheets 1 x 24 x 96" are available from lumber yards and make good inexpensive wing cores. A 2-in. thickness is also available. The white "popcorn" foam is the lightest, being about 1 lb./cu. ft. The "blue" variety is a little heavier, about 2 lbs./cu. ft., but sands easier and is stronger. I normally use the white popcorn variety.
If you never have cut foam cores it's worth your while to give it a try. There have been many articles describing this technique and your cutter may be a very simple "bow" strung with nichrome wire or, in a pinch, .008 stranded control-line wire. Power can be anything from a variac to an automobile battery.
I cut my cores and glue on balsa parts with white glue in one evening. The next evening I sand the balsa to shape at the leading edge, touch up the cores with a light sanding and cover with chromecoat. Using rubber cement for adhesive, coat both paper and wing core being sure it's dry before proceeding with covering. Lay bottom wing surface on chromecoat supported on flat surface and "roll" wing around leading edge and back across top wing surface. Take care not to twist any warps into wing. Your wing panels are now ready for joining. Sand bevel at butts to obtain required 4 in. dihedral under each tip. Join with 5-minute epoxy and cover joint with 4-in. wide fiberglass cloth adhered with thinned epoxy. Epoxy tip blocks in place. Sand and fill and your wing is ready for finish.
If you wish to use a foam core covered with balsa, you may omit spar and trailing edge. If you desire a built-up wing, cut ribs to shape by stacking seventeen 3/32" balsa rib blanks between root- and tip-rib templates and carve and sand to shape. Lay down leading and trailing edges on plan, add bottom leading edge sheet and fit bottom cap strips. Glue bottom spar to sheeting and add ribs. When dry, add top cap and remove from plan. Build remaining wing to this stage and join with proper dihedral. Reinforce spar joints with a 3/32-in. dihedral brace cut to fit behind spars. Fit top leading edge sheeting, cap strips, and sheet center section. Glue wing tip blocks in place and sand completed wing to final shape.
Built-up wings with cap strips are satisfactory if your flying site is free of weeds and other sharp objects. The most rugged wing is the fully sheeted variety. The construction procedure is basically the same, except cap strips are replaced with sheet balsa. Make up your wing skins in advance of construction. Sheet balsa is not straight enough to join edge to edge without first trimming. To trim, overlap edges to be joined 1/4 in. Lay your straightedge down the center of this overlap and run along the straightedge with a sharp knife or razor blade, thus trimming both edges at once. Any irregularities in trimming will correspond with the sheet to be matched resulting in a custom fit.
Lay down a piece of Saran Wrap, fit edges of sheet together and, while holding securely, join with Zap or equivalent. An alternate method of gluing is to join sheets with masking tape while flat. Pick up taped sheets, fold open at joint, and apply balsa cement. Lay sheet back on bench with tape side down and secure until dry. Remove tape and sand outside surface.
For the absolute ultimate in strength, cover sheeted wing with 3/4-oz. fiberglass cloth adhered with Hobby Poxy Formula II thinned with 100% methanol, and brushed through the cloth. Finish your Mountaineer with your favorite materials. As of late I have been using thinned out Hobby Poxy Stuff for filling grain and discount-store spray-can enamel for color. These paints dry quickly and look great besides costing very little.
After finishing all components, reinstall radio and hook up controls, check for travel, and check assembled model for proper balance as noted on plans. Ballast as necessary. A little nose heavy is OK. A tail heavy model is disastrous.
Flying:
Prior to launching from the slope, test glide model over level ground to determine if neutral control settings are satisfactory. The model should glide straight with no stall or diving tendencies. Adjust pushrods accordingly.
If you have not flown from the hill before I would offer these basic comments. Launch directly into the wind even if it is an angle to the slope. Be prepared to apply slight down elevator to avoid a stall as slopers tend to balloon on launch. To get familiar with the flight characteristics of the Mountaineer fly a figure-eight pattern 100-feet out from you, making all turns away from the hill. Let the model drift toward the slope as it crosses in front of you prior to turning into the wind for the next leg.
When flying back toward you or downwind, keep in mind the ground speed will be a sum of your normal flying speed plus that of the wind. The normal tendency is to slow the model to the apparent speed going into the wind, which is the normal speed less the wind speed, and can produce an unexpected stall.
If hillside landings are your only choice, I suggest landing from a low cross-slope pass with the nose of the model quartered into the wind while feeding in down elevator.
Don't forget your hot coffee, it gets chilly out there on the hill.
Transcribed from original scans by AI. Minor OCR errors may remain.

