

The "Mystery" of Muffler Pressure
By John Kilsdonk
IT WAS a week or so before Christmas when Bill Winter called and asked if I would write a "how-to" article on muffler pressure. His old man had been having fuel-draw problems on one of his RC models. Someone suggested muffler pressure; after a little deliberation he tried it and presto—his problems went away.
I can relate. At my club (Michigan Signal Seekers) I often see engines abused out of ignorance about poor engine runs. Usually one of four culprits is the cause:
- Needle valve setting
- Dirt in the fuel system
- Type of fuel
- Fuel-draw
This article is about fuel-draw — more precisely, about supplying a consistent pressure and resulting flow of fuel to the powerplant despite physical limitations of the model and the natural obstacle of gravity.
Background: why tank pressure matters
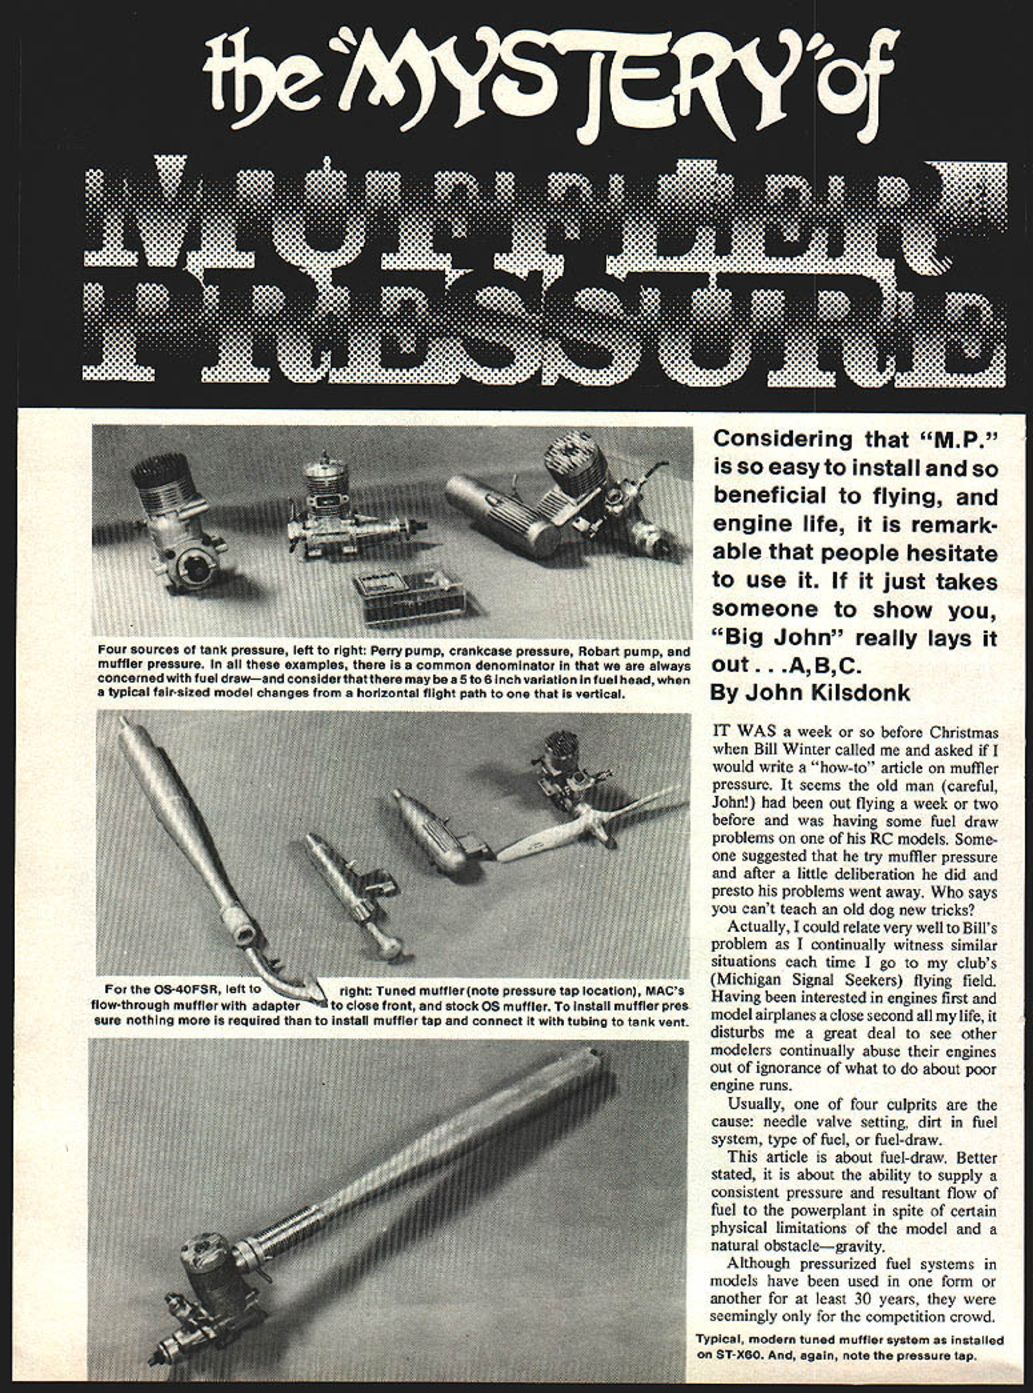
Although pressurized fuel systems have been used in models for decades, they were historically for competition fliers. Without a tank pressure source, the engine must draw fuel by suction through the venturi. A spray bar supplies fuel and may be adequate depending on venturi size, spray-bar position, tank location, total fuel draw, and elevation.
If the engine goes over-lean it slows, suction is reduced, it goes leaner still, and the situation can snowball into seizure and premature engine failure. A constant positive pressure source would solve this, but an external motor-driven pump is generally impractical. Instead, for simplicity and cost most model engine carburetors use two-position adjustments (idle and full-throttle mixture) and a fixed taper in the throttle barrel for everything between. That means we need a fuel pressure source proportional to throttle angle with near-instantaneous response.
Old-fashioned crankcase pressure alone doesn't provide tank pressure because it cannot be relieved fast enough. Muffler (exhaust) pressure, however, does approximate the needed behavior.
Muffler pressure and other devices
Sport fliers often avoided pressurized systems because they seemed "too complicated." Early methods included ram pressure (directing tank vents into the airstream), Jim Walker's balloon-regulator tanks, pen bladders, and crankcase pressure. With widespread use of mufflers for noise and pollution control, muffler pressure has become a simple, reliable source—especially for throttled engines.
More sophisticated options now exist, like the Perry Pump (built into the engine backplate) and Robart micro pumps (external, inline). These are driven by crankcase pressure and offer more regulated, constant pressure, but they are generally more expensive and aimed at competition use.
Measurements I made
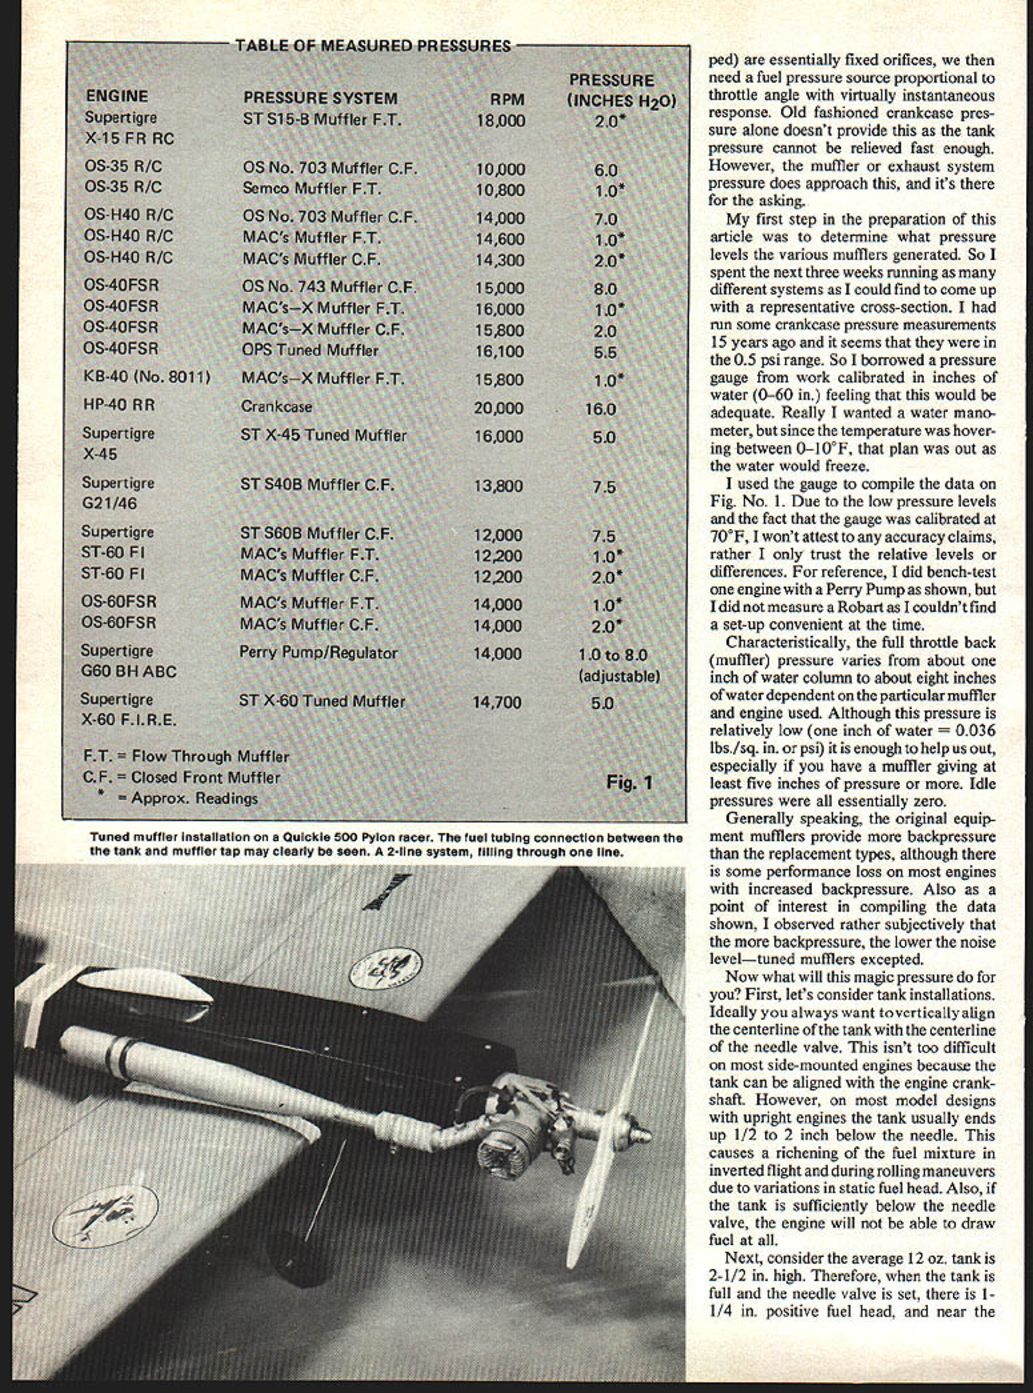
To determine typical pressure levels produced by mufflers, I ran a cross-section of mufflers and engines for about three weeks and compared those results to earlier crankcase pressure measurements I had taken about 15 years prior (around 0.5 psi). Because of low pressure levels and cold weather, I used a workplace gauge calibrated in inches of water (0–60 in.) rather than a water manometer.
Key findings:
- Full-throttle backpressure (muffler-side) typically ranges from about 1 in. to about 8 in. of water column, depending on muffler and engine.
- Idle pressures were essentially zero.
- One inch of water column ≈ 0.036 lb/sq in (psi).
- Generally, original equipment mufflers provide more backpressure than many aftermarket replacements. Subjectively, more backpressure correlated with lower noise level (tuned mufflers being an exception).
Although these pressures are low, a muffler delivering at least 5 in. of water column can significantly help fuel delivery.
Tank installation and the problem of head change
Ideally the centerline of the tank should align vertically with the centerline of the needle valve. This is easy on side-mounted engines (tank aligns with the crankshaft) but on many upright-engine models the tank often sits 1/2 to 2 in. below the needle. This causes mixture richening in inverted flight and during rolls due to static head variations. If the tank is sufficiently below the needle, the engine may not draw fuel at all.
Consider a typical 12 oz. tank about 2.5 in. high:
- When full, the needle sees about +1.25 in. positive fuel head.
- Near empty, the needle sees about −1.25 in. (a 2.5 in. head change during flight).
- In vertical maneuvers, head change can increase to 5–6 in.
This results in running rich at takeoff and progressively leaner during flight. Unless compensated for with the initial needle setting, the engine can go over-lean and be damaged after repeated flights.
By increasing static tank pressure, these variations are not eliminated but are significantly reduced. The basic flow equation used here is m = K A V P where:
- m = flow
- K = constant
- A = area
- P = pressure
Raising static pressure reduces the relative tank-full vs tank-empty pressure differences and stabilizes flow through the fixed orifices of the carburetor.
Tuned mufflers
Tuned mufflers generally respond similarly to standard mufflers with respect to pressure characteristics, provided the pressure tap is upstream of the divergent cone section. Their advantage is higher performance with reduced noise.
How to hook up muffler pressure — two simple steps
- Install a pressure tap in the muffler.
- Most modern engines and mufflers already have a threaded pressure tap location. Screw in the pressure fitting and you're ready.
- Some mufflers have undrilled bosses. Drill and tap the boss for a crankcase pressure fitting (Supertigre, Fox, KB-Veco), or whatever thread your fitting requires.
- If there is no boss, drill and tap a suitable area ahead of the converging end cone. Location isn't very critical; pick a spot that allows the shortest fuel line to the tank.
- Ensure the pressure tap has at least a 1/16" diameter hole. A smaller hole may not bleed down fast enough for a consistent transition to idle.
- Run fuel tubing from the pressure tap to the tank vent.
- Use good-quality fuel line (latex, silicone, neoprene — not hard plastic).
- Make sure all other lines (except the fuel line to the needle valve) are plugged and that the rest of the fuel system is airtight.
- Once connected, go fly.
Setting the needle and flight testing
After installing muffler pressure you'll typically need to turn the main needle valve in (leaner) by about one turn or more to compensate for increased pressure.
Suggested procedure:
- Set the engine as you normally would for the first flight.
- With the fuselage pointed up at a slight angle (about 15 degrees), lean slightly rich. I usually peak the engine then back the needle off until it just barely goes into a four-cycle "gurgle-gurgle" condition. Try it there.
- Make slight adjustments on subsequent flights as needed.
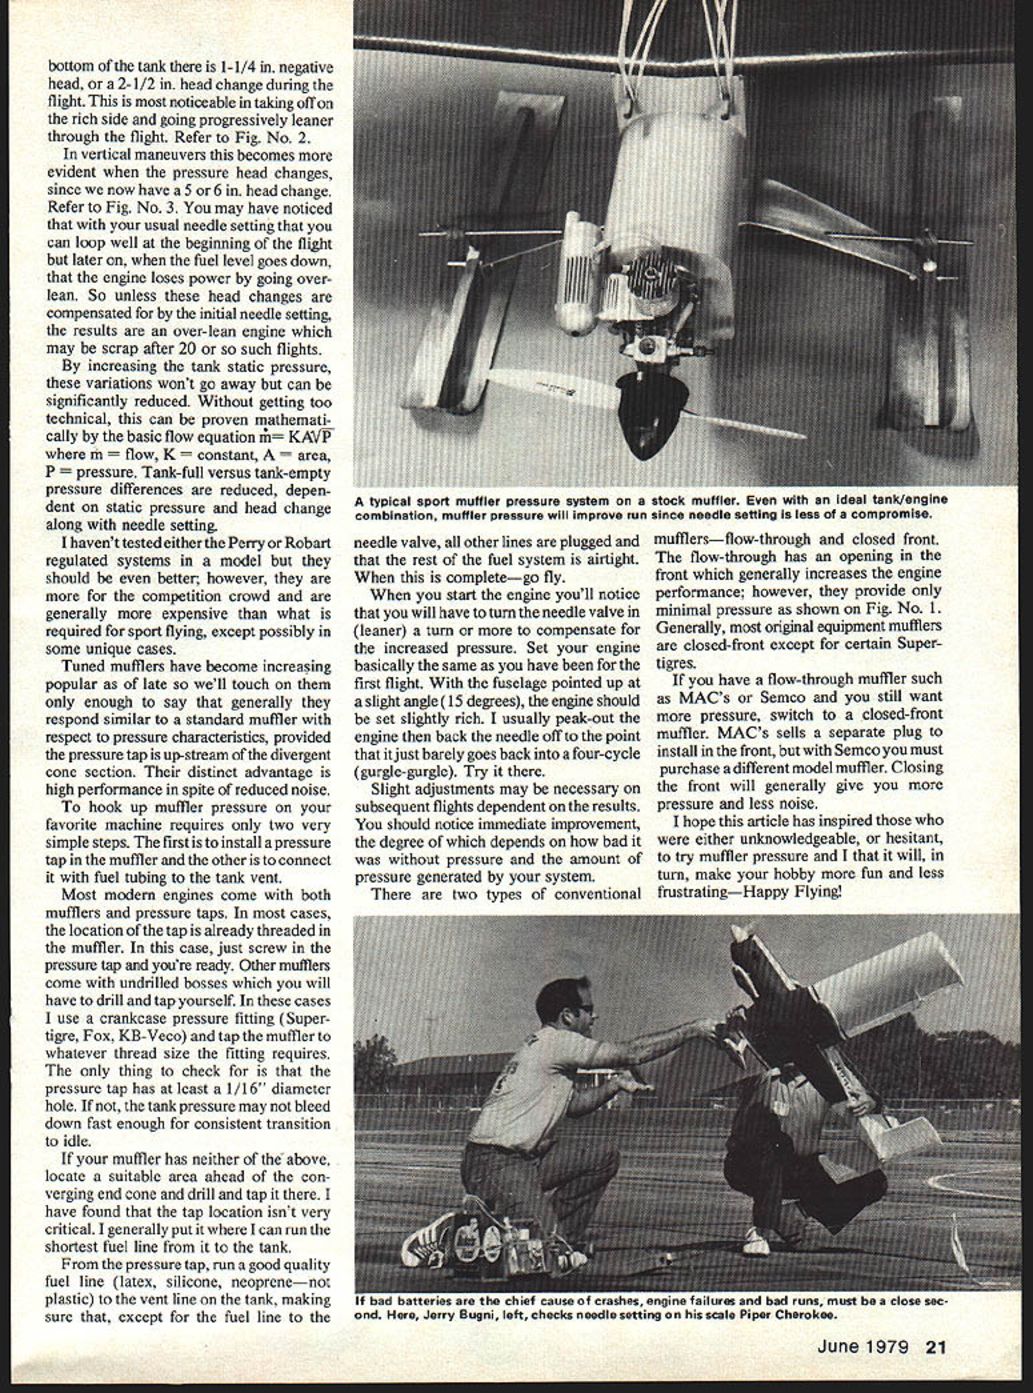
You should notice immediate improvement; the degree depends on how bad the situation was before and how much pressure your muffler produces.
Muffler types and pressure recommendations
There are two common conventional muffler types:
- Flow-through: opening in the front increases performance but provides minimal backpressure (e.g., some MAC or Semco designs).
- Closed-front: generally provide more backpressure and less noise; most original equipment mufflers are closed-front except for some Supertigres.
If you have a flow-through muffler and want more pressure, switch to a closed-front muffler. MAC sells a separate plug to close the front opening; with Semco you must buy a different model muffler.
Final notes
- Perry and Robart pumps offer more regulated pressure and are worth considering for competition use or unique cases, but they are generally more expensive than what most sport fliers need.
- Muffler pressure is an easy, inexpensive way to improve fuel delivery and reduce frustrating engine-running problems.
Happy flying!
Transcribed from original scans by AI. Minor OCR errors may remain.

