
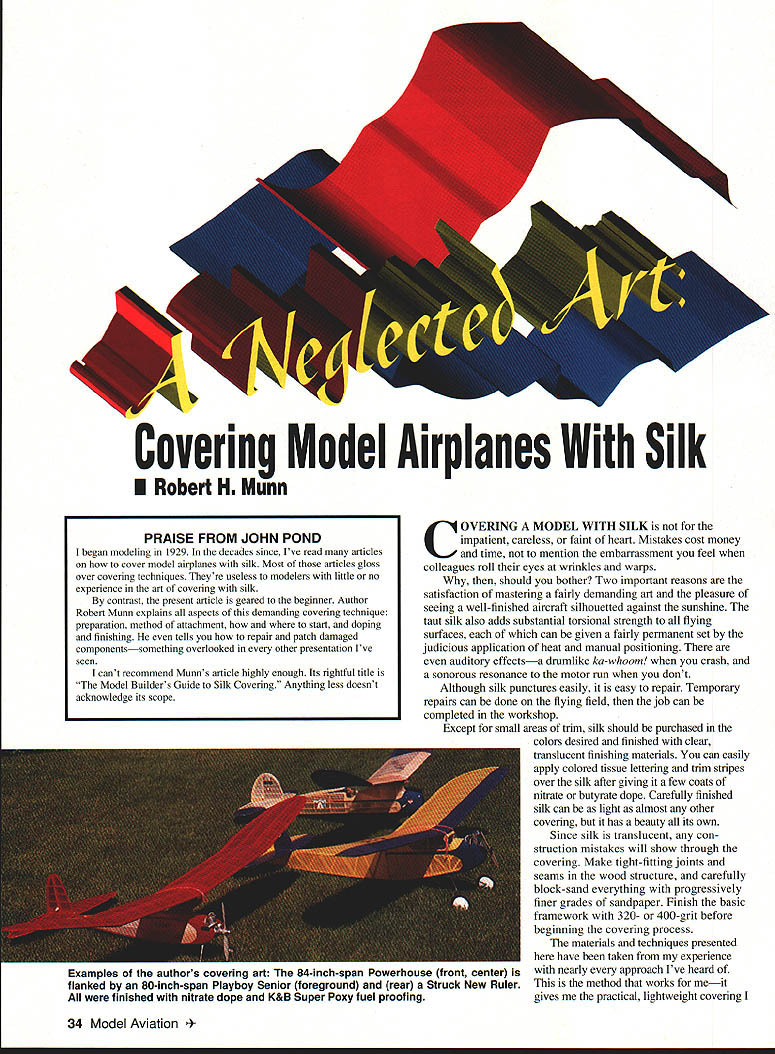
A Neglected Art: Covering Model Airplanes With Silk
Robert H. Munn
Praise from John Pond
I began modeling in 1929. In the decades since, I've read many articles on how to cover model airplanes with silk. Most of those articles gloss over covering techniques. They're useless to modelers with little or no experience in the art of covering with silk.
By contrast, the present article is geared to the beginner. Author Robert Munn explains all aspects of this demanding covering technique: preparation, method of attachment, how and where to start, and doping and finishing. He even tells you how to repair and patch damaged components—something overlooked in every other presentation I've seen.
"I can't recommend Munn's article highly enough. Its rightful title is 'The Model Builder's Guide to Silk Covering.' Anything less doesn't acknowledge its scope."
Introduction
Covering a model with silk is not for the impatient, careless, or faint of heart. Mistakes cost money and time, not to mention the embarrassment you feel when colleagues roll their eyes at wrinkles and warps.
Why bother? Two important reasons are the satisfaction of mastering a fairly demanding art and the pleasure of seeing a well-finished aircraft silhouetted against the sunshine. The taut silk also adds substantial torsional strength to all flying surfaces, each of which can be given a fairly permanent set by the judicious application of heat and manual positioning. There are even auditory effects—a drumlike ka-whoom! when you crash, and a sonorous resonance to the motor run when you don't.
Although silk punctures easily, it is easy to repair. Temporary repairs can be done on the flying field, then the job can be completed in the workshop.
Except for small areas of trim, silk should be purchased in the colors desired and finished with clear, translucent finishing materials. You can easily apply colored tissue lettering and trim stripes over the silk after giving it a few coats of nitrate or butyrate dope. Carefully finished silk can be as light as almost any other covering, but it has a beauty all its own.
Since silk is translucent, any construction mistakes will show through the covering. Make tight-fitting joints and seams in the wood structure, and carefully block-sand everything with progressively finer grades of sandpaper. Finish the basic framework with 320- or 400-grit before beginning the covering process.
The materials and techniques presented here have been taken from my experience with nearly every approach I've heard of. This is the method that works for me—it gives me the practical, lightweight covering I enjoy, and it's among the more economical techniques in use.
For example, brushing on dope finishes is less wasteful than using tissue paper, paper towels, or foam "brushes," as some do (especially on the first and second coats) to prevent running. The foam or paper absorbs most of the dope, so you use about three or four times as much as necessary. A surface with six coats of wiped-on dope is only about half as well finished as one with the same number of brushed-on coats.
Adhesives such as white glue or aliphatic resins can be used, but these products are heavier than dope, tend to warp surfaces, and prevent the easy repositioning that is often needed to remove wrinkles during the final stages of the covering process. But that's enough rationale; let's get on with the work.
Materials
For the average six- or seven-foot-span Old-Timer model, you will need, in addition to the silk itself:
- About two quarts of nitrate dope and one quart of thinner.
- A 1/2-inch-wide, top-quality sable artist's brush, semiround or flat.
- A 1-inch-wide sable brush (get the best, softest brush you can find).
- Four or five brand-new razor blades.
- Two or three pieces of #320 silicon carbide (gray) sandpaper.
- A pair of the sharpest fabric scissors you can find.
- A pint can or jar for mixing dope to the proper consistency.
- A small jar for thinner.
- A good-sized piece of poster board for your silk cutting.
I use nitrate dope throughout the initial stages for several reasons: it is readily obtainable from almost any aircraft supply house; it is inexpensive and fast drying; it has excellent penetration and adhesion, and is easily mixed with a cement such as Duco for extra adhesive strength. Most important, nitrate dope is compatible with any finish you may wish to put over it.
Be advised that if you begin with butyrate dope (or one of its trade-name varieties), you should expect longer drying times (most butyrates contain retarders), lower adhesion, and bubbles and blisters under any finish you attempt to apply over silk.
Preparing the framework
Fill a pint container with about two-thirds nitrate dope and one-third thinner. Dopes supplied by different firms vary somewhat in density, but aim for a consistency slightly heavier than water—you want the first two coats to soak well into the wood. Apply this mixture with a 1/2-inch sable brush to every part of the framework that will touch the silk: every stringer, rib, spar, longeron, etc., that will come in contact with any part of the silk.
The thinned nitrate adds little weight; slosh it on liberally so that it will soak in well. This helps achieve good adhesion around the edges and contributes to an even finish. If you failed to coat the ribs and stringers, for example, they would soak up the first few coats of dope, making the finish very uneven in later stages.
Allow the initial coat to dry thoroughly—preferably three to four hours, or longer—in a low-humidity climate. Lightly sand the framework with #320 silicon carbide, leveling any raised or rough grain. Be sure these surfaces are smooth, to avoid snagging the covering later.
When you're satisfied, brush on a second coat of dope. When the dope is dry (this takes less time than the first coat), again sand the surfaces lightly.
By this time you will have used about half of the pint of thinned nitrate dope. Refill the container with unthinned dope, making a mixture slightly thinner than, say, 30-weight motor oil. Coat the entire framework a third time with this thicker mixture, flowing it liberally on the outline, longerons, leading and trailing edges, and areas where the edges of the covering will be secured.
For undercambered wings, squeeze the entire contents of a 1/4-ounce tube of Duco cement into a four-ounce bottle with a tight cap. Fill to the top with unthinned nitrate dope, and stir until the mixture is uniform.
Apply a liberal coat of this thick mixture to the surfaces of the bottom wing spars and to each rib between the trailing edge and the main bottom spar (usually at about 30% of the chord). This will almost certainly guarantee good adhesion of the silk to the concave area of the undercambered wing. Keep this tightly capped mixture in your field box, because it will be handy for making field patches.
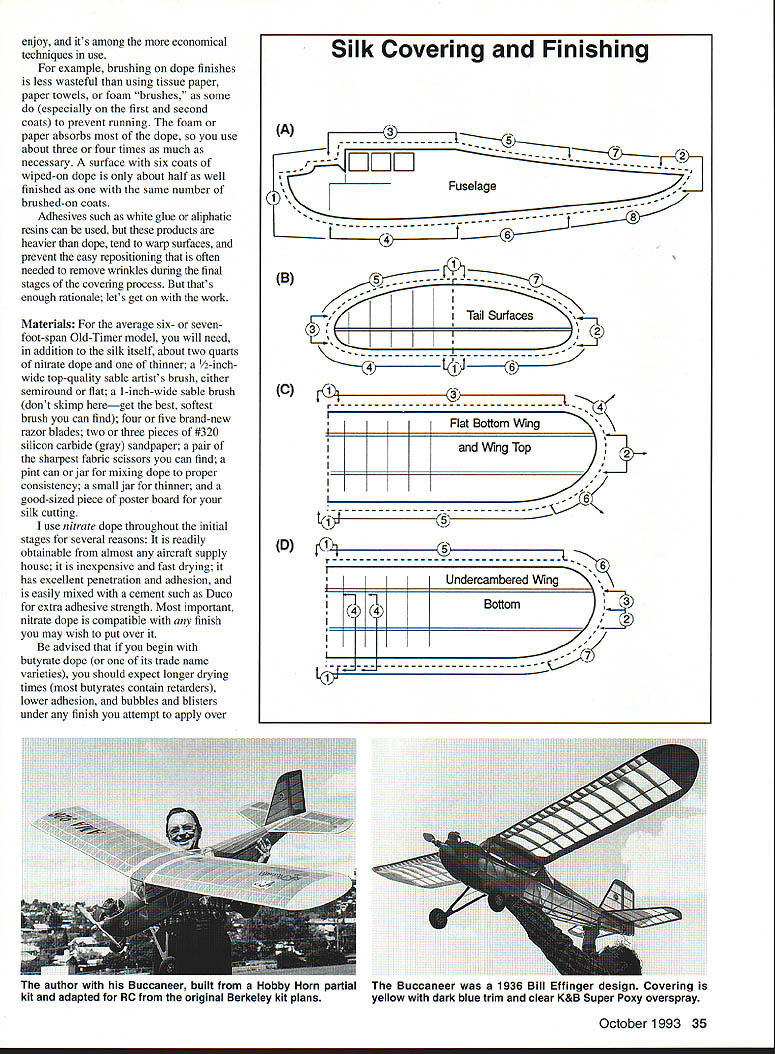
Covering the fuselage
Trim the silk so that about one inch overhangs the principal longerons. Make the overhang slightly longer in the cowling area in front of the windshield, where it will be wrapped at least to the center and possibly beyond. Try to do this in a single piece, with the grain of the silk paralleling the fuselage centerline. If you must splice the silk, do so on one of the vertical members.
Wherever a splice is anticipated, it is wise to give a few coats of dope to the edges of the part in question—upright, longeron, stringer, or spar—so that the first piece of silk can be wrapped slightly around one edge. This eliminates any possibility of loosening the first piece when the second piece is doped on top of it.
Careful trimming is needed when covering a rounded or oval fuselage in lengthwise strips. You may find it handy to lay the dry silk over the plan and lightly mark the oversize outline with a soft pencil or ball-point pen, trimming away this reference line with a razor blade or scissors as you cut the piece you need.
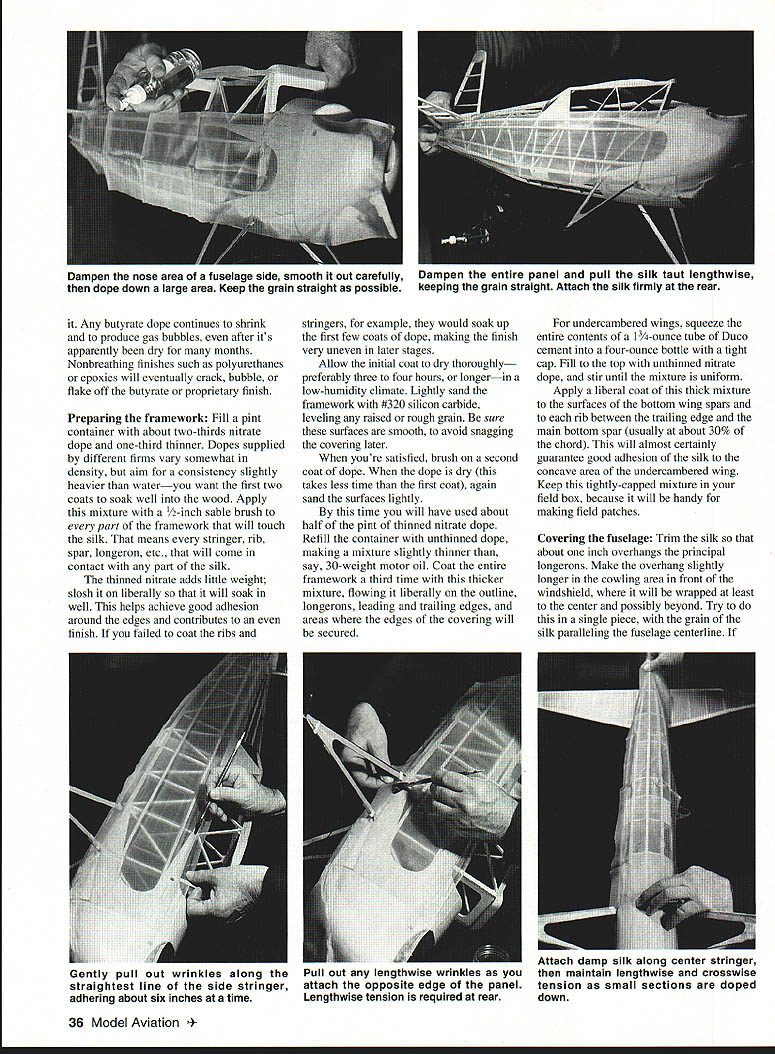
Lay the dry silk as smoothly as possible over the section to be covered. Spray the center area lightly with water dispensed as a fine mist from a pump-style container of the sort used for household cleaners. Grasp the silk at the nose end, pulling it slightly as you dampen the forward area; do the same toward the tail.
It's possible to adhere the silk using plain nitrate thinner on a small brush, provided the undercoats have been sufficiently heavy. I prefer to dilute the dope remaining in the original pint can by adding thinner, and use it on the small brush.
Put a strip of dope over the wood-supported area opposite the arrow ends of the front area marked (1) in illustration (A), and use your finger to smooth the silk tightly against the wood, pulling along the vertical line. It's important to keep the silk slightly damp at all times, spraying intermittently as required. Do not get it sopping wet; you risk warping the framework and greatly slowing the adhesion process.
Paint a thin coat of dope through the silk in area (1), and smooth it against the supporting wood. I use my fingers for this; you might prefer a piece of foam or paper towel, but remember that fingers don't leave lint and bits. Allow the dope to set for 30 seconds or so. Then, making sure the entire area is damp, pull the silk taut lengthwise by grasping the edge at the rear—area (2)—and paint dope through the silk in that area. Maintain slight tension for a few seconds until the adhesion sets. Again, rubbing lightly with your finger will improve adhesion and speed setting.
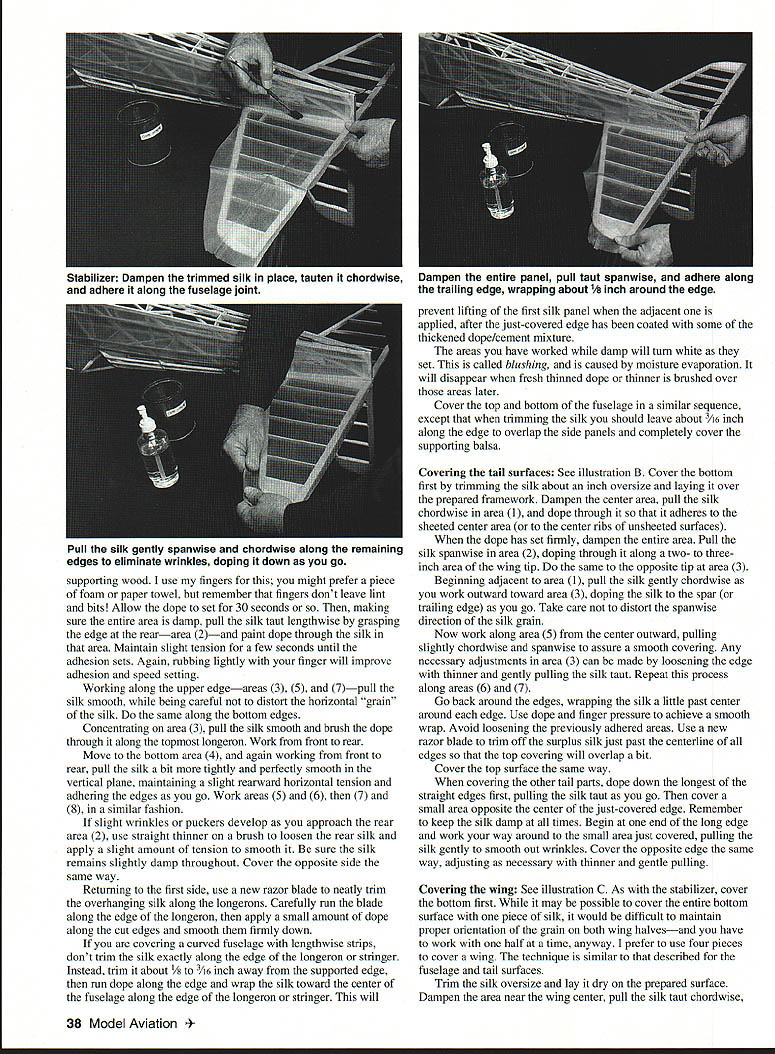
Working along the upper edge—areas (3), (5), and (7)—pull the silk smooth, while being careful not to distort the horizontal "grain" of the silk. Do the same along the bottom edges.
Concentrating on area (3), pull the silk smooth and brush the dope through it along the topmost longeron. Work from front to rear.
Move to the bottom area (4), and again working from front to rear, pull the silk a bit more tightly and perfectly smooth in the vertical plane, maintaining a slight rearward horizontal tension and adhering the edges as you go. Work areas (5) and (6), then (7) and (8), in a similar fashion.
If slight wrinkles or puckers develop as you approach the rear area (2), use straight thinner on a brush to loosen the rear silk and apply a slight amount of tension to smooth it. Be sure the silk remains slightly damp throughout. Cover the opposite side the same way.
Returning to the first side, use a new razor blade to neatly trim the overhanging silk along the longerons. Carefully run the blade along the edge of the longeron, then apply a small amount of dope along the cut edges and smooth them firmly down.
If you are covering a curved fuselage with lengthwise strips, don't trim the silk exactly along the edge of the longeron or stringer. Instead, trim it about 1/8 to 3/16 inch away from the supported edge, then run dope along the edge and wrap the silk toward the center of the fuselage along the edge of the longeron or stringer. This will prevent lifting of the first silk panel when the adjacent one is applied, after the just-covered edge has been coated with some of the thickened dope/cement mixture.
The areas you have worked while damp will turn white as they set. This is called blushing, and is caused by moisture evaporation. It will disappear when fresh thinned dope or thinner is brushed over those areas later.
Cover the top and bottom of the fuselage in a similar sequence, except that when trimming the silk you should leave about 3/16 inch along the edge to overlap the side panels and completely cover the supporting balsa.
Covering the tail surfaces
(See illustration B.)
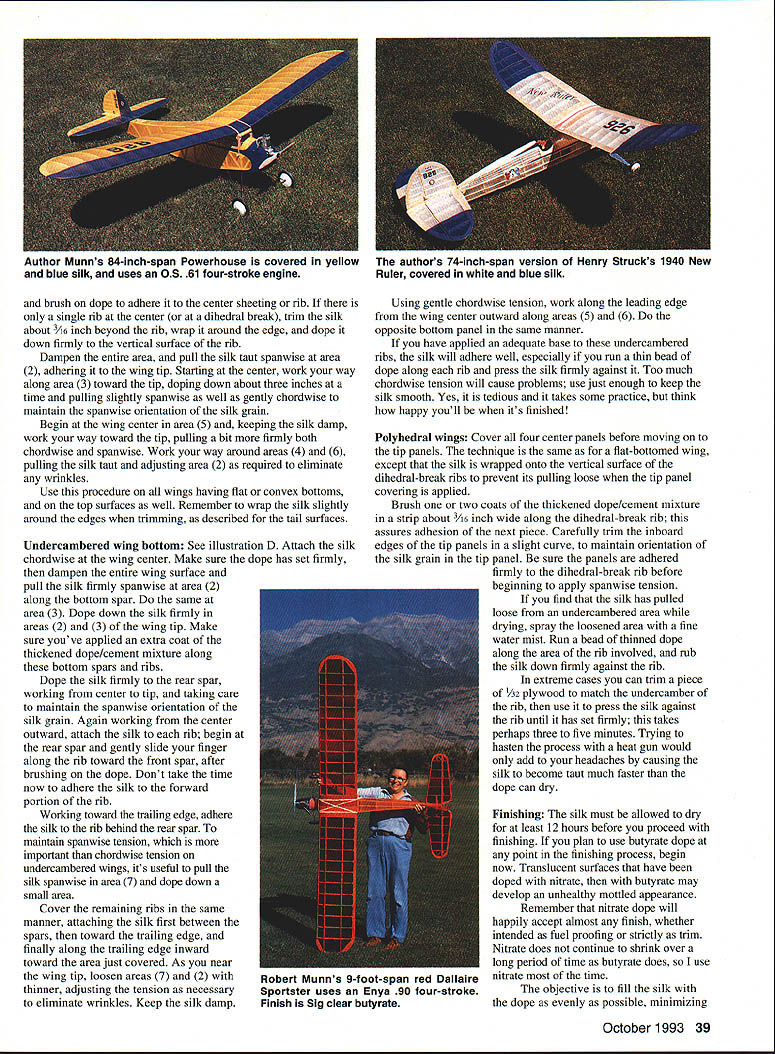
Cover the bottom first by trimming the silk about an inch oversize and laying it over the prepared framework. Dampen the center area, pull the silk chordwise in area (1), and dope through it so that it adheres to the sheeted center area (or to the center ribs of unsheeted surfaces).
When the dope has set firmly, dampen the entire area. Pull the silk spanwise in area (2), doping through it along a two- to three-inch area of the tip. Do the same to the opposite tip area (3).
Beginning adjacent to area (1), pull the silk gently chordwise as you work toward area (3), doping the silk to the spar (or trailing edge) as you go. Take care not to distort the spanwise direction of the silk.
Now work along area (5) from the center outward, pulling slightly chordwise and spanwise to assure a smooth covering. Any necessary adjustments in area (3) can be made by loosening the edge with thinner and gently pulling the silk taut. Repeat this process along areas (6) and (7).
Go back around the edges, wrapping the silk a little past center around each edge. Use dope and finger pressure to achieve a smooth wrap. Avoid loosening the previously adhered areas. Use a new razor blade to trim off the surplus silk just past the centerline of all edges so that the top covering will overlap a bit.
Cover the top surface the same way.
When covering the other tail parts, dope down the longest of the straight edges first, pulling the silk taut as you go. Then cover a small area opposite the center of the just-covered edge. Remember to keep the silk damp at all times. Begin at one end of the long edge and work your way around to the small area just covered, pulling the silk gently to smooth out wrinkles. Cover the opposite edge the same way, adjusting as necessary with thinner and gentle pulling.
Covering the wings
(See illustration C.)
As with the stabilizer, cover the bottom first. While it may be possible to cover the entire bottom surface with one piece of silk, it would be difficult to maintain the proper orientation of the grain to both wing halves—and you have to work with one half at a time, anyway. I prefer to use four pieces to cover a wing. The technique is similar to that described for the fuselage and tail surfaces.
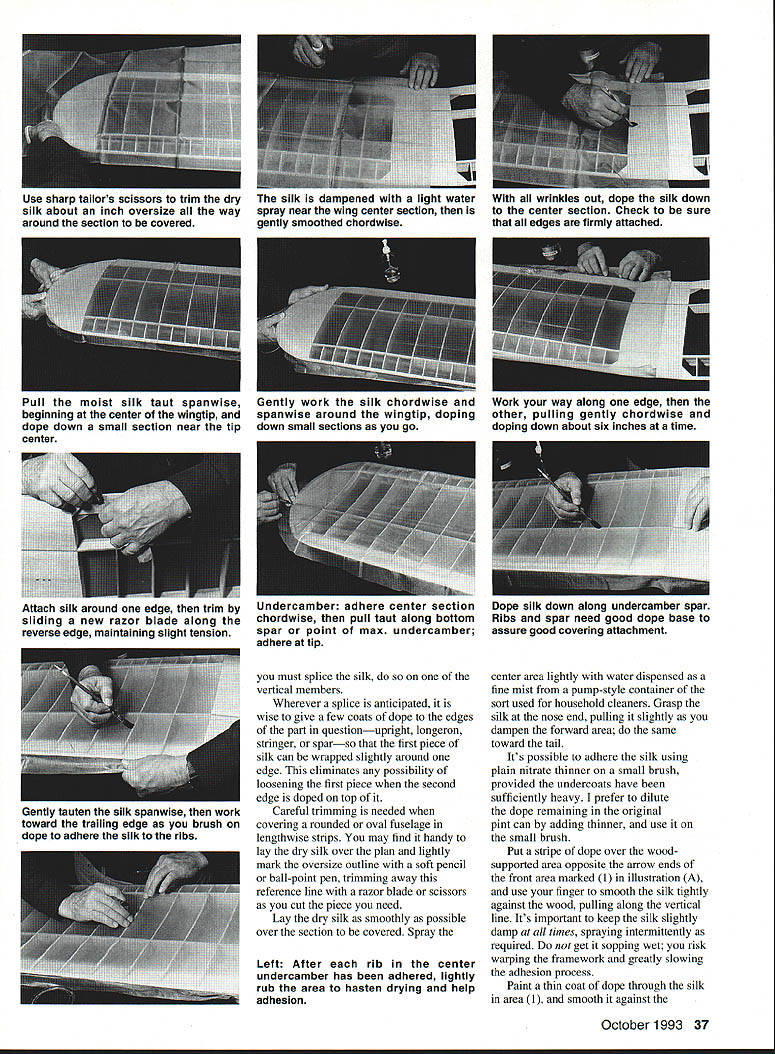
Trim the silk oversize and lay it dry on the prepared surface. Dampen the area near the wing center, pull the silk taut chordwise, and adhere it along the center section, smoothing it toward the trailing edge and adhering along the forward edges as required. Work outward toward the tip, pulling and doping the silk down in manageable sections until the entire panel is secured, and brush on dope to adhere it to the center sheeting or rib. If there is only a single rib at the center (or a dihedral break), trim the silk about 3/16 inch beyond the rib, wrap it around the edge, and dope it down firmly to the vertical surface of the rib.
Dampen the entire area, and pull the silk taut spanwise at area (2), adhering it to the wing tip. Starting at the center, work your way along area (3) toward the tip, doping down about three inches at a time and pulling slightly spanwise as well as gently chordwise to maintain the spanwise orientation of the silk grain.
Begin at the wing center in area (5) and, keeping the silk damp, work your way toward the tip, pulling a bit more firmly both chordwise and spanwise. Work your way around areas (4) and (6), pulling the silk taut and adjusting area (2) as required to eliminate any wrinkles.
Use this procedure on all wings having flat or convex bottoms, and on the top surfaces as well. Remember to wrap the silk slightly around the edges when trimming, as described for the tail surfaces.
Undercambered wing bottom
(See illustration D.)
Attach the silk chordwise at the wing center. Make sure the dope has set firmly, then dampen the entire wing surface and pull the silk firmly spanwise at area (2) along the bottom spar. Do the same at area (3). Dope down the silk firmly in areas (2) and (3) of the wing tip. Make sure you've applied an extra coat of the thickened dope/cement mixture along these bottom spars and ribs.
Dope the silk firmly to the rear spar, working from center to tip, and taking care to maintain the spanwise orientation of the silk grain. Again working from the center outward, attach the silk to each rib; begin at the rear spar and gently slide your finger along the rib toward the front spar after brushing on the dope. Don't take the time now to adhere the silk to the forward portion of the rib.
Working toward the trailing edge, adhere the silk to the rib behind the rear spar. To maintain spanwise tension, which is more important than chordwise tension on undercambered wings, it's useful to pull the silk spanwise in area (7) and dope down a small area.
Cover the remaining ribs in the same manner, attaching the silk first between the spars, then toward the trailing edge, and finally along the trailing edge inward toward the area just covered. As you near the wing tip, loosen areas (7) and (2) with thinner, adjusting the tension as necessary to eliminate wrinkles. Keep the silk damp.
Using gentle chordwise tension, work along the leading edge from the wing center outward along areas (5) and (6). Do the opposite bottom panel in the same manner.
If you have applied an adequate base to these undercambered ribs, the silk will adhere well, especially if you run a thin bead of dope along each rib and press the silk firmly against it. Too much chordwise tension will cause problems; use just enough to keep the silk smooth. Yes, it is tedious and it takes some practice, but think how happy you'll be when it's finished!
Polyhedral wings
Cover all four center panels before moving on to the tip panels. The technique is the same as for a flat-bottomed wing, except that the silk is wrapped onto the vertical surface of the dihedral-break ribs to prevent its pulling loose when the tip panel covering is applied.
Brush one or two coats of the thickened dope/cement mixture in a strip about 1/16 inch wide along the dihedral-break rib; this assures adhesion of the next piece. Carefully trim the inboard edges of the tip panels in a slight curve, to maintain orientation of the silk grain in the tip panel. Be sure the panels are adhered firmly to the dihedral-break rib before beginning to apply spanwise tension.
If you find that the silk has pulled loose from an undercambered area while drying, spray the loosened area with a fine water mist. Run a bead of thinned dope along the area involved, and rub the silk down firmly against the rib.
In extreme cases you can trim a piece of 1/32 plywood to match the undercamber of the rib, then use it to press the silk against the rib until it has set firmly; this takes perhaps three to five minutes. Trying to hasten the process with a heat gun would only add to your headaches by causing the silk to become taut much faster than the dope can dry.
Finishing
The silk must be allowed to dry for at least 12 hours before you proceed with finishing. If you plan to use butyrate dope at any point in the finishing process, begin now. Translucent surfaces that have been doped with nitrate, then with butyrate may develop an unhealthy mottled appearance.
Remember that nitrate dope will happily accept almost any finish, whether intended as fuel proofing or strictly as trim. Nitrate does not continue to shrink over a long period of time as butyrates do, so I use nitrate most of the time.
The objective is to fill the silk with the dope as evenly as possible, minimizing droplets or runs. This thorny problem has been attacked from many angles, including the use of various types of sizing, such as spray-on starches or gelling agents—anything likely to prevent blobbing of the finish. Nearly all of these techniques add a lot of weight as well as odd tones to the coloring.
Smearing the dope-treated surface with paper towels or foam brushes does help to prevent runs, but this technique also wastes a tremendous amount of dope. More coats are then required to obtain a satisfactory finish. The technique I use avoids these drawbacks—though it does tax one's patience and dexterity.
A too-thin dope mixture will seep quickly through the silk, forming runs and droplets; a too-thick mixture prohibits smooth brushing. So the trick is to thin your nitrate only slightly.
Remember that brush pressure will force the dope through the silk even more quickly and unevenly. It takes some practice to develop a gentle, quick, one-two-three brush stroke, but once mastered, you'll have it forever. Never brush more than three or four strokes; the dope sets up so quickly that even the softest sable brushes will leave ridges.
The brush must touch the silk gently in motion, moving perhaps two inches, then immediately back about three inches, then back along the same path about three inches—and that's it. Overlap previous strokes slightly, and move quickly.
Work on an area about four inches square. Hold the surface horizontal; gravity will draw the dope down through the silk. Immediately turn the surface upside down, and work on an area about the same size. Immediately turn the surface over again, and brush an area adjacent to the first one. The liquid dope remains in suspension within the weave of the silk, but doesn't stay in one position long enough for gravity to cause runs or form droplets.
If you notice an incipient run or droplet forming on the surface just turned upward, simply brush it out very lightly and quickly to obtain a more even spread. Remember to continue turning the surface over every few seconds even if you have stopped applying dope.
It takes about two minutes for this first, somewhat heavy coat of dope to set adequately to prevent drops and runs. As the dope sets, the surface will have an uneven appearance because of slight variations in the thickness of the dope, but this won't cause blobs or runs. Then, thoroughly dry, the surface will appear almost perfectly uniform.
This rather tiresome technique should fill the weave about 90% on the first try. Once a surface has set for a few minutes, the small unfilled areas (mostly around the edges of your brushed applications) will be readily apparent. Although it's less critical to keep the dope in suspension than it is to keep it moving, don't let it settle too long between coats. A couple of additional light coats, brushed in the same manner, will complete the sealing and make the surface ready for finishing.
On the first pass, it's still better to touch up several unfilled spots on one surface, then flip it over and do the ones on the other side.
The worst is over! Thin the nitrate dope a bit more so that you can lengthen your brush strokes without the dragging that presages too-rapid drying and brush marks. A thinner consistency is usually better. Brush an even coat on all surfaces, and allow to set for a day or so.
Lightly sand all edges with #320 silicon-carbide paper. Use an old piece of the same grit to gently sand along the ribs, spars, longerons, and stringers that touch the silk. Your covering job should look pretty good by now—but you're not finished yet.
From this point on, you can either brush or spray, depending on the equipment and the final finish you want. I tend to brush, and suffer the slight brush marks that inevitably creep in.
After about four additional thin coats, start thinking about trim. If you wish to use contrasting tissue for stripes or numbers, cut them neatly, lay them in place dry, and spray them with a light water mist. Using your fingers, gently pat the tissue smooth, then brush a coat of thinner through the tissue to adhere it evenly to the silk. A dark tissue color works well over light-colored silk, but the reverse doesn't apply. When the initial adhesive is dry and complete, brush on two or three coats of thinned nitrate dope.
If you're going to be running diesel engines, or ignition engines using gasoline and oil, you might consider your aircraft to be finished at this point. You will, however, still be able to see the grain of the silk; you'll need about six more thin coats of dope to almost fill it completely. Don't try to accomplish this in one or two thick coats; brush marks and grossly uneven areas will rob you of pride in your workmanship.
If you have been working with butyrate dope, you may wish to add about two more thinned coats, to which some form of nontautening agent has been added. Aircraft supply houses normally sell both tautening and nontautening varieties of both butyrate and nitrate dope. With butyrate, it's a good idea to use the nontautening variety for the last three clear coats, since this will somewhat lessen the strong shrinking tendency of butyrate.
I like to add a durable, fuelproof finish over the nitrate dope, especially in the engine area and the rest of the fuselage. If I'm using high-nitromethane fuels in a two-stroke engine, I spray all surfaces with two thin coats of K&B Super Poxy. This imparts a high shine and is very durable. For gas or diesel power, I spray one generous coat on the fuselage. For color trim, I almost always use K&B Super Poxy color, then overspray the remaining translucent silk-covered areas with the clear variety.
Patching
Small slits and punctures can be readily drawn back together with Duco cement. Run a bead of cement along the edges, and if possible, use a pin to carry the cement to the undersurface of the silk near the edges. The pin can be useful in guiding the torn edges together, and the cement will set quickly. Later, sand the surface lightly and overspray with either dope or epoxy (whichever you used for the final finish).
For a larger slit or tear, use a pin to carry cement along the edges, then further soften the cement by wetting an area about 1/2-inch wide on each side of the tear with some thinner on a small brush. Quickly lay a small piece of plastic wrap over the area, making sure the wetted areas are drawn up level against the plastic. Strip off the plastic wrap when the area beneath it has dried, and you have a surprisingly good repair job.
If the damaged area is too large or too badly torn to use these techniques, try this: trim the silk back to the nearest supported point, such as a rib or spar. Lightly sand around the edges with #320 silicon-carbide paper. Pay special attention to any epoxy-coated surfaces, since you're going to sand through the epoxy to the nitrate coating underneath.
Brush a 3/16-inch-wide strip of the dope/cement mixture around the perimeter. Trim a piece of silk to overlap the edge of the opening by 3/8 to 1/4 inch on two adjacent sides, leaving it about an inch long on the remaining sides. Lay this piece over the opening, and dampen it with a fine water spray. Smooth the silk evenly along one of the closely trimmed edges, and adhere the edge neatly with a uniform application of the thickened dope/cement mixture.
Allow the patch to set for a few minutes, then pull the silk taut along the other trimmed edge at a 90° angle to the first. Keeping the silk damp, pull it taut in the other two directions and adhere it around the edges.
Allow the surplus material to remain in place for a minute or two, then place a new razor blade vertically about 3/16 inch from the patched opening and pull the silk edge up against the blade, cutting the material along the length of the blade. Move the blade farther along the edge and repeat this process until the edges are neatly trimmed. Any stray strands or loose spots can be tacked down with dope.
After the patch has thoroughly dried, apply a medium-thick coat of dope, flipping the surface over and back a few times to achieve a good fill coat. Then apply several more coats of thinned dope. Later, you can sand the area lightly, especially around the edges, and add a few more coats of dope over the newly covered area before applying your final finish coat.
Be sure to apply enough coats of dope. Well-finished silk can last many years, especially if some form of plasticizer has been added to the dope to prevent over-treating. A few drops of castor oil were used as a plasticizer in earlier years, but modern nonnitrating dopes contain more advanced chemicals.
Once you have mastered the technique of covering models with silk, you'll have unparalleled satisfaction with your handiwork.
Transcribed from original scans by AI. Minor OCR errors may remain.

