
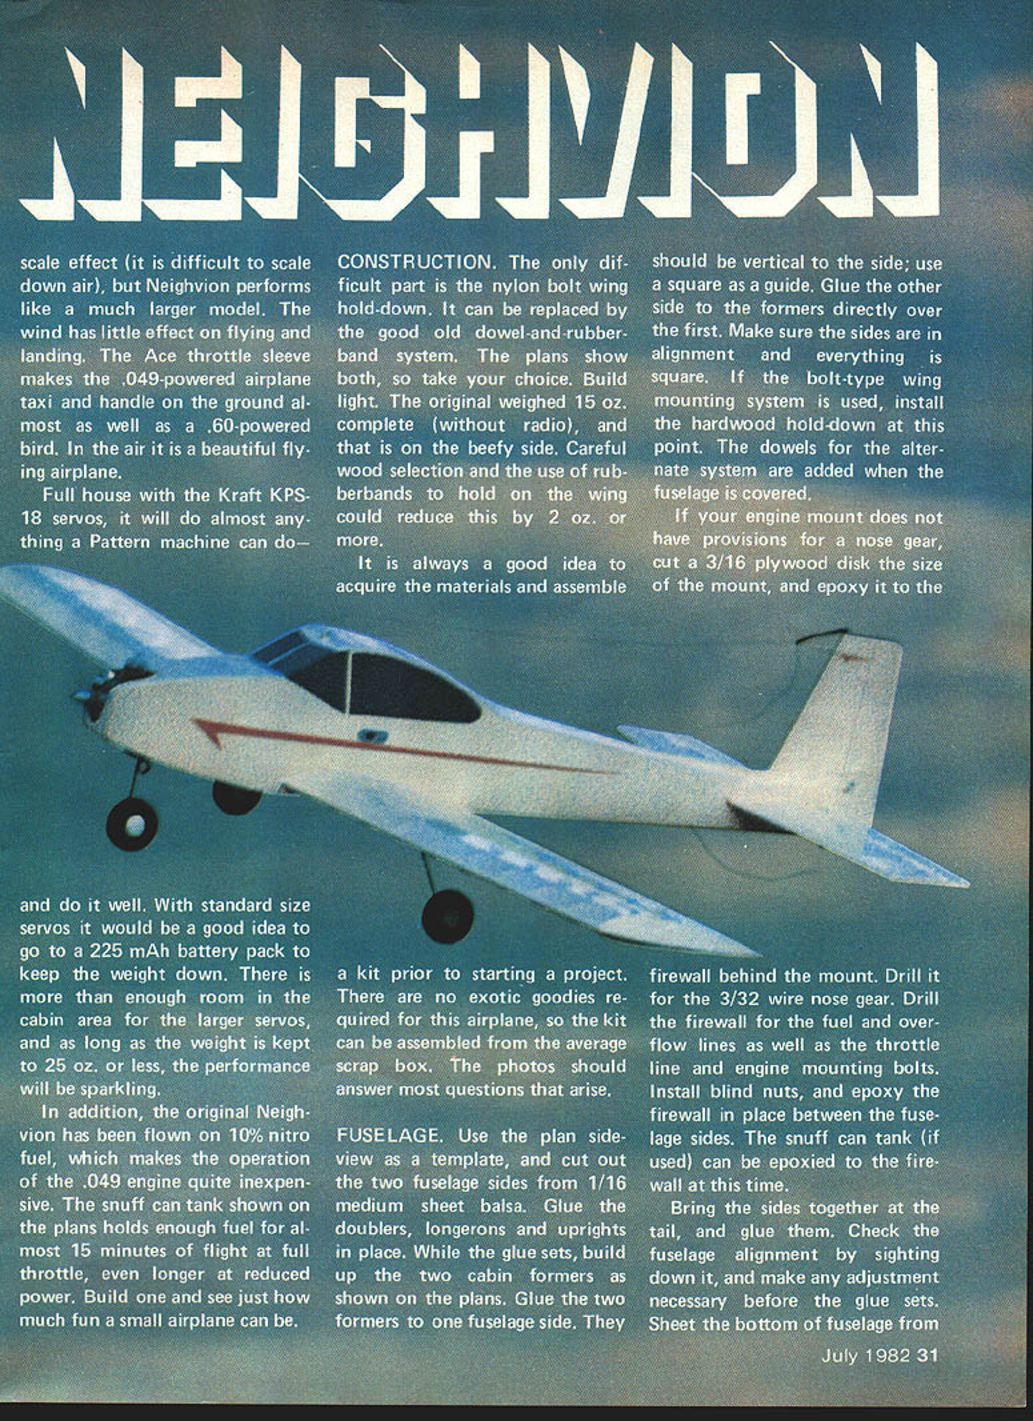
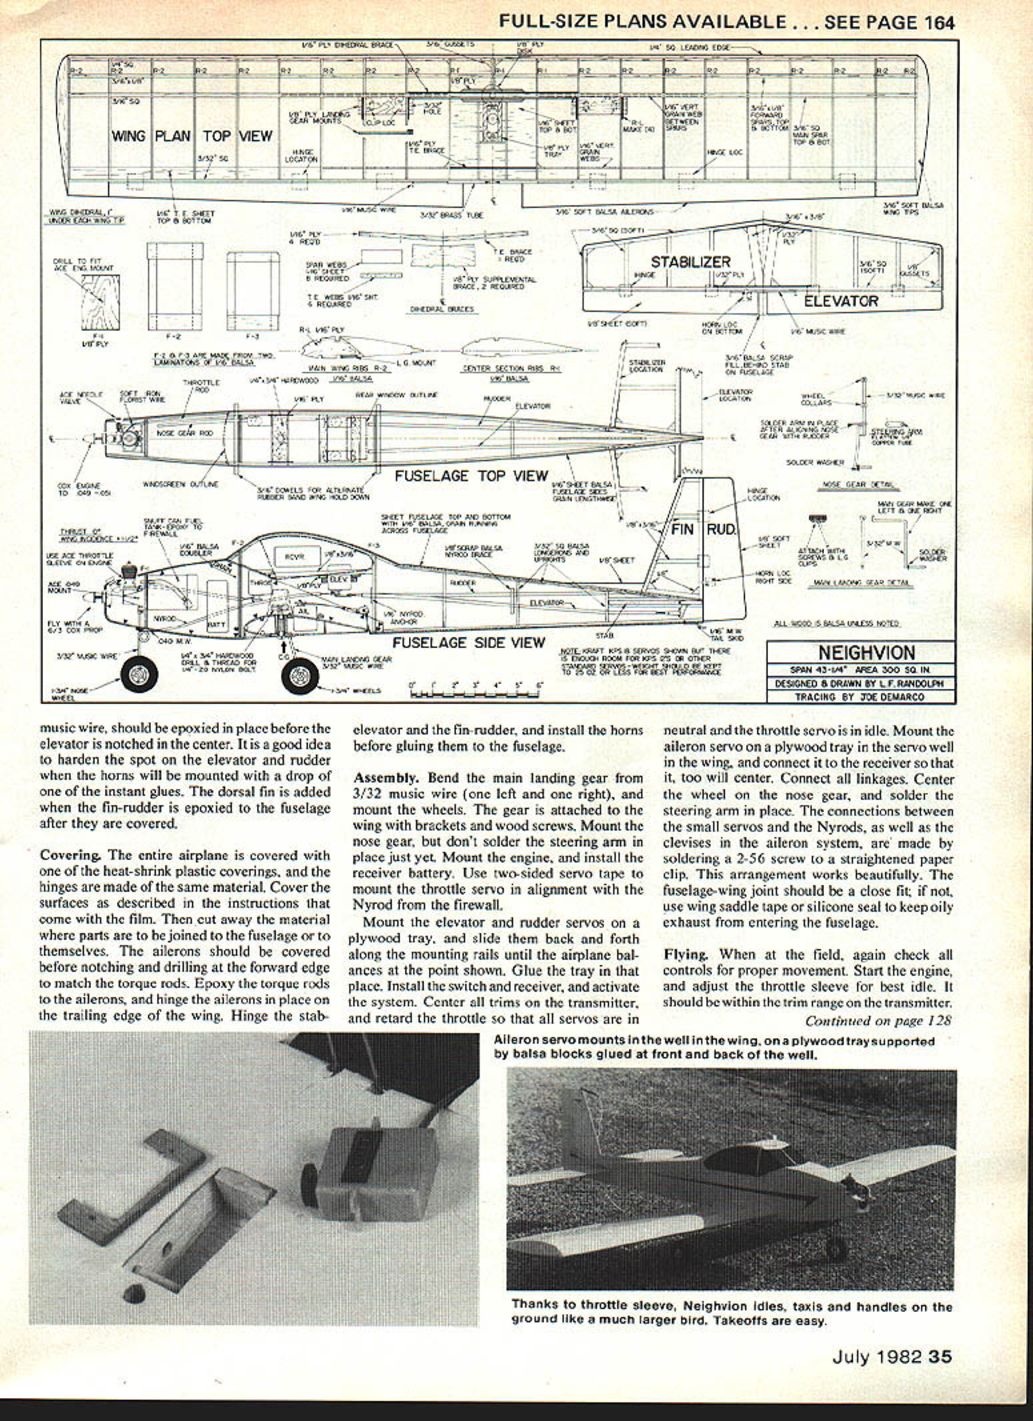
Neighvion
The Navion as designed by Ryan and built and sold by North American should be an ideal scale subject because of its lines and flyability, not to mention ease of documentation, but somehow it has been neglected. Neighvion was designed as a sort of "reminder-scale" of this neglected airplane. Its slab sides and imitation tapered wing make it quite inexpensive as well as easy to build, and it still maintains the flavor of the big brother.
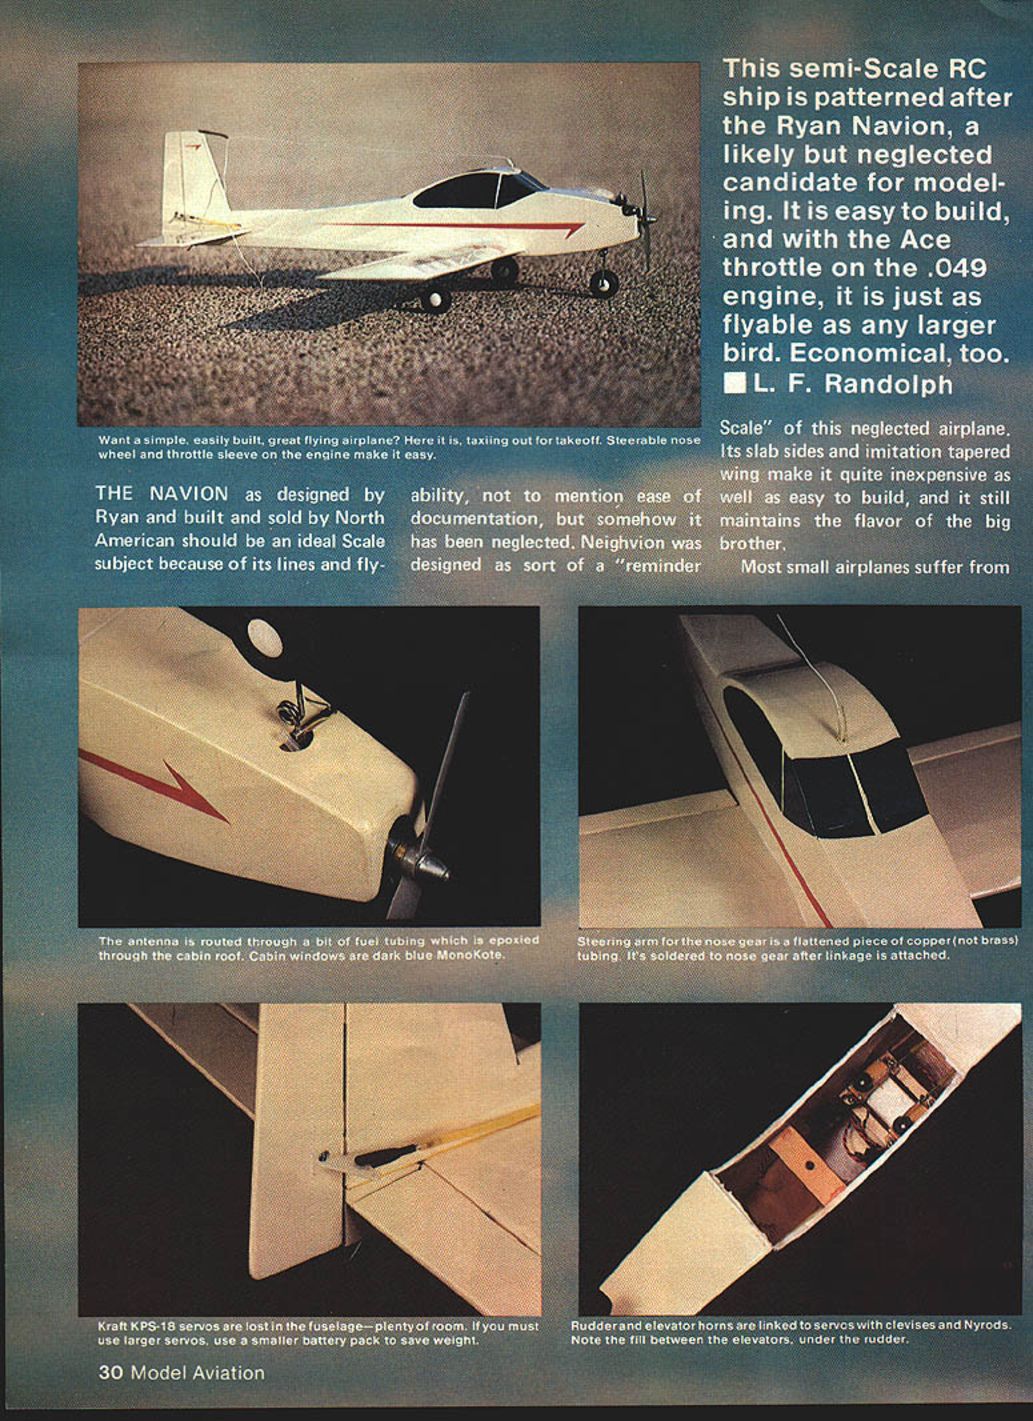
This semi-scale RC ship is patterned after the Ryan Navion, a likely but neglected candidate for modeling. It is easy to build, and with the Ace throttle on the .049 engine, it is just as flyable as any larger bird. Economical, too.
L. F. Randolph
Most small airplanes suffer from scale effect (it is difficult to scale down air), but Neighvion performs like a much larger model. Wind has little effect on flying and landing. The Ace throttle sleeve makes the .049-powered airplane taxi and handle on the ground almost as well as a .60-powered bird. In the air it is a beautiful flying airplane.
With a full house of Kraft KPS-18 servos, it will do almost anything a pattern machine can do.
The original Neighvion has been flown on 10% nitro fuel, which makes operation of the .049 engine quite inexpensive. The snuff-can tank shown on the plans holds enough fuel for almost 15 minutes of flight at full throttle, and even longer at reduced power. Build one and see just how much fun a small airplane can be. And do it well. With standard-size servos it is a good idea to use a 225 mAh battery pack to keep the weight down. There is more than enough room in the cabin area for the larger servos, and as long as the weight is kept to 25 oz. or less, the performance will be sparkling.
Construction
The only difficult part is the nylon-bolt wing hold-down; it can be replaced by the good old dowel-and-rubber-band system. The plans show both, so take your choice. Build light. The original weighed 15 oz. complete (without radio), and that is on the beefy side. Careful wood selection and the use of rubber bands to hold on the wing could reduce this by 2 oz. or more.
It is a good idea to acquire materials and assemble a kit prior to starting. There are no exotic goodies required for this airplane, so the kit can be assembled from the average scrap box. The photos and plans should answer most questions that arise.
Fuselage
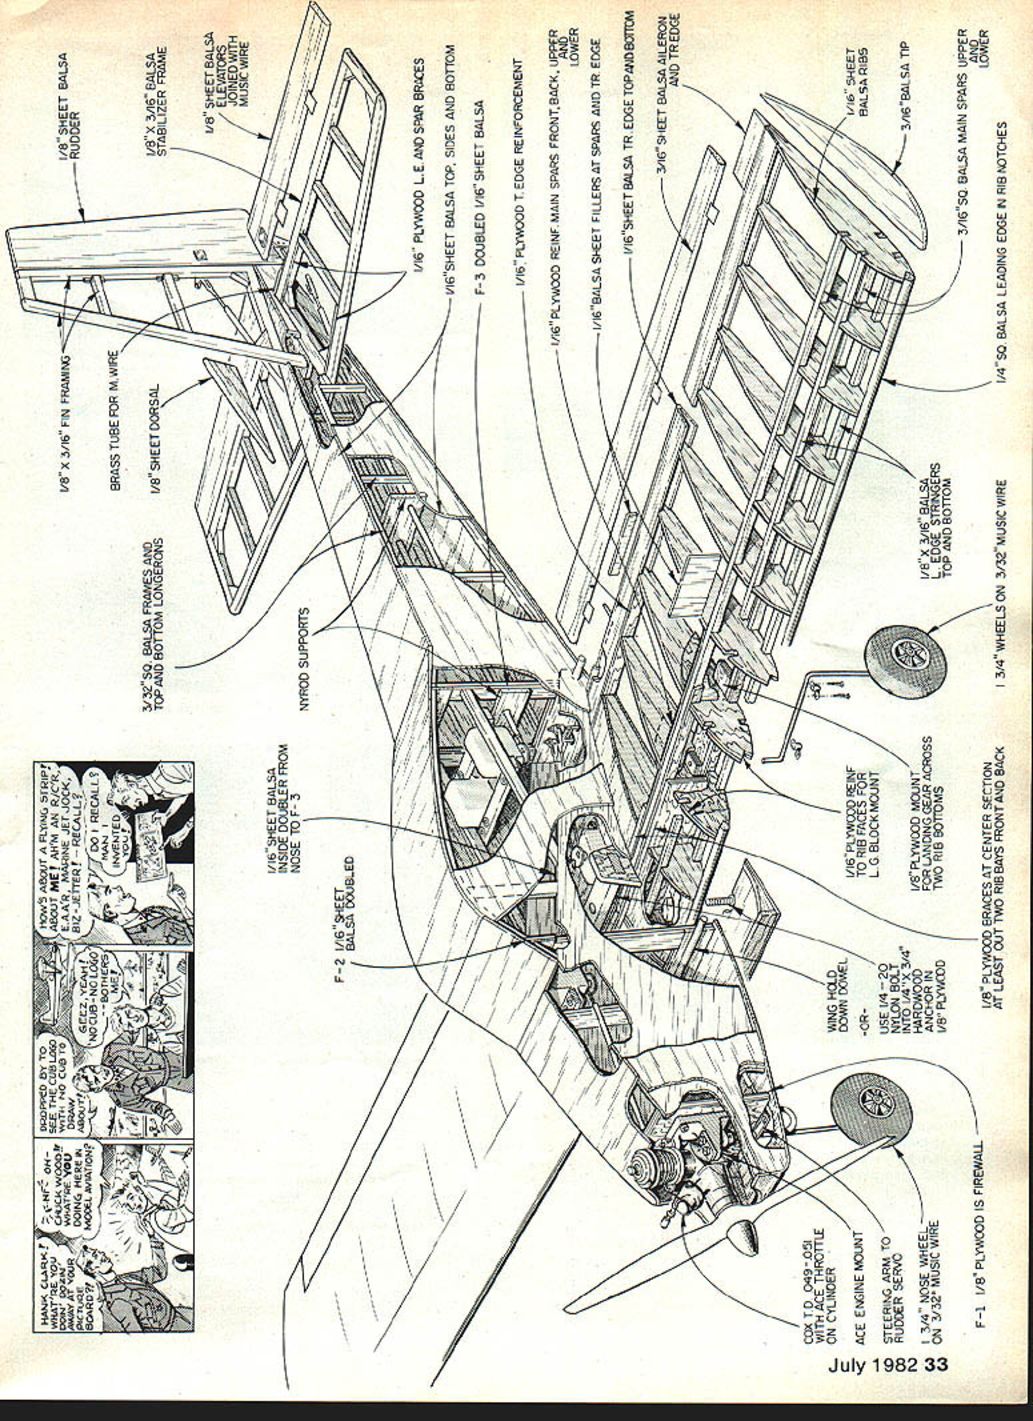
- Use the plan side view as a template and cut out the two fuselage sides from 1/16" medium sheet balsa. Glue the doublers, longerons and uprights in place.
- While the glue sets, build the two cabin formers as shown on the plans. Glue the two formers to one fuselage side, making sure they are vertical to the side (use a square as a guide). Glue the other side to the formers directly over the first. Make sure the sides are in alignment and everything is square.
- If the bolt-type wing mounting system is used, install the hardwood hold-down at this point. The dowels for the alternate system are added when the fuselage is covered.
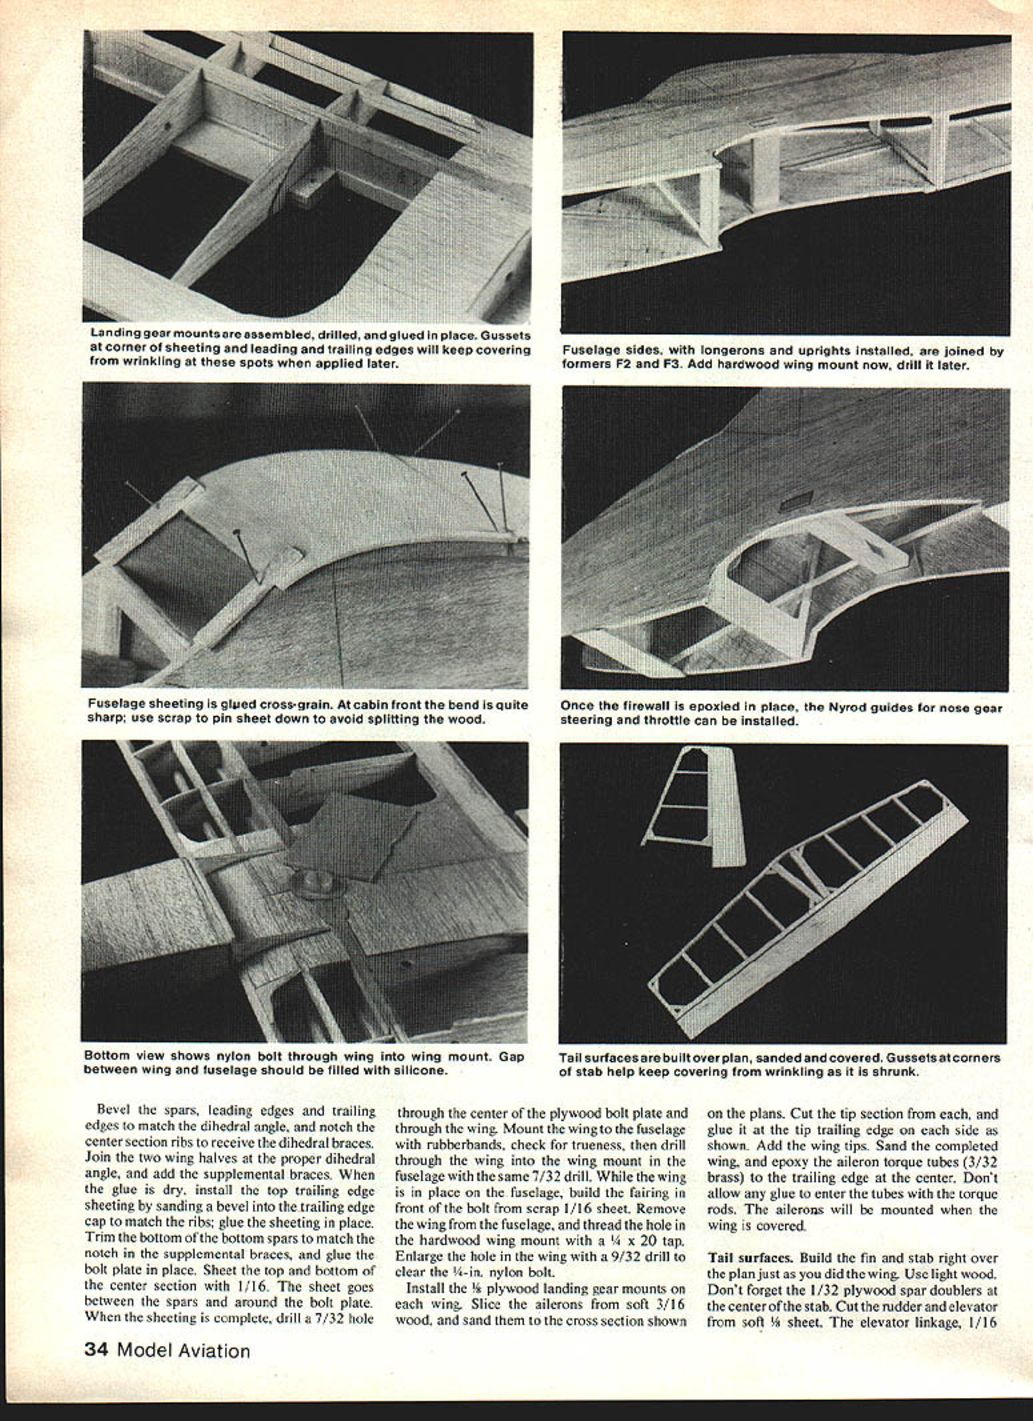
- If your engine mount does not have provisions for a nose gear, cut a 3/16" plywood disk the size of the mount and epoxy it to the firewall behind the mount. Drill it for the 3/32" wire nose gear.
- Drill the firewall for fuel and overflow lines as well as the throttle line and engine mounting bolts. Install blind nuts and epoxy the firewall in place between the fuselage sides. The snuff-can tank (if used) can be epoxied to the firewall at this time.
- Bring the sides together at the tail and glue. Check fuselage alignment by sighting down it and make any adjustment necessary before the glue sets.
- Sheet the bottom of the fuselage from the wing mount forward, and install the nyrod guides for the nose-gear steering and throttle lines. If a commercial fuel tank is to be used, install it now on a bed of foam.
- Glue the nyrod guides for the rudder and elevator in place, and finish the top and bottom sheeting.
- Finish the inside of the cowl area with HobbyPoxy Formula 2 (or equivalent epoxy) to keep oil and fuel away from the wood. Sand the completed fuselage.
Wing
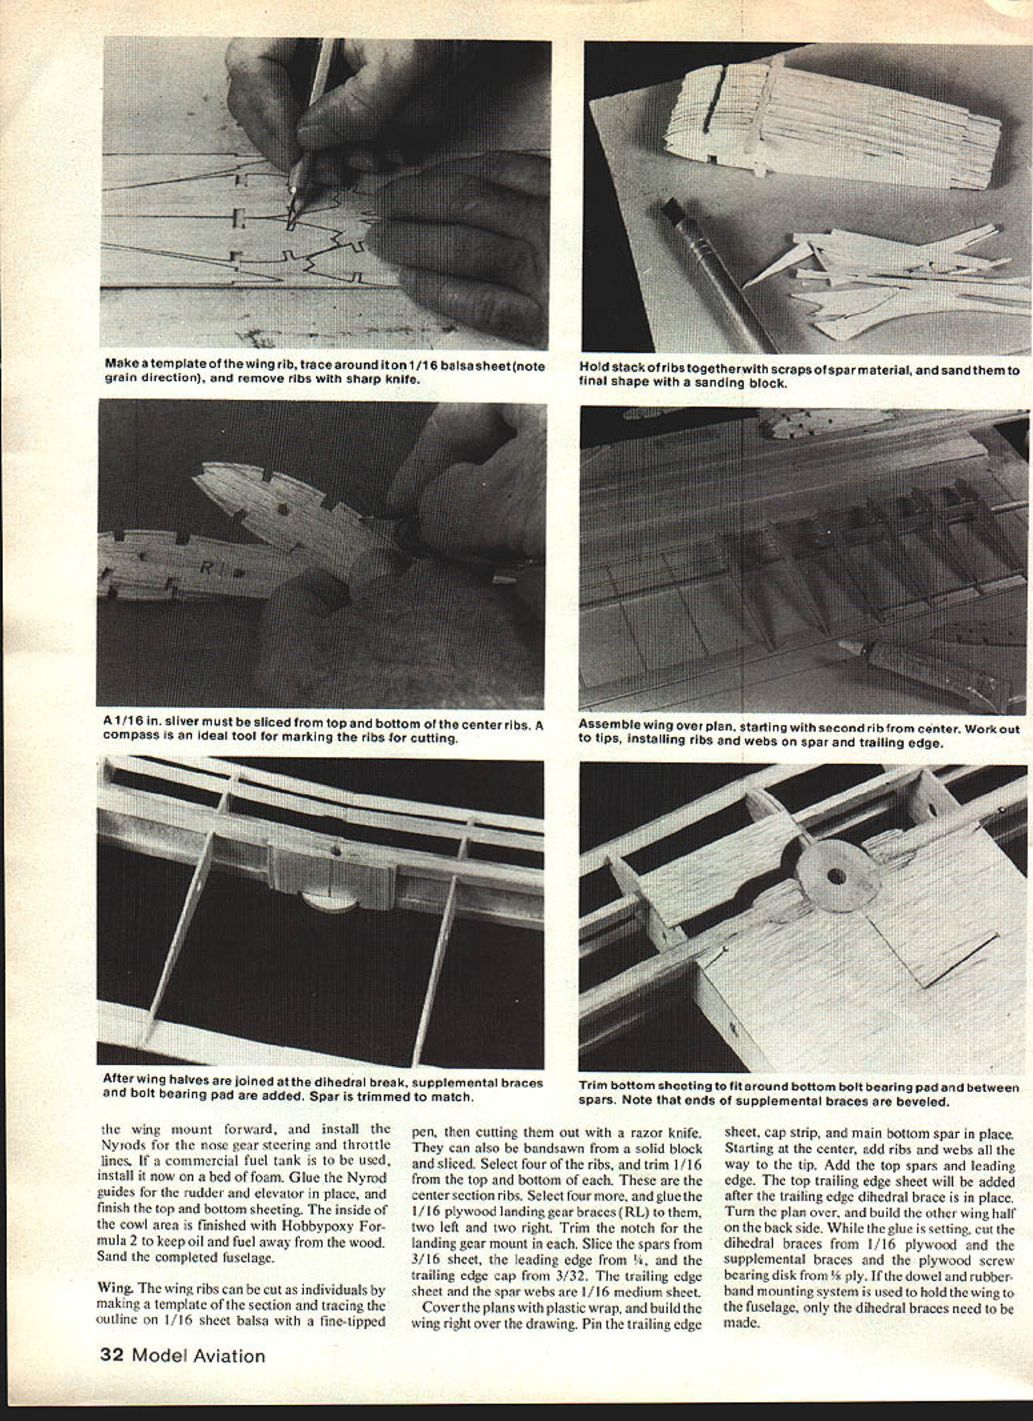
- Cut wing ribs individually by making a template and tracing the outline on 1/16" sheet balsa, then cut with a razor knife, or bandsaw ribs from a block and slice. Select four ribs and trim 1/16" from the top and bottom of each for the center section ribs.
- Select four more ribs and glue 1/16" plywood landing-gear braces (RL) to them, two left and two right. Trim the notch for the landing-gear mount in each.
- Slice spars from 3/16" sheet, leading edge from 3/8", and trailing-edge cap from 3/32". The trailing-edge sheet and spar webs are 1/16" medium sheet.
- Cover the plans with plastic wrap and build the wing directly over the drawing. Pin the trailing-edge sheet, cap strip, and main bottom spar in place. Starting at the center, add ribs and webs all the way to the tip. Add the top spars and leading edge. The top trailing-edge sheet will be added after the trailing-edge dihedral brace is in place.
- Turn the plan over and build the other wing half on the back side. While the glue sets, cut the dihedral braces from 1/16" plywood and the supplemental braces and plywood screw-bearing disk from 1/8" ply. If the dowel-and-rubber-band mounting system is used, only the dihedral braces need to be made.
- Bevel the spars, leading edges and trailing edges to match the dihedral angle, and notch the center-section ribs to receive the dihedral braces. Join the two wing halves at the proper dihedral angle, and add the supplemental braces. Note that ends of supplemental braces are beveled.
- Trim spars to match. Trim the bottom sheeting to fit around the bottom bolt-bearing pad and between the spars.
- Sheet the top and bottom center section with 1/16" sheet between the spars around the bolt plate. When sheeting is complete, drill a 7/32" hole through the center plywood bolt plate and through the wing.
- Mount the wing on the fuselage with rubber bands and check trueness. Drill through the wing and wing mount on the fuselage with the same 7/32" drill. Remove the wing and build the fairing at the front bolt with a scrap of 1/16" sheet.
- Thread the hole in the hardwood wing mount and tap (1/4-20). Enlarge the hole in the wing to 9/32" to clear the 5/16" nylon bolt.
- Install wood landing-gear mounts in the wing (1/8" plywood).
- Slice the ailerons from soft 3/16" wood and sand to the cross section shown on the plans. Cut the tip section and glue the tip to the trailing edge as shown. Add wingtips and sand the completed wing.
- Epoxy the aileron torque tubes (3/32" brass) into the trailing-edge center. Do not allow glue into the tubes where the torque rods will run. The ailerons will be mounted when the wing is covered.
- Mount the wing forward; install nyrods for nose-gear steering and throttle lines. If using a commercial fuel tank, bed it in foam and glue in nyrod guides.
- Install rudder and elevator pushrods and position them. Finish the top and bottom sheeting in the inside-cowl area before final assembly. Use HobbyPoxy (or equivalent) to protect wood from oil and fuel.
Tail surfaces
- Build the fin and stabilizer right over the plan as you did the wing. Use light wood.
- Remember the 1/32" plywood spar doublers at the center of the stabilizer.
- Cut the rudder and elevator from soft 1/16" sheet. The elevator linkage (1/16" music wire) should be epoxied in place before the elevator is notched in the center.
- Harden the spot on the elevator and rudder where the horns will be mounted with a drop of instant glue.
- The dorsal fin is added after the fin-rudder assembly is epoxied to the fuselage once they are covered.
Covering
- Cover the entire airplane with heat-shrink plastic covering; hinges are made of the same material. Follow the instructions that come with the film.
- Cut away material where parts join the fuselage or themselves. Cover the ailerons before notching and drilling at the forward edge to match the torque rods.
- Epoxy the torque rods to the ailerons and hinge the ailerons in place on the trailing edge of the wing. Hinge the stabilizer and fin-rudder and install the horns before gluing them to the fuselage.
Assembly
- Bend the main landing gear from 3/32" music wire (one left and one right) and mount the wheels. Attach the gear to the wing with brackets and wood screws.
- Mount the nose gear, but do not solder the steering arm in place yet.
- Mount the engine and install the receiver battery. Use two-sided servo tape to mount the throttle servo in alignment with the nyrod from the firewall.
- Mount the elevator and rudder servos on a plywood tray. Slide the tray along the mounting rails until the airplane balances at the point shown on the plans, then glue the tray in place.
- Install the switch and receiver and activate the system. Center all trims on the transmitter and retard the throttle so that all servos are neutral and the throttle servo is at idle.
- Mount the aileron servo on a plywood tray in the servo well in the wing and connect it to the receiver so it centers. Connect all linkages.
- Center the wheel on the nose gear and solder the steering arm in place.
- The connections between the small servos and the nyrods, as well as the clevises in the aileron system, can be made by soldering a 2-56 screw to a straightened paper clip — a simple, effective arrangement.
- Ensure the fuselage–wing joint is a close fit; if not, use wing-saddle tape or silicone seal to keep oily exhaust from entering the fuselage.
Flying
- At the field, check all controls for proper movement. Start the engine and adjust the throttle sleeve for best idle; it should be within the transmitter trim range.
- Taxi out to a spot, stop, and apply power for takeoff as you would with a larger plane. Do not rush the first rotation: apply slight back stick and let Neighvion fly off. Climb straight out, level off, and trim it out. The initial flight required a slight up and left aileron trim.
- Landings are easy. Fly the pattern on power, then ease off the power just before touchdown for a smooth, solid arrival.
Neighvion is a smooth, solid flier — economical to operate and a delight to build and fly.
Transcribed from original scans by AI. Minor OCR errors may remain.

