
New Comers
Box 40, St. Peters MO 63376
This month's offering has a word (or three!) for a variety of groups. Perhaps we could refer to it as something of a potpourri—but maybe not, since no one can spell or pronounce that correctly!
To Clubs
The Northern Virginia Radio Control Club (NVRC) celebrates its 40th anniversary this year. The club works very hard at not only welcoming new members but also in maintaining continued communications with all members.
Each year every member receives an updated handbook. The subjects covered make the handbook extremely valuable. Among a host of items, one can find:
- All officers' names and phone numbers
- A complete directory
- Complete field rules
- Club history
- Complete constitution and bylaws
- Transmitter registration and radio requirements
- Field etiquette
- Student training guidelines and qualification flight check
- Complete maiden flight and routine preflight inspections
- A set of maps and illustrations for field and meeting place
- A complete yearly calendar of events and yearly budget
There is also information concerning ticks (those mean little critters that jump on you from the grass); a club information hotline; and a BBS open to members. For your edification and as an illustration, consider their Qualification Flight Check.
Qualification Flight Check
- Must be tested by two qualified club pilots.
- Must have current AMA license and be a club member in good standing.
- Must be recommended for qualification flight by an instructor.
- Know all club by-laws, AMA and club safety rules.
- Complete preflight inspection, start engine, and taxi airplane to runway safely, unassisted.
- Demonstrate satisfactory takeoff and climb out.
- Execute 180° turn away from flightline after climb out and demonstrate control of straight-line flyby.
- Do, on request of the qualifying instructors:
- a. Complete flat horizontal figure 8 per illustrations (both directions).
- b. Satisfactory inside loop maintaining correct altitude and direction.
- c. Complete two satisfactory Immelmann turns, one going away from and one coming toward pilot.
- d. Stall airplane and recover satisfactorily.
- e. Demonstrate satisfactory left and right flyby approaches.
- f. Resume altitude of 200 feet or more. Instructor will cut throttle to idle without warning to simulate dead-stick condition. The qualifying pilot must land airplane on runway satisfactorily without increasing throttle.
SIGNATURES:
WITNESS: _______________________ DATE: ________________
If enough clubs are interested, we'll work at seeing if NVRC will allow us to duplicate the document, perhaps sans roster, for you to use as guidance.
To Manufacturers
We received the following text from the father of Model Aviation's ad rep, Sue Schrock. In just getting started in aeromodelling, Luke suffered the ailments many others have encountered. It only points up the need for all of us to use care in the way we try to communicate to newcomers.
A Beginner's Misunderstandings
"My daughter Sue started my interest in RC modeling. As I soon found out, even well-detailed instructions make many assumptions that a beginning modeler does not understand. I also found out that all you modelers ask questions; experienced modelers were willing and ready to help. Unfortunately, I didn't know anyone who modeled, and I didn't like to bother others with problems. Since I was somewhat mechanically inclined, I figured I would do it myself. What a laugh!
I picked up my first ARF model at a very small hobby shop. Of course I didn't know ARF means Almost Ready-to-Fly. The shop owner showed me a list of additional items the instructions said I would need and was able to supply most items. I found out later he had supplied some wrong items—either he didn't know or he did not have the correct item in stock.
My daughter put me in touch with an executive at a radio company; the gentleman was very helpful in deciding which system to purchase. For a few extra bucks I selected a six-channel system that will cover future needs while my first plane uses three channels. The radio and additional items were ordered from a catalog company; the woman who took my order was very helpful in deciding on other items I would need, such as propeller, spinner, "chicken stick," fuel tank, glow plugs, glow plug starters, and more.
Modelers' kit instructions use abbreviations you will need to decipher. Everyone knows what epoxy is, but there are different types—some set longer and are stronger. CyA (cyanoacrylate) glue is very fast and strong and comes in various viscosities—thick, medium, thin. "Un-glue" (debonder) selection can be confusing, with manufacturers all claiming their product is best. Get some debonder—you are guaranteed at some point you will glue your fingers together.
Looking back at the instructions now, the parts I stumbled over are elementary: 'Slide stabilizer into position. Measure from stab tips to fuselage to center stab with fuselage.' I realize now that 'stab' is short for stabilizer.
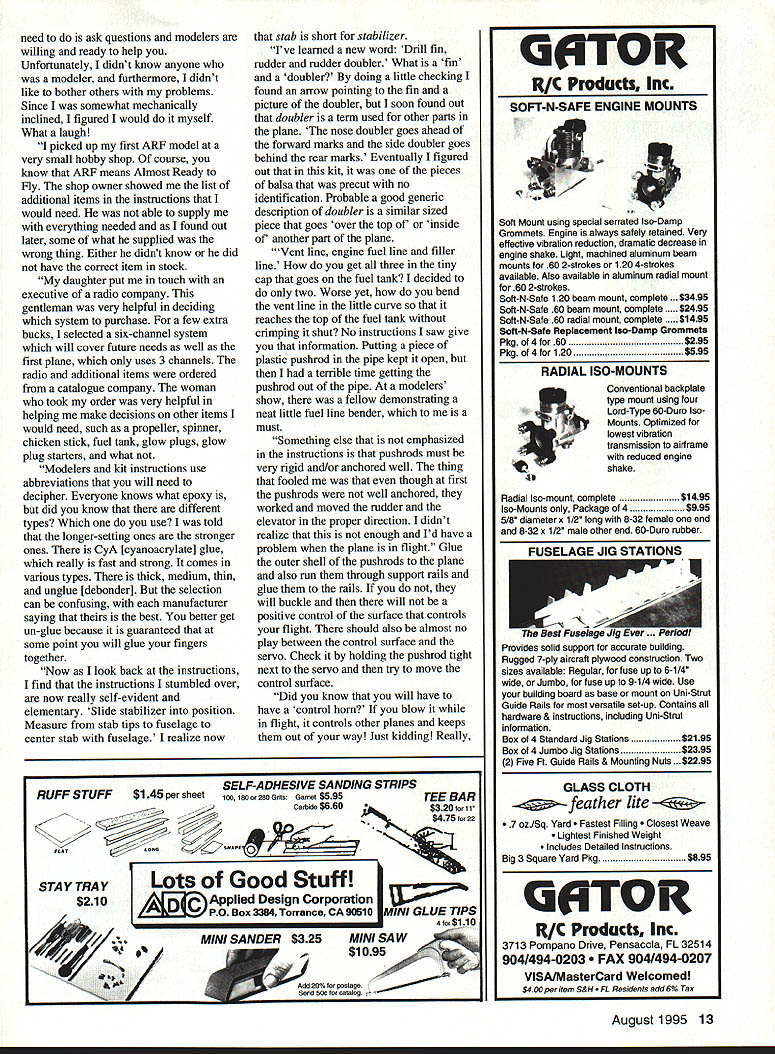
I've learned a new word: 'drill fin, rudder, and rudder doubler.' What is a 'fin' and a 'doubler'? By checking the plans I found an arrow pointing to the fin and a picture of the doubler. I soon learned that a doubler is a term used for pieces that reinforce other parts of the plane. In this kit the doubler was one of the precut pieces of balsa with no identification. A good generic description is a piece that goes 'over the top' or 'inside of' another part of the plane.
Another confusing instruction was 'engine fuel line and filler line.' How do you get all three lines into the tiny cap that goes on the fuel tank? I decided to do only two. Worse yet, how do you bend the vent line in the little curve so it reaches the top of the fuel tank without crimping it shut? No instructions I saw gave that information. Putting a piece of plastic pushrod in the pipe kept it open, but then I had a terrible time getting the pushrod out. At a modeler's show, a fellow demonstrated a neat little fuel line bender, which to me is a must.
Something else not emphasized in the instructions is that pushrods must be very rigid and/or anchored well. The thing that fooled me was that even though at first the pushrods were not well anchored, they worked and moved the rudder and elevator in the proper direction. I didn't realize that this is not enough; you'll have a problem when the plane is in flight. Glue the outer shell of the pushrods to the plane and run them through support rails and glue them to the rails. If you do not, they will buckle and you will lose positive control of the surfaces. There should also be almost no play between the control surface and the servo. Check it by holding the pushrod tight next to the servo and then try to move the control surface.
Did you know you will need a 'control horn'? (No, it does not blow other planes away.) The control horn is the small part that attaches the pushrod to the control surface with a clevis or keeper. Make sure the control horn is securely fastened to the control surface and the screws are locked with thread lock or CA. Some kits give you a flimsy pushrod connector—replace it with a heavier one if you are not convinced it will hold. I've had one of those connectors fail and the plane pulled up into a stall/spin. Fortunately, I was not hurt and the plane was not severely damaged. You will fasten a control horn on the rudder, the elevator, and each aileron. The pushrods will be fastened between the servos and the horn. There are several holes in the horn; frankly, I still haven't found out which hole you put the pushrod link in!
There are many elementary things which could be clarified, but this gives you some of the thinking I went through. You may ask why I didn't get a primer on modeling before starting. I am one of those people who want to get hands-on and not spend all week just reading about it. It would be helpful for some of us if manufacturers would not assume that we understand modeling terminology."
Lake Bomberger Lancaster, Pennsylvania
To Everyone
Some exciting developments regarding youth activities are beginning to peek over the horizon. Contact with a government group and a university show promise in our ability to develop a major program. At the time this was written, a proposal has been advanced to the AMA Executive Council for consideration and refinement. Referred to as the Youth Educational Stipend (YES) program, it is designed to create funds for use by chartered clubs and/or chapters to develop educational programs. If approved, we will let you know the details as soon as possible.
In speaking about educational programs, Los Olivos has reported that a 48,000-member German aero club provides $90,000 each year to fund youth model-building education activities. The scope of that program reveals the resources they place on the issue. Hopefully we will be able to provide greater detail soon, including the types of programs they employ.
A last word: We're something shy of a year now in supplying this column. Thank you to the many persons who have taken the time to pass on information or encouraging words. There is a tremendous frustration from the writer's end, due to the many areas of concern that need to be addressed. To that end, we say thank you for your patience and understanding.
Transcribed from original scans by AI. Minor OCR errors may remain.

