
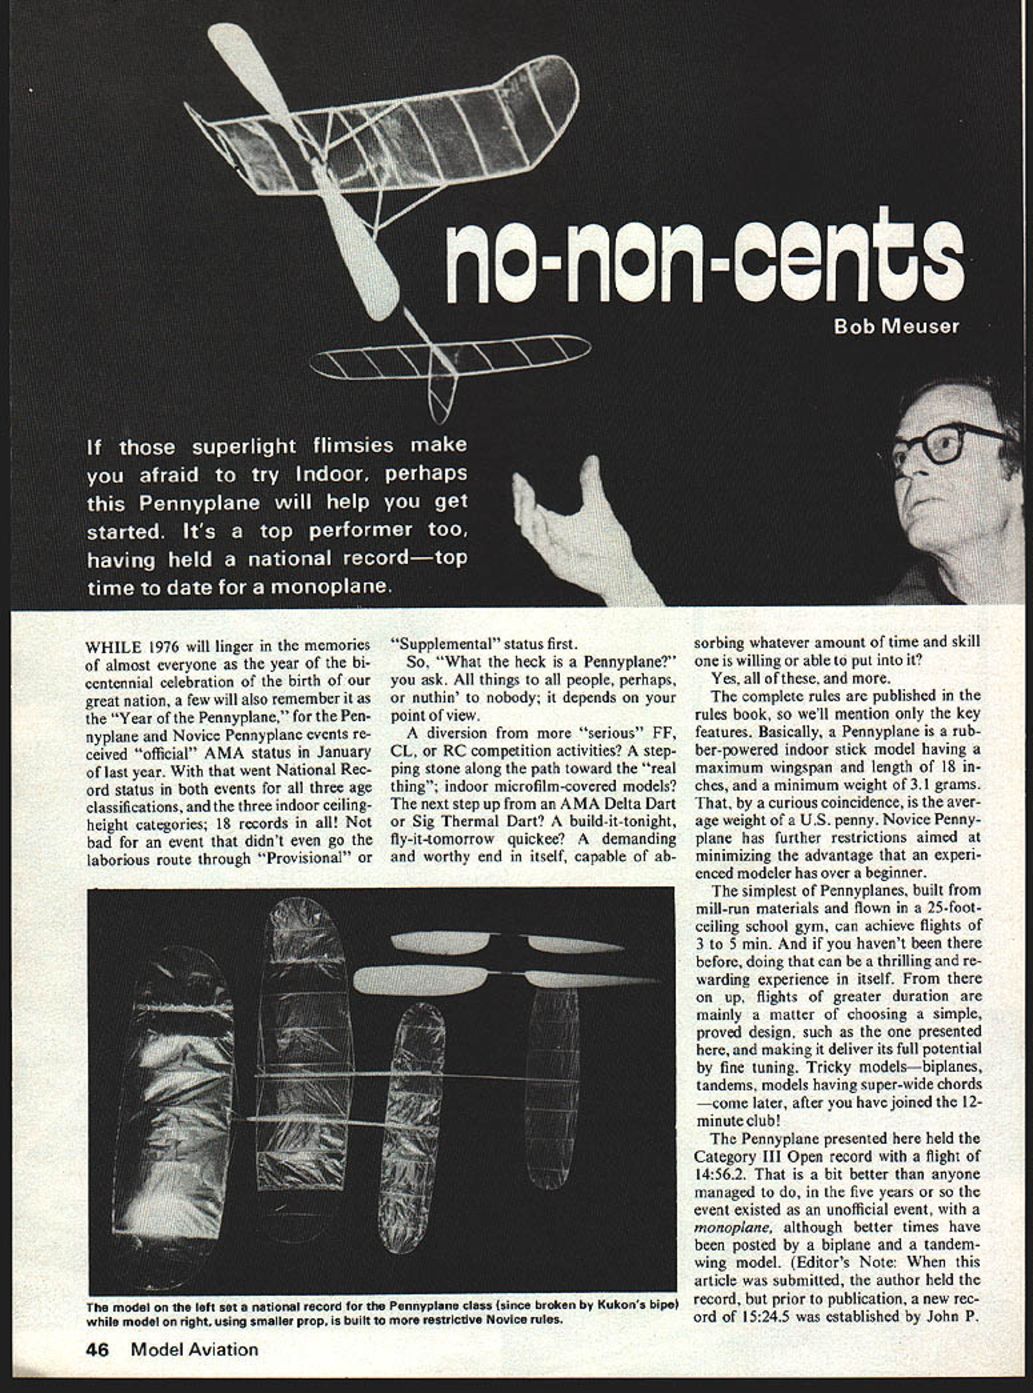
No-non-cents
Bob Meuser
If those superlight flimsies make you afraid to try Indoor, perhaps this Pennyplane will help you get started. It's a top performer too, having held a national record—top time to date for a monoplane.
WHILE 1976 will linger in the memories of almost everyone as the year of the bicentennial celebration of the birth of our great nation, a few will also remember it as the "Year of the Pennyplane," for the Pennyplane and Novice Pennyplane events received "official" AMA status in January of last year. With that went National Record status in both events for all three age classifications, and the three indoor ceiling-height categories; 18 records in all! Not bad for an event that didn't even go the laborious route through "Provisional" or "Supplemental" status first.
So, "What the heck is a Pennyplane?" you ask. All things to all people, perhaps, or nuthin' to nobody; it depends on your point of view.
A diversion from more "serious" FF, CL, or RC competition activities? A stepping stone along the path toward the "real thing"; indoor microfilm-covered models? The next step up from an AMA Delta Dart or Sig Thermal Dart? A build-it-tonight, fly-it-tomorrow quickie? A demanding and worthy end in itself, capable of absorbing whatever amount of time and skill one is willing or able to put into it?
Yes, all of these, and more.
The complete rules are published in the rules book, so we'll mention only the key features. Basically, a Pennyplane is a rubber-powered indoor stick model having a maximum wingspan and length of 18 inches, and a minimum weight of 31.3 grams. That, by a curious coincidence, is the average weight of a U.S. penny. Novice Pennyplane has further restrictions aimed at minimizing the advantage that an experienced modeler has over a beginner.
The simplest of Pennyplanes, built from mill-run materials and flown in a 25-foot-ceiling school gym, can achieve flights of 3 to 5 min. And if you haven't been there before, doing that can be a thrilling and rewarding experience in itself. From there on up, flights of greater duration are mainly a matter of choosing a simple, proved design, such as the one presented here, and making it deliver its full potential by fine tuning. Tricky models—biplanes, tandems, models having super-wide chords—come later, after you have joined the 12-minute club!
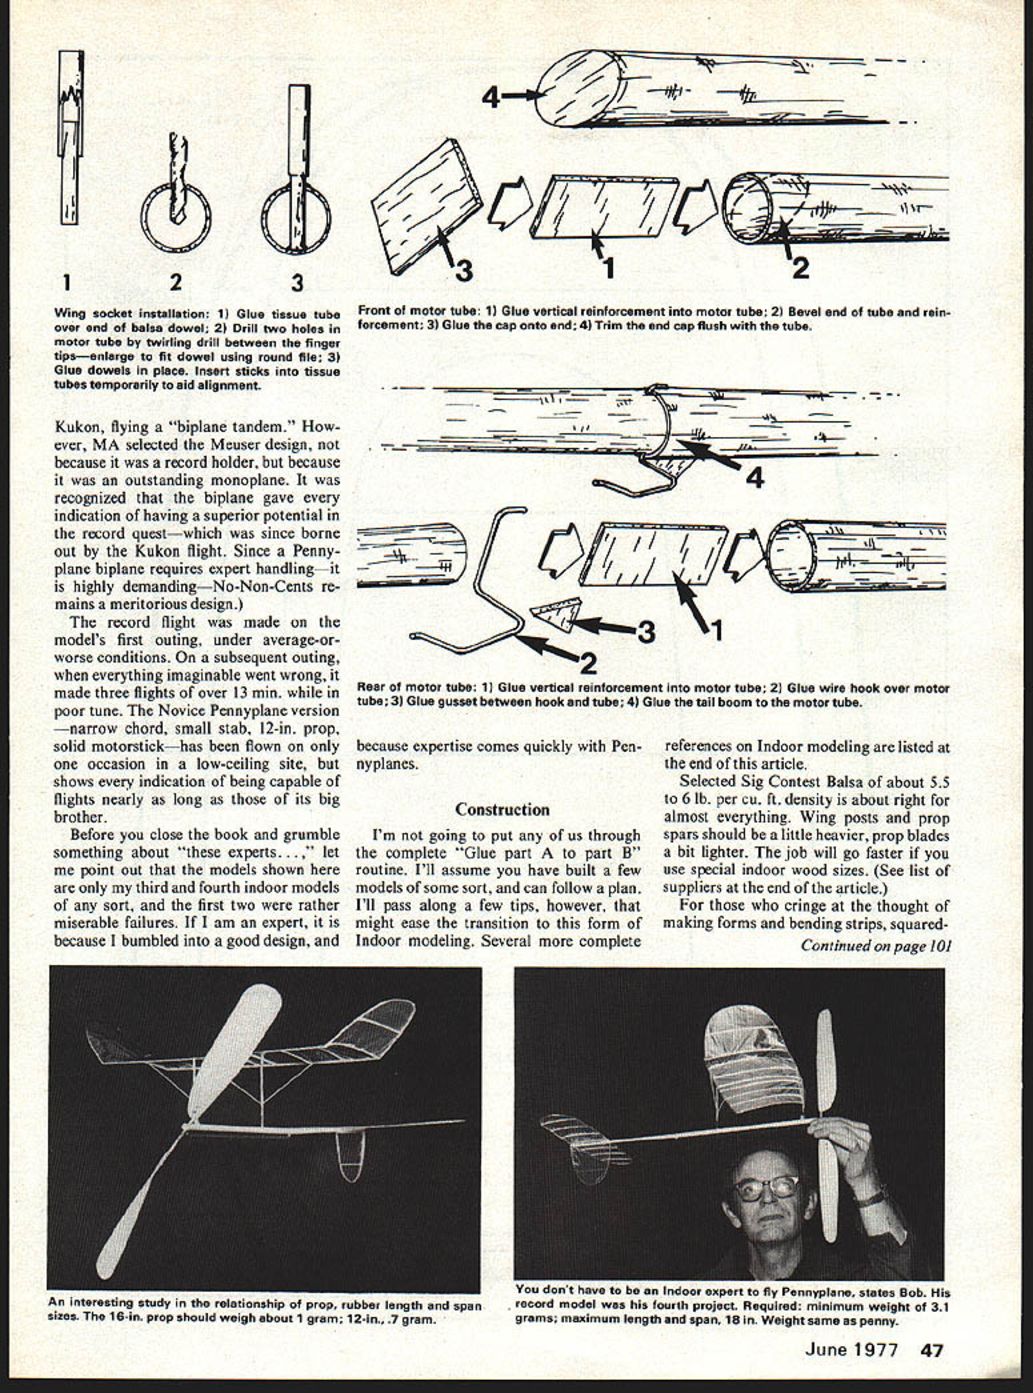
The Pennyplane presented here held the Category III Open record with a flight of 14:56.2. That is a bit better than anyone managed to do, in the five years or so the event existed as an unofficial event, with a monoplane, although better times have been posted by a biplane and a tandem-wing model. (Editor's Note: When this article was submitted, the author held the record, but prior to publication, a new record of 15:24.5 was established by John P Kukon, flying a "biplane tandem." However, MA selected the Meuser design, not because it was a record holder, but because it was an outstanding monoplane. It was recognized that the biplane gave every indication of having a superior potential in the record quest—which was since borne out by the Kukon flight. Since a Pennyplane biplane requires expert handling—it is highly demanding—No-Non-Cents remains a meritorious design.
The record flight was made on the model's first outing, under average-or-worse conditions. On a subsequent outing, when everything imaginable went wrong, it made three flights of over 13 min. while in poor tune. The Novice Pennyplane version—narrow chord, small stab, 12-in. prop, solid motorstick—has been flown on only one occasion in a low-ceiling site, but it shows every indication of being capable of flights nearly as long as those of its big brother.
Before you close the book and grumble something about "these experts...." let me point out that the models shown here are only my third and fourth indoor models of any sort, and the first two were rather miserable failures. If I am an expert, it is because I bumbled into a good design, and because expertise comes quickly with Pennyplanes.
Construction
I'm not going to put any of us through the complete "Glue part A to part B" routine. I'll assume you have built a few models of some sort, and can follow a plan. I'll pass along a few tips, however, that might ease the transition to this form of indoor modeling. Several more complete references on indoor modeling are listed at the end of this article.
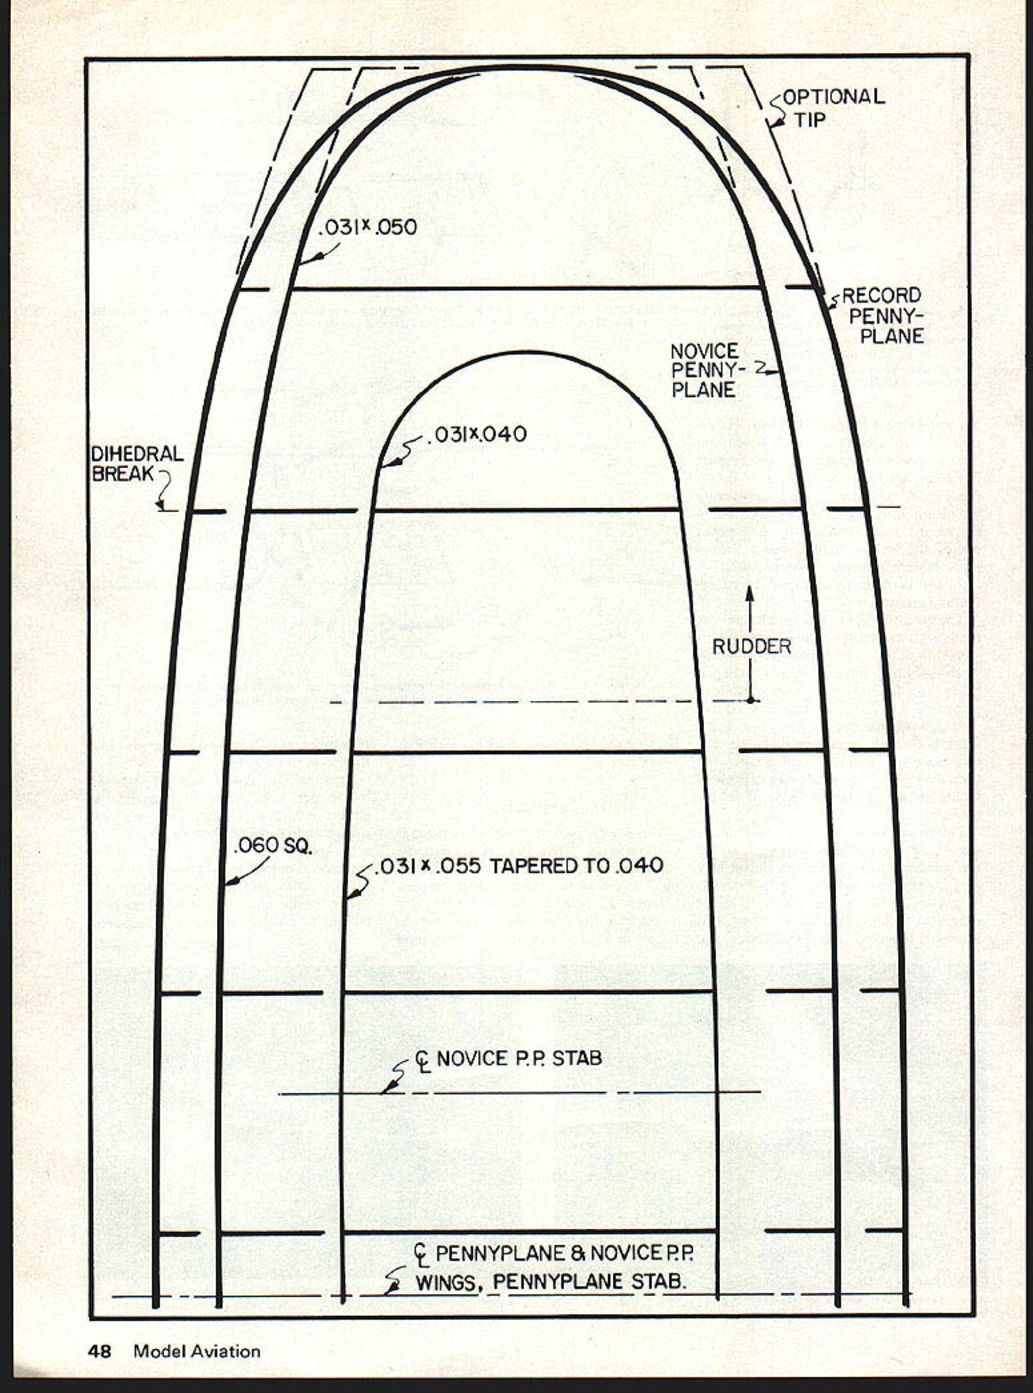
Selected Sig Contest Balsa of about 5.5 to 6 lb. per cu. ft. density is about right for almost everything. Wing posts and prop spars should be a little heavier; prop blades a bit lighter. The job will go faster if you use special indoor wood sizes. (See list of suppliers at the end of the article.) For those who cringe at the thought of making forms and bending strips, squared- OPTIONAL TIP
.031 x .050
RECORD PENNYPLANE
NOVICE PENNYPLANE
DIHEDRAL BREAK
.031 x .040
RUDDER
.060 SQ.
.031 x .055 TAPERED TO .040
C NOVICE P.P. STAB
C PENNYPLANE & NOVICE P.P. WINGS, PENNYPLANE STAB.
BOB MEUSER'S NO NON-CENTS
NATIONAL RECORD PENNYPLANE
TIP .015 ROOT .025
TEMPLATE 7" RADIUS
UNIFORM PITCH PROP BLADE FORM
ALTERNATIVE BLADE FORMING
5 TO 6 DIA.
FOR NOVICE P.P.
.025, 1/4 DIA.
5/64 I.D.
TISSUE TUBE GLUED TO BALSA PEG THROUGH MOTOR TUBE. FOR NOVICE P.P., GLUE TO SIDE OF STICK.
.020 WIRE
THRUST BRG.
INSERTING PROP SHAFT
NOVICE P.P.: STICK 5/8 x 5/16 BOOM 1/16 x 3/16 TAPERED TO 1/16 SQ.
1/32 x 1/16 BRACES, FRONT AND REAR.
2 5/8 3
3/32 DIA.
PAPER TUBE
CL
TOP VIEW
SIDE VIEW
CG 50%
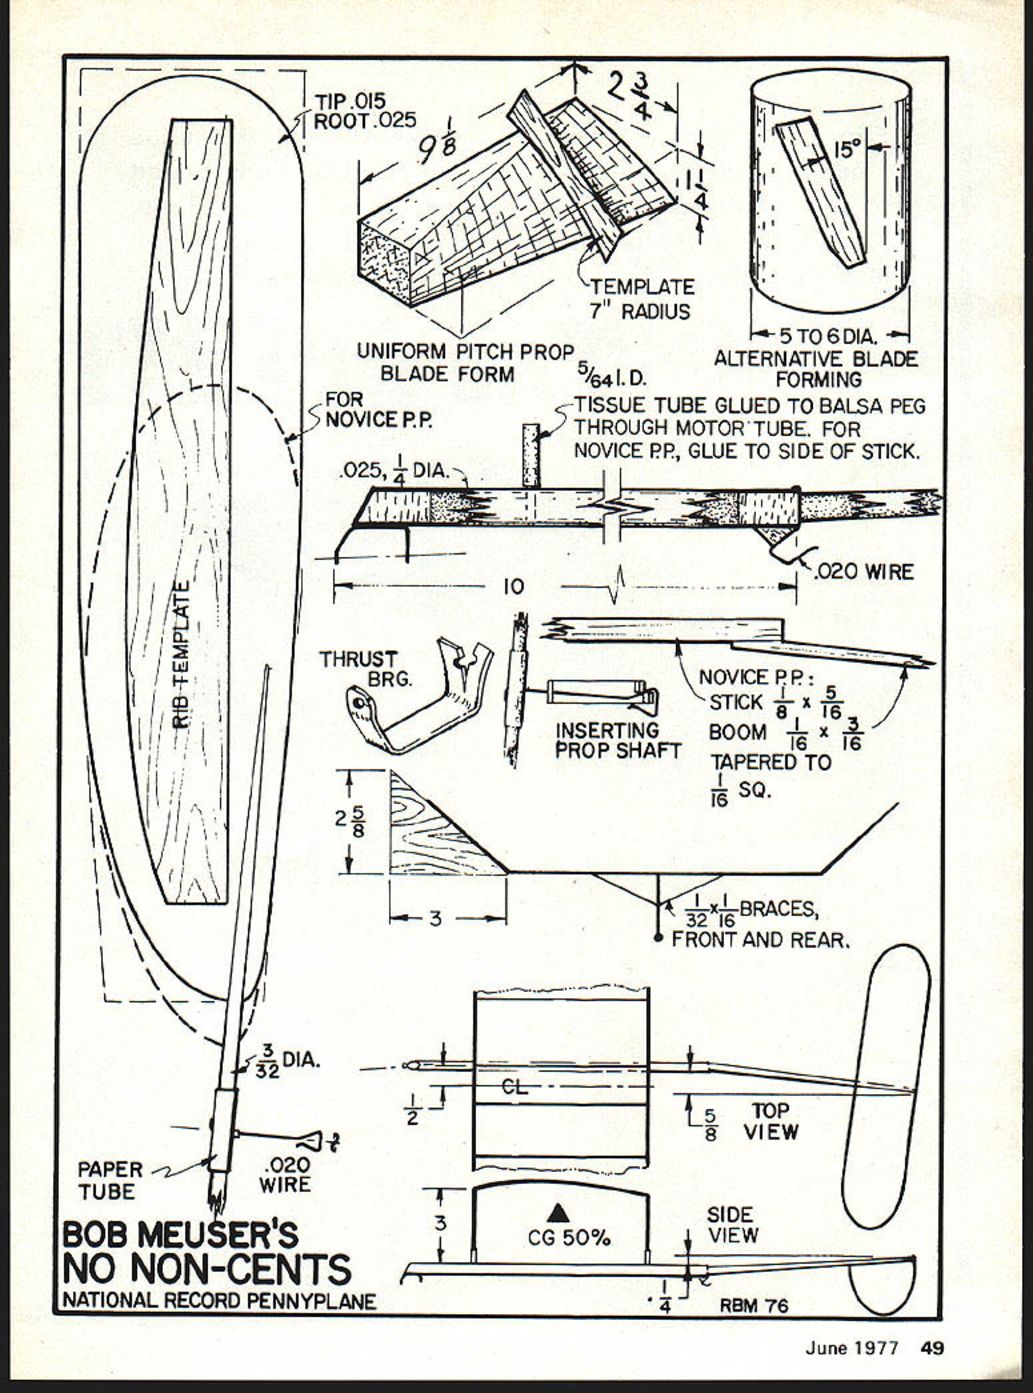
RBM 76 Off wing tips are indicated. Rudder and stab outlines could be squared off, too, of course. However, I would strongly urge you to take the trouble to make rounded tips. They are stiffer and less prone to warping, and although I'd be hard put to prove it, I think they fly better.
It's easy. Make a form from heavy illustration board, obtainable at art supply stores. Soak the strips in water for 10 minutes. Then bend the strip around the form, holding it under slight tension. Secure the ends in place with masking tape, and cook in an oven at 140 degrees for 3 hours.
The solid motor stick of the Novice Pennyplane version turned out to be lighter than the rolled tube motor stick of the Pennyplane. It isn't quite as stiff, but it certainly seems adequate. So if rolling balsa tubes isn't your cup of tea, and if you have some very light balsa, by all means use a solid stick for the Pennyplane. (Of course, you must use a solid stick for the Novice Pennyplane.)
The model uses down-thrust and side-thrust, so a double thrust bearing is essential. The thrust bearing shown is a bit difficult to make, but it works beautifully. A similar one can be purchased from Ray Harlan. (See list of suppliers at the end of this article.) Since the rubber motors used on these models might be more than twice the length of the motor stick, they tend to knot up rather severely. A large distance from the prop shaft to the motor stick is therefore essential. On mine, the distance is nearly 1/4 inch, and more would have been better. If your thrust bearing isn't that deep, glue a sliver of balsa between the thrust bearing and the motor stick. Taper the sliver to get the correct down-thrust angle. Indoor experts don't do this, but I always feel more comfortable with a few turns of glue-saturated thread wrapped around the thrust bearing and motor stick.
Note that the rear hook has an upward projection at the rear. This is to prevent the motor from falling off if it completely unwinds in flight. Some experts claim that if the motor unwinds completely, the model isn't correctly tuned and the flight time will not be good, so it doesn't matter if the motor falls off and the flight is voided. Incorrectly tuned models that had their motors unwind completely in the air have won contests. And occasionally a properly tuned model will unwind completely because it caught a thermal. Make the rear hook as shown!
Viewed from the rear, the back part of the prop shaft is bent into an S-shape. That kind of hook is easy to make if you simply bend the S-curve into the wire as the very first step. This can be done with round-nose pliers, or with a pair of small nails held in a vise. This type hook seems to keep the rubber motor centered quite well.
Front motor tube
- Glue vertical reinforcement to motor tube
- Bevel end of tube reinforcement
- Glue cap onto end
- Trim end cap flush with tube
Rear motor tube
- Glue vertical reinforcement to motor tube
- Glue wire hook over motor tube
- Glue gusset between hook and tube
- Glue tail boom to motor tube
The round, tapered sticks on which the prop blades are mounted might seem difficult to make, but they aren't. Tape a full sheet of 180-grit emery paper to the work board, and another to a large sanding block. Sand off the corners of a piece of medium-soft 1/4" sq. balsa. Then without holding the balsa piece, sand it between the two sheets of emery paper, using a diagonal or circular motion. The stick will come out perfectly round after a few strokes. The same trick is used for making the round wing posts. Tapering the ends of the prop arm is done, after getting it round, by tilting the sanding block.
Tissue tubes are used for the prop hub and for the wing-post sockets on the motor stick. A 2-inch strip of tissue is cut about a half-inch wider than the length of the finished tube. It is rolled onto a piece of smooth, clean music wire of the right diameter, while the tissue is saturated with cellulose-type model airplane cement. The outside will dry quickly, and while the inside is still soft, twist it free from the music wire, and push it off the end. After it dries thoroughly, cut the tube to length, discarding the uneven parts at the ends. If this procedure doesn't work at first, try again. Suddenly you will find yourself making perfect tubes, and you will wonder why you had so much difficulty on the first couple of tries.
The prop blades and their round balsa "arms" are assembled before the arms are inserted into the tissue-tube prop hub. On some props, I have cut a slot into the blade, and glued the tapered arm into the slot. That's too much work. More recently, I simply glue the blade onto the arm so that the arm is on the back or bottom of the blade.
The prop blades are sanded from flat sheet stock; 1/32" sheet is the stuff to use if sufficiently light wood can be obtained in that thickness. I usually sand mine down from 1/16 or 3/32" stock, because the light quarter-grain wood I need only seems to be available in those sizes. When sanding the sheet to thickness, use a piece of sandpaper taped to the work-board, to prevent the balsa sheet from sliding. And, use a large balsa sanding block, at least 3 x 8 in., 1/4 to 3/8" thick. Do not use fine sandpaper except for the few finishing strokes. Use 120-grit paper for most of the sanding, and do not press down. The finished thickness is about .015 at the tip, and .025 to .030 at the root of the blade. The completed 16-in. prop should weigh about 1 gram. If it is much lighter, the blades will probably be too flexible. The 12-in. prop should weigh no less than about 0.7 grams.
If you haven't built several Pennyplanes before, I strongly suggest that you use a prop no larger than 12 inches in diameter, and a pitch of no more than 20 inches. The first prop will probably be a bit of a bummer anyhow, so don't spend a lot of time making it, and consider it expendable. It is much easier to trim and tune a model with such a prop than one with a much larger prop. At our first contest, everybody showed up with huge props, influenced by Dennis Jaekel's Nats winners. By the end of the day everyone, including the winner, had chopped his prop down to around a 12-in. diameter. When you have qualified for the Ten Minute Pennyplane Club with a 12-in. prop, then try a larger one. You will be much happier.
Covering materials: For Pennyplanes, having wide chords and large, rather heavy props, the covering material must be pretty light. Condenser paper, Micro-Lite, and (shudder!) microfilm are candidate materials. For anyone who has used microfilm before, thick microfilm is the best choice. Once you get the hang of using it, it is far easier to use than either condenser paper or Micro-Lite. At least, that is what the local mike freaks tell me. And, inasmuch as I have always found condenser paper and Micro-Lite extremely difficult to work with, I can believe it. On the other hand, others I have talked to can't understand why I should have any trouble with these materials.
Aluminized (chrome, silver, whatever) Micro-Lite is more difficult to work with, and more expensive, than the plain stuff. Static charges make it want to roll itself into a soda-straw configuration. I have tried a number of home-brew concoctions—dilute rubber cement, in infinite varieties—but find Micro-X Condenser Paper Cement best for Micro-Lite. It also works well on condenser paper, strangely enough. Others report good success with various spray-can adhesives, such as 3-M Spray Mount.
Condenser paper is easier to use than Micro-Lite, I feel, but it is bad news if the model must survive humidity changes.
Some modelers say that it is best to seal the wood first with dope before applying the condenser-paper cement. By all means do not use colored dope, as I did on my first record model. Oh, colored dope works perfectly well, and I used it simply because that was the only thing I had in a spray can. The big problem with using colored dope as a sealer is explaining why you built your model out of red balsa wood!
The very last step in the assembly procedure is the gluing of the wing-post sockets to the motor stick. At this stage, the tail surfaces have been assembled and glued to the boom. Install the prop and a loop of rubber, or a dummy weight equal to the weight of the rubber motor—about 3 grams—midway between the motor hooks. Determine the balance point of the combination. Install the wing-post sockets at equal distances on either side of the balance point.
The positioning of the wing posts will affect the twist of the wing and the tilt of the stabilizer. Contrary to current practice, my models are rigged with no wing wash, and no stab tilt. But if there is any error at all, I would err toward the side of conventional practice; wash-in (leading edge up) on the left wing, left stab tip high. A few slivers of balsa tucked here and there, or a minor repositioning of the wing braces, will set things right.
Flying: Start with a loop of rubber about 18 in. long made from .085-wide stock. Tie the ends by making an overhand knot in both ends together, followed by a square knot or two tied with the ends. Put in about 500 turns, and fly the model. Adjust the angle of incidence of the wing until the model flies just short of the point of stalling. Increase the number of turns, and readjust the wing angle. As the power is increased, the wing adjustment will become more critical.
If you have 100 feet or more of ceiling height available, go for full winds, just short of the breaking point. If the model lands with several hundred turns left in the motor, shorten the motor and try again. If the model runs out of beans before it lands, switch to a longer motor. The model should land with just enough turns remaining in the motor to keep it from going slack.
Greater duration can be obtained by using wider rubber, provided the model can stand the added power. When the length of the motor is adjusted as described above, it will turn out to be considerably longer than the one made of narrower rubber, and will store more turns.
If you don't have 100 feet of headroom available, and don't want to risk banging your model around in the girders, you'll have to modify the procedure. Wind the motor fully, then back off turns, until the right flight altitude is obtained. The optimum length of rubber for such low-ceiling flying will be roughly that which results in the model landing with about the same number of turns left as you backed off when winding.
Transcribed from original scans by AI. Minor OCR errors may remain.

