
Northwest Dakota
By Clarence Haught
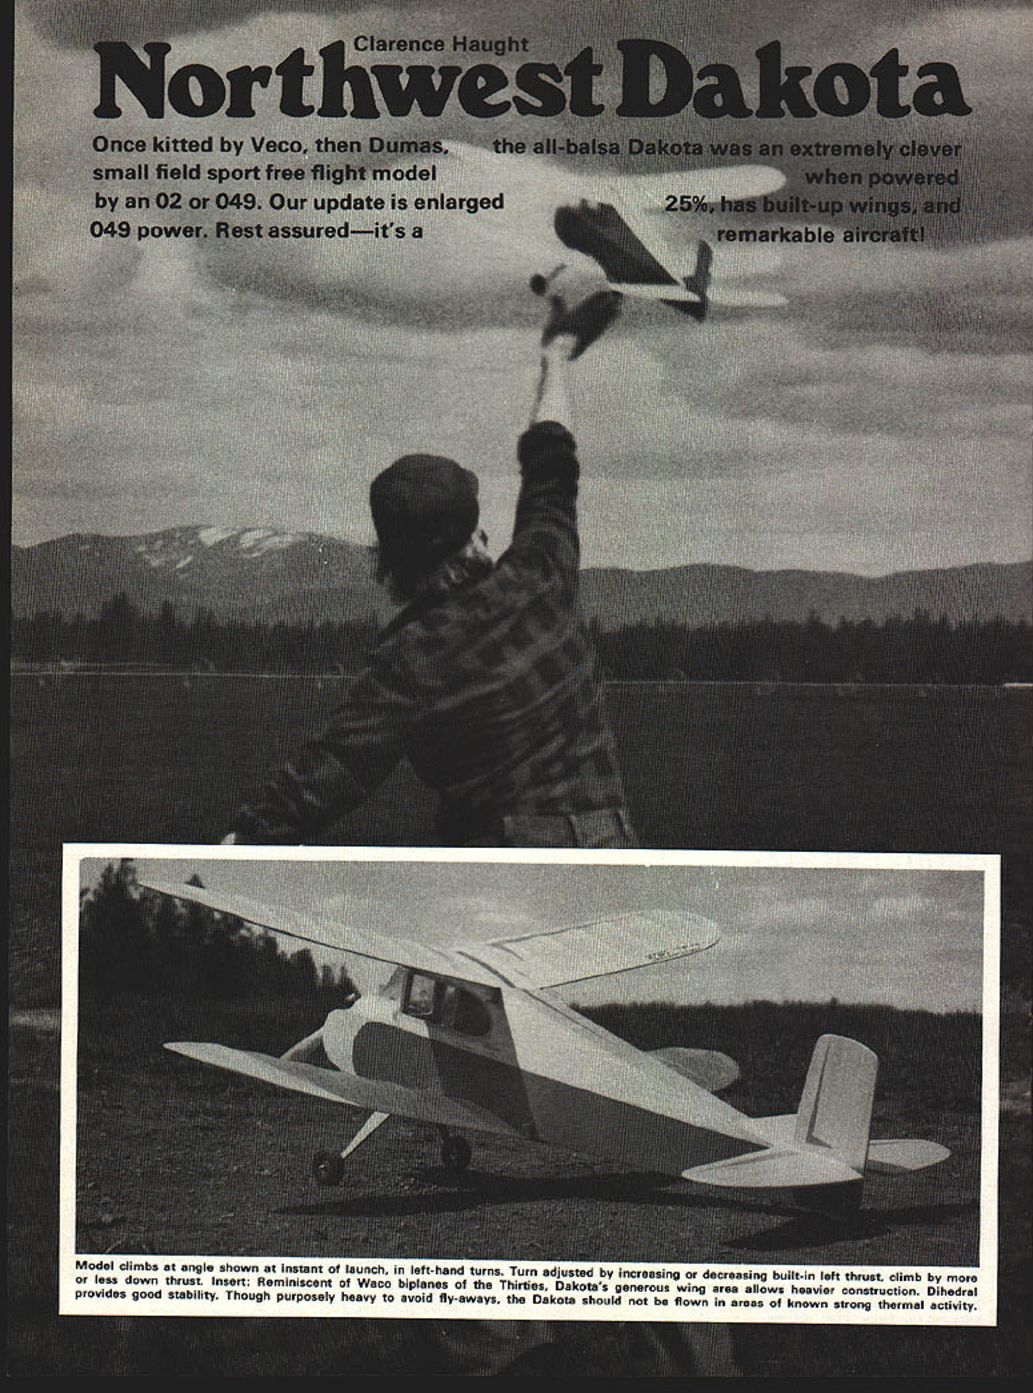
Once kitted by Veco and later by Dumas, the all-balsa Dakota was an extremely clever small-field sport free-flight model when powered by an .020 or .049 engine. Our update is enlarged 25%, has built-up wings, and uses .049 power. Rest assured — it's a remarkable aircraft!
Even if you've only been into modeling for a short time, you probably have a soft spot for that one special model. It may have been your first or your fiftieth model, but some models just turn out to be special. Maybe it was the way it flew or perhaps it had a classical appearance. Whatever the case, it lingers in the mind.
The Dakota is a cabin biplane, reminiscent of the old Waco cabins, designed for the infant engines that emerged in the post–World War II years. Construction was all balsa, with the exception of a few plywood parts, making for a rugged and durable model. Designed for sport flying, the little 24-inch span model would put in very acceptable flights on the relatively low-powered engines of the day.
I recently acquired a kit for the original design which went together in a couple of evenings. But there have been changes in powerplant design and the once-adequate .049 has now become far too much power for the smallest version. The kit model was fitted with a Cox Pee Wee .020 which proved ample power.
Given the abundance of Cox Baby Bee .049 and McCoy .049 engines now retired from brief careers in plastic ready-to-fly control-line models, a modernized version of the Dakota seemed appropriate for a sport free-flight model for young and old alike. Scaling the design up 25% results in a 30-inch wingspan. Built-up wings attached with rubber bands provide a better glide and less chance of damage than the rigidly attached sheet wings of the original. Such a model should be about right for the power output of the Baby Bee.
A few evenings later the new version was ready for testing. Hand-gliding a model of this type reveals little in the way of pronounced stalling or diving tendencies. After a couple of tosses to satisfy my curiosity the engine was started, tuned, and allowed to run out of fuel. A small measured amount of fuel, placed in the tank from a syringe, restarted the engine. The safest desired power pattern for a model of this type is to the left.
At first launch the ship wanted to go to the right and the climb was too steep. Corrections were applied and the next short hop looked great. With a large field and minimal wind, a generous fuel allowance was used. The ship climbed quite high until the engine quit and began a gentle spiral down. Suddenly the wings began to rock, the nose perked up, and the model ascended in strong lift. Five minutes later it was a speck and disappeared from view.
No dethermalizer had been incorporated in the design for three reasons:
- Simplicity of operation — the design should appeal to young and inexperienced fliers who do not need extra hassles.
- Pop-up tails require accurate keying to prevent misalignment and resultant trim changes in flight.
- Fuses used with a proper snuffer tube tend to be a fire hazard to flying-site owners unfamiliar with model airplanes and who might be alarmed by burning material projecting from a model.
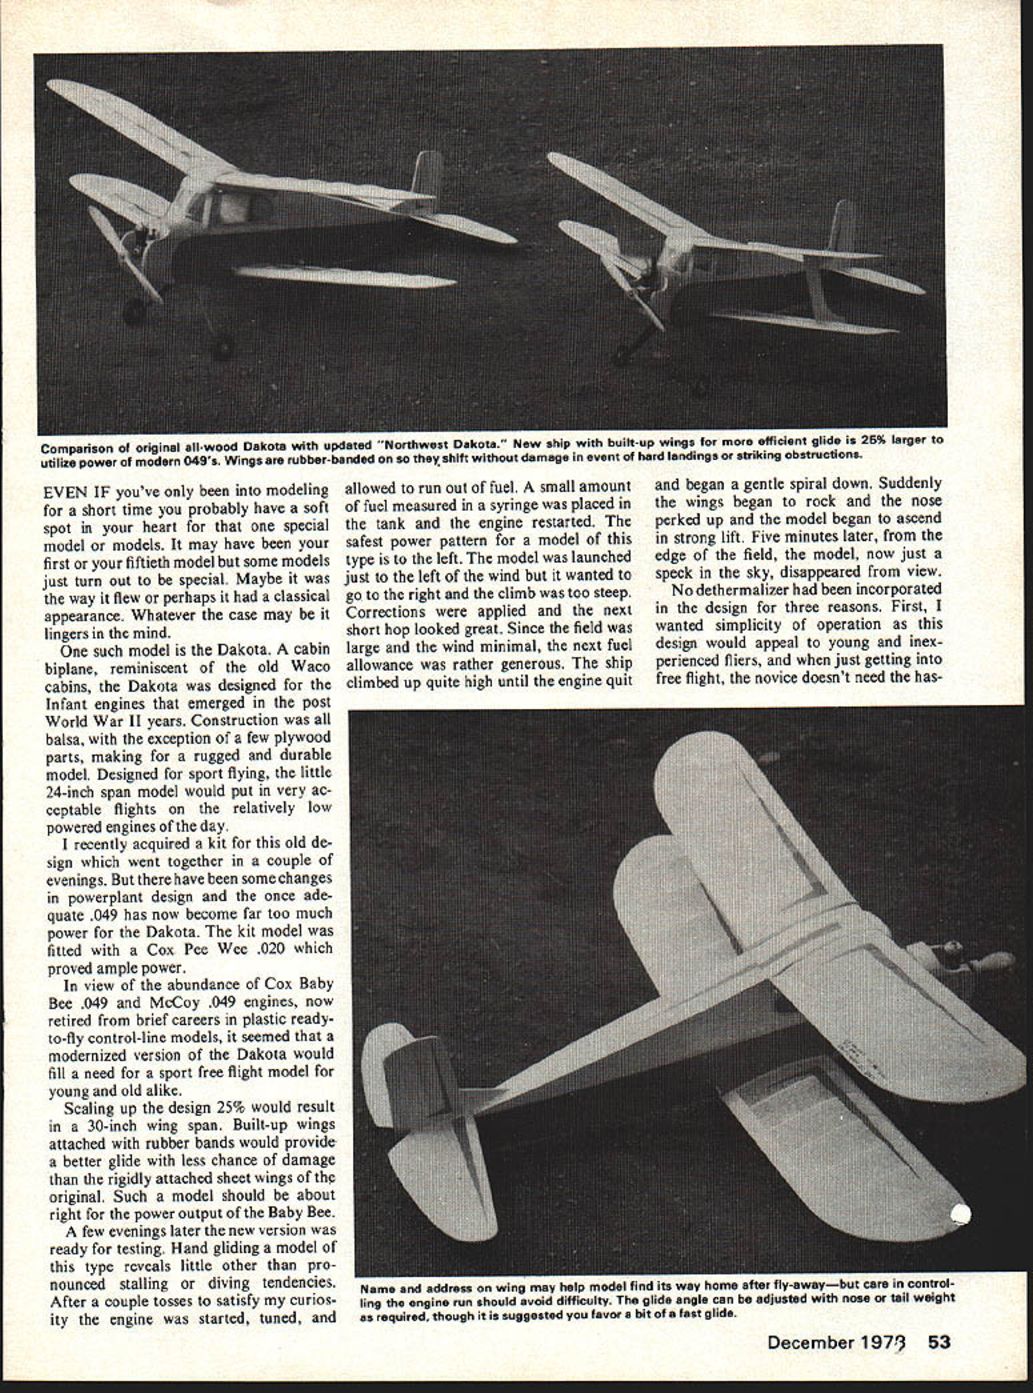
So the model flew away. Two hours later I received a phone call from a local golf pro informing me the model had landed on the fairway. Whew! A name and address on the wing may help the model find its way home after a fly-away — but care in controlling the engine run should avoid that difficulty. The glide angle can be adjusted with nose or tail weight as required; favor a slightly fast glide.
Comparison — original all-wood Dakota; Northwest Dakota
- New ship: built-up wings for a more efficient glide.
- Scaling up the design 25% results in a 30-inch wingspan to better utilize modern .049 engines.
- Built-up wings attached with rubber bands provide better glide and less chance of damage than the rigid sheet wings of the original, particularly in hard landings or when striking obstructions.
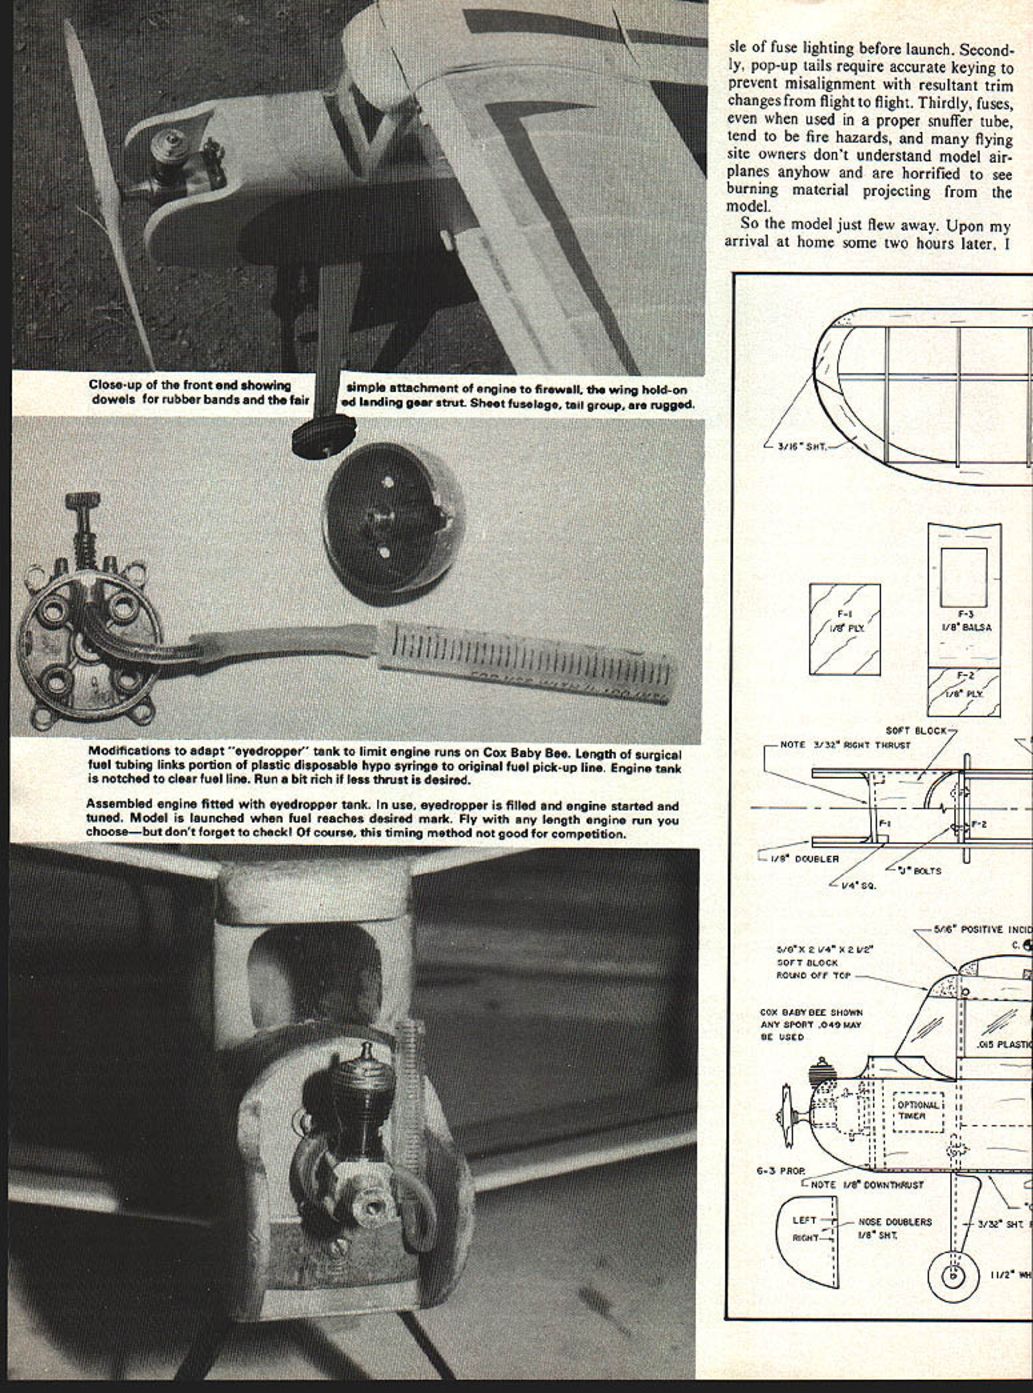
- Modifications adapt an "eyedropper" tank to limit engine runs on a Cox Baby Bee:
- Lengths of surgical fuel tubing link a portion of a plastic disposable syringe to the original fuel pick-up line.
- The engine tank is notched to clear the fuel line.
- Run the engine a bit rich if less thrust is desired.
Assembled engine fitted with an eyedropper tank:
- Fill the eyedropper and start and tune the engine.
- Launch when the fuel level reaches the desired mark.
- Fly with whatever length of engine run you choose — but check the fuel level carefully. (This timing method is not suitable for competition.)
Distance flown during one test was about three miles. The possibility of loss is greatly reduced by keeping engine runs short and building the model on the heavy side.
The best way to control the engine run is by use of a shut-off timer. However, timers are expensive and complicate the launch procedure for beginners. As an alternative:
- Use an eyedropper tank as shown above.
- Drill a hole in the side of the fuel tank so it may only be filled partially full.
- Use a calibrated syringe (disposable plastic type without needle, as sold in drug stores) to measure fuel.
Construction
General notes:
- Construction begins with the wings since they are needed to prepare the wing saddles on the fuselage.
- Wood selection is not critical; stay with medium-weight stock. Use your lightest wood for tail components and your heaviest in the nose and wings.
- Remember this is a biplane — you will need twice as many wing parts as it might first appear.
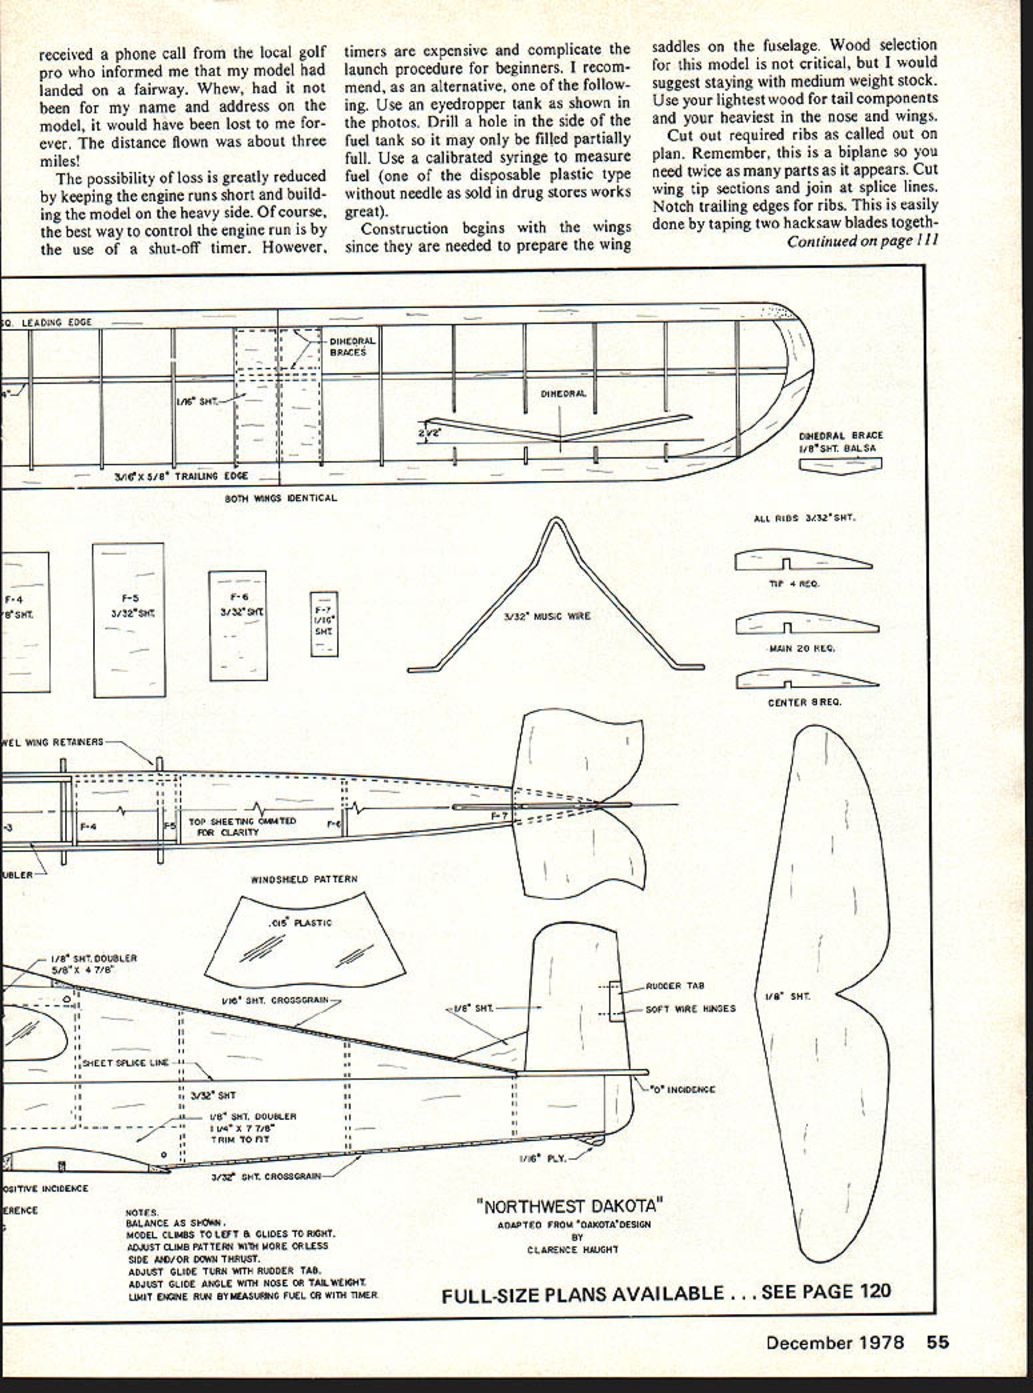
Wing building:
- Cut out required ribs as called out on the plan. Cut wing tip sections and join at splice lines.
- Notch the trailing edges for ribs. Tip: tape two hacksaw blades together to make a cutting tool the thickness of the ribs and saw the notches to the proper depth. Do not omit this step or you will lose considerable strength.
- Cover the plan with clear plastic or wax paper and pin leading and trailing edges in place. Fit wing tips and glue to leading and trailing edges.
- Place the spar in proper location and install wing ribs, using proper size ribs in the center section. Do not install the exact center rib at this time.
- Build two identical wings. When dry, remove from the plan and sand leading edges and tips to proper shape; blend everything into a smooth surface.
- Cut wings in two at center and bevel the edges of leading and trailing edges for joining at dihedral angle (use a sanding block).
- Pin one half of the wing to the bench, block up the other tip until it is 5 inches above the bench, and glue securely.
- Joining the two halves with glue and allowing to dry before final joining increases joint strength.
- Install 1/8" balsa dihedral braces and cut the center rib into sections and glue in place.
- Complete wing assembly by planking the center section and final touch-up sanding.
Fuselage and mounting:
- Cut 3/32" x 3/4" stock to the rough shape of fuselage sides and join upper and lower portions at the indicated sheet splice line. Trim to final shape.
- Install wing mount doublers (glue to fuselage sides before final shaping). Use the completed wing as a pattern for shaping the lower wing mount.
- Be sure the lower wing has 1/8" positive incidence and the upper wing has 5/16" positive incidence in relation to the forward fuselage bottom (the baseline).
- Stabilizer mounting surface should be at 0 incidence.
- Make one right and one left fuselage side.
- Join fuselage sides using a 1/8" plywood former at the wing saddle area. Install F-1 through F-4 formers and join fuselage top and bottom as shown on the plan.
- Install firewall and engine mount, making sure thrust line is correct.
- Install landing gear and reinforce as required.
- Fit and glue in place the center fuselage sheeting and sand to final shape. Add nose blocks and fairings and carve to shape. Install tail surfaces, sand to final shape, and align to fuselage.
Additional fuselage detail:
- Cut and install nose doublers; note the left side doubler is longer than the right to establish the required 3/32" left thrust. Also ensure the 1/8" down thrust is built into the doublers.
- Drill holes for wing retaining dowels while you can still stack the fuselage sides together to ensure alignment.
- Cut out all formers: F-1 and F-2 are plywood; the rest are balsa. F-3 is similar to F-2 but shorter.
- Bend landing gear wire and attach to F-2 with "J" bolts or metal clips.
- Join fuselage sides using F-1, F-2, F-3, and F-4. Lay the fuselage upside down on the wing mount on the building board and check alignment carefully before glue sets. Cardboard triangles help check alignment.
- When dry, pull fuselage sides together at the tailpost and install remaining formers.
- Sheet bottom with 3/32" balsa cross grain and sheet top with 1/16" balsa cross grain. Sand edges to fit fuselage sides.
- Carve nose block and upper windshield block from soft balsa and glue in place. Add fill-in strips to F-2 and F-3 in window cutouts. Sand completed fuselage smooth.
- Install landing gear fairings using light cloth as an aid to bonding and reinforcing. Tail skid is cut from plywood and glued to fuselage bottom.
Tail surfaces:
- Cut from light to medium-light sheet, sand to shape, and install on fuselage making sure the stabilizer is level and the rudder is straight.
- The small rudder tab is helpful in trimming. Hinge the rudder with soft wire.
Covering and finishing:
- You may use your favorite iron-on covering if you wish. The author prefers traditional finishing: brush two coats of clear butyrate dope to the structure with light sanding between coats to remove raised grain.
- Wings: cover with SGM Silkspan.
- Sheeted portions: cover with Japanese tissue. Cover wood parts in sections by laying dry tissue over the previously doped and dry surface and adhering by brushing a mixture of 25% dope and 75% thinner directly through the tissue.
- Tissue covering increases the strength of the balsa and improves resistance to abrasion and splitting. Trim can be applied by cutting patterns from colored Japanese tissue and adhering as above.
- After applying adequate dope to produce a luster, complete the model by adding wing retaining dowels, wheels, windows, and windshield. Install engine with number-two sheet-metal screws and check for balance.
- Add ballast to attain the center of gravity shown on the plan, or slightly nose heavy. Do not fly a tail-heavy model.
Warp removal:
- Check wings and tail surfaces for warps. Remove warps by holding the warped surface over steaming pan of boiling water, twist in the opposite direction, keep opposite tension on the surface, remove from steam, and hold until cool.
Flight testing and trimming
- Begin with limited engine runs. Use full power for initial tests because reduced-power tests will need to be repeated.
- Use enough wing bands to hold the wings firmly in place but not so tight as to prevent their shifting in the event of a crash.
- Launch slightly to the left of the wind with the nose level or slightly up.
- The model should climb in left circles. Control the rate of turn with side thrust by adding washers under the engine mount lugs.
- Control climb angle with down thrust as needed. Force the model to climb to the left.
- The glide direction may be either right or left, but not straight. Use the rudder tab to control glide turn. Some modelers prefer to climb left against right rudder tab and control right glide turn with the tab.
- Control glide angle by adding tail weight if the glide is too fast, and nose weight if too slow or to eliminate stalling.
- The model does not have a high-performance glide; most flight time will be under power. Obtain a gentle climb pattern to allow long power flights without gaining excessive altitude.
Notes and recommendations:
- The best way to control engine run is a shut-off timer, but for beginners an eyedropper tank or calibrated syringe works well and keeps operation simple.
- Keep engine runs short to reduce the chance of loss; build the model on the heavy side for better recovery.
- Put your name and address on the model in case of fly-away.
The Northwest Dakota is great to keep the kids busy while you trim up your latest competition bird or have fun flying yourself. Be sure to put your name and address on it!
Transcribed from original scans by AI. Minor OCR errors may remain.

