
NovaClone
Article: Bob Dorn with John Hunton
This Control Line club has found a new way to beat the building blahs. Modelers begin with given design specs, then improvise on them within specified limits and fly their creations in a variety of events. The results can be surprisingly individual.
Model Design: Bob Dorn — Plan: John Hunton
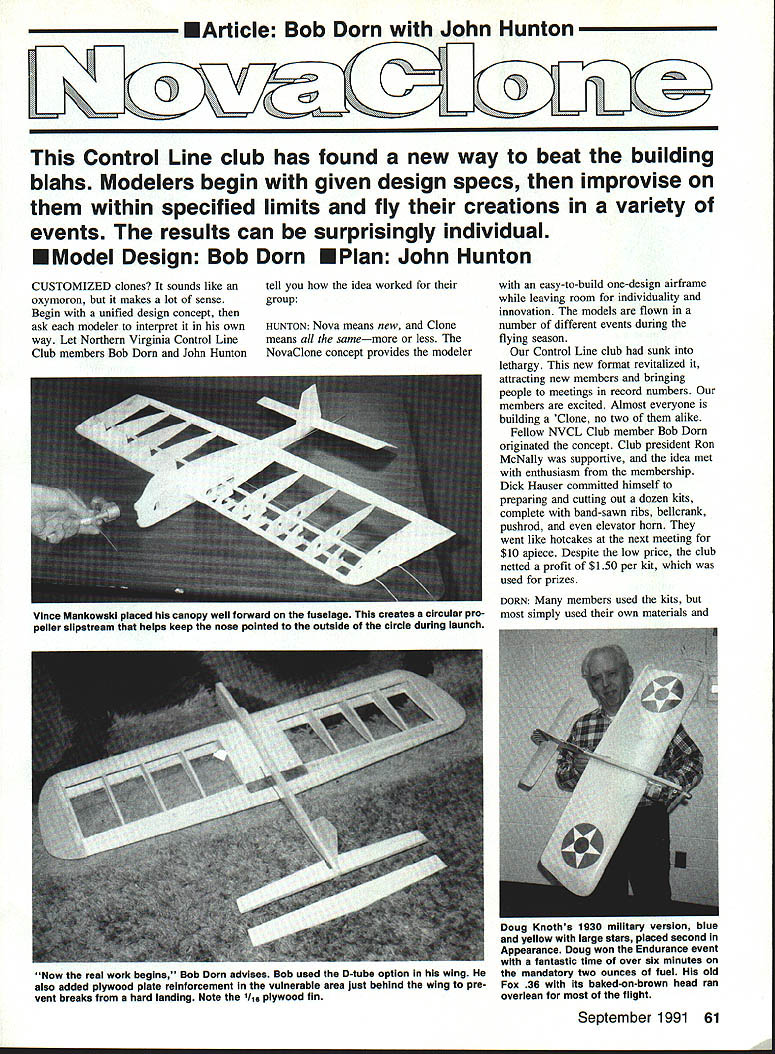
CUSTOMIZED clones? It sounds like an oxymoron, but it makes a lot of sense. Begin with a unified design concept, then ask each modeler to interpret it in his own way. Let Northern Virginia Control Line Club members Bob Dorn and John Hunton tell you how the idea worked for their group.
HUNTON: Nova means new, and Clone means all the same—more or less. The NovaClone concept provides the modeler with an easy-to-build one-design airframe while leaving room for individuality and innovation. The models are flown in a number of different events during the flying season.
Our Control Line club had sunk into lethargy. This new format revitalized it, attracting new members and bringing people to meetings in record numbers. Our members are excited. Almost everyone is building a "Clone," no two of them alike.
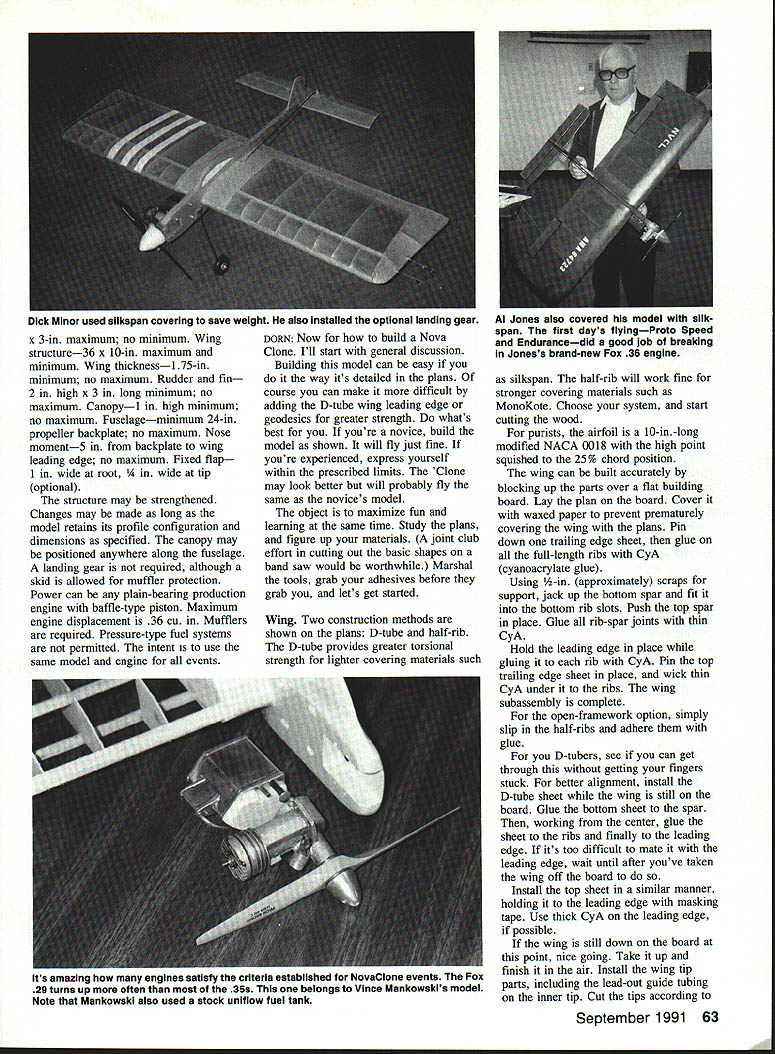
Fellow NVCL Club member Bob Dorn originated the concept. Club president Ron McNally was supportive, and the idea met with enthusiasm from the membership. Dick Hauser committed himself to preparing and cutting out a dozen kits, complete with band-sawn ribs, bellcrank, pushrod, and even elevator horn. They went like hotcakes at the next meeting for $10 apiece. Despite the low price, the club netted a profit of $1.50 per kit, which was used for prizes.
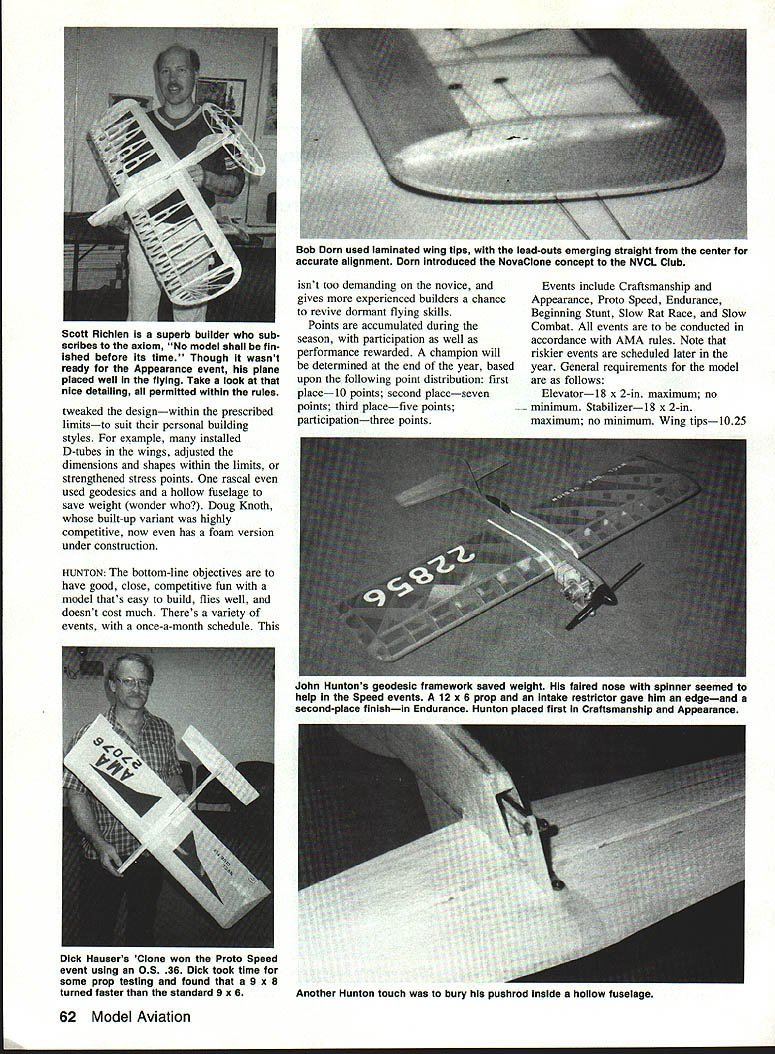
DORN: Many members used the kits, but most simply used their own materials and tweaked the design—within the prescribed limits—to suit their personal building styles. For example, many installed D-tubes in the wings, adjusted the dimensions and shapes within the limits, or strengthened stress points. One rascal even used geodesics and a hollow fuselage to save weight. Doug Knoth, whose built-up variant was highly competitive, now even has a foam version under construction.
HUNTON: The bottom-line objectives are to have good, close, competitive fun with a model that's easy to build, flies well, and doesn't cost much. There's a variety of events, with a once-a-month schedule. This isn't too demanding on the novice, and gives more experienced builders a chance to revive dormant flying skills.
Points are accumulated during the season, with participation as well as performance rewarded. A champion will be determined at the end of the year, based upon the following point distribution:
- First place — 10 points
- Second place — 7 points
- Third place — 5 points
- Participation — 3 points
Events include Craftsmanship and Appearance, Proto Speed, Endurance, Beginning Stunt, Slow Rat Race, and Slow Combat. All events are to be conducted in accordance with AMA rules. Note that riskier events are scheduled later in the year.
General model requirements
- Elevator — 18 x 2 in. maximum; no minimum.
- Stabilizer — 18 x 2 in. maximum; no minimum.
- Wing tips — 10.25 in. maximum.
- Landing gear — 3 in. maximum; no minimum.
- Wing structure — 36 x 10 in. maximum.
- Wing thickness — 0.075 in. minimum; no maximum.
- Rudder/fin — 2 in. high x 3 in. long minimum; no maximum.
- Canopy — 1 in. high minimum; no maximum.
- Fuselage — minimum 24 in.
- Propeller backplate — no maximum.
The structure may be strengthened. Changes may be made as long as the model retains its profile configuration and dimensions as specified. The canopy may be positioned anywhere along the fuselage. A landing gear is not required, although a skid is allowed for muffler protection.
Power can be any plain-bearing production engine with baffle-type piston. Maximum engine displacement is .36 cu. in. Mufflers are required. Pressure-type fuel systems are not permitted. The intent is to use the same model and engine for all events.
How to build a NovaClone (Dorn)
DORN: Now for how to build a NovaClone. I'll start with general discussion. Building this model can be easy if you do it the way it's detailed in the plans. Of course you can make it more difficult by adding the D-tube wing leading edge or geodesics for greater strength. Do what's best for you. If you're a novice, build the model as shown. It will fly just fine. If you're experienced, express yourself within the prescribed limits. The "Clone" may look better but will probably fly the same as the novice's model.
The object is to maximize fun and learning at the same time. Study the plans, and figure up your materials. (A joint club effort in cutting out the basic shapes on a band saw would be worthwhile.) Marshal the tools, grab your adhesives before they grab you, and let's get started.
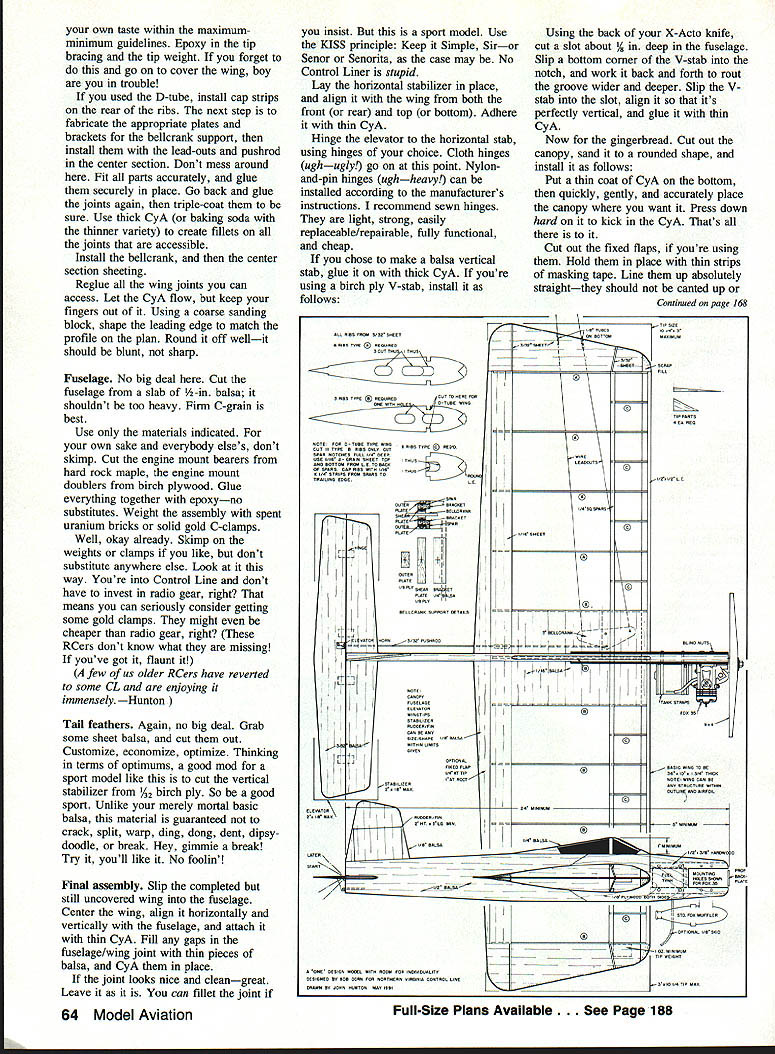
#### Wing
Two construction methods are shown on the plans: D-tube and half-rib. The D-tube provides greater torsional strength for lighter covering materials such as silkspan. The half-rib will work fine for stronger covering materials such as MonoKote. Choose your system, and start cutting the wood.
For purists, the airfoil is a 10-in.-long modified NACA 0010 with the high point squished to the 25% chord position.
Build the wing accurately by blocking the parts over a flat building board. Lay the plan on the board and cover it with waxed paper to prevent prematurely curing the wing with the plans. Pin down one trailing edge sheet, then glue on all the full-length ribs with thin CyA (cyanoacrylate glue).
Using 1/8-in. (approx.) scraps for support, jack up the bottom of the spar and fit it into the bottom rib slots. Push the spar in place and glue all rib-spar joints with thin CyA. Hold the leading edge in place while gluing it to each rib with CyA. Pin the top trailing edge sheet in place and wick thin CyA under it to the ribs. The wing subassembly is complete.
For the open-framework option, simply slip in the half-ribs and adhere them with thin CyA.
For D-tube construction:
- Install the D-tube sheet while the wing is still on the board for better alignment.
- Glue the bottom sheet to the spar, then working from the center glue the sheet to the ribs and finally to the leading edge.
- If it's difficult to mate to the leading edge, wait until after removing the wing from the board.
- Install the top sheet similarly, holding it to the leading edge with masking tape. Use thick CyA on the leading edge if possible.
- If the wing is still on the board, scribe and fit the dowel holes in the air.
- Install the wing tip parts, including the lead-out guide tubing on the inner tip, and cut the tips according to the plan.
- On the D-tube option, glue the leading edge to the top sheet with CyA.
If you used the D-tube, install cap strips on the rear of the ribs. Epoxy in the tip bracing and the tip weight. If you forget to do this and go on to cover the wing, you'll be in trouble.
Fabricate appropriate plates and brackets for the bellcrank support, then install them with the lead-outs and pushrod in the center section. Fit all parts accurately and glue them securely. Go back and glue the joints again, then triple-coat them to be sure. Use thick CyA (or baking soda with the thinner variety) to create fillets on all accessible joints.
Install the bellcrank, then the center section sheeting. Reglue all wing joints you can access and use a coarse sanding block to shape the leading edge to match the plan profile. Round it off well—it should be blunt, not sharp.
#### Fuselage
Cut the fuselage sides from medium-hard 1/8-in. balsa. Pin the sides over their patterns and sheet the bottom with 1/16-in. balsa. Fit the formers and add the nose blocks. Trim parts and assemble with aliphatic resin. Install the bellcrank and pushrod before sheeting the top.
If you use the optional landing gear, fit and epoxy the plywood plates and gear wire. Install the canopy and finish.
Use only the materials indicated. Cut the engine mount bearers from hard rock maple, the engine mount doublers from birch plywood. Glue everything together with epoxy. Weight the assembly appropriately—no need for extravagant clamps, but be sure the assembly is solid.
Power installation:
- The prototype used an old Fox .36.
- Use a spinner backplate and cut the prop backplate to fit.
- Solder the lead-out wire to the prop backplate and reinforce with epoxy.
- Balance the model at the point shown on the plans.
- Test-glide the model and correct trim as necessary.
For flying:
- Use a 12 x 6 prop with intake restrictor for Speed events.
- Use a 9 x 6 or 9 x 8 for Endurance, depending on your engine.
- Adjust throttle and needle for good runs.
Balance the model on the spar; any farther back and it may become unstable. If you're a beginner—or simply rusty—keep the center-of-gravity forward for better handling.
#### Tail feathers
Cut the tail surfaces from sheet balsa and customize as desired. A good modification for a sport model is to cut the vertical stabilizer from 1/8-in. birch ply for added durability.
#### Final assembly
- Slip the completed but still uncovered wing into the fuselage. Center it, align it horizontally and vertically, and attach it with thin CyA.
- Fill any gaps in the fuselage/wing joint with thin pieces of balsa and CyA them in place. Fillet the joint if you wish, but this is a sport model—Keep It Simple.
- Lay the horizontal stabilizer in place, align it with the wing from front and top, and adhere it with thin CyA.
- Hinge the elevator to the horizontal stab using your choice of hinges. Sewn hinges are recommended for weight, strength, and serviceability.
- If you make a balsa vertical stab, glue it on with thick CyA. For a birch ply V-stab, rout a 1/8-in.-deep slot in the fuselage, slip the V-stab into the slot, align it vertical, and glue with thin CyA.
- Cut out the canopy, sand it to shape, and attach with a thin coat of CyA on the bottom.
- Cut out fixed flaps (if used). Hold them with masking tape, tack glue them straight, remove the tape, then run a continuous flow of CyA down the joints and wipe off excess.
#### Finishing
- Sand the entire model: start with 100–150 grit, continue with 200–220 grit, and finish with 400 grit.
- Cover with fabric, film, or silkspan and finish with dope or polyurethane.
- Recommended coverings/finishes: Micafilm to cover voids and Aeroglaze dope for a light finish. The lighter the model, the better it will fly.
Flying
No secrets here. The NovaClone is relatively high performance (wing design is of Combat lineage). While the club specified 60-ft., .018 lines because of Rat Race and Combat events, for solo flying .015 lines will do fine. The model will fly the entire aerobatic pattern but can be pushed if desired.
Future possibilities
What's in the future for individualized clones? The possibilities are limitless. Perhaps generic clones could be flown in multi-events at national contests, with judging over multiple days: craftsmanship/appearance, mild events, then racing and Combat. What a blast.
DORN: Special update on the NVCL Club's NovaClone event in May 1991:
- There was a good turnout for the Craftsmanship and Appearance judging. AMA Executive Director Vince Mankowski brought his model—a pleasant surprise.
- Doug Knoth won the Endurance event with an overlean 6:36 run on his brown-baked Fox .35. He used two ounces of 10% nitro stock fuel.
- John Hunton finished second with a 12 x 6 prop and a restricted venturi.
- Dick Hauser won Proto Speed, using an O.S. .35 turning 69.6 mph. Vince Mankowski came in second at only 0.25 seconds slower.
Event results are shown below.
Scoring for Beginning Stunt (NVCL NovaClone Club Championship)
Scoring was based on the following maneuvers (points ranges shown where applicable):
- Starting & Launch within one minute — 0 or 5
- Launch & Level Flight (two laps) — 10–40
- Wingover (not reverse) — 10–40
- Three Inside Loops — 10–40
- Two Inside Loops — 10–40
- Three Outside Loops — 10–40
- Two Outside Loops — 10–40
- Two Horizontal Eights — 10–40
- Two Overhead Eights — 0–40
- Approach & Landing — 0–25
- Flight Pattern Points — 0–25
Note: A minimum of two laps was flown between maneuvers.
Final Standings
Proto Speed (mph)
- Dick Hauser — 69.6
- Vince Mankowski — 66.9
- John Hunton — 66.9
- Bob Klimkiewicz — 57.6
- Al Jones — 57.6
- Doug Knoth — 53.4
Endurance (time)
- Doug Knoth — 6:36
- John Hunton — 6:30
- Bob Klimkiewicz — 4:12
- Dick Hauser — 3:18
- Al Jones — 2:56
- Vince Mankowski — 0:40
Maybe it's time for your club to give the generic clone concept a try.
Transcribed from original scans by AI. Minor OCR errors may remain.

