
THE NOVICE
Simple A-1 glider was designed for son Robert for competition in the contest‑lively Taft area.
William H. Langenberg
THE CONCEPTION of this simple model took place on a hot May day in Taft, Calif., site of the 1973 USA Free-Flight Championships. My son Robert, age 12, had just experienced a frustrating day of competition in which he had failed to place in both 1/2 A and A junior gas, his favorite events. To me, his seeming failure was simply lack of luck, i.e., six perfect launches and power patterns, two light thermals, 5 minutes maxes. Two maxes in six attempts at Taft generally means "forget it," and I was prone to shrug it off as one of those days.
But not 12-year-old Robert. His reaction was, "Dad, I need to fly more events. The small towline gliders look interesting, and the competition doesn't look too sharp. How about helping me with one of those!"
I admired his spunk. Furthermore, he was right—the competition did not look nearly as tough as it was in the gas events. Upon our return home, however, a disconcerting discovery was made. We could find no A-1 glider kits which seemed to meet our needs, i.e., simplicity, durability, and consistent performance. I decided to design such a model. On this note, the Novice was born.
The limits on A-1 towline glider design are few: 279 sq. in. maximum wing and stab area, and a minimum of 5.08 ounces in weight. No pull-test for the towline is required. Almost total freedom of other design features is permitted.
Complying with these restrictions, the design of Novice was easy. Among our objectives were simplicity of design and construction, durability and consistency. The first two ruled out curved wing and stab planforms and built-up construction, and they dictated the use of a fiberglass rod tail boom. Ample dihedral instead of polyhedral was used to eliminate two wing joints. The wire wing joiners were employed to minimize folded wings on tow, a common problem among inexperienced flyers in towline events. A clockwork D-T timer was employed instead of a fuse because of local fire hazard regulations, but a simple fuse dethermalizer would be equally satisfactory. No gadgets of any kind were used. Consistency was enhanced by the forward C.G. (Center of Gravity) location with positive wing incidence, ample dihedral, and stable tow characteristics.
Construction
Stabilizer
Begin construction with the stabilizer, since it is similar to the wing, but easier to build. Select a piece of 1/16" x 3" x 36" very light, warp-free balsa. Cut off a piece 14" long, sand smooth on both sides and apply one coat of dope to the underside. Set this aside to dry. Next cut out the 1/16" bass rib template and sand to the shape shown on the plan. Using this template cut out nine stab ribs from 3/32" soft sheet balsa. Pin ribs together and sand to shape. Note ribs are longer than the stab chord; this is done for a reason. Pin ribs to the plan through the overhang at each end. Next carefully glue the 1/16" x 1/4" x 14" precut balsa sheet, doped surface down, to the ribs. Be sure to pin it carefully to the ribs so that the true airfoil shape is obtained. When dry, remove the stab from the building board, add the D-T rubber band hooks, D-T string, wire and reinforcing members under the leading and trailing edge of the stab. Cut off the excess leading and trailing edges and sand the entire stab to shape. Apply three coats of dope, sanding the upper surface smooth after each coat, and set aside the stab to dry and season.
Rudder
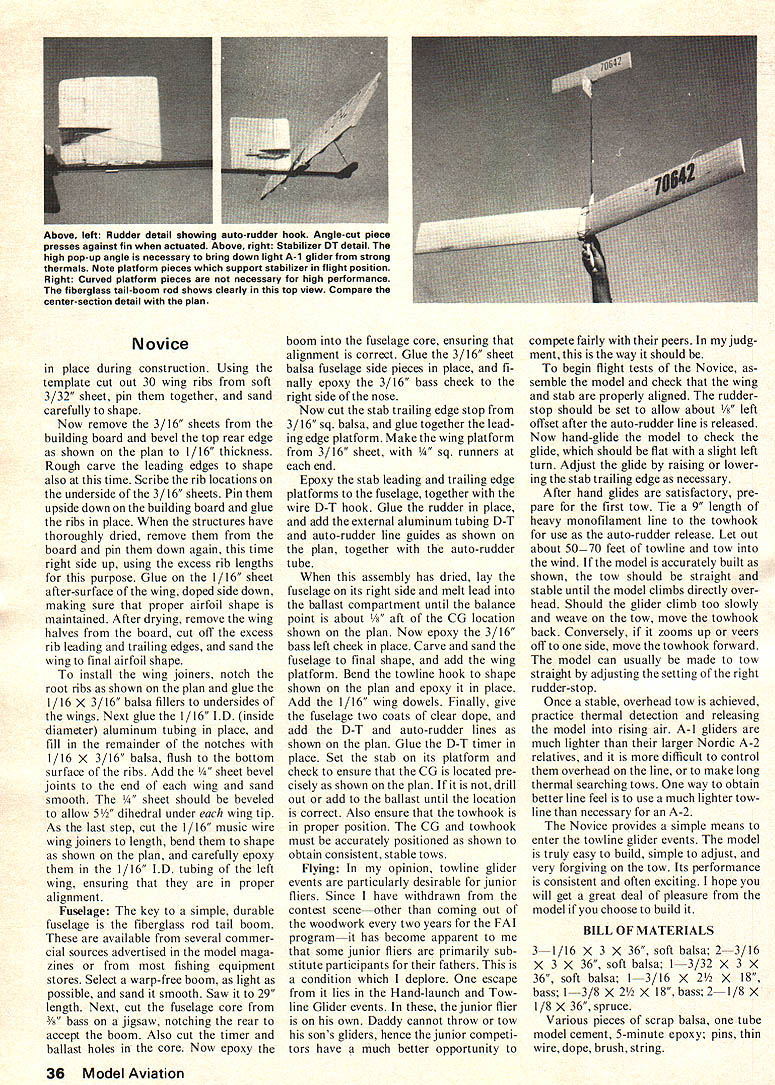
The rudder is cut from the same piece of soft 1/16" x 3" sheet balsa that produced the stab. It is 2-1/4" long. Sand both sides smooth and apply one coat of dope. Next, cut off the movable rudder and rejoin it with cloth hinges as shown on the plan. Add the 1/16" hard balsa rudder stops on both sides. Cement the rubber band and auto-rudder hooks in place, and give the entire assembly two more coats of dope.
Wing
Start the wing by selecting two sheets each of soft 3/16" x 3" x 36" and 1/16" x 3" x 36" balsa. Cut off 24" lengths. Dope one side of each. Next pin the two 3/16" sheets to the workbench, doped side down, glue 1/8" sq. spruce leading edges in place. Cut out the 1/16" bass rib template and sand carefully to the shape shown on the plan. Using the template cut out 30 wing ribs from soft 3/32" sheet balsa. Pin them together and sand carefully to shape. Now remove the 3/16" sheets from the building board and bevel the top rear edge as shown on the plan to 1/16" thickness. Rough carve the leading edges to shape at this time also. Scribe rib locations on the underside of the 3/16" sheets. Pin the assembly upside down to the building board and glue the ribs in place. When the structures have thoroughly dried, remove the board and pin down again, this time right side up using the excess rib lengths for that purpose. Glue the 1/16" sheet after-surface to the wing, doped side down, making sure the proper airfoil shape is maintained. After drying, remove the wing halves from the board, cut off the excess rib leading and trailing edges, and sand the wing to final airfoil shape.
To install the wing joiners, notch the root ribs as shown on the plan and glue the 1/16" x 3/32" bass fillers to undersides of the wings. Next glue the 1/16" I.D. aluminum tubing in place, and fill in the remainder of the notches with 1/16" x 3/16" balsa, flush to the bottom surface of the ribs. Add the 1/4" sheet bevel joints to the end of each wing and sand smooth. The 1/16" sheet should be beveled to allow 5/8" dihedral under each wing tip. As the last step, cut the 1/16" music wire wing joiners to length, bend them to shape as shown on the plan, and carefully epoxy them in the 1/16" I.D. tubing of the left wing, ensuring that they are in proper alignment.
Fuselage: The key to a simple, durable fuselage is the fiberglass rod tail boom. These are available from several commercial sources advertised in the model magazines or from most fishing equipment stores. Select a warp-free boom, as light as possible, and sand it smooth. Saw it to the length shown on the plan. Next, cut the fuselage core from 3/8" bass or an 1/8" square, notching the rear to accept the boom. Also cut the timer and ballast holes in the core. Now epoxy the boom into the fuselage core, ensuring that alignment is correct. Glue the 3/16" sheet balsa fuselage side pieces in place, and finally epoxy the 3/16" bass cheek to the right side of the nose. Now cut the stab trailing edge stop from 3/16" sq. balsa, and glue together the leading edge platform. Make the wing platform from 3/16" sheet, with 1/4" sq. runners at each end.
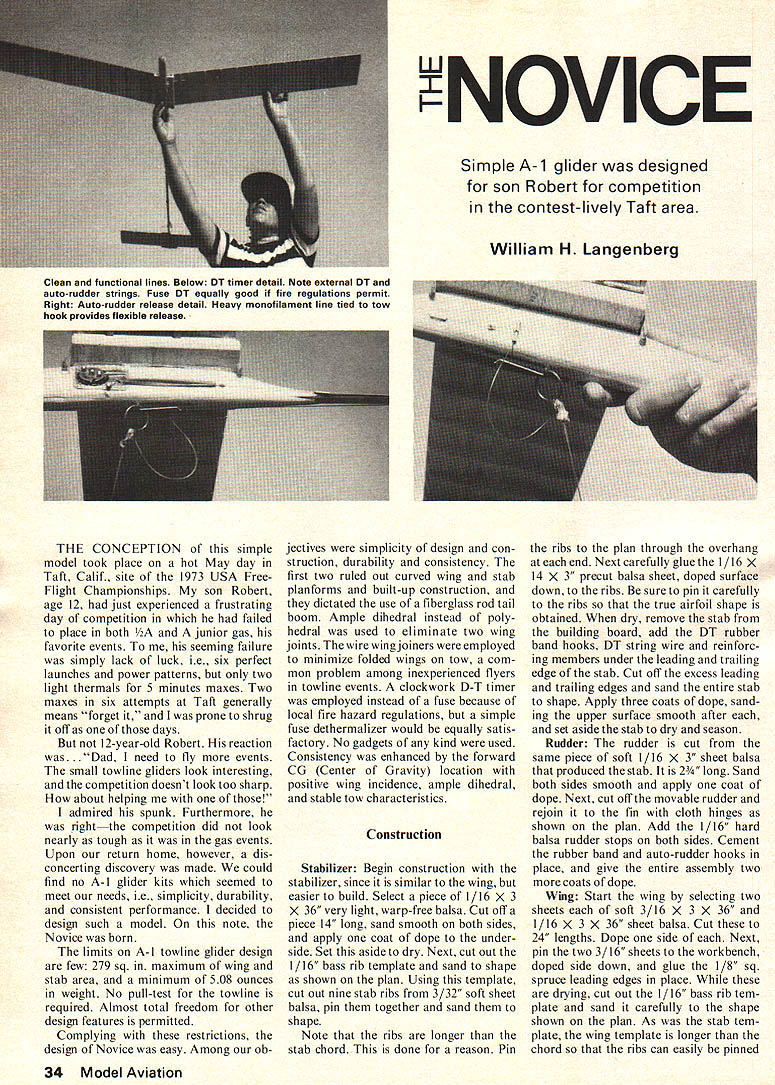
Epoxy the stab leading and trailing edge platforms to the fuselage, together with the wire D-T hook. Glue the rudder in place, and add the external aluminum tubing D-T and auto-rudder line guides as shown on the plan, together with the auto-rudder line.
When this assembly has dried, lay the fuselage on its right side and melt lead into the ballast compartment until the balance point is about 1/8" aft of the CG location shown on the plan. Now epoxy the 3/16" bass left cheek in place. Carve and sand the fuselage to final shape, and add the wing platform. Bend the towline hook to the shape shown on the plan and epoxy it in place. Add the 1/16" wing dowels. Finally, give the fuselage two coats of clear dope, and add the D-T and auto-rudder lines as shown on the plan. Glue the D-T timer in place. Set the stab on its platform and check to ensure that the CG is located precisely as shown on the plan. If it is not, drill out or add to the ballast until the location is correct. Also ensure that the towhook is in proper position. The CG and towhook must be accurately positioned as shown to obtain consistent, stable tows.
Flying: In my opinion, towline glider events are particularly desirable for junior fliers. Since I have withdrawn from the contest scene—other than coming out of the woodwork every two years for the general program—it has become apparent to me that some junior fliers are primarily substitute participants for their fathers. This is a condition which I deplore. One escape from this is the Hand-launch and Towline Glider events. In these, the junior flier is on his own. Daddy can assist by handling the big gliders, hence the junior competitors have a much better opportunity to compete fairly with their peers. In my judgment, this is the way it should be.
To begin flight tests of the Novice, assemble the model and check that the wing and stab are properly aligned. The rudder stop should be set to allow about 1/8" left offset after the auto-rudder line is released. Now hand-glide the model to check the glide, which should be flat with a slight left turn. Adjust the glide by raising or lowering the stab trailing edge as necessary. After hand glides are satisfactory, prepare for the first tow. Tie a 9' length of heavy monofilament line to the towhook for use as the auto-rudder release. Let out about 50–70 feet of towline and tow into the wind. The model should be accurately built as shown; the tow should be straight and stable until the model climbs directly overhead. Should the glider climb too slowly and weave on the tow, move the towhook back. Conversely, if it zooms up or veers off to one side, move the towhook forward. The model can usually be made to tow straight by adjusting the setting of the right rudder stop.
Once a stable, overhead tow is achieved, practice thermal detection and releasing the model into rising air. A-1 gliders are much lighter than their larger Nordic A-2 relatives, and it is more difficult to control them overhead on the line, or to make long thermal searches. One way to obtain better line feel is to use a much lighter towline than necessary for an A-2.
The Novice provides a simple means to enter the towline glider events. The model is truly easy to build, simple to adjust, and very forgiving on the tow. Its performance is consistent and often exciting. I hope you will get a great deal of pleasure from the model if you choose to build it.
BILL OF MATERIALS
- 3 — 1/16" x 3" x 36", soft balsa
- 2 — 3/16" x 3" x 36", soft balsa
- 1 — 3/32" x 3" x 36", soft balsa
- 1 — 1/4" x 2" x 18", bass
- 1 — 3/8" x 3" x 36", bass
- 2 — 1/8" x 3/8" x 36", spruce
- Various pieces of scrap balsa, one tube model cement, 5-minute epoxy; pins, thin wire, dope, brush, string.
Transcribed from original scans by AI. Minor OCR errors may remain.

