
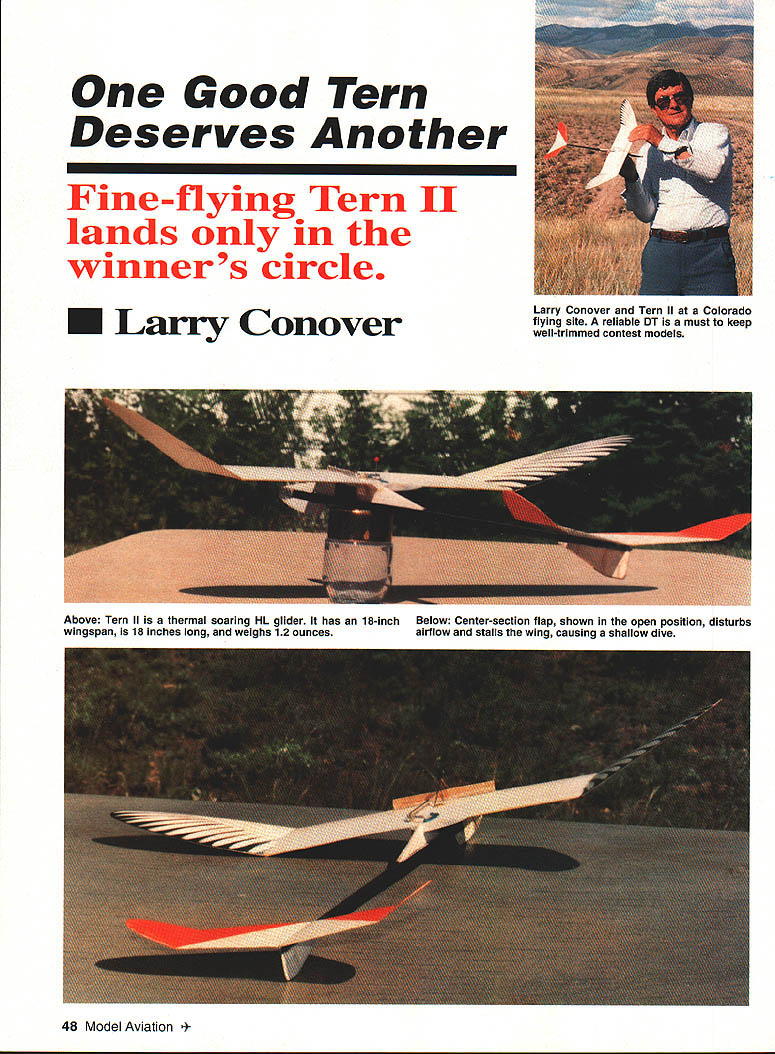
One Good Tern Deserves Another
Fine-flying Tern II lands only in the winner's circle.
Larry Conover
IN THEIR QUEST for theory and knowledge of flight, the Wright brothers studied birds. Many before them had also watched the soaring flight of eagles and gulls, but lacked the careful attention to detail and the creative capacity the Wrights possessed.
Others "talked" a good flight long before they attempted to brave the unknown elements of the ether. The French were being hailed as the world's greatest aviators before they ever completed a circular flight.
Wilbur Wright cut through to the truth when he answered some critics. He observed: "The parrot talks more than any bird, but is a rather poor flier."
With his words in mind, I searched bird books for a gull-like creature that could soar in nearly all contest conditions. The tern family filled the bill—graceful, more streamlined than gulls, good ground skimmers, agile, and great at picking up lift.
But before we get into the hand-launched glider (HLG) designs, let's take a look at those exciting days of yesteryear when such Chicago glider pitchers as Milt Huguelet and Wally Simmers (later to become Hall of Famers) were setting the pace for both the East Coast hotshots and the West Coast thermal thumbers.
In those early days most hand-launched gliders looked pretty much alike. Many V-dihedral gliders with swept wings and long noses can be seen in the older Zaic Yearbooks. Polyhedral wings became popular in the 1940s a la Goldberg's Zipper. Later, tail moment arms stretched out, and noses were shortened.
Another real departure in hand-launched technology that I remember was Ray Acord's Monster. The model, with its huge 30-inch wingspan and six-inch chord, held the Junior, Senior, and Open records back in the early 1950s—a true California thermal catcher. It was the first glider I saw that sported both a guppy and a dethermalizer (DT). I borrowed both features for my Flanger designs.
Note: There is no continuing article text on this scanned page — it consists entirely of the Tern II full-size plans, construction labels, and captions (no body-copy continuation of the article).
I had found that a sharp leading-edge airfoil was most stable for models flying at low Reynolds numbers. It starts a turbulation process early into a stall and helps keep the flow attached to the wing surface.
In the '50s and '60s, we knifed through the air with sharp leading edges and generous polyhedral, but the general layout copied those who had tested and experimented before us.
Another real departure in the '70s and '80s was the wonderful creative work of Mark Drela and his brother. They did very well with their high-tech models, which featured folding wings, tissue covering, carbon fiber—the list goes on. The Buddenbohm boys, with their Silly Putty DT, put a capper on recent HLG technology.
Today, 25 years after the days of my strong-arm launches, it's becoming apparent that innovation is the best approach. (So whose arm lasts forever?)
When I studied bird configurations, I noted the swept-back tips, the short nose, and the forked tail that twisted and tilted for roll and rudder at the same time. Terns have an ability to roll into any upcurrent and ride the lift. They often ride mechanical lift of waves, knolls, and trees.
And so our Tern II has swept wing tips, a short nose, polyhedral tail, very little subrudder and a pelican-style guppy. The long spruce tail boom is not tern-style, so you might want to substitute hard, stringy balsa to keep the tail light and weight down.
This glider is not designed to be a dead-air floater. Its greatest talent is nosing up into approaching lift and wheeling around in a short turn to pick up the little risers. In a full-blown thermal, it just rides up like a hawk until the DT cuts in.
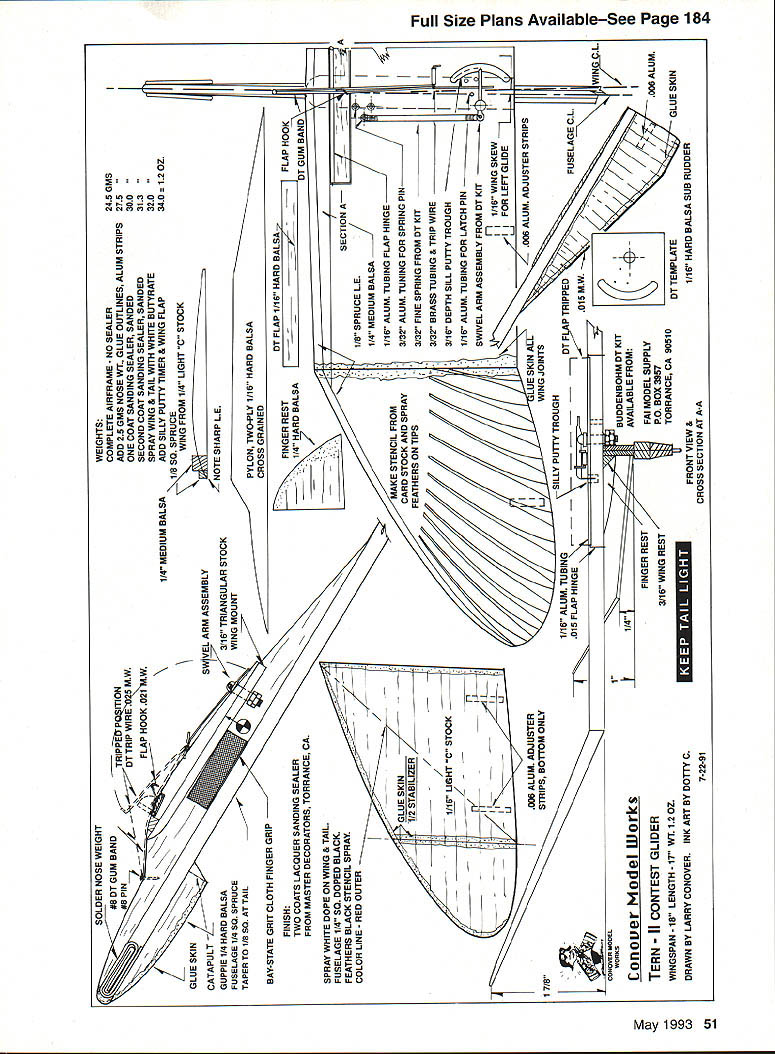
Tern II
- Type: Outdoor HLG
- Wingspan: 18 inches
- Expected flying weight: 1.2 ounces
- Type of construction: Solid balsa and spruce
- Type of covering/finish recommended: Lacquer sanding sealer
Wing
Select light 1/4-in. C stock, and white-glue a hard 1/4-in. square to the leading edge. Put a 1/8-in. square spruce in front of that. Note that the long center span is one piece. Use a template of the airfoil section to get both sides equal. Taper the tips before airfoiling. Don't worry about the DT installation until the model is finished and has been flown a few times.
Fuselage
The fuselage is constructed using 1/4-in. square spruce or hard, stringy balsa, and is tapered as the plans show. The pylon is hard 1/16-in. sheet, cross-grained in two layers, and the guppy is hard 1/16-in. sheet. The triangular wing saddle is hard 3/32-in. square balsa, split in half. Keep the tail end light.
Tail
The stabilizer should be medium-light 1/16-in. C stock, tapered and airfoiled like the wing. The subrudder is hard 1/16-in. sheet with a .015 wire skid—it takes a beating on cartwheels.
Finish
Use your favorite sealer, but if you can find it, try the lacquer sanding sealer from Master Decorators. I believe it even beats the old Testors sealer.
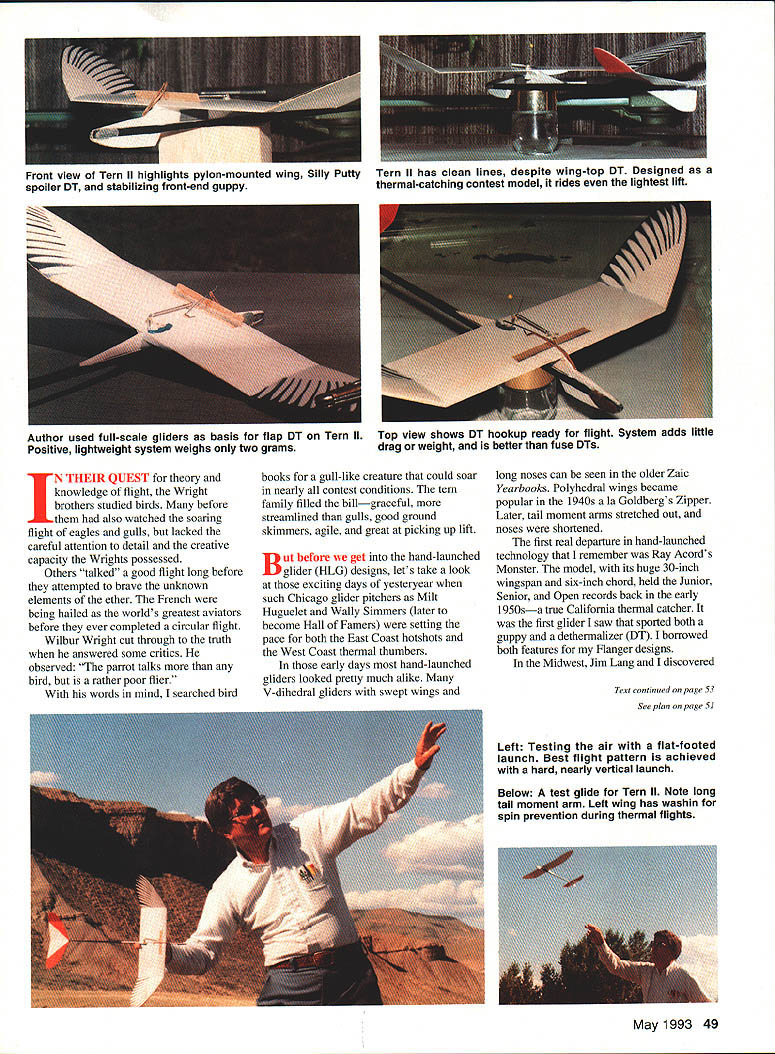
Spoiler flap
I was only about six years late when I discovered the Silly Putty timer. The West Coast fliers have used it with great success, according to Gary Buddenbohm, who manufactures it and whose workmanship is excellent. Ed Dobly markets the timers through FA Model Supply—the address is on the plans. It really is worth the few extra bucks.
A good DT is about as important as the American Express card: don't leave home without it! If you have fussed with fuses as I have over the years, you'll love this DT. It resets in less than 10 seconds, and the action is reliable.
A full-scale soaring glider I saw years ago is responsible for my decision to use a wing spoiler flap. It's a natural for the Silly Putty timer, because the mechanism is concentrated in the wing and adds only two grams to the weight—a pittance.
My drawing of the spoiler should be clear, but here are a couple of hints. The flap hinge is secured with an .015 wire that runs through the entire length of the tubing. It is a good idea to glue silk over the tubing.
The little flap hook will surprise you, as it did me. When the trip lever flips up, the rubber band slips along the length of it (not a normal use of the trip lever) and engages the flap hook (if you have the proper dogleg bend in it). This lifts the flap up and helps the trip lever keep the flap steady in the wind. Drawing it took a lot longer than installing the real thing.
To install, just follow the step-by-step instructions that come with the DT kit.
The aerodynamics of it
The lift on the center of the wing is killed when the spoiler flips up, which drops the nose. When the turbulent flow reaches the tail, it upsets the whole bird, so the model comes down in a controlled shallow dive (about 20°). No spiral dives. No flipping around in a boomer. It flies out of it and down.
All that bobbing and sitting on top of the wing may cause some worry. Do not fret. The climb or glide doesn't seem to be affected, but it does make it a real joy to test-fly the bird.
Flight pattern
This glider has an uncanny ability to roll out of the worst pullouts. Rather than stalling off the top, it rolls over into a glide circle instead of screaming back down. It is a good thermal hunter. It noses up into the edge of lift turbulence and whips around into the thermal. Let it ride on the edge of a stall—just keep the circle small. Some wash-in on the left wing will keep it up in a tight circle. Be wary of using rudder for turn. The 1/16-inch wing skew (see plan) will give you a natural left turn.
The best launching technique is to throw it hard, nearly straight up, into a thermal. You laugh—everybody tries to fly thermal air. Tries.
If you want to be a winner, get Dave Thornbury's Old Buzzard's Soaring Book. That old buzzard knows his air currents. Just make sure to pull the release pin on the DT, and have that Honda handy...
Transcribed from original scans by AI. Minor OCR errors may remain.

