

OS2U Kingfisher
Richard L. Perry
Introduction
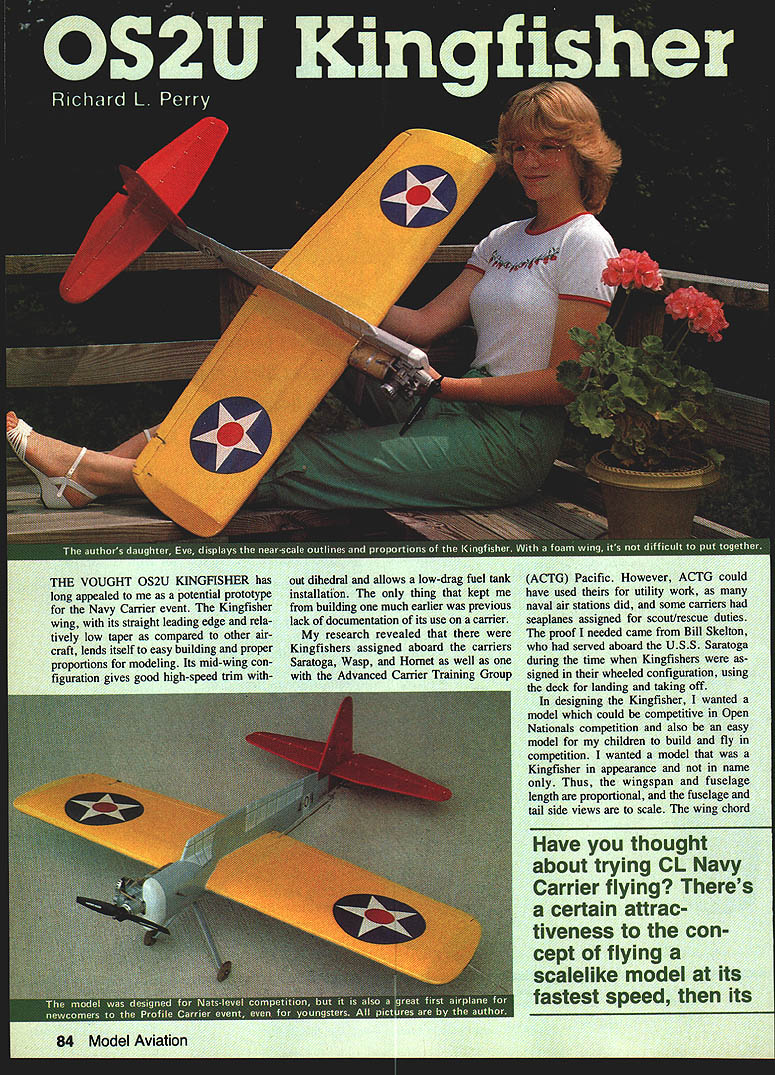
The Vought OS2U Kingfisher has long appealed to me as a potential prototype for the Navy Carrier event. The Kingfisher's wing, with its straight leading edge and relatively low taper compared to many other aircraft, lends itself to easy building and proper proportions for modeling. Its mid-wing configuration gives good high-speed trim without dihedral and allows a low-drag fuel tank installation.
My research revealed Kingfishers assigned aboard the carriers Saratoga, Wasp, and Hornet, as well as with the Advanced Carrier Training Group (ACTG) Pacific. ACTG machines could have been used for utility work, as many naval air stations did, and some carriers had seaplanes assigned for scout/rescue duties. The proof I needed came from Bill Skelton, who served aboard USS Saratoga during the period when Kingfishers were assigned in their wheeled configuration, using the deck for landing and taking off.
Design goals
I wanted a model that could be competitive in Open Nationals competition and also be easy enough for my children to build and fly in competition. I wanted the model to be a Kingfisher in appearance, not in name only. Accordingly:
- Wingspan and fuselage length are proportional; fuselage and tail side views are to scale.
- The wing chord was enlarged slightly and the tips shaped to allow good prop-hanging.
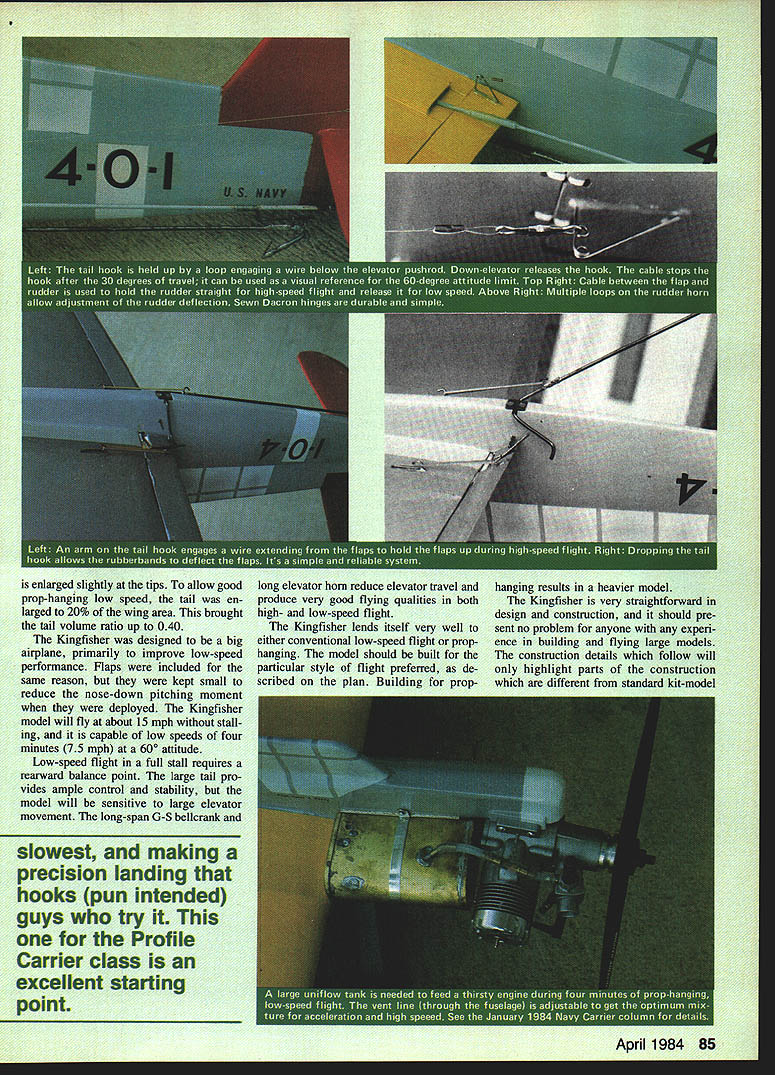
- The low-speed tail was enlarged 20% and the wing area increased to bring the tail-volume ratio to 0.040.
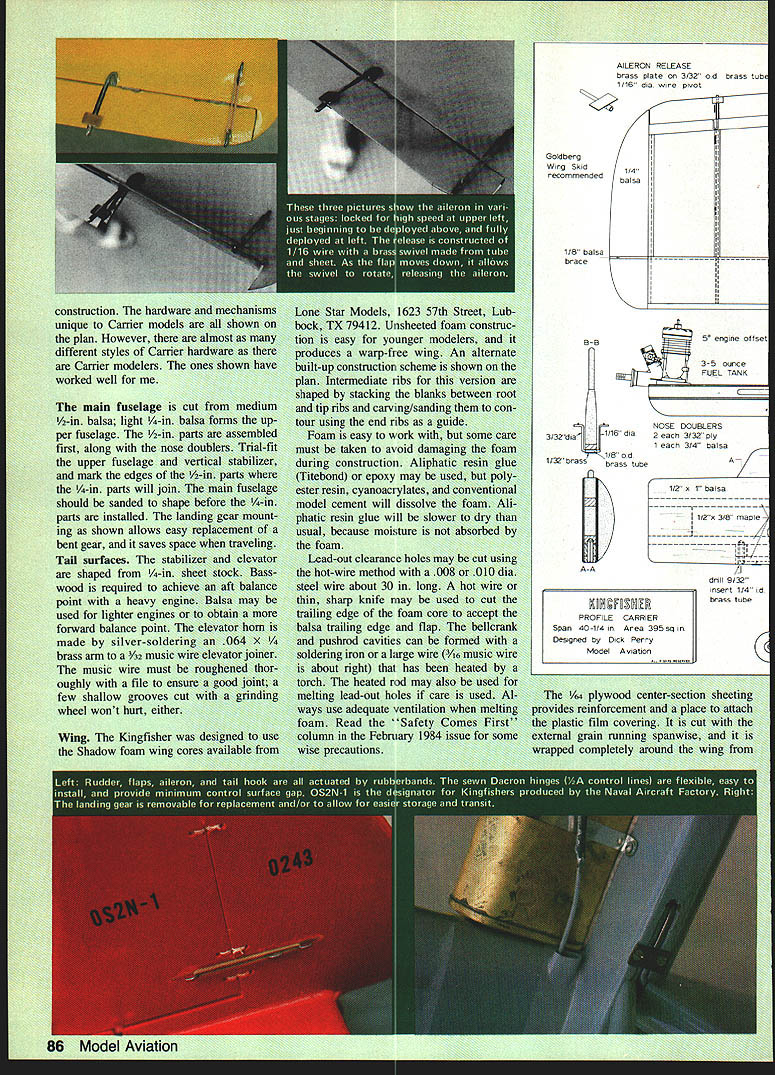
The Kingfisher was designed as a fairly large airplane primarily to improve low-speed performance. Small flaps are included to help slow-flight performance while reducing the nose-down pitching moment when deployed. The model will fly very slowly and stall gently. Full-stall low-speed flight requires a rearward balance point; the large tail provides ample control and stability. The model is sensitive to large elevator movements, so a long-span G-S bellcrank is used to slow control response and make precision landings (hooks, pun intended) easier.
The Profile Carrier class is an excellent starting point; prop-hanging results indicate this heavier-model Kingfisher is a very straightforward design. Construction should present no problem to anyone experienced in building and flying large models. The construction details that follow highlight parts that differ from a standard kit model. The hardware and mechanisms unique to Carrier models are shown on the plan, though there are many styles of Carrier hardware—these are the ones that have worked well for me.
Construction overview
The model can be set up for conventional low-speed flight or for prop-hanging. Build it in the style of flight you prefer; building for prop-hanging results in a heavier model. The plan shows the hardware and mechanisms unique to Carrier models and details that differ from typical kit construction.
#### Fuselage
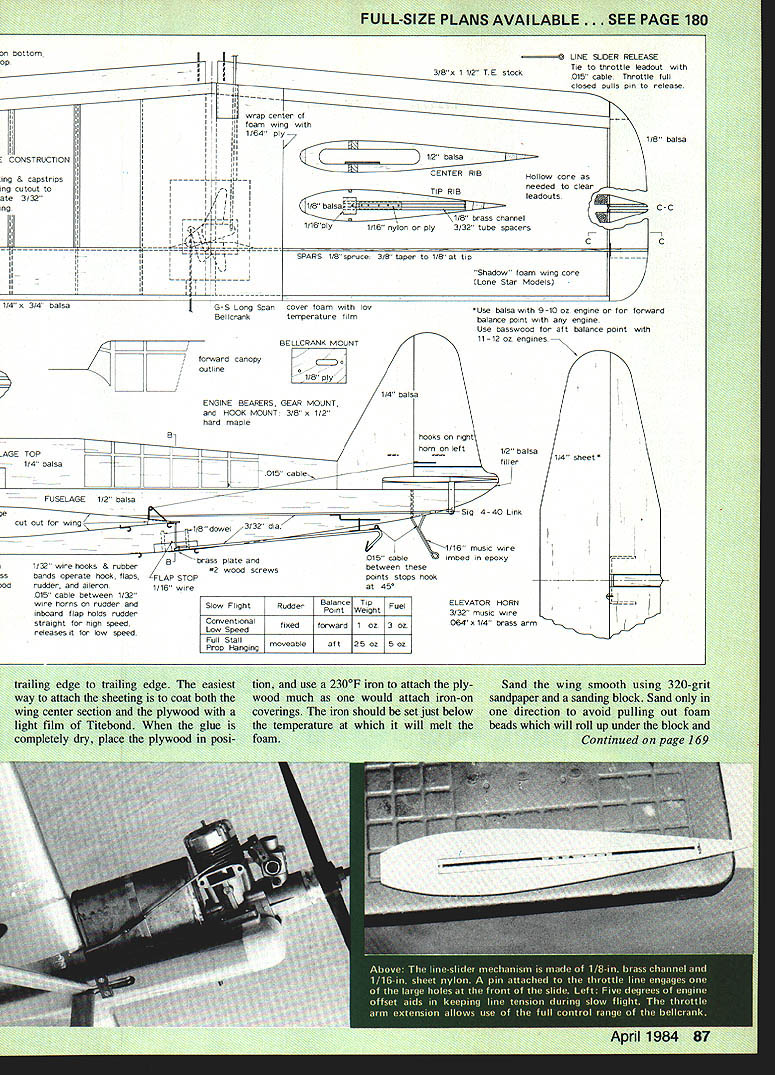
- Main fuselage: cut from medium 1/2-in. balsa; light 1/4-in. balsa forms the upper fuselage.
- Assemble the 1/2-in. parts first, along with the nose doublers.
- Trial-fit the upper fuselage and vertical stabilizer, and mark the edges of the 1/2-in. parts where the 1/4-in. parts will join.
- Sand the main fuselage to shape before installing the 1/4-in. parts.
- The landing gear mounting shown allows easy replacement of a bent gear and saves space when traveling.
#### Tail surfaces
- Stabilizer and elevator are shaped from 1/4-in. sheet stock.
- Use basswood to achieve an aft balance point with a heavy engine. Balsa may be used for lighter engines or to obtain a more forward balance point.
- Elevator horn: silver-solder an .064 x 1/4-in. brass arm to a 3/32-in. music-wire elevator joiner. Thoroughly roughen the music wire with a file to ensure a good joint; a few shallow grooves cut with a grinding wheel can help.
#### Wing
- The Kingfisher was designed to use the Shadow foam wing cores available from Lone Star Models (1623 57th Street, Lubbock, TX 79412). Unsheeted foam construction is easy for younger modelers and produces a warp-free wing. An alternate built-up construction scheme is shown on the plan.
- For built-up ribs: shape intermediate ribs by stacking blanks between root and tip ribs, then carve/sand them to contour using the end ribs as a guide.
Working with foam
- Foam is easy to work with, but some care is required to avoid damage.
- Use aliphatic resin (Titebond) or epoxy; avoid polyester resin, cyanoacrylates, and conventional model cement, which will dissolve the foam.
- Aliphatic resin will be slower to dry because the foam does not absorb moisture.
Cutting and forming
- Lead-out clearance holes may be cut using the hot-wire method with a .008 or .010-in. diameter steel wire about 30 in. long.
- A hot wire or a thin, sharp knife may be used to cut the trailing edge of the foam core to accept the balsa trailing edge and flap.
- Bellcrank and pushrod cavities can be formed with a soldering iron or a large wire (about 3/16-in. music wire) heated by a torch. The heated rod may also be used for melting lead-out holes if used carefully.
- Always use adequate ventilation when melting foam. See the "Safety Comes First" column (February 1984) for precautions.
Center-section sheeting and covering
- The 1/4-in. plywood center-section sheeting provides reinforcement and a place to attach the plastic film covering. Cut it with the external grain running spanwise, and wrap it completely around the wing from the bottom trailing edge to the top trailing edge.
- To attach the sheeting: coat both the wing center section and the plywood with a light film of Titebond. When the glue is completely dry, position the plywood and use a 230°F iron to attach the plywood much as one would attach iron-on coverings. Set the iron just below the temperature at which it will melt the foam.
- Sand the wing smooth using 320-grit sandpaper and a sanding block. Sand only in one direction to avoid pulling out foam beads, which can roll up under the block and dig into the wing surface.
- Vacuum the wing before applying a low-temperature covering film, such as Solar Film.
Hardware and control setup
The hardware and mechanisms unique to Carrier models are shown on the plan. There are many variations in Carrier hardware among modelers; use whatever style you prefer, though the ones shown have worked well for me.
The model can be set up with a long elevator horn to reduce elevator travel and produce very good flying qualities at both high and low speeds. A long-span G-S bellcrank is recommended to slow elevator response for precision landings.
Flying
For conventional low-speed flight, particularly for a young or inexperienced pilot:
- Use a forward balance point and limit up-elevator to reduce the chance of a stall.
- Set the engine idle so power is just sufficient to maintain level flight in dead calm conditions. Normal flying conditions will require only slight throttle changes to compensate for wind.
Full-stall, prop-hanging low-speed flight requires practice:
- Smooth, precise throttle control is necessary.
- An extension on the throttle control arm allows the full control range of the G-S bellcrank to be used and improves engine speed control.
- To avoid yaw oscillations, transition through the stall smoothly, without throttle bursts. If oscillations occur, recover to level flight and increase speed to improve line tension and increase rudder effectiveness.
Closing
I hope you enjoy the Kingfisher as much as I have. May all your landings be 100-pointers.
Transcribed from original scans by AI. Minor OCR errors may remain.

