
P-40K
Paul Johnston
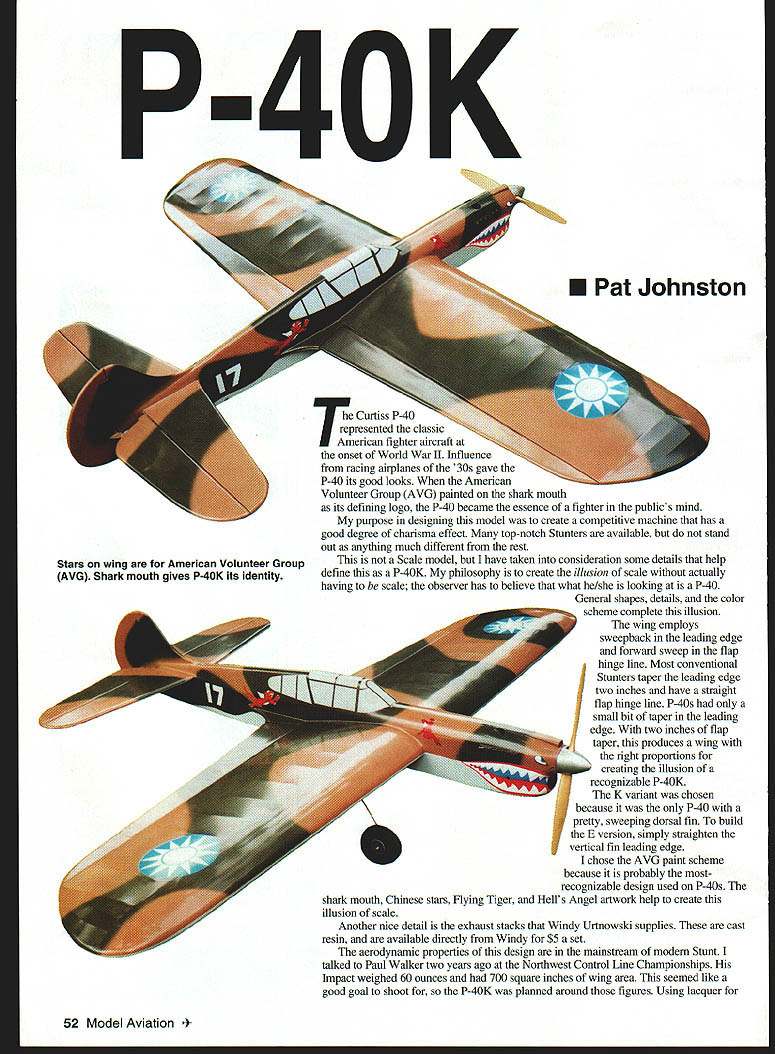
The Curtiss P-40 represented the classic American fighter aircraft at the onset of World War II. Influence from racing airplanes of the '30s gave the P-40 its good looks. When the American Volunteer Group (AVG) painted on the shark mouth as its defining logo, the P-40 became the essence of a fighter in the public's mind.
My purpose in designing this model was to create a competitive machine that has a good degree of charisma effect. Many top-notch Stunters are available, but do not stand out as anything much different from the rest.
This is not a scale model, but I have taken into consideration some details that help define this as a P-40K. My philosophy is to create the illusion of scale without actually having to be scale; the observer has to believe that what he or she is looking at is a P-40. General shapes, details, and the color scheme complete this illusion.
The wing employs sweepback in the leading edge and forward sweep in the flap hinge line. Most conventional Stunters taper the leading edge two inches and have a straight flap hinge line. P-40s had only a small bit of taper in the leading edge. With two inches of flap taper, this produces a wing with the right proportions for creating the illusion of a recognizable P-40K.
The K variant was chosen because it was the only P-40 with a pretty, sweeping dorsal fin. To build the E version, simply straighten the vertical fin leading edge.
I chose the AVG paint scheme because it is probably the most-recognizable design used on P-40s. The shark mouth, Chinese stars, Flying Tiger, and Hell's Angel artwork help to create this illusion of scale.
Another nice detail is the exhaust stacks that Windy Urtnowski supplies. These are cast resin and are available directly from Windy for $5 a set.
The aerodynamic properties of this design are in the mainstream of modern Stunt. I talked to Paul Walker two years ago at the Northwest Control Line Championships. His Impact weighed 60 ounces and had 700 square inches of wing area. This seemed like a good goal to shoot for, so the P-40K was planned around those figures. Using lacquer for the color coat added a bit of extra weight, but the P-40K does tip the scales at 61 ounces.
The first contest I entered was the 1997 Northwest Control Line Championships. The P-40K did better than I expected, with a front-row appearance and 20 points very generously awarded by the Stunt judges. I put in a very smooth flight for a total of 500 points. This was my highest personal Stunt score.
The P-40K was very well received, with many people expressing an interest in building one for their own. I believe that the appeal of a semiscale Stunter will always be great—look at Al Rabe’s Mustang, Bearcat, and Sea Fury. The great Al Rabe has been my inspiration in Stunt since I was 16 years old. The extra effort in creating an airplane that noticeably resembles its full-scale counterpart provides greater interest for spectators and competitors.
Specifications
- Type: CL Stunt
- Wingspan: 59 inches
- Engine: .60 two-stroke
- Flying weight: 61 ounces
- Construction: Built-up
- Covering/finish: Silkspan and dope
Construction
Engine
The first priority is to determine the engine to install. I started with the Double Star .60 Lite, which weighs two ounces less than the SuperTigre .60. An 11-ounce engine like the DS .60 with a light tongue muffler and six- to seven-pound density balsa will get the center of gravity (CG) very close to the plan recommendations.
If the ST .60 is chosen, the builder may consider reducing the nose moment an inch or installing an adjustable tail weight box. Shortening the nose may compromise tank room, so be sure there will be enough room for the tank requirements. I use about six ounces of fuel for a pattern with the ST .60.
Other engines available are the O.S./Magnum .46 and .53, SuperTigre .51, Stalker .61, or one of the tuned-pipe setups used by many experts these days. Consult Stunt News, the Precision Aerobatics Model Pilots Association publication, for more information about the multitude of Stunt engines available.
Airframe
The construction type and techniques are straightforward and conventional. There are some tricks that I’ve picked up that I have employed in the P-40K. These small things add up to create a better overall Stunter.
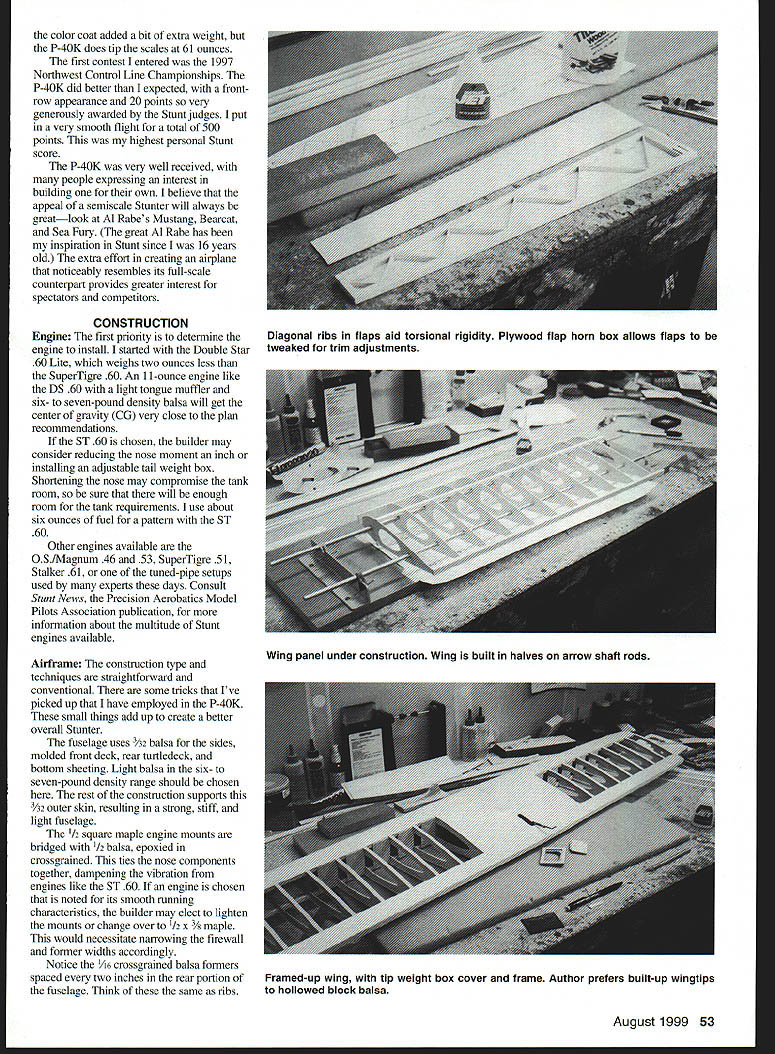
The fuselage uses 3/32" balsa for the sides, molded front deck, rear turtledeck, and bottom sheeting. Light balsa in the six- to seven-pound density range should be chosen here. The rest of the construction supports this 3/32" outer skin, resulting in a strong, stiff, and light fuselage.
The 1/2" square maple engine mounts are bridged with 1/8" balsa, epoxied in cross-grained. This ties the nose components together, dampening the vibration from engines like the ST .60. If an engine is chosen that is noted for its smooth running characteristics, the builder may elect to lighten the mounts or change over to 1/2" x 3/8" maple. This would necessitate narrowing the firewall former widths accordingly.
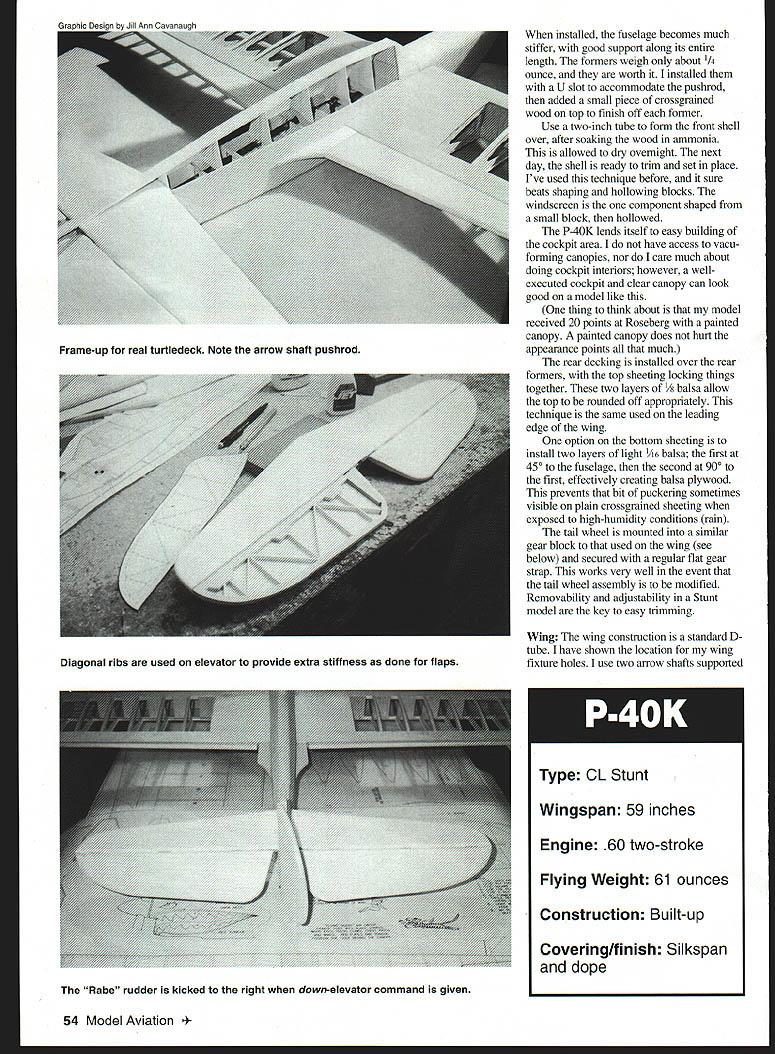
Note the 1/16" cross-grained balsa formers spaced every two inches in the rear portion of the fuselage. Think of these the same as ribs. When installed, the fuselage becomes much stiffer, with good support along its entire length. The formers weigh only about 1/4 ounce, and they are worth it. I installed them with a U-slot to accommodate the pushrod, then added a small piece of cross-grained wood on top to finish off each former.
Use a two-inch tube to form the front shell after soaking the wood in ammonia. Allow it to dry overnight. The next day, the shell is ready to trim and set in place. I’ve used this technique before, and it sure beats shaping and hollowing blocks. The windscreen is the one component shaped from a small block, then hollowed.
The P-40K lends itself to easy building of the cockpit area. I do not have access to vacuum-forming canopies, nor do I care much about doing cockpit interiors; however, a well-executed cockpit and clear canopy can look good on a model like this. One thing to think about is that my model received 20 points at Roseburg with a painted canopy. A painted canopy does not hurt the appearance points all that much.
The rear decking is installed over the rear formers, with the top sheeting locking things together. These two layers of 1/8" balsa allow the top to be rounded off appropriately. This technique is the same used on the leading edge of the wing.
One option on the bottom sheeting is to install two layers of light 1/16" balsa: the first at 45° to the fuselage, then the second at 90° to the first, effectively creating balsa plywood. This prevents that bit of puckering sometimes visible on plain cross-grained sheeting when exposed to high-humidity conditions (rain).
The tail wheel is mounted into a similar gear block to that used on the wing (see below) and secured with a regular flat gear strap. This works very well in the event that the tail wheel assembly is to be modified. Removability and adjustability in a Stunt model are the key to easy trimming.
Wing
The wing construction is a standard D-tube. I use two arrow shafts supported on parallel spars, and I build each wing half separately. The wing halves are joined by inserting the arrow shafts halfway into each wing to maintain alignment. After the glue sets, slide the shafts out. The rest of the wing is then completed.
The leading edge is built up from two layers of 1/8" balsa, which locks the leading edge sheeting in place and allows the leading edge to be rounded to the proper radius. The last rib is trimmed down, creating a sweeping curve in the leading edge at the last bay. This also reduces the thickness at the tip rib, making an easier transition to the tip.
Note that the 1/4" trailing edge cap is shaped and sandwiched between the trailing edge sheeting. This method is not too tough to do, and eliminates an external joint to be dealt with in the finishing stage.
The wingtips may be carved from a light block and hollowed, or may be built up. My preference is to build them up; I just hate the thought of throwing all that good balsa away after hollowing a block.
The landing gear mounts are shown built up from 1/8" and 1/16" plywood supported vertically with plywood. This vertical support spans to both spars, effectively creating a landing gear box, making it strong and light. I prefer this method over conventional maple landing gear blocks, which are heavy and not as strong. A 1/16" plywood gear cover secures the 1/8" gear with 4-40 flathead screws.
Tail
The flaps and tail surfaces are built up using a method found on Bob Whiteley’s Derringer 46. They have a border of 1/4" square balsa and geometric 1/16" ribs skinned with 1/16" balsa. This method produces a lightweight, flat, and extremely stiff surface—everything we want for a Stunt model. This method worked so well that I have made it my standard for building the control surfaces.
Finish
I used dope and lacquer on my model, but I do not recommend lacquer, as it appears to be a little heavy and can have some compatibility problems with dope. My preference is to use Sig dope throughout the finishing process. I start with nitrate as the base coats, with silkspan covering everything. Then four to six coats of Sig Supercoat dope are used on the wings to get the covering to tighten up. Then use Sig Lite-Coat (a low-shrink butyrate) for everything following.
Apply the color scheme of your choice—ink lines, or whatever else—then spray on clear. I rubbed out my clear with a regular automotive rubbing compound, and waxed it after the dope had time to cure. For the highest gloss possible, use Gorham’s silver polish.
Trimming and Flying
The fuel tank is wedged in with foam to resist vibration. Fuel vents are permanently mounted in the fuselage, and fuel lines connect them to the tank. This provides great isolation between the tank and vents.
Mount the engine on aluminum pads. Position the center of gravity as indicated on the plans (about a 20% CG). I find that anything farther forward slows the turn down too much and demands too much control handle output pressure. A .60-sized Stunter can become a lot of work to fly in a stiff wind. Don’t add any more work than necessary.
Balance the airplane laterally by supporting it on the tail wheel and glow plug. The right wing should measure two ounces heavier. Install enough lead in the tip box to achieve this figure.
The leadout wires are swept back one inch from the CG. My handle is adjusted for approximately three inches line spacing. This controls the turn rate and makes the exits on the square corners easier to control, helping to eliminate the usual bobble.
You may wish to start with a four-inch spacing for the first flights. If clean squares are difficult, start reducing the spacing until the squares exit flat and smooth.
My .60s run “happy” with Rev-Up 13x6 and the excellent BY&O 13x5 props. Rev-Up props are tough to find, and Clarence Bull’s BY&O props are tops. His 13x5 gives 5.4-second laps and lots of pulling power. The Rev-Up 13x6 produces 5.2-second laps.
I set up my P-40K with lightweight three-inch wheels to handle the sometimes poor grass fields, but many will opt to install the lightweight 2-1/2-inch wheels shown on the plans. I’m not so sure that the soft three-inch wheels don’t give more consistent landings on pavement.
All of these adjustments are safe starting points, and it is expected that the individual will make adjustments to suit personal flying style.
The P-40K is a fun Stunter, and in the hands of a good pilot can produce good flight scores. It draws a lot of interest naturally. The .60-size P-40K design has spun off to a .40-size version being kitted by RSM Distribution.
I hope the P-40K provides as much enjoyment for you as it has for me. Feel free to contact me if I can be of any assistance.
Paul Johnston 3417 W. Elk Bugle Ln. Meridian, ID 83642 (208) 887-0803
Stunt engines:
- Tom Dixon
Box 671166 Marietta, GA 30066
- Tom Lay
T&L Specialties Box 6052 Torrance, CA 90504
Other addresses:
- Windy Urtnowski
93 Elliot Place Rutherford, NJ 07070
- RSM Distribution
1570 E. Edinger Ave., Unit G Santa Ana, CA 92705
- PAMPA
158 Flying Cloud Isle Foster City, CA 94404
Transcribed from original scans by AI. Minor OCR errors may remain.

