
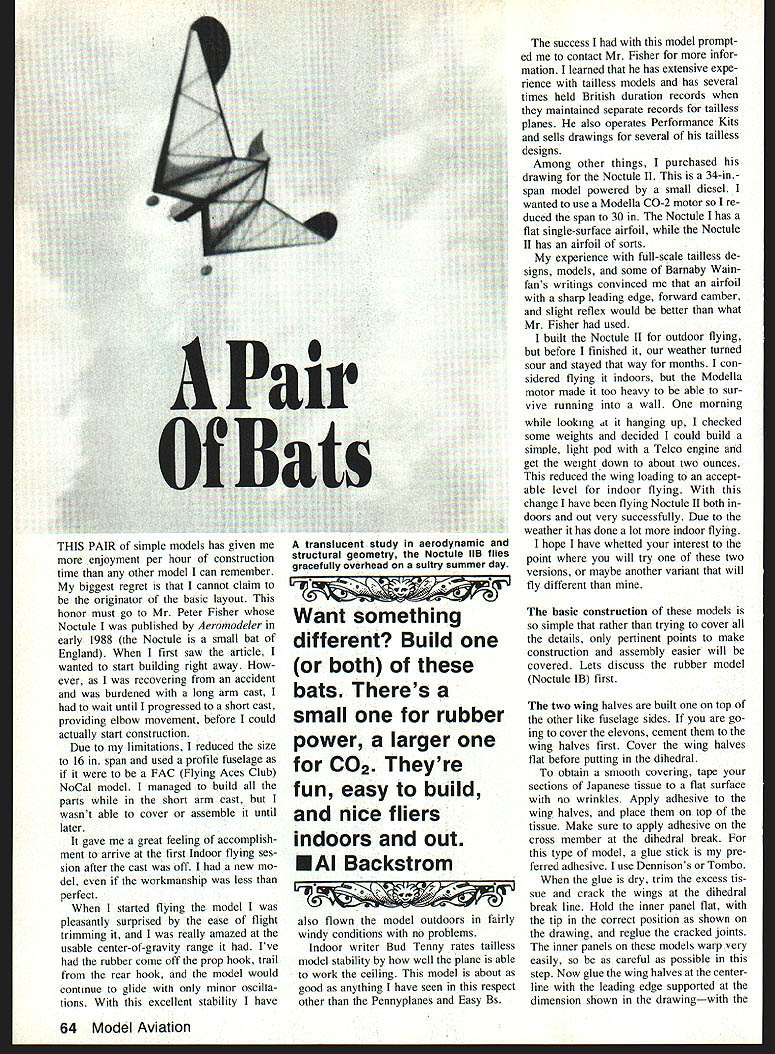
A Pair Of Bats
This pair of simple models has given me more enjoyment per hour of construction time than any other model I can remember. My biggest regret is that I cannot claim to be the originator of the basic layout. This honor must go to Mr. Peter Fisher, whose Noctule was published by Aeromodeller in early 1988 (the Noctule is a small bat of England). When I first saw the article, I wanted to start building right away. However, as I was recovering from an accident and was burdened with a long arm cast, I had to wait until I progressed to a short cast, providing elbow movement, before I could actually start construction.
Due to my limitations, I reduced the size to 16 in. span and used a profile fuselage as if it were to be a Flying Aces Club (No-Cal) model. I managed to build all the parts while in the short arm cast, but I wasn't able to cover or assemble it until later.
It gave me a great feeling of accomplishment to arrive at the first indoor flying session after the cast was off. I had a new model, even if the workmanship was less than perfect.
When I started flying the model I was pleasantly surprised by the ease of trimming, and I was really amazed at the usable center-of-gravity range it had. I've had the rubber come off the prop hook, trail from the rear hook, and the model would continue to glide with only minor oscillations. With this excellent stability I have also flown the model outdoors in fairly windy conditions with no problems.
Indoor writer Bud Tenny rates tailless model stability by how well the plane is able to work the ceiling. This model is about as good as anything I have seen in this respect other than the Pennyplanes and Easy Bs.
Want something different? Build one (or both) of these bats. There's a small one for rubber power and a larger one for CO-2. They're fun, easy to build, and nice fliers indoors and out.
— Al Backstrom
The success I had with this model prompted me to contact Mr. Fisher for more information. I learned that he has extensive experience with tailless models and has several times held British duration records when they maintained separate records for tailless planes. He also operates Performance Kits and sells drawings for several of his tailless designs.
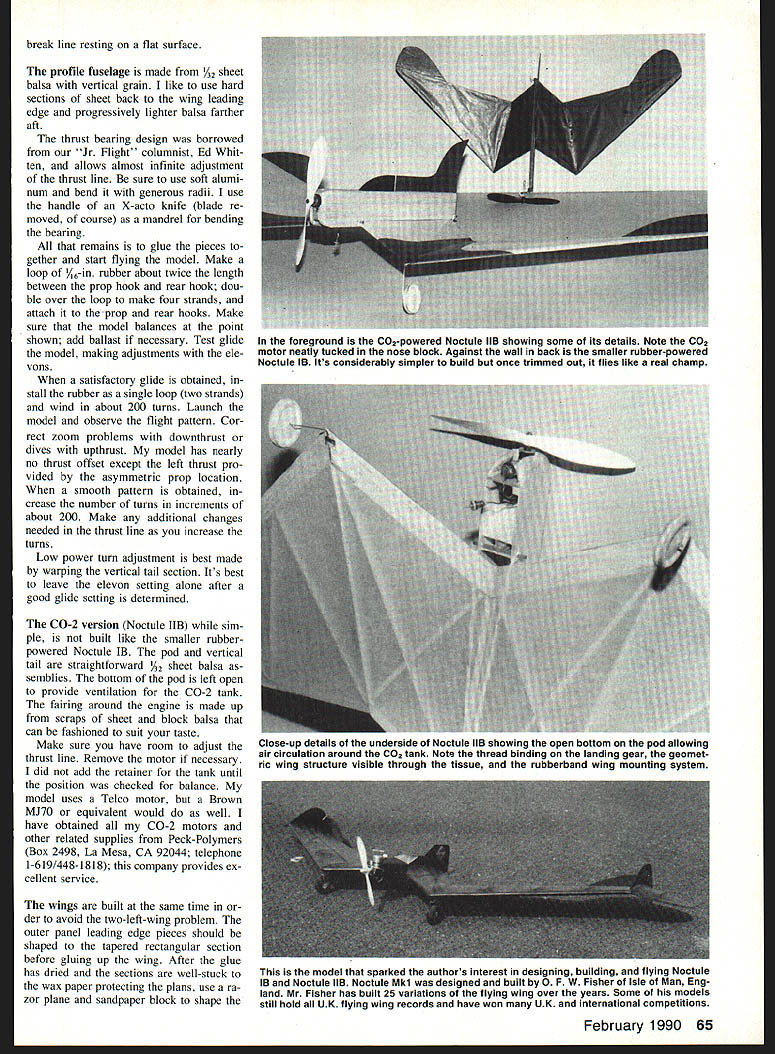
Among other things, I purchased his drawing for the Noctule II. This is a 34-in. span model powered by a small diesel. I wanted to use a Modella CO-2 motor so I reduced the span to 30 in. The Noctule I has a flat single-surface airfoil, while the Noctule II has an airfoil of sorts.
My experience with full-scale tailless designs, models, and some of Barnaby Wainfan's writings convinced me that an airfoil with a sharp leading edge, forward camber, and slight reflex would be better than what Mr. Fisher had used.
I built the Noctule II for outdoor flying, but before I finished it our weather turned sour and stayed that way for months. I considered flying it indoors, but the Modella motor made it too heavy to be able to survive running into a wall. One morning while looking at it hanging up, I checked some weights and decided I could build a simple, light pod with a Telco engine and get the weight down about two ounces. This reduced the wing loading to an acceptable level for indoor flying. With this change I have been flying Noctule II both indoors and out very successfully. Due to the weather it has done a lot more indoor flying.
I hope I have whetted your interest to the point where you will try one of these two versions, or maybe another variant that will fly differently than mine.
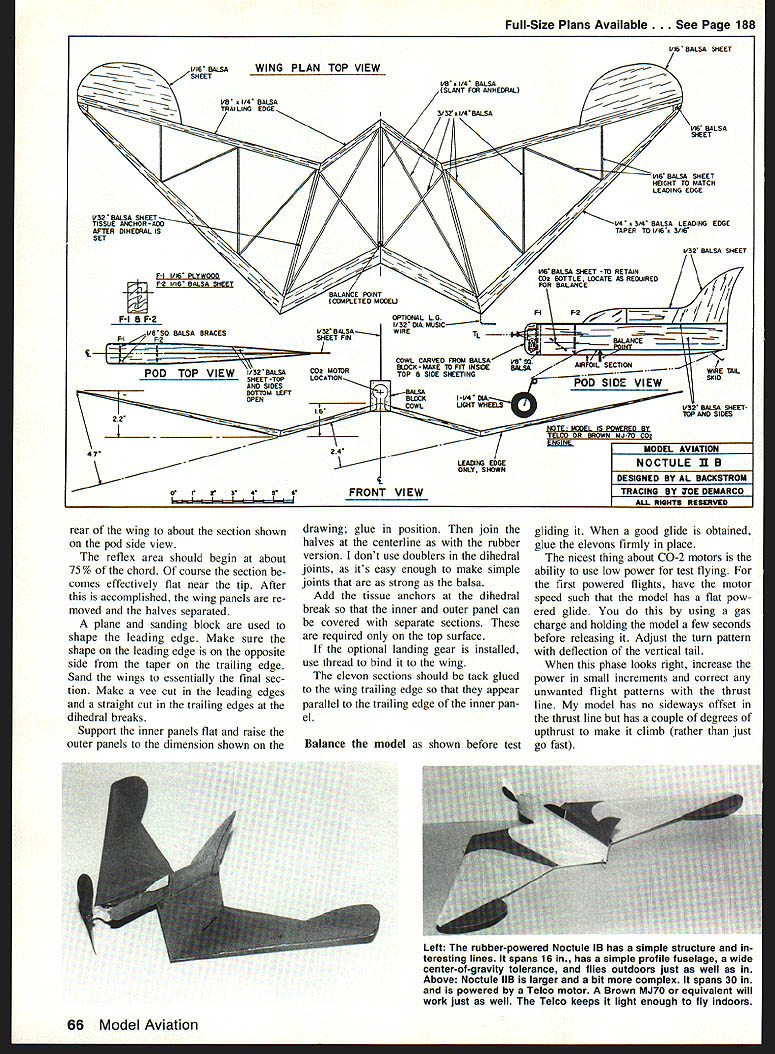
The basic construction of these models is so simple that rather than trying to cover all the details, only the pertinent points to make construction and assembly easier will be covered. Let's discuss the rubber model (Noctule IB) first.
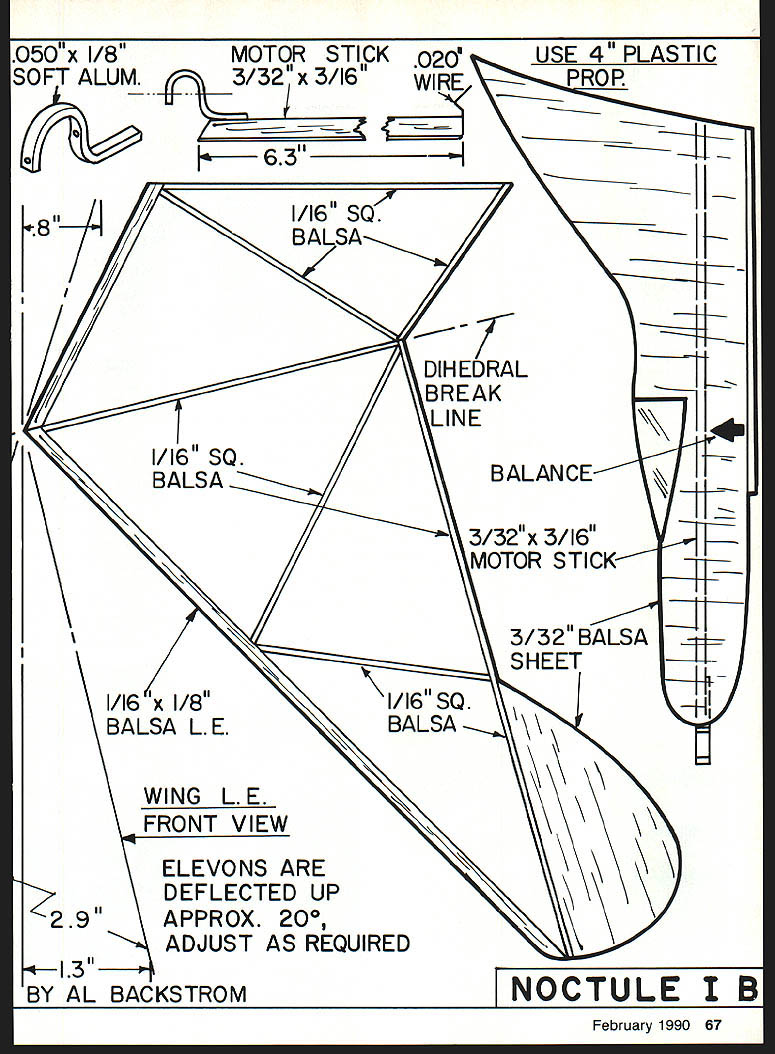
Noctule IB (rubber-powered)
- The two wing halves are built one on top of the other like fuselage sides. If you are going to cover the elevons, cement them to the wing halves first. Cover the wing halves flat before putting in the dihedral.
- To obtain a smooth covering, tape your sections of Japanese tissue to a flat surface with no wrinkles. Apply adhesive to the wing halves and place them on top of the tissue. Make sure to apply adhesive on the cross member at the dihedral break. For this type of model, a glue stick is my preferred adhesive (Dennison's or Tombo).
- When the glue is dry, trim the excess tissue and crack the wings at the dihedral break line. Hold the inner panel flat, with the tip in the correct position as shown on the drawing, and reglue the cracked joints. The inner panels on these models warp very easily, so be as careful as possible in this step.
- Now glue the wing halves at the centerline with the leading edge supported at the dimension shown on the drawing, with the break line resting on a flat surface.
- The profile fuselage is made from 1/2" sheet balsa with vertical grain. Use harder sections of sheet back to the wing leading edge and progressively lighter balsa farther aft.
- The thrust bearing design was borrowed from Jr. Flight columnist Ed Whitten and allows almost infinite adjustment of the thrust line. Use soft aluminum and bend it with generous radii. I use the handle of an X-Acto knife (blade removed) as a mandrel for bending the bearing.
- All that remains is to glue the pieces together and start flying the model.
Rubber installation and trimming
- Make a loop of 1/8-in. rubber about twice the length between the prop hook and rear hook; double over the loop to make four strands, and attach it to the prop and rear hooks.
- Make sure that the model balances at the point shown on the plan; add ballast if necessary.
- Test-glide the model, making adjustments with the elevons.
- When a satisfactory glide is obtained, install the rubber as a single loop (two strands) and wind in about 200 turns.
- Launch the model and observe the flight pattern. Correct zoom problems with downthrust or dives with upthrust.
- My model has nearly no thrust offset except the left thrust provided by the asymmetric prop location. When a smooth pattern is obtained, increase the number of turns in increments of about 200. Make any additional changes needed in the thrust line as you increase the turns.
- Low-power turn adjustment is best made by warping the vertical tail section. It's best to leave the elevon setting alone after a good glide setting is determined.
Noctule IIB (CO-2 powered)
- The CO-2 version is simple but not built like the smaller rubber-powered Noctule IB. The pod and vertical tail are straightforward 1/8" sheet balsa assemblies. The bottom of the pod is left open to provide ventilation for the CO-2 tank.
- The fairing around the engine is made up from scraps of sheet and block balsa that can be fashioned to suit your taste.
- Make sure you have room to adjust the thrust line. Remove the motor if necessary. I did not add the retainer for the tank until the position was checked for balance.
- My model uses a Telco motor, but a Brown MJ70 or equivalent would do as well. I have obtained all my CO-2 motors and other related supplies from Peck-Polymers (Box 2498, La Mesa, CA 92044; telephone 1-619/448-1818); this company provides excellent service.
- The wings are built at the same time in order to avoid the two-left-wing problem.
- The outer panel leading-edge pieces should be shaped to the tapered rectangular section before gluing up the wing.
- After the glue has dried and the sections are well-stuck to the wax paper protecting the plans, use a razor plane and sandpaper block to shape the rear of the wing to about the section shown on the pod side view.
- The reflex area should begin at about 75% of the chord. Of course, the section becomes effectively flat near the tip. After this is accomplished, the wing panels are removed and the halves separated.
- A plane and sanding block are used to shape the leading edge. Make sure the shape on the leading edge is on the opposite side from the taper on the trailing edge. Sand the wings to essentially the final section.
- Make a Vee cut in the leading edges and a straight cut in the trailing edges at the dihedral breaks.
- Support the inner panels flat and raise the outer panels to the dimension shown on the drawing; glue in position. Then join the halves at the centerline as with the rubber version. I don't use doublers in the dihedral joints, as it's easy enough to make simple joints that are as strong as the balsa.
- Add the tissue anchors at the dihedral break so that the inner and outer panel can be covered with separate sections. These are required only on the top surface.
- If the optional landing gear is installed, use thread to bind it to the wing.
- The elevon sections should be tack-glued to the wing trailing edge so that they appear parallel to the trailing edge of the inner panel.
Balance
- Balance the model as shown on the plan before test-gliding it. When a good glide is obtained, glue the elevons firmly in place.
- The nicest thing about CO-2 motors is the ability to use low power for test flying. For the first powered flights, set the motor speed such that the model has a flat powered glide. You do this by using a gas charge and holding the model a few seconds before releasing it.
- Adjust the turn pattern with deflection of the vertical tail.
- When this phase looks right, increase the power in small increments and correct any unwanted flight patterns with the thrust line. My model has no sideways offset in the thrust line but has a couple of degrees of upthrust to make it climb rather than just go fast.
Plan details and notes
- Use soft aluminum for thrust-bearing parts; bend with generous radii.
- Motor stick: 3/32" x 3/16"
- Consider using a 4" plastic prop for the CO-2 version.
- Typical small stock: 1/16" square balsa for some structural pieces.
- Dihedral break line and balance points are shown on the plan and should be followed during assembly.
- The wing leading-edge front view and elevon deflection for trimming: elevons are deflected up approximately 20°, adjust as required.
- Typical reference dimensions (as labeled on the plan): 0.8", 2.9", 1.3" (use the drawing for exact placement).
NOCTULE IB
BY AL BACKSTROM
Transcribed from original scans by AI. Minor OCR errors may remain.

