

Panther II
By Dee B. Mathews
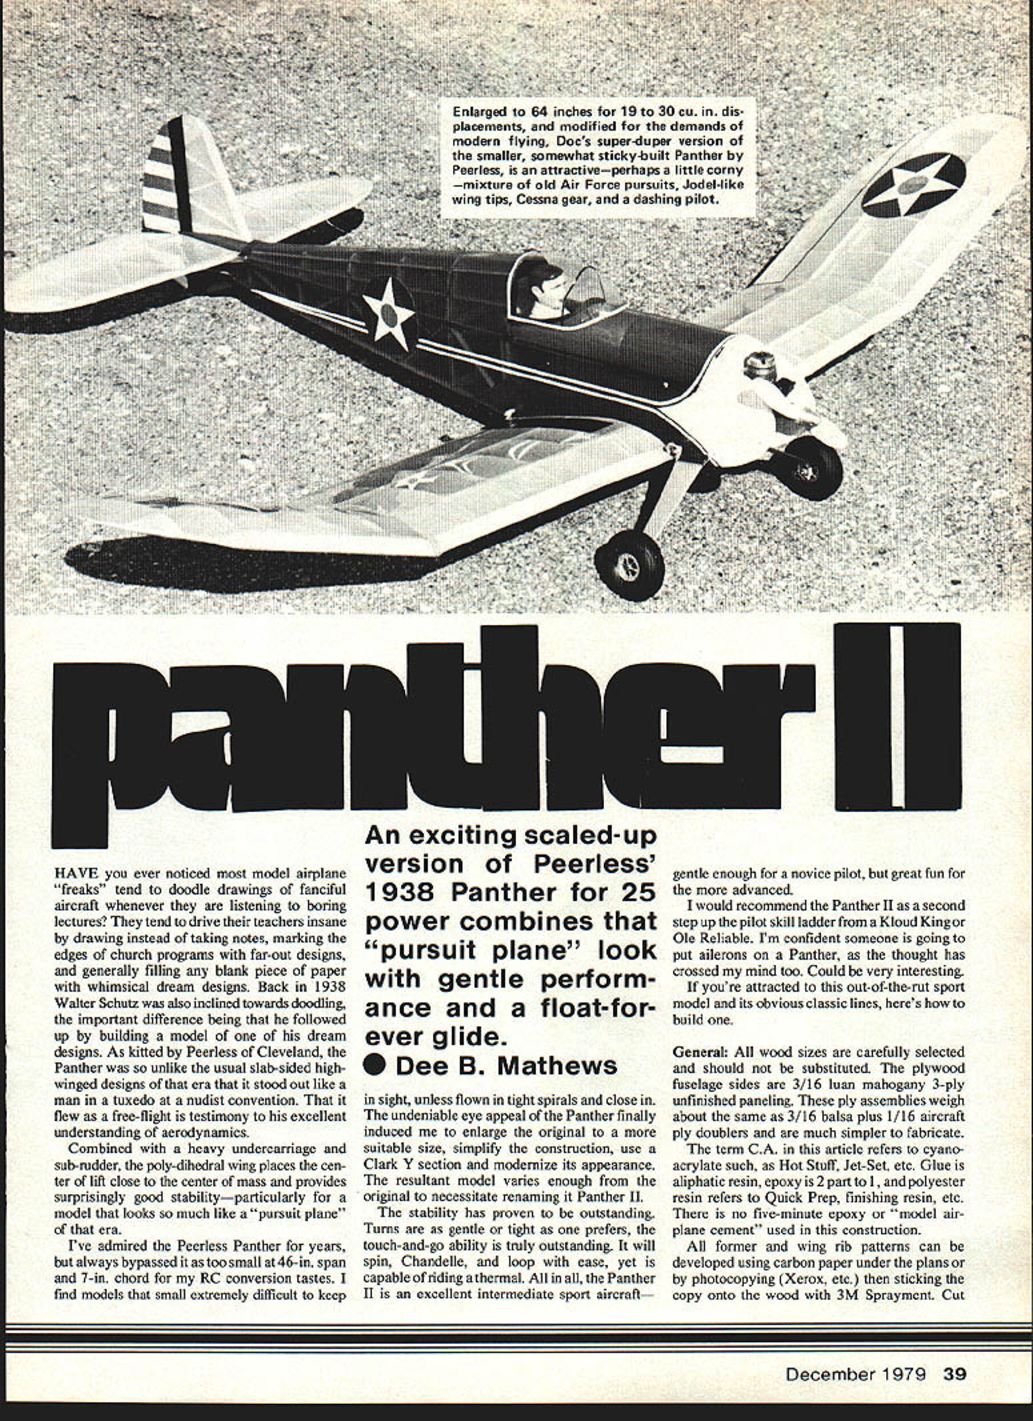
An exciting scaled-up version of Peerless' 1938 Panther for .25 power combines that "pursuit plane" look with gentle performance and a float‑forever glide.
Have you ever noticed most model airplane "freaks" tend to doodle drawings of fanciful aircraft whenever they are listening to boring lectures? They tend to drive their teachers insane by drawing instead of taking notes, marking the edges of church programs with far-out designs, and generally filling any blank piece of paper with whimsical dream designs. Back in 1938 Walter Schutz was also inclined towards doodling, the important difference being that he followed up by building a model of one of his dream designs. As kitted by Peerless of Cleveland, the Panther was so unlike the usual slab-sided high-winged designs of that era that it stood out like a man in a tuxedo at a nudist convention. That it flew as a free-flight is testimony to his excellent understanding of aerodynamics.
Combined with a heavy undercarriage and sub-rudder, the poly-dihedral wing places the center of lift close to the center of mass and provides surprisingly good stability—particularly for a model that looks so much like a "pursuit plane" of that era.
I've admired the Peerless Panther for years, but always bypassed it as too small at 46 in. span and 7 in. chord for my R/C conversion tastes. I find models that small extremely difficult to keep in sight, unless flown in tight spirals and close in. The undeniable eye appeal of the Panther finally induced me to enlarge the original to a more suitable size, simplify the construction, use a Clark Y section and modernize its appearance. The resultant model varies enough from the original to necessitate renaming it Panther II.
The stability has proven to be outstanding. Turns are as gentle or tight as one prefers; the touch-and-go ability is truly outstanding. It will spin, Chandelle, and loop with ease, yet is capable of riding a thermal. All in all, the Panther II is an excellent intermediate sport aircraft—gentle enough for a novice pilot, but great fun for the more advanced.
I would recommend the Panther II as a second step up the pilot skill ladder from a Kloud King or Ole Reliable. I'm confident someone is going to put ailerons on a Panther, as the thought has crossed my mind too. Could be very interesting. If you're attracted to this out-of-the-rut sport model and its obvious classic lines, here's how to build one.
General
All wood sizes are carefully selected and should not be substituted. The plywood fuselage sides are 3/16 in. luan mahogany 3-ply unfinished paneling. These ply assemblies weigh about the same as 3/16 in. balsa plus 1/16 in. aircraft ply doublers and are much simpler to fabricate.
The term CA in this article refers to cyanoacrylate (Hot Stuff, Jet-Set, etc.). "Glue" is aliphatic resin; "epoxy" is 2-part; and "polyester resin" refers to Quick Prep, finishing resin, etc. There is no five-minute epoxy or "model airplane cement" used in this construction.
All former and wing rib patterns can be developed using carbon paper under the plans or by photocopying (Xerox, etc.) then sticking the copy onto the wood with 3M Spraymount. Cut out drilled parts prior to actual assembly. Firewall holes can be developed using a mounted engine guide; watch tank position.
Wing
- Develop ply rib pattern on tracing paper. Stack-cut ribs; reduce three ribs in the center section.
- Notch the LE and TE of ribs.
- Pin the plan and block tip washout using 3/16 in. scrap under the LE at the point shown.
- Pin bottom spars over plan, straddle spar penetration.
- Lay tip sheets over bottom spars; glue LE and TE.
- Glue ribs (notches over spars). For dihedral, use double ribs and set the jig.
- Glue top spars and triangular corner gussets; fill tips with 3/16 in. scrap under spars.
- After glue cures, saw cut panel joints and remove plans. Cut tips to outside contour using a cardboard pattern and carbon-paper tracings.
- Sand dihedral joints using the classic sanding-block–table-edge technique with panels blocked up to proper height. Use block #7 jig when epoxying joints. Allow complete epoxy cure.
- Cut ply gusset slots using two hacksaw blades taped together and run along spar faces at LE. Insert ply blank into slots; mask shape with pencil and cut out epoxy slots using cloth pins to hold (see Ole Reliable, July 1978 Model Aviation photos technique).
- Plank the center section top and bottom. Epoxy anti-crush wire at TE.
- Carve and sand LE, tips, etc., to contour. Glue shear webs as drawn.
- The wing is strong enough that the bottom can be covered completely in two sections; the top requires covering the tip sections first, then the center panel.
Tail Feathers
- Assemble over plans and cut to outline using carbon paper under plans.
- Sand after hinging and adding strengthener to the elevator.
- Mount the fuselage-seat with epoxy while checking alignment.
- Install horns before assembly.
Fuselage
- Build two identical sides, one over the other. Small pieces of masking tape are applied at the cement joint interfaces. Small brads will hold ply sides in position.
- Remove sides and pop apart with a table knife.
- Align the box inverted over the top view, using formers C and H in notches. Hold with masking tape, spring clothes pins, and clamps. Make certain of squareness with 90-degree triangles and a carpenter's square. Allow eight hours or more of curing.
- Pull tail posts together directly in line with top view drawing and CA.
- Cut cross-frame members, CA to balsa and glue to spruce.
- Epoxy landing gear bearer and sub-fin filler, then remove frame from top view.
- Turtle-deck formers are laid down directly over the plan. Cut scraps of 3/32 in. sheet from wing rib cut-outs into strips, pin top and bottom over plan. CA sides strips into position, remove from plan and sand to shape. It is helpful to pre-shape the top section, but it can be done either way. This technique produces a lighter and stronger former than the traditional sheet cut-out type.
- Epoxy A flush against C, glue B, D, E, etc. CA turtle-deck formers, cut notches for stringers using a straight-edge as a guide.
- Form the front cowl with moist sheet, CA to hatch boxing strips and sides, pull over formers around to opposite side. Trim for fit then CA from underside.
- Cut tank hatch free by razor sawing between formers. Add hold-down hardware (I used plywood blocks and sheet metal screws). Consideration should be given to the new hatch hardware from Carl Goldberg.
- Tank floor is positioned to suit the engine, then glued.
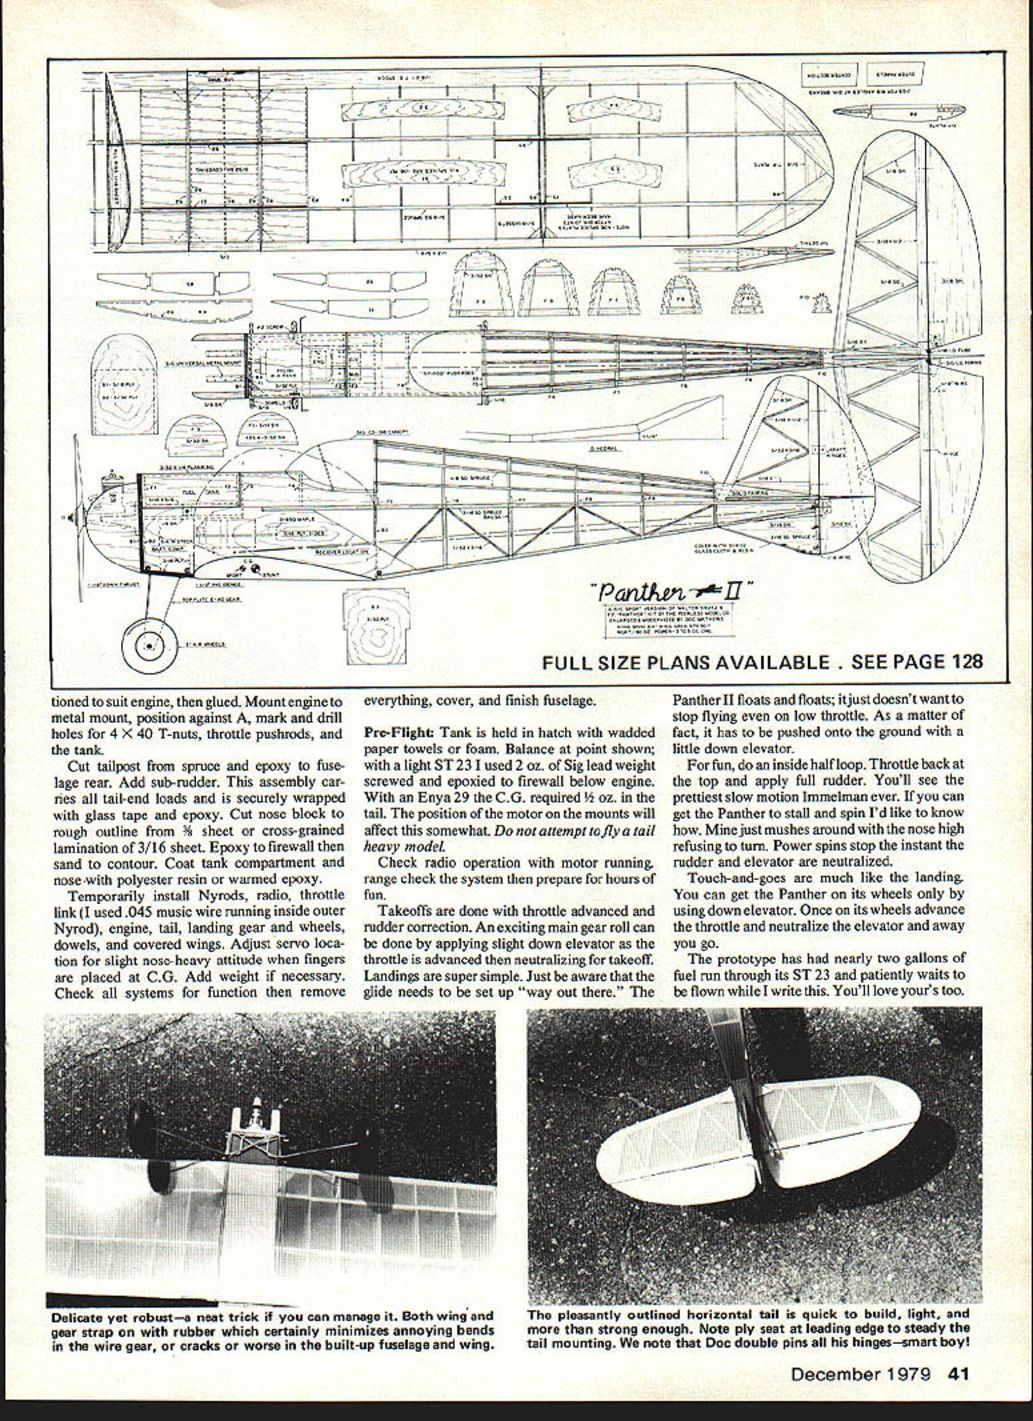
- Mount engine to metal mount, position against former A, mark and drill holes for 4-40 T-nuts, throttle pushrods, and the tank.
- Cut tailpost from spruce and epoxy to fuselage rear. Add sub-rudder. This assembly carries all tail-end loads and is securely wrapped with glass tape and epoxy.
- Cut nose block to rough outline from 3/8 in. sheet or cross-grained lamination of 3/16 in. sheet. Epoxy to firewall then sand to contour. Coat tank compartment and nose with polyester resin or warmed epoxy.
Final Assembly and Covering
- Temporarily install Nyrods, radio, throttle link (I used .045 in. music wire running inside outer Nyrod), engine, tail, landing gear and wheels, dowels, and covered wings.
- Adjust servo locations for a slight nose-heavy attitude when fingers are placed at the CG. Add weight if necessary.
- Check all systems for function, then remove everything, cover, and finish fuselage.
Pre-Flight and Flying
- Tank is held in hatch with wadded paper towels or foam.
- Balance at the point shown on the plans. With a light ST 23 I used 2 oz. of Sig lead weight screwed and epoxied to the firewall below the engine. With an Enya 29 the CG required 1/2 oz. in the tail. The position of the motor on the mounts will affect this somewhat. Do not attempt to fly a tail-heavy model.
- Check radio operation with motor running, range-check the system, then prepare for hours of fun.
Takeoffs are done with throttle advanced and rudder correction. An exciting main-gear roll can be done by applying slight down elevator as the throttle is advanced, then neutralizing for takeoff.
Landings are super simple. Be aware that the glide needs to be set up "way out there." The Panther II floats and floats; it just doesn't want to stop flying even on low throttle. In fact, it has to be pushed onto the ground with a little down elevator.
For fun, do an inside half loop. Throttle back at the top and apply full rudder. You'll see the prettiest slow-motion Immelmann ever. If you can get the Panther to stall and spin I'd like to know how—mine just mushes around with the nose high, refusing to turn. Power spins stop the instant the rudder and elevator are neutralized.
Touch-and-goes are much like the landing. You can get the Panther on its wheels only by using down elevator. Once on its wheels, advance the throttle, neutralize the elevator, and away you go.
The prototype has had nearly two gallons of fuel run through its ST 23 and patiently waits to be flown while I write this. You'll love yours too.
Transcribed from original scans by AI. Minor OCR errors may remain.

