


Para Craft
— Luther Hux
Introduction
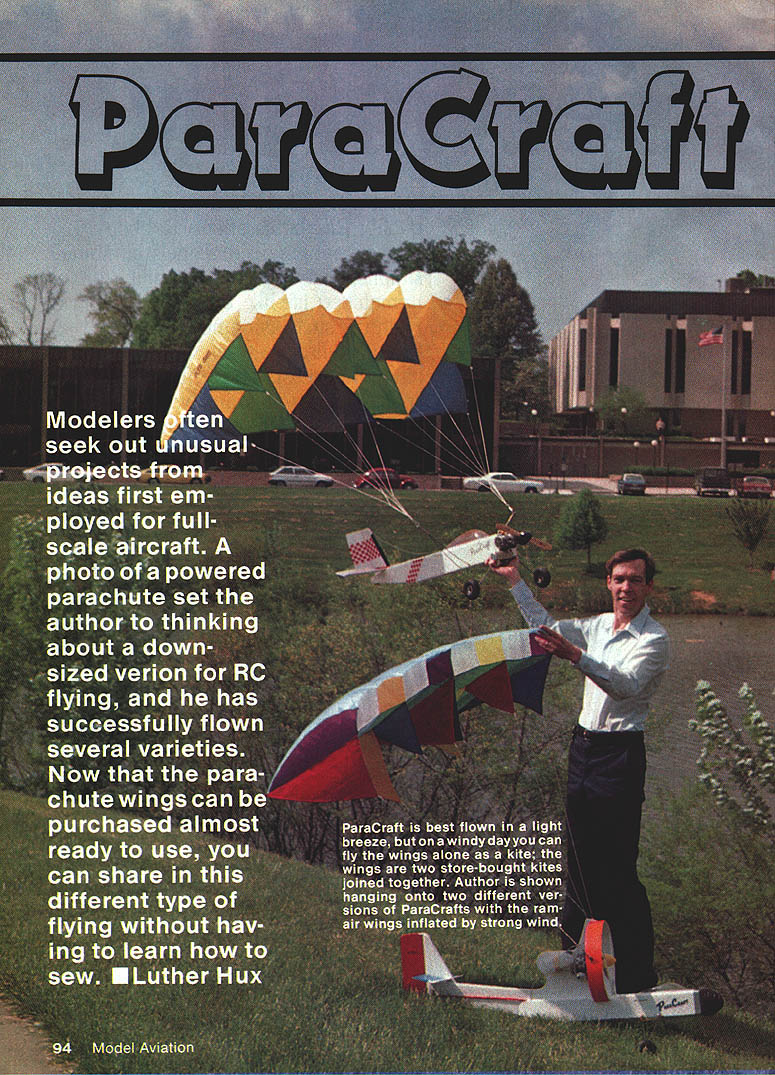
Modelers often seek unusual projects inspired by full-scale aircraft. A photo of a powered parachute led the author to design a down-sized version for RC flying. With commercially available parafoil kites, you can now build and fly this different type of model without needing to sew complex wings.
Developing New Acts
Developing new acts for model show teams requires spotting interesting and unexpected items to fly. This approach has produced models such as flying lawn mowers and flying hamburgers. A full-scale powered parachute photo suggested an aerodynamically feasible RC version—less difficult than making a flying hamburger.
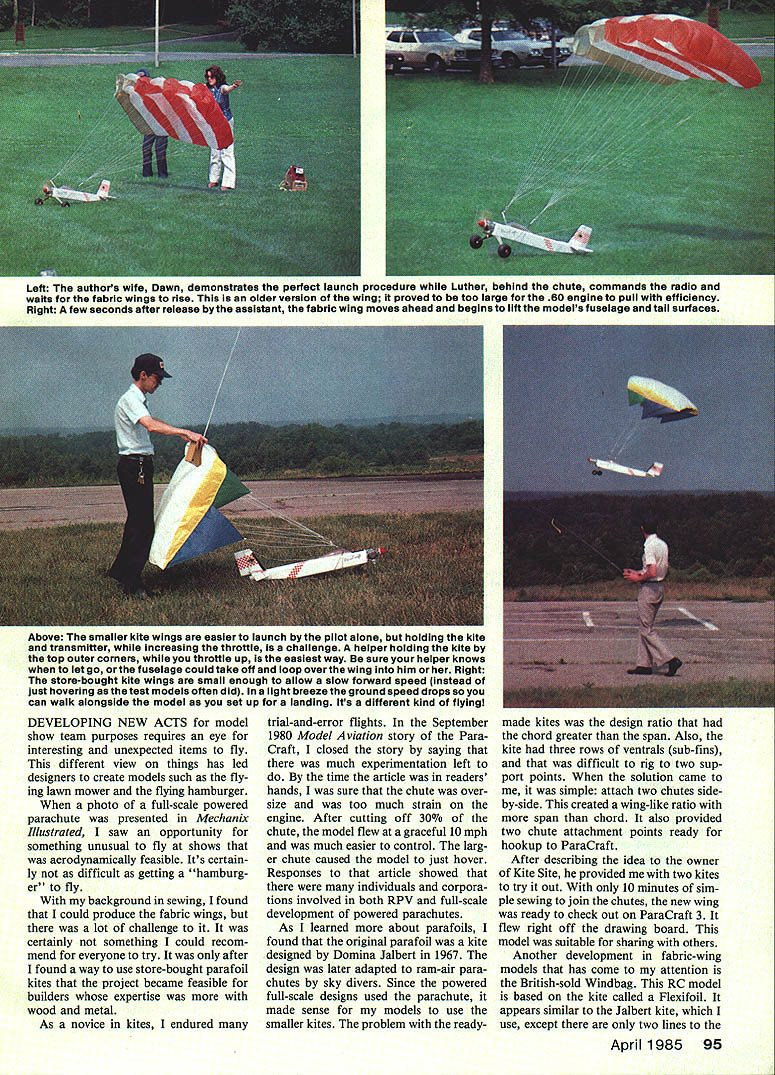
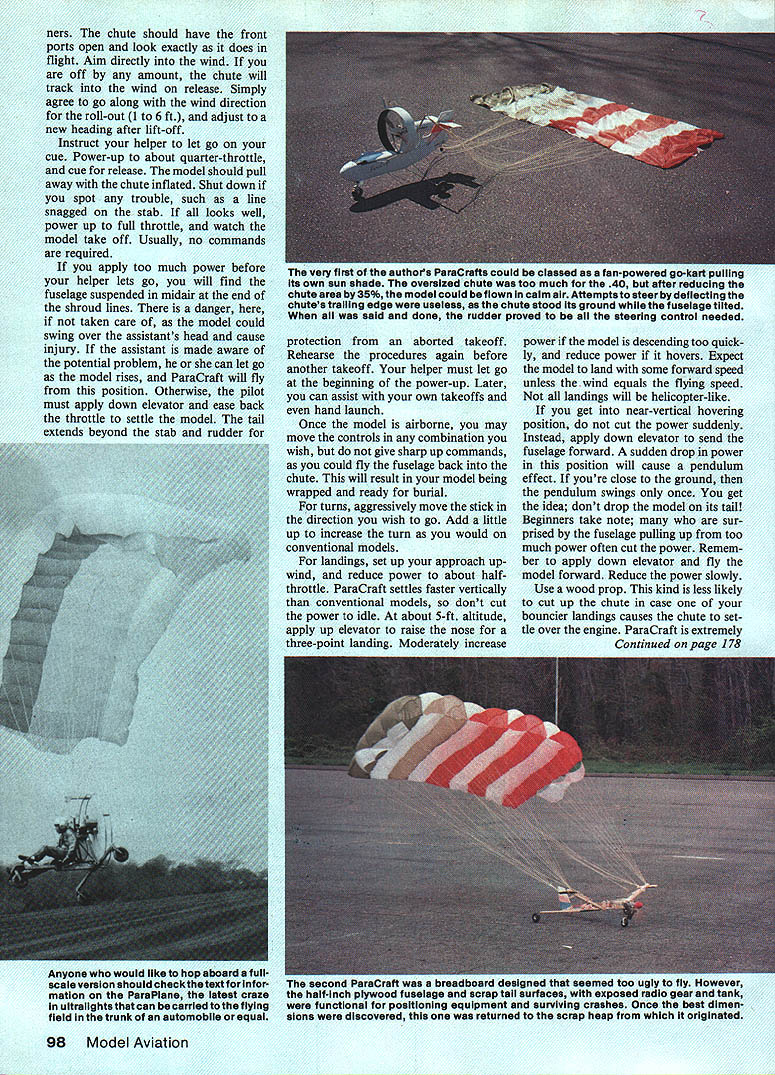
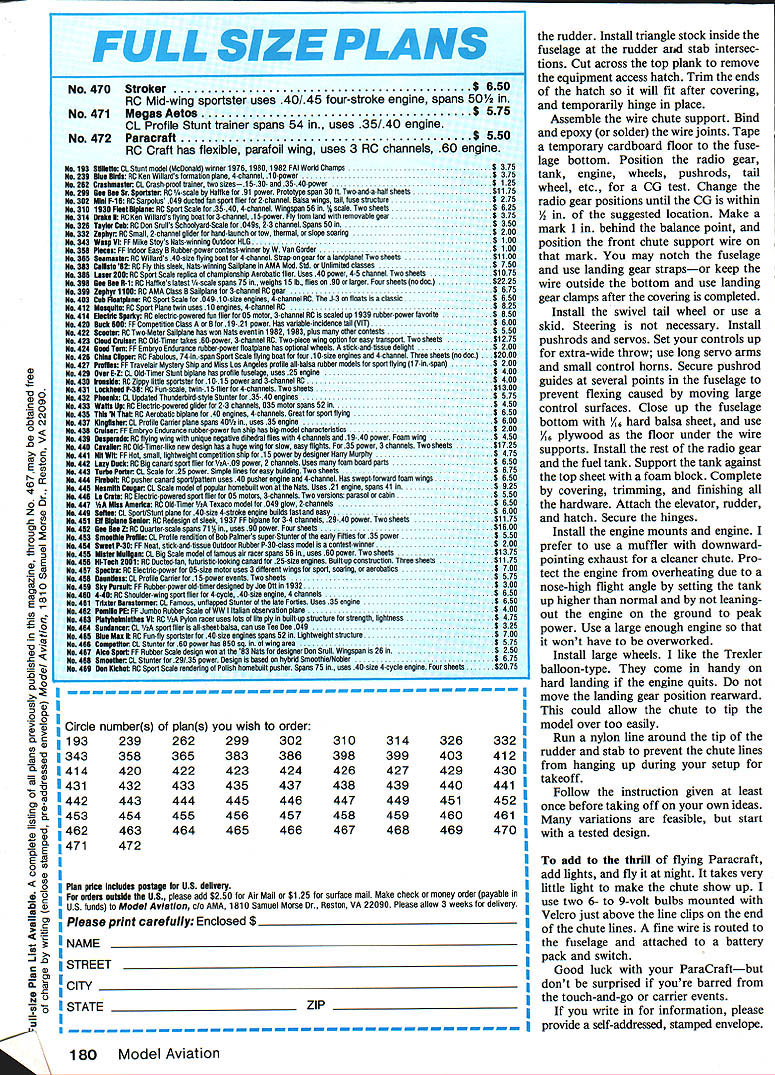
Initially, the author sewed fabric wings, but that was challenging. The project became feasible for typical wood-and-metal modelers after discovering ready-made parafoil kites that required only minor modification. Early flights involved trial and error; a large chute caused hovering and excessive engine strain until 30% of the chute was cut away, producing a graceful 10 mph flight and easier control.
Responses to early articles showed many individuals and companies were involved in RPV and full-scale powered parachute development.
Parafoil background
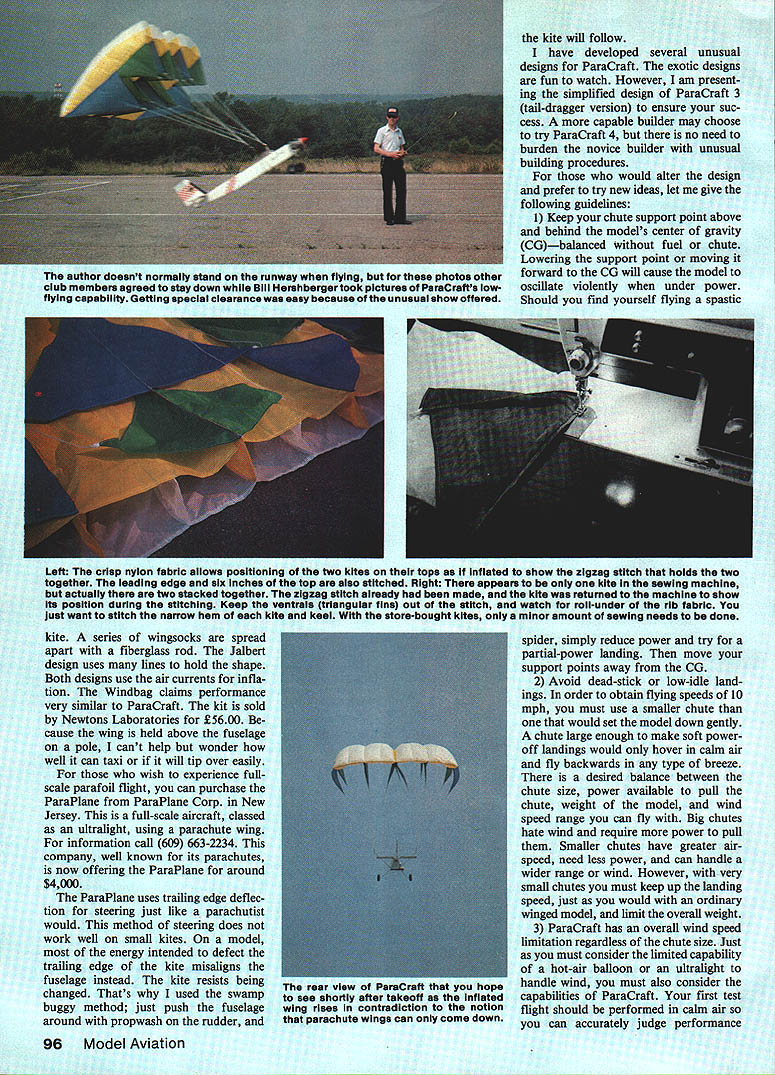
The original parafoil was a kite designed by Domina Jalbert in 1967. The design was later adapted to ram-air parachutes used by skydivers. Full-scale powered parachutes used parafoil wings, so smaller parafoil kites made sense for RC versions. Store-bought kites presented two issues: a chord greater than span (poor wing aspect ratio) and three rows of ventrals (sub-fins), making mounting to two support points awkward. The simple solution: attach two chutes side-by-side to create a wing-like ratio with more span than chord and provide two ready attachment points.
After discussing the idea with the owner of The Kite Site, the author received two kites to try. Ten minutes of simple sewing joined the chutes and the wing flew immediately on ParaCraft 3.
Other designs and full-scale options
- Windbag: A British RC model based on the Flexifoil kite. It uses wingsocks spread on a fiberglass rod rather than many lines. Windbag claims performance similar to ParaCraft and is sold by Newtons Laboratories (kit around $56). Because its wing is held above the fuselage on a pole, taxiing and tipping risk are concerns.
- ParaPlane: A full-scale ultralight using a parachute wing, available from ParaPlane Corp., NJ. The ParaPlane uses trailing-edge deflection for steering like parachutists. For info call (609) 663-2234. The trailing-edge steering method does not work well on small kites for RC; on a model the energy used to deflect the trailing edge tends to misalign the fuselage rather than change the kite shape. That’s why ParaCraft steers by using propwash on the rudder to push the fuselage and let the kite follow.
Design approach
The author developed several exotic ParaCraft designs but presents a simplified ParaCraft 3 (tail-dragger version) to ensure novice builders’ success. More capable builders may try other variants, but beginners should start with the tested design.
General design guidelines
- Keep the chute support point above and behind the model's center of gravity (CG) — balanced without fuel or chute. Lowering the support point or moving it forward toward the CG will cause violent oscillation under power. If the model becomes uncontrollable, reduce power and attempt a partial-power landing, then move the support points rearward.
- Avoid dead-stick or low-idle landings. To achieve ~10 mph flying speed, use a smaller chute than one that would permit soft power-off landings. A large chute may only hover in calm air and fly backward in any breeze. Choose a balance among chute size, available power, model weight, and wind speed range. Large chutes require more power and hate wind; smaller chutes have higher airspeed, need less power, and handle a wider wind range but require maintaining landing speed and limiting overall weight.
- ParaCraft has a wind-speed limitation regardless of chute size. Test in calm air first to judge performance accurately.
- Avoid tricycle landing gear. Variations in headwind during takeoff can tip the model. A tail-dragger with mains well forward of the chute supports will align with headwinds without tipping. Do not move the landing gear rearward.
- ParaCraft tends to fly slightly nose-high. Mount the fuel tank aligned level with the carburetor at this angle. Do not mount the engine upright (this raises the carb, causing leaning-out and overheating). If you must “peak” the engine on takeoff, use a more powerful engine instead of overworking a smaller one.
- Avoid flying with a steep nose-down attitude for more than a few seconds — fuel can run away from the carb because there’s little flying inertia at these slow speeds.
- Do not attempt to combine wings and a parafoil on ParaCraft. Those photos typically show chute-assisted landings; the model lacks airspeed to use conventional wings and the wings will catch crosswinds and spoil flying.
- Be considerate of other modelers. ParaCraft can hover like a helicopter and become a sitting target or nuisance to fixed-wing pilots. Do not hover over runways or interfere with takeoffs and landings.
Flying
- Test new models in calm air. Experienced pilots can extend wind range up to ~10 mph; for 10–15 mph consider a smaller chute made from two J-5 kites.
- Takeoff setup: Have a helper hold the chute at top, front, outer corners while you stand behind the model with the transmitter. A simple hand launch gets the model airborne. If the helper lets go early, the fuselage will hang at the end of the shroud lines — ensure the helper knows to release as the model rises or apply down elevator and reduce throttle to settle safely.
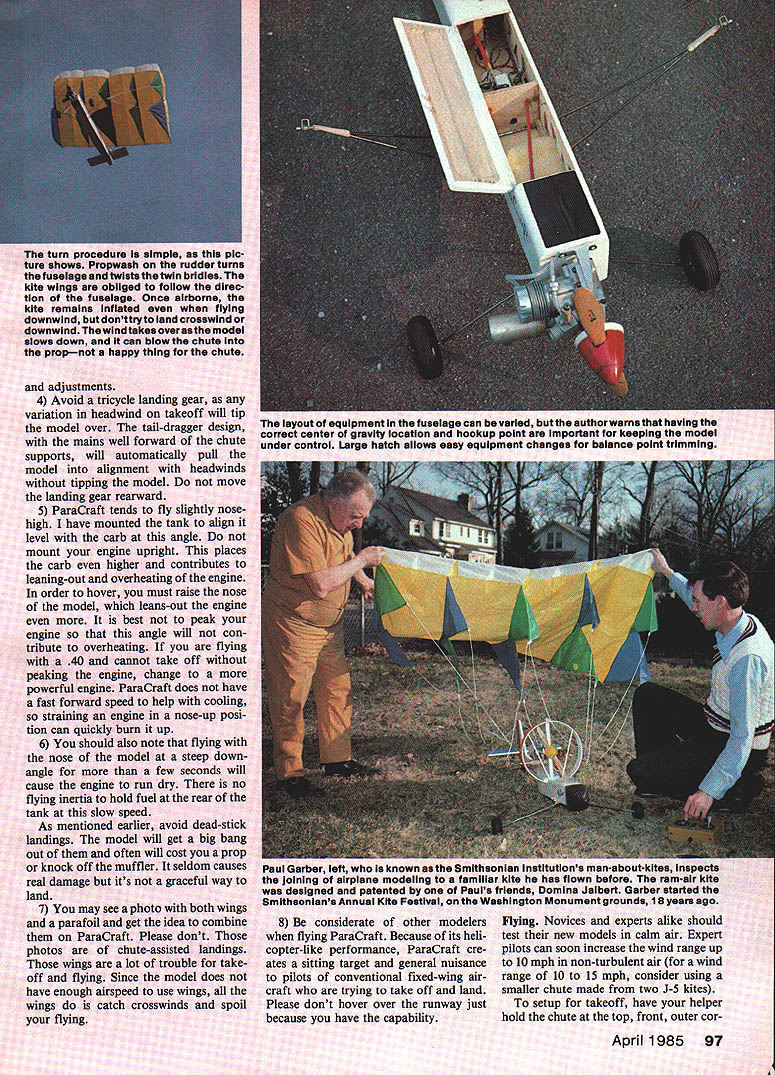
- Turning: Use propwash on the rudder to turn the fuselage; this twists the twin bridles and the kite follows. Aggressively move the stick in the desired direction and add a little up to tighten the turn.
- Control cautions: Do not give sharp up commands once airborne — pulling the fuselage back into the chute can wrap the model in lines.
- Landings: Approach upwind, reduce to about half-throttle. ParaCraft settles faster vertically than conventional models, so do not idle the engine. At ~5 ft altitude apply up elevator to raise the nose for a three-point landing. Increase power if descending too quickly, reduce it if the model hovers. Expect some forward speed on touchdown unless the wind equals flying speed.
- Near-vertical hover: Do not cut power suddenly. Apply down elevator to send the fuselage forward and reduce power slowly to avoid a pendulum effect and dropping the model on its tail.
- Use a wooden prop; it’s less likely to cut the chute if the chute descends over the prop after a rough landing.
If flying in a strong wind and the model drifts backward beyond control, reduce power and let it parachute down. Trying to fight a strong wind will make the kite rise higher.
Preparing and purchasing kites
- ParaCraft uses two Jalbert J-7.5 ram-air kites. These are available at kite shops; AKA members or Kite Lines can help locate stores. If local shops aren't available, order from The Kite Site, Washington, DC: (202) 965-4230. You may order by charge card or request a mail order form.
- (1984 prices as reference) J-7.5 kites cost about $3.00 each; shipping added about $3.00. For smaller chutes suitable for higher wind ranges or .40-size models, order the J-5 (about $16.00 each).
- For repairs, buy rip-stop nylon tape (adhesive-backed) in several colors. Use permanent marker pens to match colors.
Before using on ParaCraft, fly each kite singly on 50–100 lb test nylon line in a mild breeze to remove creases and relax the fabric. Use gloves when handling lines to prevent burns and cuts.
Joining two kites
- Place kites side-by-side, lining up bottom keel hems. Fold back ventrals, lines, and remaining fabric.
- Set sewing machine to longest stitch and a wide zigzag. Assemble the two hems starting at the leading edge: the left zig should enter the fabric and the right zig should fall just outside the hem. Triple-knot the thread at both ends.
- Set the machine for a straight stitch and sew the leading edge of the two chutes together. Center the stitch between the factory stitch and the edge of the fabric. Triple-knot both ends.
- Attach about six inches of one of the tape ties on top of the kites together. Hand-stitching is recommended for this area; use large stitches over the manufacturer’s stitches and triple-knot ends.
- Keep ventrals out of the stitch area and avoid rolling-under ribs — stitch only the narrow hem of the kite keel.
Check all seams, hems, and intersections for loose threads. Under pressure, seams can come apart. Snug bridle knots and apply a small folded tape piece to prevent slippage.
Bridle setup and tuning
- Place key clips (from variety stores) through the bridle loops for quick hookup.
- To help untangle lines, tie a different colored line between the two bridle clips. Wrap and tie an extra two inches of line so you can follow the colored line through tangles.
- If the chute flies misaligned or twisted, test with the model unpowered. Correct by lengthening the rear ventral line on the side that leads or shortening the rear ventral line on the side that follows — about 1/2 in. at a time (usually less is needed). Choose the adjustment that doesn’t create looseness in other ventrals.
- Secure knots with pliable glue such as RC/5-66 if needed.
Maintenance — washing and care
- If the chute gets soiled or oily, wash in warm water with mild liquid soap (Woolite) in a bathtub. Do not use a washing machine.
- Tie chute clips together and run a line to a towel rack to keep lines from tangling. Agitate by hand or lift and dunk the chute while holding the trailing edge.
- A wet chute is heavy — never lift it by the shroud lines. After rinsing, lift by the trailing edge, let water drain, and hang to dry. When just damp, fly the chute for final drying and shaping.
- Do not pack a damp chute in a sealed bag. Oil stains may not fully disappear but should not leave sticky, heavy fabric after washing.
Building the fuselage
- Cut out all parts and bend wire pieces. Glue stab strips together and temporarily hinge wire parts. Complete tail surfaces and temporarily hinge elevator and rudder.
- Assemble bulkheads F-2 (a, b, c). Attach 1/4 x 1/2 pine longerons and triangle stock to fuselage sides. Attach landing gear to the firewall with clamps or wire. Install blind nuts for the engine mount.
- Place the fuselage upside down over the top view drawing, glue bulkheads front to rear, then turn the fuselage over. Attach and shape the top 1/4-in balsa plank; glue only front and rear of the hatch area. Cut a slot in the top plank for the rudder, glue the stab and then the rudder. Install triangle stock inside at rudder and stab intersections. Cut and trim the hatch so it fits after covering and temporarily hinge.
- Assemble the wire chute support; bind and epoxy or solder wire joints. Tape a temporary cardboard floor to the fuselage bottom.
- Position radio gear, tank, engine, wheels, pushrods, tail wheel, etc., for a CG test. Move radio gear until the CG is within 1 in. of the suggested location. Mark 1 in. behind balance point and position the front throttle servo over that mark.
- You may notch the fuselage so landing gear straps fit, or keep the wire outside and use landing gear clamps after covering.
- Install swivel tail wheel or use a skid (steering not necessary). Install pushrods and servos with extra-wide throw using long servo arms and small control horns. Secure pushrod guides at several fuselage points to prevent flex.
- Close the fuselage bottom with 1/8-in hard balsa sheet and use 1/16-in plywood as the floor under wire supports. Install remaining radio gear and fuel tank; support tank with foam block against the top sheet. Complete covering, trimming, and finishing. Attach elevator, rudder, and hatch; secure hinges.
- Install engine mount and engine. Prefer a muffler with downward exhaust to protect the chute. Avoid engine overheating by mounting tank high and not leaning out the engine on the ground. Use a sufficiently powerful engine so it isn’t overworked.
- Install large wheels (Trexler balloon-type are recommended) to help on hard landings if the engine quits. Again, do not move landing gear rearward.
- Run a nylon line around tip of rudder and stab to prevent chute lines from hanging up during setup.
Final setup, tips, and extras
- Follow the instructions and rehearsed procedures at least once before improvising.
- ParaCraft kits and related wings are available from Newtons Laboratories (Windbag). The author noted concerns about high-mounted wings and taxiing stability.
- For added spectacle, fly at night with lights. Two 6–9V bulbs mounted with Velcro just above the line clips at the end of chute lines show up well. Route fine wire to a battery pack and switch on the fuselage.
- ParaCraft is forgiving of errors, but learning the basics increases chances of a successful first flight.
Good luck with your ParaCraft — and be aware you may be excluded from touch-and-go or carrier events because of hovering capability.
If you write for information, include a self-addressed stamped envelope.
Transcribed from original scans by AI. Minor OCR errors may remain.

