
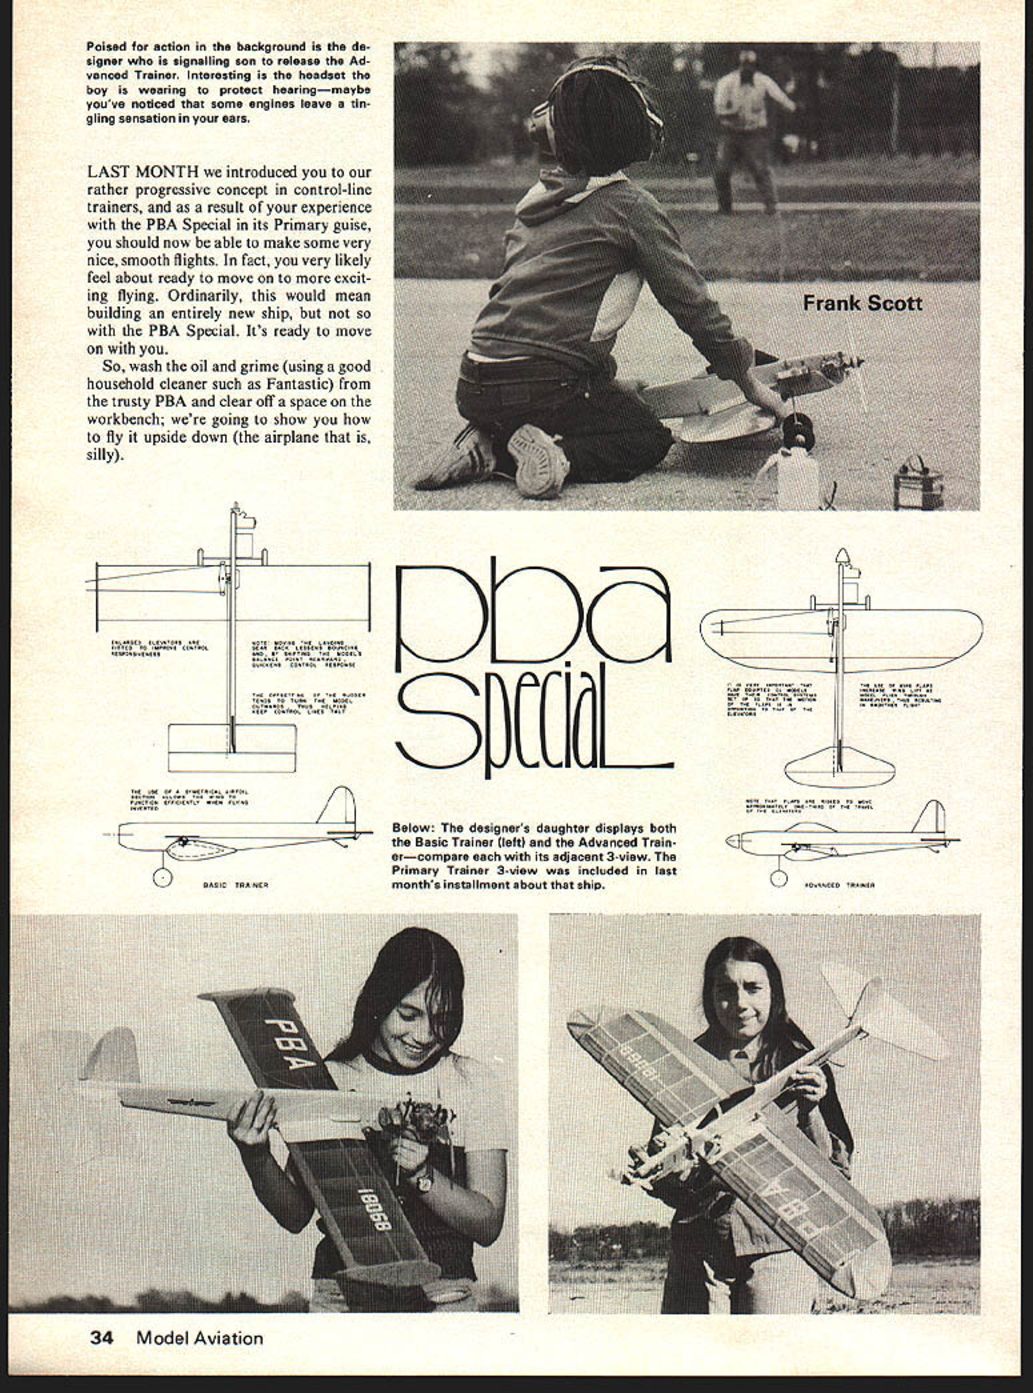
PBA Special
LAST MONTH we introduced you to our rather progressive concept in control-line trainers, and as a result of your experience with the PBA Special in its Primary guise, you should now be able to make some very nice, smooth flights. In fact, you very likely feel about ready to move on to more exciting flying. Ordinarily, this would mean building an entirely new ship, but not so with the PBA Special. It's ready to move on with you.
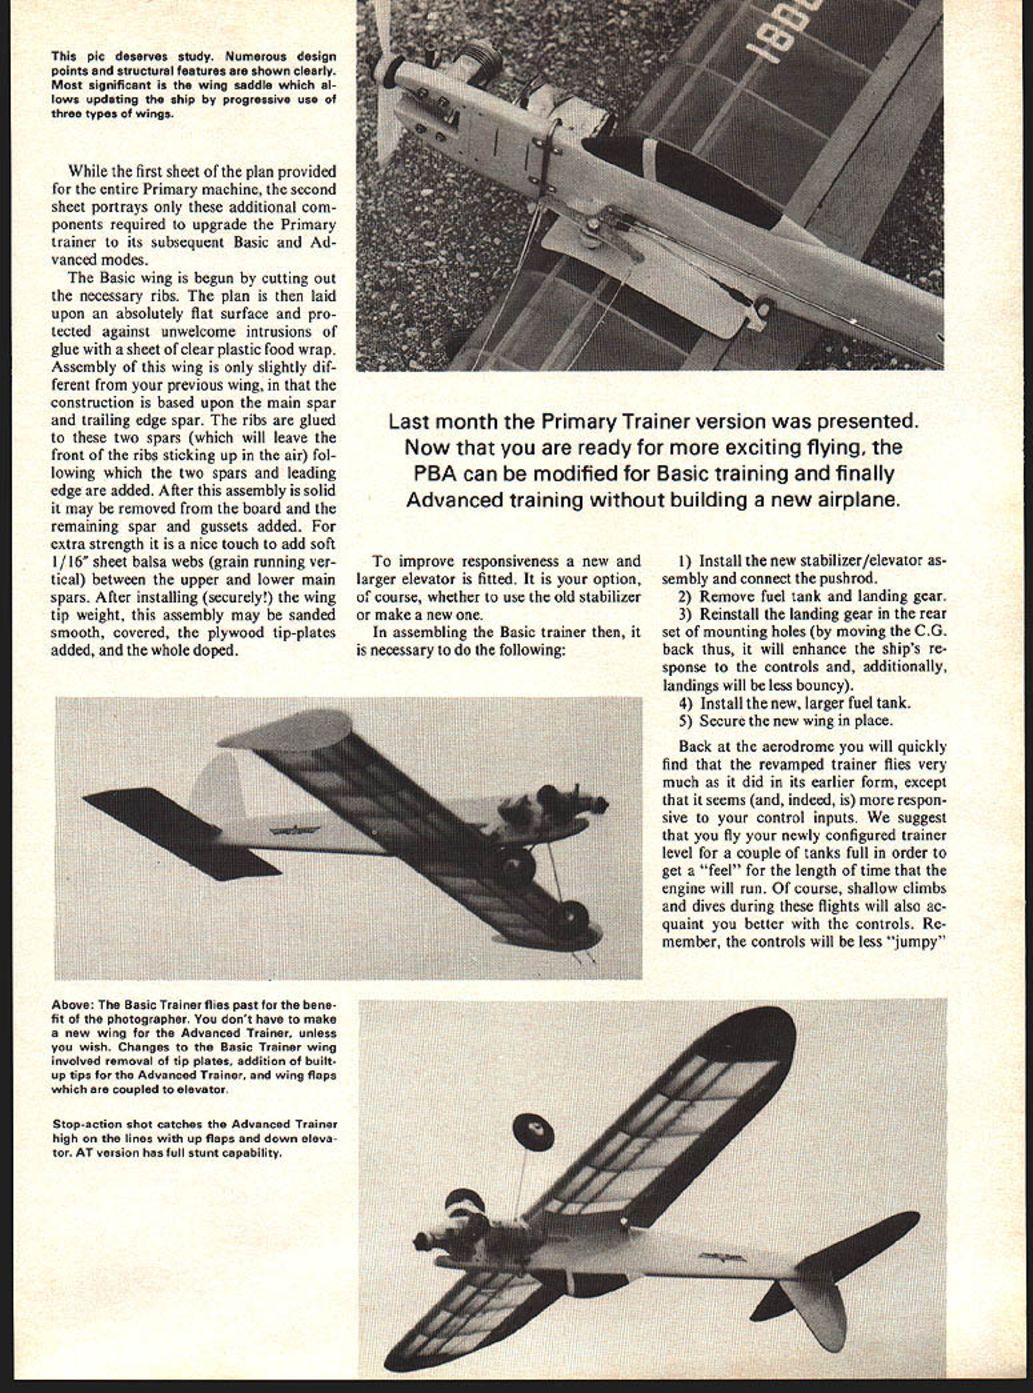
So, wash the oil and grime (using a good household cleaner such as Fantastic) from the trusty PBA and clear off a space on the workbench; we're going to show you how to fly it upside down (the airplane that is, silly). While the first sheet of the plan provided for the entire Primary machine, the second sheet portrays only these additional components required to upgrade the Primary trainer to its subsequent Basic and Advanced modes.
The Basic wing is begun by cutting out the necessary ribs. The plan is then laid upon an absolutely flat surface and protected against unwelcome intrusions of glue with a sheet of clear plastic food wrap. Assembly of this wing is only slightly different from your previous wing, in that the construction is based upon the main spar and trailing edge spar. The ribs are glued to these two spars (which will leave the front of the ribs sticking up in the air) following which the two spars and leading edge are added. After this assembly is solid it may be removed from the board and the remaining spar and gussets added. For extra strength it is a nice touch to add soft 1/16" sheet balsa webs (grain running vertical) between the upper and lower main spars. After installing (securely!) the wing tip weight, this assembly may be sanded smooth, covered, the plywood tip-plates added, and the whole doped.
To improve responsiveness a new and larger elevator is fitted. It is, of course, your option whether to use the old stabilizer or make a new one.
In assembling the Basic trainer then, it is necessary to do the following:
1) Install the new stabilizer/elevator assembly and connect the pushrod.
2) Remove fuel tank and landing gear.
3) Reinstall the landing gear in the rear set of mounting holes (by moving the C.G. back thus, it will enhance the ship's response to the controls and, additionally, landings will be less bouncy).
4) Install the new, larger fuel tank.
5) Secure the new wing in place.
Back at the aerodrome you will quickly find that the revamped trainer flies very much as it did in its earlier form, except that it seems (and, indeed, is) more responsive to your control inputs. We suggest that you fly your newly configured trainer level for a couple of tanks full in order to get a "feel" for the length of time that the engine will run. Of course, shallow climbs and dives during these flights will also acquaint you better with the controls. Remember, the controls will be less "jumpy." If you keep your arm stiff and not fly from the wrist. One of the easiest, and most basic, maneuvers is the wingover. Remember those gentle climbs, and dives mentioned earlier? Simply do a series of those climbs, making each climb a bit steeper than its predecessor until you find that your PBA Special is describing a right angle pull-up, climbing straight over the top of the flying circle and down in a vertical dive. A similar sharp pull-up will restore the diving model to level flight. This is a wingover.
One point to keep in mind, anytime that you are starting to fly, is to note the direction of the breeze (you want to take off downwind anyway) and plan your maneuvers so that the model is doing its maneuvers on the down-wind side of the flying circle. That is to say, that the pilot's back should be towards the wind so that the breeze will help keep the flying lines taut to insure good control.
Every new pilot is anxious to loop his ship, and why not, it's as easy as it looks. With your back to the wind (and your arm stiff), feed in enough "up" to nose the ship up into a big curve. As your plane becomes vertical give additional "up" elevator, increasing the elevator deflection as the model comes around. As the nose comes up to horizontal it is time to level off. Now, frankly, a loop done in this manner may not look very round (you probably will recover level flight a good bit higher than you started the loop) but it is a safe way to start, and with practice, and confidence, your loops will become nice and round.
After you've got your loops looking pretty good, you'll be ready to go onto something a bit different. Pull up into a loop as you have been doing, only this time, as the model reaches the top of the loop, neutralize the controls. Wow, you're flying upside down! Quickly pulling "up," the model will finish the loop. Using this technique of extending the loop, you can fly upside down for as long as you like. Note that, while inverted, the controls will seem to be reversed (i.e. "up" elevator will cause the ship to pitch downwards and vice-versa) and curiously, most fliers find it easier to fly the inverted phase of the flight with their controlling hand laid over sideways with the palm up. Do not attempt to turn the handle over in your hand in order to fly upside down, for to do so will likely result in a confused situation and a crash. Also, do not worry excessively about the flying lines becoming twisted during loops, as the wires can withstand quite a few twists before the controls start to "stiffen." The control lines may be easily untwisted once the model is on the ground. In fact, once you have learned the technique of outside looping, you can easily keep the lines straight in flight by doing as many outside loops as inside loops.
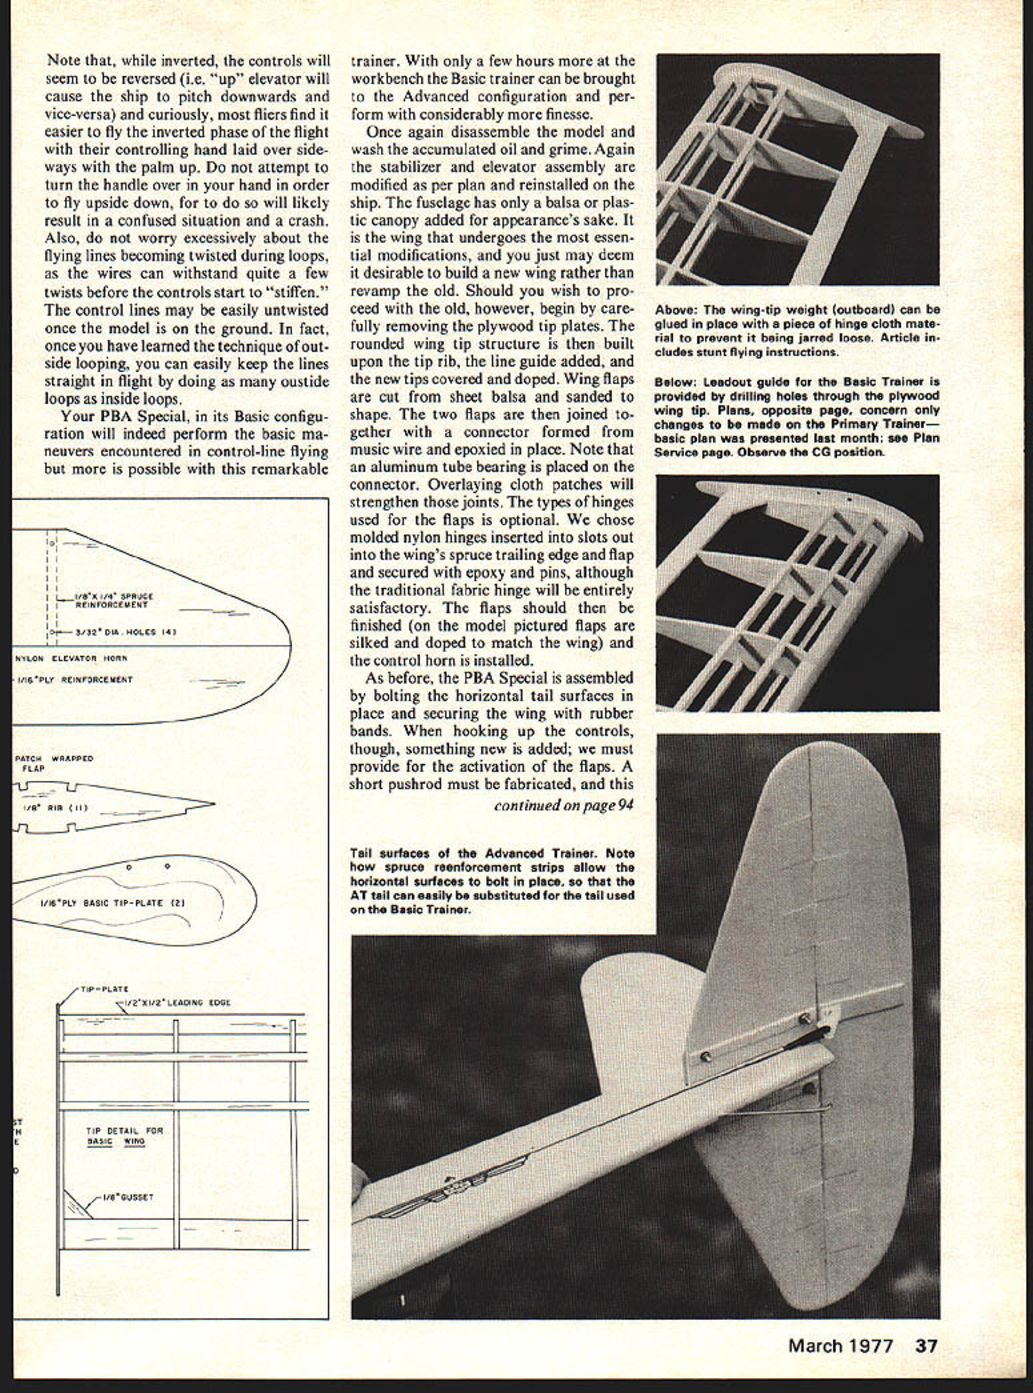
Your PBA Special, in its Basic configuration, will indeed perform the basic maneuvers encountered in control-line flying but more is possible with this remarkable trainer. With only a few hours more at the workbench the Basic trainer can be brought to the Advanced configuration and perform with considerably more finesse.
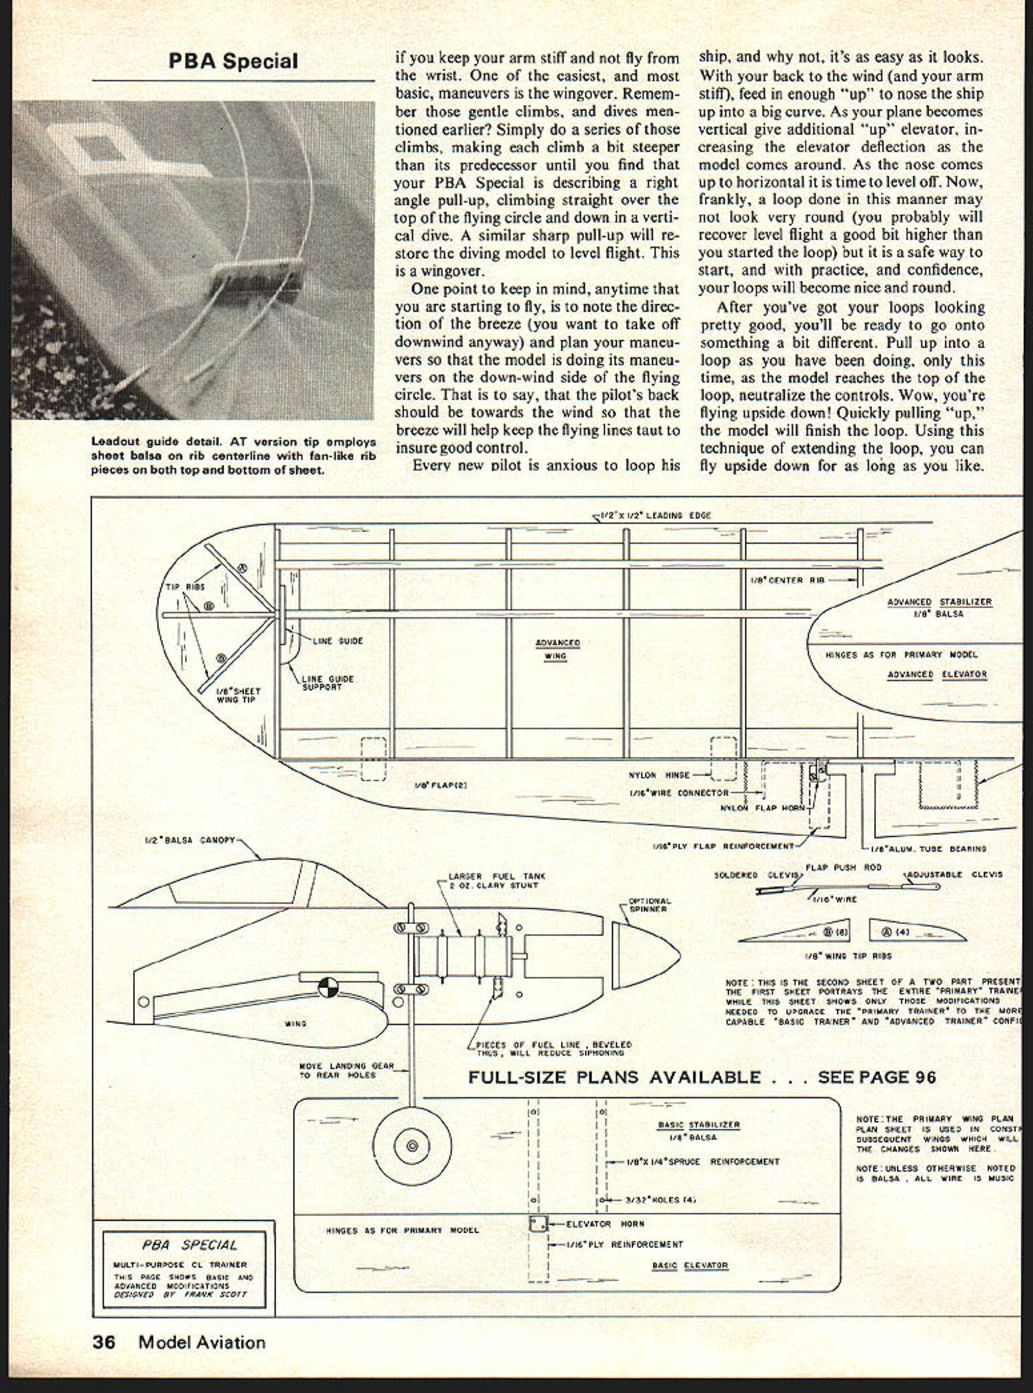
Once again disassemble the model and wash the accumulated oil and grime. Again the stabilizer and elevator assembly are modified as per plan and reinstalled on the ship. The fuselage has only a balsa or plastic canopy added for appearance's sake. It is the wing that undergoes the most essential modifications, and you just may deem it desirable to build a new wing rather than revamp the old. Should you wish to proceed with the old, however, begin by carefully removing the plywood tip plates. The rounded wing tip structure is then built upon the tip rib, the line guide added, and the new tips covered and doped. Wing flaps are cut from sheet balsa and sanded to shape. The two flaps are then joined together with a connector formed from music wire and epoxied in place. Note that an aluminum tube bearing is placed on the connector. Overlaying cloth patches will strengthen those joints. The types of hinges used for the flaps is optional. We chose molded nylon hinges inserted into slots out into the wing's spruce trailing edge and flap and secured with epoxy and pins, although the traditional fabric hinge will be entirely satisfactory. The flaps should then be finished (on the model pictured flaps are silked and doped to match the wing) and the control horn is installed.
As before, the PBA Special is assembled by bolting the horizontal tail surfaces in place and securing the wing with rubber bands. When hooking up the controls, though, something new is added; we must provide for the activation of the flaps. A short pushrod must be fabricated, and this is used to connect the innermost hole in the bellcrank to the outer hole of the flap horn. The elevator's pushrod connects the outer bellcrank hole to the elevator horn. The hole used here should be such that the travel of the elevator is about three times, and in opposition to, the travel of the flaps. Thus, applying 45° of UP elevator should result in the flaps being depressed by about 15°. The use of adjustable RC-type clevis fitting on the pushrods will greatly simplify the setting up of the flaps. Performance of the PBA Special will also be enhanced by fitting smaller wheels, though this is done at the expense of ground handling (another lesson in aeronautics: practically every design feature in Aviation is a compromise).
And now you are again ready to return to the aerodrome, this time with the Advanced trainer. The Advanced trainer will fly much as the Basic configuration did. However the larger wing and the wing flaps will allow the model to fly rather more smoothly through the maneuvers in the AMA Rule Book and, while Precision Aerobatics can be very demanding, all of the maneuvers accomplished by contest stunt ships are nothing but combinations of those taught by the PBA Special: take-offs, level flight, loops, wingovers, inverted flight and landing. Thus, with an understanding of these, you may proceed with confidence to any area of Control-line flying.
Happy landings, and lots of 'em.
Transcribed from original scans by AI. Minor OCR errors may remain.

