
Peanut Packet
By Bill Hannan
An easily made box which totes everything you'll possibly need.
HERE'S A LITTLE project that will protect your Peanut Scale model during transportation, and organize all the support equipment needed for flying it. The idea of model protection boxes is not new, of course; the indoor microfilm specialists have always used them. Then too, many RC fliers employ elaborate field kits for their equipment. International competitors have developed their model packaging into almost a science. Their containers are generally large, and often intended to hold several models.
By contrast, ours was designed small enough to be transported via bicycle, yet accommodate enough equipment for contest participation. It is also ideal for those spur-of-the-moment trips to the field for sport flying. Carefully packed, it will hold the following:
One Peanut Scale model, one mechanical winder, rubber lube, spare rubber motors, stuffing stick (for replacing motors), glue.
Tools: Scissors (folding type), long-nose pliers, diagonal cutters, modeling knife, ball-point pen.
Spare prop hooks, clay ballast, proof-of-scale loose-leaf binder, notebook, stopwatch, camera and film, emergency rations.
Miscellaneous items: Band-Aids, straight pins, thrust washers, shims, etc.
Obviously, the contents could vary, depending upon personal preferences and type of flying contemplated. For example, if one planned sport flying, rather than contest work, a few sandwiches could replace the proof-of-scale binder. Our "emergency rations" consist only of a health food bar or two for that quick burst of energy, or to tide one over when the flying session runs past normal eating time. We considered the incorporation of a thermos bottle for liquid refreshment, but decided against its considerable weight and bulk. You may feel differently.
Note that the basic design could easily be expanded for larger models, or an extra "layer" added to permit transportation of another Peanut. Our goal, however, was minimum exterior dimensions consistent with reasonable utility, for ease of handling, traveling and stowage.
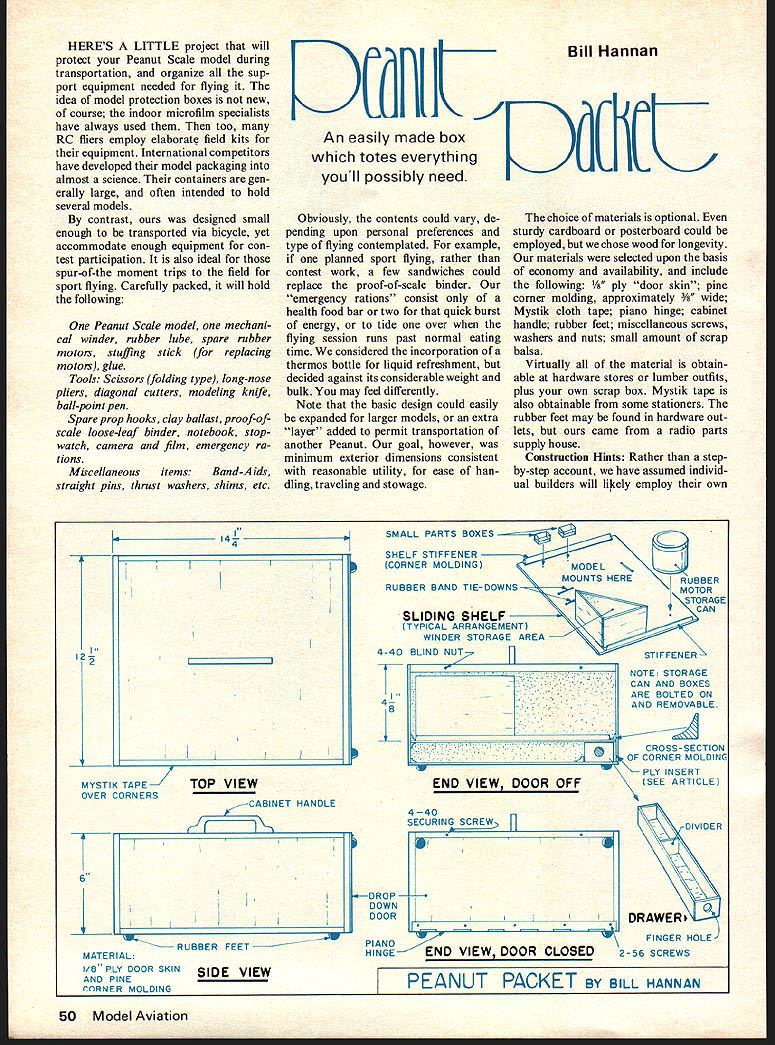
The choice of materials is optional. Even sturdy cardboard or posterboard could be employed, but we chose wood for longevity. Our materials were selected upon the basis of economy and availability, and include the following: 1/8" ply door skin; pine corner molding, approximately 3/8" wide; Mystik cloth tape; piano hinge; cabinet handle; rubber feet; miscellaneous screws, washers and nuts; small amount of scrap balsa.
Virtually all of the material is obtainable at hardware stores or lumber outfits, plus your own scrap box. Mystik tape is also obtainable from some stationers. The rubber feet may be found in hardware outlets; but ours came from a radio parts supply house.
Construction Hints: Rather than a step-by-step account, we have assumed individual builders will likely employ their own choice of materials and methods. A full-size layout is strongly recommended. Although the sketches indicate the basic dimensions used, be aware requirements may be different. Under the 13" wingspan rule governing Peanut Scale competitions, some aircraft subjects, including low-aspect-ratio racers, feature fuselages too long to be contained within the box illustrated. Drawings can roughly be made on inexpensive shelving paper or an opened-up grocery bag. Such a sketch will enable quick visualization and direct checking of space requirements for model and support equipment. Don't simply rely upon estimates. Once the layout has been established, cut various components to size. The project can be constructed almost entirely with ordinary hand tools, including a small cross-cut saw, razor saw, and long sanding block.
Door-skin plywood is quite inexpensive but has the disadvantage of splintering easily; a fine-toothed saw will minimize or eliminate the problem. Corner molding used is a concave section; quarter-round stock would serve the purpose. One could use balsa strips, but it seems a shame to use such expensive/scarce material for such a mundane purpose. The box is assembled base up in a sort of learn-as-you-go manner. which reminded us that cabinetry is an entirely different ball game than model building! As an example, we had difficulty properly clamping the corner molding in place while the glue was drying. Doubtless there are old carpenters' tricks for doing this, but not being an old carpenter, we resorted to masking tape and weights. Perhaps the use of small brads in addition to the glue would simplify the chore.
Some portions of our plywood were warped, but the panels were rendered flat by careful placement of the grain in relation to the corner molding strips, combined with overnight glue drying and suitable weights.
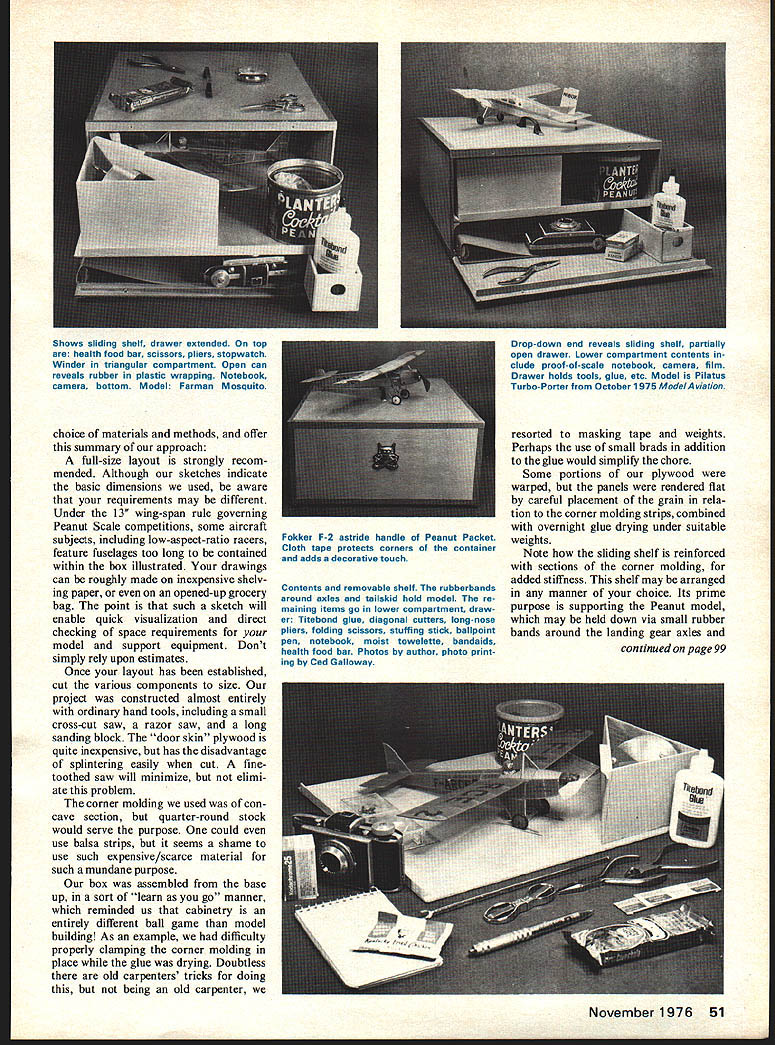
Note how the sliding shelf is reinforced with sections of the corner molding, for added stiffness. This shelf may be arranged in any manner of your choice. Its prime purpose is supporting the Peanut model, which may be held down via small rubber bands around the landing gear axles and tail skid. If desired, small balsa "chocks" may be glued onto the shelf to assure exact placement. The hold-down rubber bands are secured by passing their looped ends through holes in the shelf. The loops are retained on the underside of the shelf with toothpicks.
After the model has been satisfactorily located, the remaining corners of the shelf may be utilized as storage space. We constructed a triangular shaped compartment to accommodate the mechanical winder, for one corner of the shelf, a Planters Peanut (hatch!) can for rubber motor storage was bolted to another corner, and small clear plastic snap-top boxes were attached along one side. These hold items such as prop washers and hooks. Other arrangements are easily possible, to suit your particular needs.
A long thin drawer in the lower right-hand corner of our box contains such items as tools, glue, and the motor stuffing stick. In a separate rear compartment, health food bars are accommodated. We fitted 1/8 x 1/16" hard balsa "cap strips" to cover the rough upper edges of the drawer. Note there is a strip of door skin to the right of the drawer, glued to the inner wall of the box, which serves as the lower runner to support the sliding shelf. Sections of corner molding serve as the remaining three runners. A finger hole in the end of the drawer is used for opening it. A small knob could be used instead, but would require a shorter drawer, in order to provide clearance for the knob.
The lower left-hand compartment of the box is usually occupied by a proof-of-scale loose-leaf binder, small camera, etc., and requires no special treatment. Alternatively, it could be fitted with additional drawers, if desired.
Reinforcing strips of wood were glued inside the box top, in order to spread carrying loads from the handle, which is held in place by two screws. Large diameter thin metal washers might serve the same purpose.
The front of the box features a stiffening section of corner molding at the top, and is pivoted by means of a piano hinge, held in place with 2-56 machine screws, washers and nuts. Our hinge was placed on the outside, for simplicity, but might be neater, if fastened on the inside instead. Our door is kept closed by means of two 4-40 machine screws, which thread into blind nuts epoxied into the upper corner strip of the box. If preferred, your choice of latches could be employed.
3/4" wide Mystik brand cloth tape is applied to each of the outside corners. This serves to conceal any rough edges or imperfections, while it strengthens joints, and adds a decorative note, since the tape is available in different colors.
The finished box may be given a coat or two of clear urethane varnish to seal the wood and render it moisture resistant.
Next, rubber feet may be added to the bottom of the box and upper corners of the drop-front door, to protect the surfaces from field abrasion. The finishing touch can be in the form of any personalizing items you may care to add, such as your AMA number, club decals, etc. In our case, we added a Nash "Gremlin" emblem, supplied by a friendly American Motors representative. The thought was that a gremlin on the outside was better than one inside!
Transcribed from original scans by AI. Minor OCR errors may remain.

