
Peanut Pilatus Turbo
Bill Hannan
THE FULL-SIZE Turbo-Porter is a product of Switzerland, and first flew during May of 1961. An outgrowth of the piston-engined Pilatus Porter, the Turbo-Porter has been produced in several variations over the years, differing in power plants and many minor details. These machines have been employed in a number of different countries, and thus a large variety of color/marking schemes may be found from which to choose. For those who may care to undertake research, we offer the following list of references: Flying, April, 1962; Aviation Week, December 17, 1962; The AOPA Pilot, December, 1963; Aviation Week, October 4, 1963; Flugwelt Heft 11, 1965; The AOPA Pilot, October, 1965; Flugzeuge aus Aller Welt, 1966; The Aircraft of the World, 1965; Model Airplane News, August, 1968; Australian Modeler, No. 7, 1968.
Our model was based upon an early aircraft used as a demonstrator by the Fairchild Stratos Corporation, which was colored an overall white with red embellishments. This machine featured a French Turbomeca Astazou engine. Other types were powered by the Canadian Pratt and Whitney PT6, and our drawings also show that alternative cowling shape.
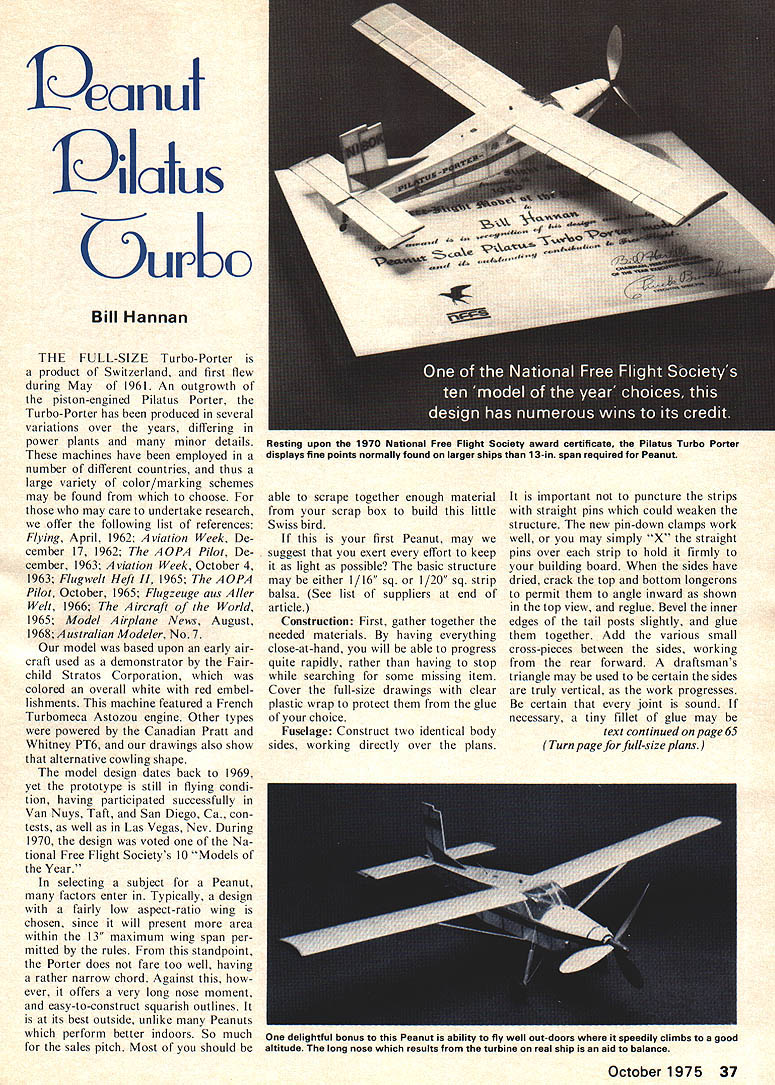
The model design dates back to 1969, yet the prototype is still in flying condition, having participated successfully in Van Nuys, Taft, and San Diego, Ca., contests, as well as in Las Vegas, Nev. During 1970, the design was voted one of the National Free Flight Society's 10 "Models of the Year."
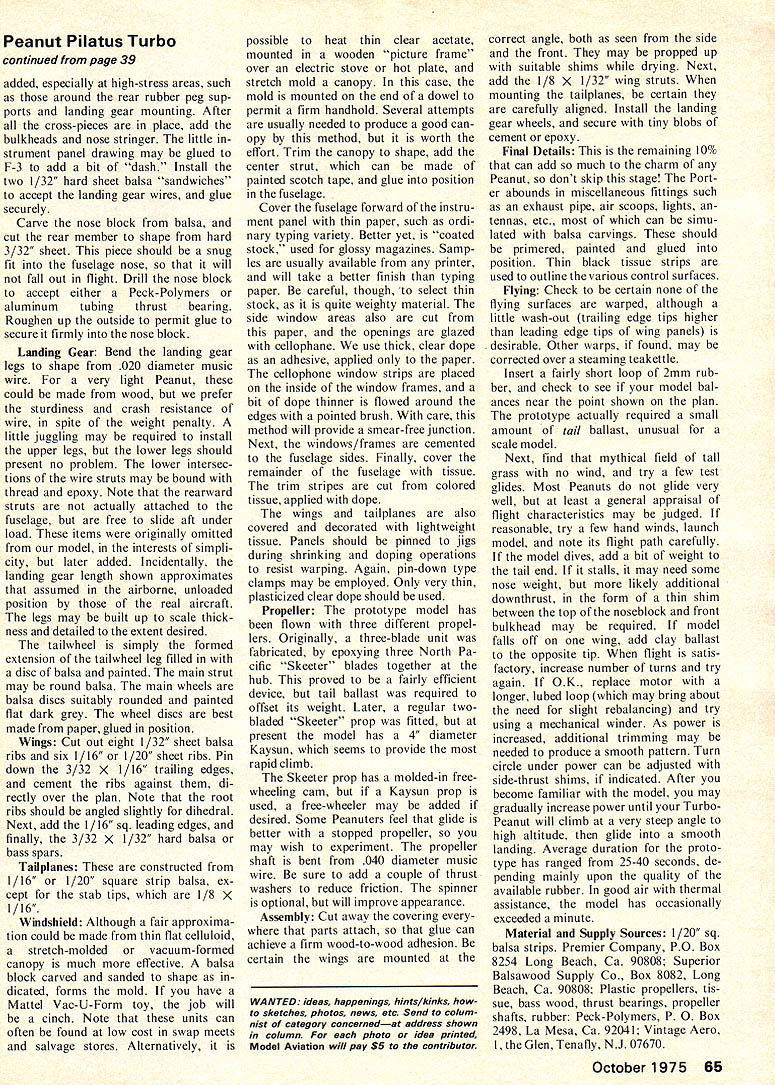
In selecting a subject for a Peanut, many factors enter in. Typically, a design with a fairly low aspect-ratio wing is chosen, since it will present more area within the 13" maximum wingspan permitted by the rules. From this standpoint, the Porter does not fare too well, having a rather narrow chord. Against this, however, it offers a very long nose moment, and easy-to-construct squarish outlines. It is at its best outside, unlike many Peanuts which perform better indoors. So much for the sales pitch. Most of you should be able to scrape together enough material from your scrap box to build this little Swiss bird.
If this is your first Peanut, may we suggest that you exert every effort to keep it as light as possible? The basic structure may be either 1/16" sq. or 1/20" sq. strip balsa. (See list of suppliers at end of article.)
Construction
First, gather together the needed materials. By having everything close-at-hand, you will be able to progress quite rapidly, rather than having to stop while searching for some missing item. Cover the full-size drawings with clear plastic wrap to protect them from the glue of your choice.
Fuselage
Construct two identical body sides, working directly over the plans. It is important not to puncture the strips with straight pins which could weaken the structure. The new pin-down clamps work well, or you may simply "X" the straight pins over each strip to hold it firmly to your building board. When the sides have dried, crack the top and bottom longerons to permit a long inward angle as shown in the top view, and reglue. Bevel the inner edges of the tail posts slightly, and glue them together. Add the various small cross-pieces between the sides, working from the rear forward. A draftsman's triangle may be used to be certain the sides are truly vertical, as the work progresses. Be certain that every joint is sound. A tiny fillet of glue may be added especially in high-stress areas such around rear rubber peg supports and landing gear mounting.
After cross-pieces are in place, add the bulkheads, nose stringer and little instrument panel drawing may glued F-3 add bit dash. Install two 1/32" hard sheet balsa sandwiches to accept landing gear wires; glue securely. Carve nose block from balsa; cut rear member shape from hard 3/32" sheet. Piece should snug fit fuselage nose will fall out in flight. Drill nose block to accept either Peck-Polymers aluminum tubing thrust bearing. Roughen up outside permit glue secure firmly nose block.
Landing Gear: Bend landing gear legs to shape from .020 diameter music wire. For a very light Peanut, wood could be used, but wire is preferred for sturdiness and crash resistance despite the weight penalty. A little juggling may be required to install upper legs; lower legs should present no problem. Lower intersections and wire struts may be bound with thread and epoxy. Note rearward struts actually attached to fuselage free to slide aft under load; items originally omitted for model interests simplicity later added. Incidentally, landing gear length shown approximates assumed airborne unloaded position. The tailwheel is simply the formed extension of the tailwheel leg filled in with a disc of balsa and painted. The main strut may be round balsa. The main wheels are balsa discs suitably rounded and painted flat dark gray. The wheel discs are best made from paper, glued in position.
Wings:
Cut out eight 1/32" sheet balsa ribs and six 1/16" or 1/20" sheet ribs. Pin down the 3/32" x 1/16" trailing edges, and cement the ribs against them, directly over the plan. Note that the root ribs should be angled slightly for dihedral. Next, add the 1/16" sq leading edges, and finally, the 3/32" x 1/32" hard balsa or bass spars.
Tailplanes:
These are constructed from 1/16" or 1/20" square strip balsa, except for the stab tips, which are 1/8" x 1/16".
Windshield:
Although a fair approximation could be made from thin flat celluloid, a stretch-molded or vacuum-formed canopy is much more effective. A balsa block carved and sanded to shape is indicated, from which the mold is made. If you have a Mattel Vac-U-Form toy, the job will be a cinch. Note that these units can often be found at low cost in swap meets and salvage stores. Alternatively, it is possible to heat thin clear acetate, mounted in a wooden "picture frame" over an electric stove or hot plate, and stretch mold a canopy. In this case, the mold is mounted on the end of a dowel to permit a firm handhold. Several attempts are usually needed to produce a good canopy by this method, but it is worth the effort. Trim the canopy to shape, add the center strut, which can be made of painted scotch tape, and glue into position in the fuselage.
Cover the fuselage forward of the instrument panel with thin paper such as ordinary typing variety. Better yet, is "coated stock," used for glossy magazines. Sample sizes are usually available from any printer, and will take a better finish than typing paper. Be careful, though, to select thin stock, as it is quite weighty material. The side window areas are cut out from this paper, and the openings are glazed with cellophane. We use thick, clear dope as an adhesive, applied only to the paper. The cellophane window strips are placed on the inside of the window frames, and a bit of dope thinner is flowed around the edges with a pointed brush. With care, this method will provide a smear-free junction. Next, the windows/frames are cemented to the fuselage sides. Finally, cover the remainder of the fuselage with tissue. The trim stripes are cut from colored tissue, applied with dope.
The wings and tailplanes are also covered and decorated with lightweight tissue. Panels should be pinned to jigs during shrinking and doping operations to resist warping. Again, pin-down type clamps may be employed. Only very thin, plasticized cover dope should be used.
Propeller:
The prototype model has been flown with three different propellers. Originally, a three-blade unit was fabricated by epoxying three North Pacific "Skeeter" blades together at the hub. This proved to be a fairly efficient device, but tail ballast was required to offset its weight. Later, a regular two-bladed "Skeeter" prop was fitted, but at present the model has a 4" diameter Kaysun, which seems to provide the most rapid climb.
The Skeeter prop has a molded-in freewheeling cam, but if a Kaysun prop is used, a free-wheeler may be added if desired. Some Peanuts feel that glide is better with a stopped propeller, so you may wish to experiment. The propeller shaft is bent from .040" diameter music wire. Be sure to add a coupling of thrust washers to reduce friction. The spinner is optional, but will improve appearance.
Assembly:
Cut away the covering everywhere that parts attach, so that glue can achieve a firm wood-to-wood adhesion. Be certain the wings are mounted at the correct angle, both as seen from the side and the front. They may be propped up with suitable shims while drying. Next, add the 1/8" x 1/32" wing struts. When mounting the tailplanes, be certain they are carefully aligned. Install the landing gear wheels, and secure with tiny blobs of cement or epoxy.
Final Details:
This is the remaining 10% that can add so much to the charm of any Peanut, so don't skip this stage! The Porter abounds in miscellaneous fittings such as an exhaust pipe, air scoops, lights, antennas, etc., most of which can be simulated with balsa carvings. These should be primed, painted and glued into position. Thin black tissue strips are used to outline the various control surfaces.
Flying:
Check to be certain none of the flying surfaces are warped, although a slight washout (trailing edge tips higher than leading edge tips of wing panels) is desirable. Other warps, if found, may be corrected over a steaming tea kettle.
Insert a fairly short loop of 2mm rubber, and check to see if your model balances near the point shown on the plan. The prototype actually required a small amount of tail ballast, unusual for a scale model.
Next, find that mythical field of tall grass with no wind, and try a few test glides. Most Peanuts do not glide very well, but at least a general appraisal of flight characteristics may be judged. If reasonable, try a few hand winds, launch the model, and note its flight path and stability. If the model dives, add a bit of weight to the tail end. If it stalls, it may need some nose weight, but more likely additional downthrust, in the form of a thin shim between the top of the noseblock and the front bulkhead may be required. If the model falls off on one wing, add clay ballast to the opposite tip. When flight is satisfactory, increase number of turns and try again. If O.K., replace motor with a longer, lubed loop (which may bring about the need for slight rebalancing) and try using a mechanical winder. As power is increased, additional trimming may be needed to produce a smooth pattern. Turn circle under power can be adjusted with side-thrust shims, if indicated. After you become familiar with the model, you may gradually increase power until your Turbo-Peanut will climb at a very steep angle to a high altitude, then glide into a smooth landing. Average duration for the prototype has ranged from 25–40 seconds depending mainly upon the quality of the available rubber. In good air with thermal assistance, the model has occasionally exceeded a minute.
Material and Supply Sources:
- 1/20" sq. balsa strips: Premier Company, P.O. Box 8254, Long Beach, CA 90808
- Superior Balsawood Supply Co., Box 8802, Long Beach, CA 90808
- Plastic propellers, tissue, bass wood, thrust bearings, propeller shafts, rubber: Peck-Polymers, P.O. Box 2498, La Mesa, CA 92041
- Vintage Aero, Inc., Tenafly, N.J. 07670
Transcribed from original scans by AI. Minor OCR errors may remain.

