
PGM Trainer
This 16 1/2-in. wingspan, 15 1/2-gram ROG design is a great way to introduce young people to the fun of building and flying models. Larry Conover
As any parent of a high school student knows, there's no sense trying to keep up with teenage slang. No sooner do you get the latest buzzwords straight than they've moved on to something new.
Modelspeak, while just as esoteric to those outside the hobby, is a lot less fickle. Take ROG, for example. Teens who build models today are probably as familiar with the term as were young modelers in the 1930s. And despite some serious competition from Nintendo and Ninja Turtles, rise-off-ground takeoffs are as much fun as they ever were.
The PGM Trainer makes an ideal introduction to ROG flying. An intermediate step in my model aviation educational program PROJECT GRANDPA: MENTOR, this nimble little fledgling can be built in two evenings for less than two dollars. That works out to a hundred flights for a quarter.
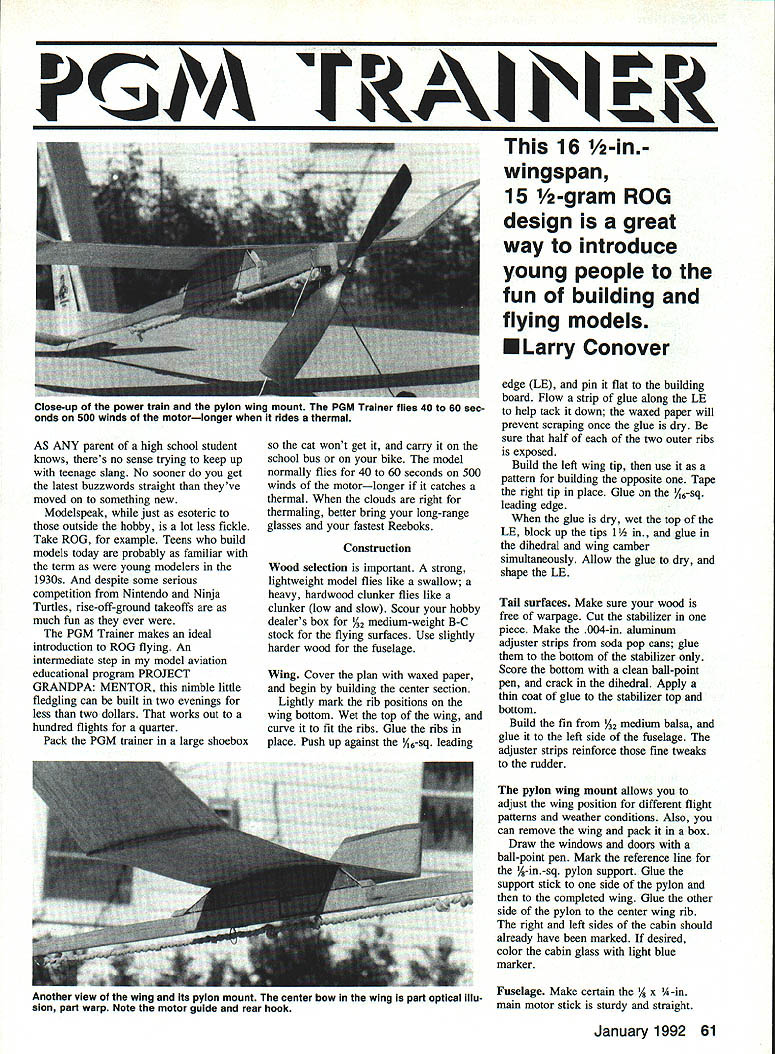
Pack the PGM Trainer in a large shoebox so the cat won't get it, and carry it on the school bus or on your bike. The model normally flies for 40 to 60 seconds on 500 winds of the motor—longer if it catches a thermal. When the clouds are right for thermaling, better bring your long-range glasses and your fastest Reeboks.
Construction
Wood selection is important. A strong, lightweight model flies like a swallow; a heavy, hardwood clunker flies like a clunker (low and slow). Scour your hobby dealer's box for 1/32-in. medium-weight B-C stock for the flying surfaces. Use slightly harder wood for the fuselage.
Wing
- Cover the plan with waxed paper, and begin by building the center section.
- Lightly mark the rib positions on the wing bottom. Wet the top of the wing and curve it to fit the ribs. Glue the ribs in place.
- Push up against the 1/16-in.-sq. leading edge (LE), and pin it flat to the building board. Flow a strip of glue along the LE to help tack it down; the waxed paper will prevent scraping once the glue is dry. Be sure that half of each of the two outer ribs is exposed.
- Build the left wing tip, then use it as a pattern for building the opposite one. Tape the right tip in place. Glue on the 1/16-in.-sq. leading edge.
- When the glue is dry, wet the top of the LE, block up the tips 1 1/2 in., and glue in the dihedral and wing camber simultaneously. Allow the glue to dry, and shape the LE.
Tail surfaces
- Make sure your wood is free of warpage. Cut the stabilizer in one piece.
- Make the .004-in. aluminum adjuster strips from soda pop cans; glue them to the bottom of the stabilizer only. Score the bottom with a clean ball-point pen and crack in the dihedral. Apply a thin coat of glue to the stabilizer top and bottom.
- Build the fin from 1/32-in. medium balsa, and glue it to the left side of the fuselage. The adjuster strips reinforce those fine tweaks to the rudder.
Pylon and cabin
- The pylon wing mount allows you to adjust the wing position for different flight patterns and weather conditions. Also, you can remove the wing and pack it in a box.
- Draw the windows and doors with a ball-point pen. Mark the reference line for the 1/8-in.-sq. pylon support.
- Glue the support stick to one side of the pylon and then to the completed wing. Glue the other side of the pylon to the center wing rib. The right and left sides of the cabin should already have been marked.
- If desired, color the cabin glass with a light blue marker.
Fuselage
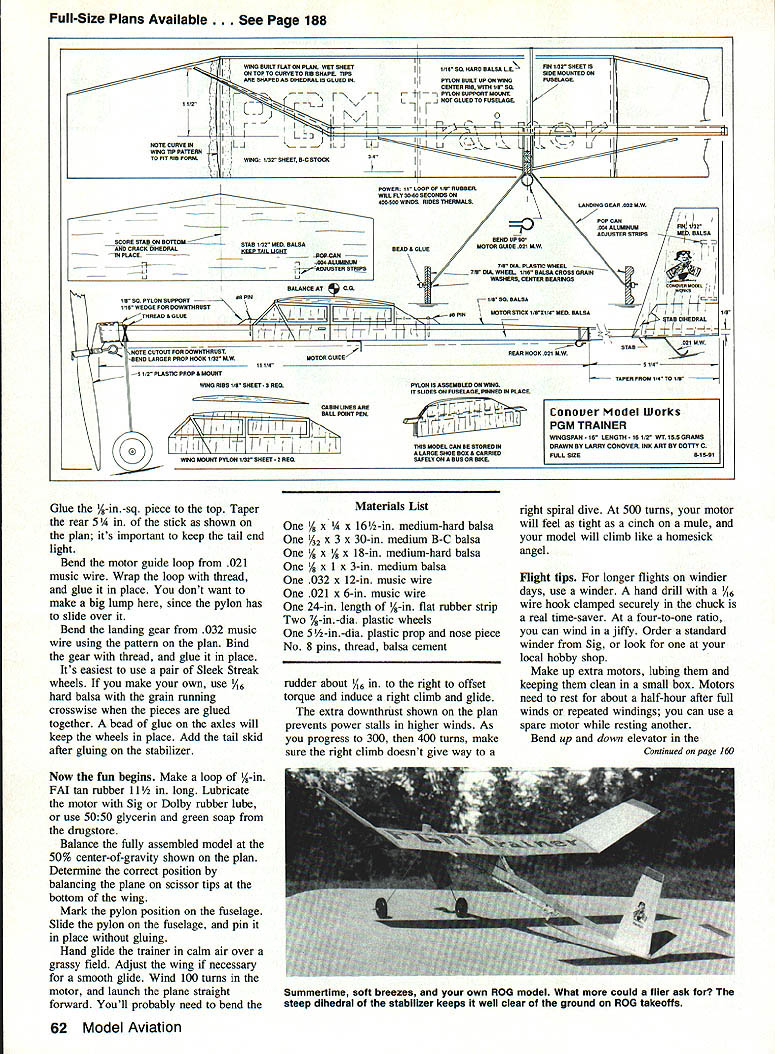
- Make certain the 1/8 x 1/4-in. main motor stick is sturdy and straight. Glue a 1/8-in.-sq. piece on top.
- Taper the rear 5/16-in. stick as shown on the plan; it's important to keep the tail end light.
- Bend the motor guide loop from .021-in. music wire. Wrap the loop, thread, and glue in place; don't make a big lump since the pylon must slide over it.
- Bend the landing gear from .032-in. music wire using the pattern on the plan. Bind the gear, thread, and glue in place.
- It's easiest to use a pair of Sleek Streak wheels. You can make your own using hard balsa with the grain running crosswise, pieces glued together with a bead of glue; axles will keep the wheels in place.
- Add the tail skid after gluing the stabilizer.
Motor and assembly
- Make a loop of 1/8-in. FAI tan rubber 11 1/2 in. long. Lubricate the motor with Sig or Du-Bro rubber lube, or use 50:50 glycerin and green soap from the drugstore.
- Balance the fully assembled model at the 50% center-of-gravity shown on the plan. Determine the correct position by balancing the plane on scissor tips at the bottom of the wing.
- Mark the pylon position on the fuselage. Slide the pylon on the fuselage, and pin it in place without gluing.
- Hand glide the trainer in calm air over a grassy field. Adjust the wing if necessary for a smooth glide.
- Wind 100 turns in the motor, and launch the plane straight forward. You'll probably need to bend the rudder about 1/8 in. to the right to offset torque and induce a right climb and glide.
- The extra downthrust shown on the plan prevents power stalls in higher winds. As you progress to 300, then 400 turns, make sure the right climb doesn't give way to a right spiral dive. At 500 turns, your motor will feel as tight as a cinch on a mule, and your model will climb like a homesick angel.
Flight tips
- For longer flights on windier days, use a winder. A hand drill with a 1/8-in. wire hook clamped securely in the chuck acts as a real time-saver. At a four-to-one ratio, you can wind in a jiffy.
- Order a standard winder from Sig, or look for one at your local hobby shop.
- Make up extra motors, lubing them and keeping them clean in a small box. Motors need to rest for about a half-hour after all winds or repeated windings; you can use a spare motor while another is resting.
- Bend up and down elevator in the stabilizer to test the control effects. For example, right down elevator can prevent power stalls by lifting the tail leftward. It may take a few flights and small adjustments to trim the model correctly.
Materials List
- One 1/8 x 1/4 x 16-1/2-in. medium-hard balsa
- One 1/8 x 3 x 30-in. medium B-C balsa
- One 1/8 x 1/8 x 18-in. medium-hard balsa
- One 1/8 x 1 x 3-in. medium balsa
- One .032 x 12-in. music wire
- One .021 x 6-in. music wire
- One 24-in. length of 1/8-in. flat rubber strip
- Two 7/8-in. dia. plastic wheels
- One 5-1/2-in.-dia. plastic prop and nose piece
- No. 8 pins, thread, balsa cement
Transcribed from original scans by AI. Minor OCR errors may remain.

