
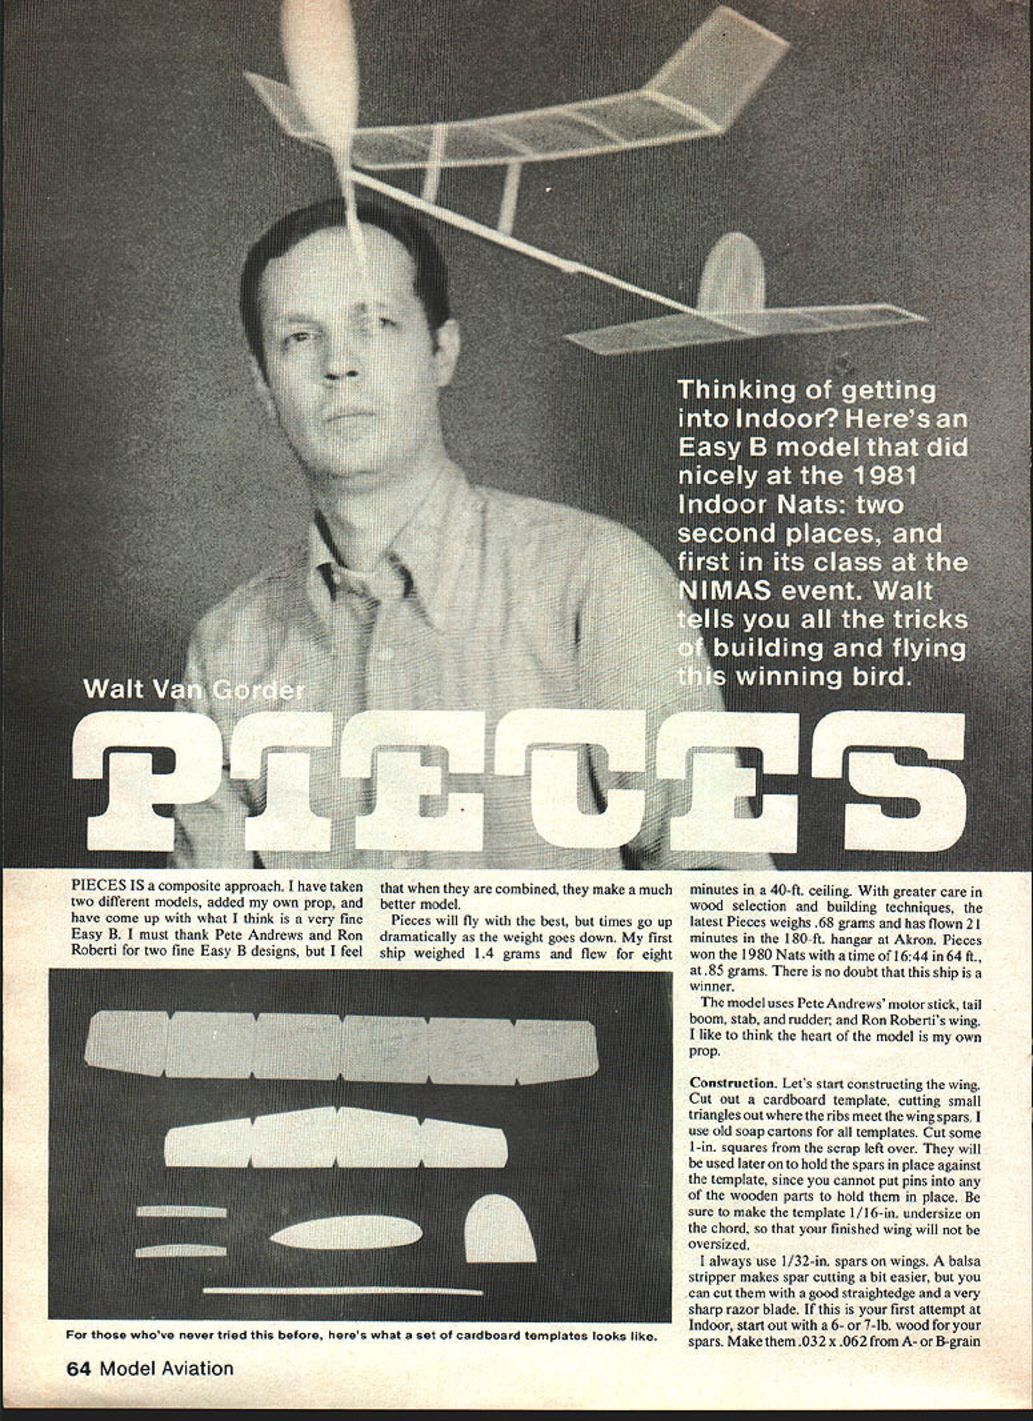
PIECES
Walt Van Gorder
PIECES is a composite approach. I have taken two different models, added my own prop, and have come up with what I think is a very fine Easy B. I must thank Pete Andrews and Ron Roberti for two fine Easy B designs, but I feel that when they are combined, they make a much better model.
Pieces will fly with the best, but times go up dramatically as the weight goes down. My first ship weighed 1.4 grams and flew for eight minutes in a 40-ft. ceiling. With greater care in wood selection and building techniques, the latest Pieces weighs 0.68 grams and has flown 21 minutes in the 180-ft. hangar at Akron. Pieces won the 1980 Nats with a time of 16:44 in 64 ft., at 0.85 grams. There is no doubt that this ship is a winner.
The model uses Pete Andrews' motor stick, tail boom, stab, and rudder; and Ron Roberti's wing. I like to think the heart of the model is my own prop.
CONSTRUCTION
Wing
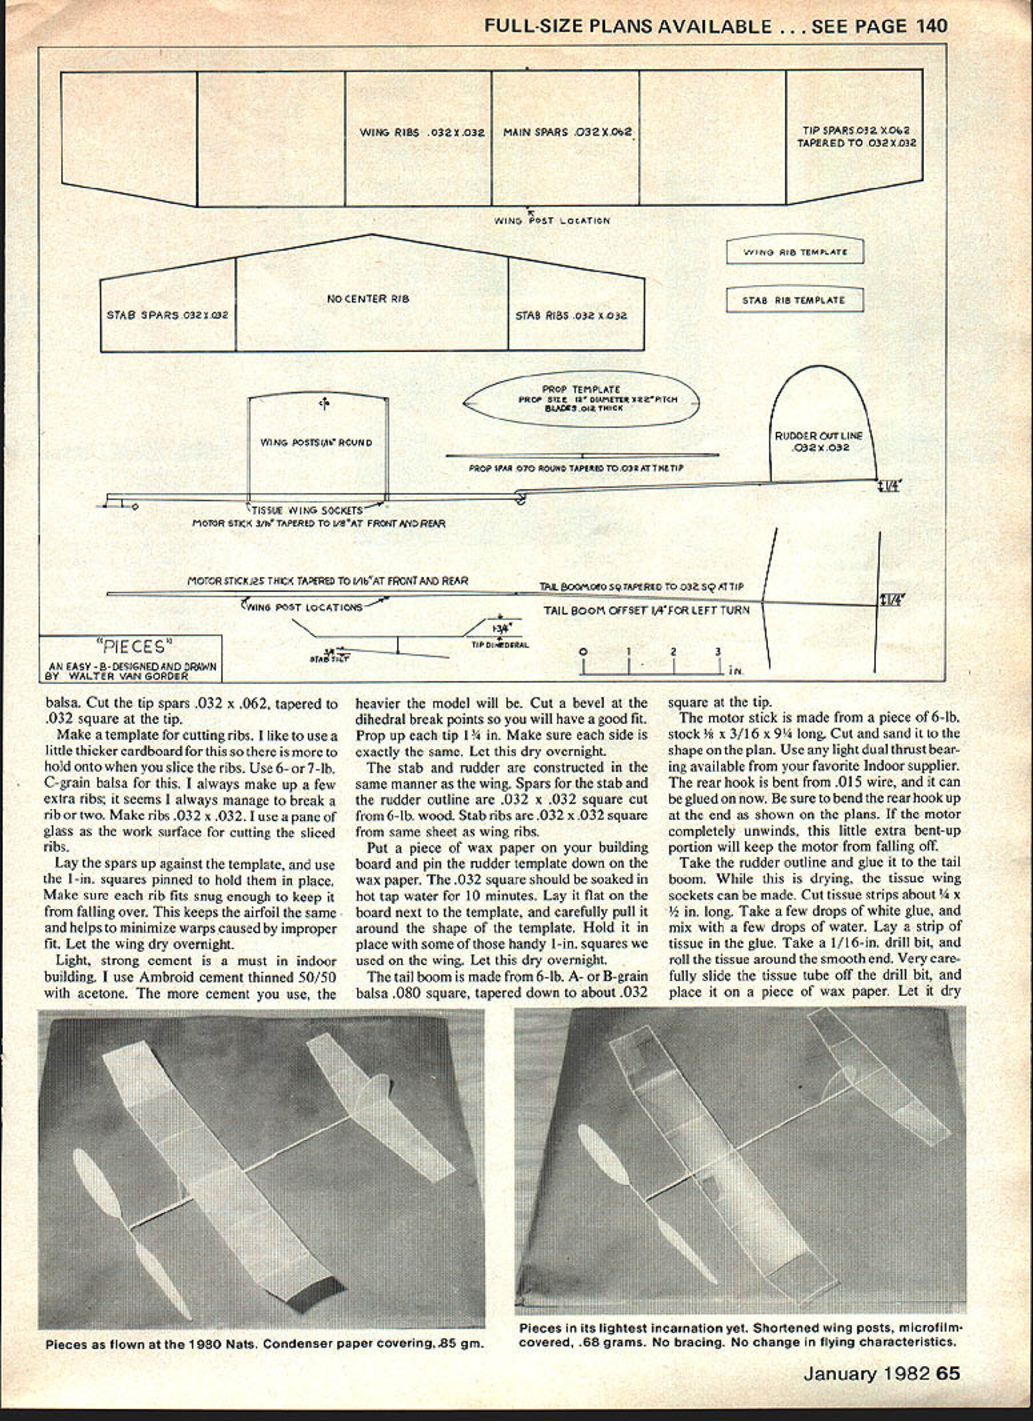
- Cut a cardboard template for the wing, trimming small triangles where the ribs meet the wing spars. Make the template 1/16 in. undersize on the chord so the finished wing will not be oversized. I use old soap cartons for templates.
- Cut some 1-in. squares from scrap to hold spars in place against the template (you cannot pin any wooden parts).
- Use 1/32-in. spars (0.032 x 0.062 in.) from A- or B‑grain balsa. A balsa stripper helps, but you can cut them with a straightedge and a sharp razor blade. For your first indoor attempt use 6- or 7-lb. wood.
- Cut tip spars 0.032 x 0.062 in., tapered to 0.032 in. square at the tip.
- Make a template for cutting ribs from slightly thicker cardboard to hold while slicing. Use 6- or 7-lb. C‑grain balsa and make ribs 0.032 x 0.032 in. Always make a few extras.
- Use a pane-glass work surface for cutting sliced ribs.
- Lay spars against the template and use the 1-in. squares to hold them in place. Make sure each rib fits snugly so it does not keep falling over; this keeps the airfoil consistent and helps minimize warps.
- Let the wing dry overnight.
- Use a light, strong cement—Ambroid thinned 50/50 with acetone is good for indoor models. The more cement you use, the heavier the model will be.
- Cut bevels at the dihedral break points for a good fit. Prop up each tip about 1/4 in. and make sure each side is exactly the same. Let dry overnight.
Stab and Rudder
- Construct the stab and rudder the same way as the wing.
- Spars for the stab and rudder outline are 0.032 x 0.032 in. square cut from 6-lb. wood. Stab ribs are 0.032 x 0.032 in. from the same sheet as the wing ribs.
- Put wax paper on the building board and pin the rudder template to it.
- Soak the 0.032-in. square stock in hot tap water for 10 minutes. Lay it flat next to the template and carefully bend it around the shape, holding it in place with 1-in. squares. Let dry overnight.
Tail Boom and Motor Stick
- Tail boom: 6-lb. A- or B‑grain balsa, 0.080 in. square, tapered down to about 0.032 in. square at the tip.
- Motor stick: 6-lb. stock, 3/16 x 9-1/4 in. long. Cut and sand to shape per the plan.
- Use a light dual-thrust bearing available from indoor suppliers.
- Bend the rear hook from 0.015-in. wire and glue it on now. Bend the rear hook up slightly as shown on the plans so that if the motor completely unwinds the motor will not fall off.
- Take the rudder outline and glue it to the tail boom.
Tissue Wing Sockets
- Cut tissue strips about 1/2 to 1 in. wide.
- Mix a few drops of white glue with a few drops of water. Lay a strip of tissue on the glue mixture.
- Take a 1/16-in. drill bit and roll the tissue around the smooth end. Carefully slide the tissue tube off the drill bit and place it on wax paper to dry.
COVERING AND HUMIDITY CONTROL
Care must be taken when covering such light models with condenser paper. This covering material shrinks dramatically when exposed to heat. To counter this, cover the model in as high a temperature as possible, but reduce ambient humidity first.
Low-Humidity Box
- Buy a cardboard box about 24 x 11 x 12 in. and lay it on its side so the top opening faces you.
- Install two 150-watt light bulbs in the top of the box. Attach a piece of clear plastic to the front opening (use thumbtacks).
- Editor's note: Be sure the bulbs do not touch the box—there is a fire hazard.
- Use a humidity gauge inside the box (available at hardware stores). Turn on the lights and cover the front; in about half an hour the humidity will drop to around 20–30%.
- Place the part to be covered and a piece of condenser paper in the box for about half an hour to remove excess moisture.
- When ready to cover, raise the plastic about halfway so you can reach inside.
- After covering, the condenser paper will be limp; since you will rarely fly in humidity below 20–30%, the model should not warp due to the covering.
CARVING THE PROP
- The prop for this model is 12 in. diameter by 22 in. pitch. A good prop is crucial—take your time.
- Make a cardboard template of the blade and cut two blades from 1/16- to 1/12-in. C‑grain balsa.
- Lightly sand blades with No. 600 sandpaper, sanding in one direction only.
- Prop spar: use 6- or 7-lb. square stock, sanded round to 0.070 in. at the center and tapering to 0.032 in. at the tip. Tape a sheet of 180-grit sandpaper to the work board and another to a large sanding block, then sand the corners off the spar by moving it between the two sheets in a diagonal or circular motion until round.
- Taper the ends to 0.032 in. by tilting the sanding block (see Bob Meuser, Model Aviation, June 1977 for details).
- Make the prop shaft from 0.015-in. wire bent to the plan shape. Insert it into the center of the spar, bend the end 90 degrees, trim the excess, and secure with a drop of CA (Hot Stuff).
- Soak the blades in hot tap water for 15 minutes.
- Lay the wet blades on a prop form (a smooth-sided can, bottle, jar, or jug 5–6 in. diameter) 15 degrees left of center. Lash them to the form with stretch gauze bandage snug enough to hold them, then add 2–3 strips of masking tape.
- Place in a preheated oven at 250°F for 15–20 minutes. After cooling, remove blades carefully.
- Make a jig to assemble the blades to the hub so they are set at 45 degrees at 3.5 in. from the center of the hub. Ensure both blades are at exactly the same angle.
FINAL ASSEMBLY AND TRIMMING
- Attach the wing posts to the wing spar as shown on the plans. Ensure the posts are 90 degrees to the wing spars and perfectly aligned front to rear.
- Attach the tail boom and rudder assembly to the motor stick with 1/4 in. of left rudder and 1/4 in. of negative incidence as per the plan.
- Attach the stab with a 1/4-in. tilt for left tip (the left side will be higher when viewed from the rear).
- To locate the CG:
- Put the prop on and install a loop of 0.045-in. rubber between the prop shaft hook and the rear hook with slight tension.
- Find the balance point and mark it on the motor stick.
- Locate and cement the wing post sockets so the CG is at 55% chord — approximately 1.65 in. back from the leading edge of the wing.
- Test glide without the rubber motor first. Start with 0° incidence and make several test glides. Adjust the wing until you get a smooth glide with the prop turning and a slight nose-down attitude.
- Motor recommendations:
- If the model weighs over 1.0 gram, use a motor of 0.050 x 18 in.
- If the model weighs near 0.85 gram, it will fly on 0.040–0.045 in.
- As model weight decreases, it takes less rubber to get it up, which helps performance.
- It may be necessary to add wash-in to the left panel of your wing; test flying will determine how much.
NOTES
You have now completed a model that has proven to be a good flier. Duration will depend on how familiar you become with the model. Fly it often, experiment with motor size and length, and record your results to find the best combination for your ship.
If you have questions concerning construction or adjusting Pieces, write to: 5669 Victoryview Lane, Cincinnati, Ohio 45238. Please include a self-addressed stamped envelope.
Transcribed from original scans by AI. Minor OCR errors may remain.

